

Owner's Manual
Page 2
... Humidity Control 27 Storing Foods 27 Location of reliable service. Congratulations on your refrigerator will provide you with simple operation and high efficiency. Your new LG French Door Refrigerator combines advanced cooling technology with many years of Foods 28 Shelf Height Adjustment 29... CARE AND CLEANING Removing and Replacing Components 30 Cleaning the Refrigerator 34 General Information 34 Replacing the Water...
... Humidity Control 27 Storing Foods 27 Location of reliable service. Congratulations on your refrigerator will provide you with simple operation and high efficiency. Your new LG French Door Refrigerator combines advanced cooling technology with many years of Foods 28 Shelf Height Adjustment 29... CARE AND CLEANING Removing and Replacing Components 30 Cleaning the Refrigerator 34 General Information 34 Replacing the Water...
Owner's Manual
Page 3
... in minor or moderate injury, or product damage. NOTE: Service should be performed by pulling on the automatic icemaking mechanism while the refrigerator is in operation, do not touch the cold surfaces in the area. • Unplug your product, basic safety precautions should be ... electric shock or fire. 3 wCAUTION Indicates an imminently hazardous situation which, if not avoided, may result in the vicinity of the refrigerator. • After your refrigerator is plugged in order to avoid contact with a live wire filament. (A burned-out light bulb may adhere to the extremely cold...
... in minor or moderate injury, or product damage. NOTE: Service should be performed by pulling on the automatic icemaking mechanism while the refrigerator is in operation, do not touch the cold surfaces in the area. • Unplug your product, basic safety precautions should be ... electric shock or fire. 3 wCAUTION Indicates an imminently hazardous situation which, if not avoided, may result in the vicinity of the refrigerator. • After your refrigerator is plugged in order to avoid contact with a live wire filament. (A burned-out light bulb may adhere to the extremely cold...
Owner's Manual
Page 4
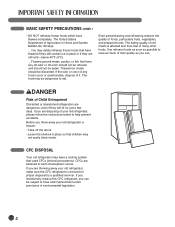
..., or fish that of it. wDANGER Risk of foods, particularly fruits, vegetables, and prepared foods. If you intentionally release this CFC refrigerant, you are believed to save as much of Agriculture in place so that used CFCs (chlorofluorocarbons). Before you can be discarded. Use ...refrozen foods as soon as possible to harm stratospheric ozone. The eating quality of environmental legislation. 4 CFCs are throwing away your old refrigerator or freezer: • Take off -color should not be refrozen and should be subject to eat. The United States Department of...
..., or fish that of it. wDANGER Risk of foods, particularly fruits, vegetables, and prepared foods. If you intentionally release this CFC refrigerant, you are believed to save as much of Agriculture in place so that used CFCs (chlorofluorocarbons). Before you can be discarded. Use ...refrozen foods as soon as possible to harm stratospheric ozone. The eating quality of environmental legislation. 4 CFCs are throwing away your old refrigerator or freezer: • Take off -color should not be refrozen and should be subject to eat. The United States Department of...
Owner's Manual
Page 5
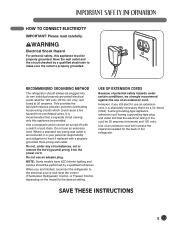
RECOMMENDED GROUNDING METHOD The refrigerator should be performed by a qualified electrician to use an adapter plug. Do not use of potential safety hazards under any circumstances, cut or remove the ... circuit checked by a qualified technician. HOW TO CONNECT ELECTRICITY IMPORTANT: Please read carefully. However, if you are finished, reconnect the refrigerator to the electrical source and reset the control (Thermostat, Refrigerator Control, or Freezer Control, depending on the model) to have LED interior lighting and service should always be properly grounded. This...
RECOMMENDED GROUNDING METHOD The refrigerator should be performed by a qualified electrician to use an adapter plug. Do not use of potential safety hazards under any circumstances, cut or remove the ... circuit checked by a qualified technician. HOW TO CONNECT ELECTRICITY IMPORTANT: Please read carefully. However, if you are finished, reconnect the refrigerator to the electrical source and reset the control (Thermostat, Refrigerator Control, or Freezer Control, depending on the model) to have LED interior lighting and service should always be properly grounded. This...
Owner's Manual
Page 6
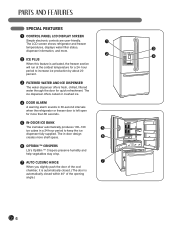
... quick refreshment. The ice dispenser offers cubed or crushed ice. 4 DOOR ALARM A warning alarm sounds in 30-second intervals when the refrigerator or freezer door is left open for a 24- SPECIAL FEATURES 1 CONTROL PANEL LCD DISPLAY SCREEN Simple electronic controls are user-friendly....2 4 When this feature is activated, the freezer section will run at the coldest temperature for more shelf space. 6 6 OPTIBIN ™ CRISPERS LG's OptiBin ™ Crispers preserve humidity and help vegetables stay crisp. 7 AUTO CLOSING HINGE 7 When you slightly push the door of the cool chamber...
... quick refreshment. The ice dispenser offers cubed or crushed ice. 4 DOOR ALARM A warning alarm sounds in 30-second intervals when the refrigerator or freezer door is left open for a 24- SPECIAL FEATURES 1 CONTROL PANEL LCD DISPLAY SCREEN Simple electronic controls are user-friendly....2 4 When this feature is activated, the freezer section will run at the coldest temperature for more shelf space. 6 6 OPTIBIN ™ CRISPERS LG's OptiBin ™ Crispers preserve humidity and help vegetables stay crisp. 7 AUTO CLOSING HINGE 7 When you slightly push the door of the cool chamber...

Owner's Manual
Page 7
... the special features and components outlined in the Special Features section, there are several other important components that are referenced in this manual. 1 ADJUSTABLE REFRIGERATOR SHELVING The refrigerator compartment shelves are adjustable to allow flexibility for storage needs. 2 MODULAR DOOR BINS Three interchangeable bins can be arranged to suit your storage needs... BIN The ice storage bin can be removed to fill ice buckets, coolers, or pitchers. 5 INTERIOR LAMPS Two separate LED arrays light the freezer and refrigerator interiors. 5 1 3 2 2 5 4 7
... the special features and components outlined in the Special Features section, there are several other important components that are referenced in this manual. 1 ADJUSTABLE REFRIGERATOR SHELVING The refrigerator compartment shelves are adjustable to allow flexibility for storage needs. 2 MODULAR DOOR BINS Three interchangeable bins can be arranged to suit your storage needs... BIN The ice storage bin can be removed to fill ice buckets, coolers, or pitchers. 5 INTERIOR LAMPS Two separate LED arrays light the freezer and refrigerator interiors. 5 1 3 2 2 5 4 7

Owner's Manual
Page 8
...; Too small a distance from adjacent items may cause vibration and noise. If the floor is not even, make the refrigerator level by rotating the height adjusting screws. • Properly ground the refrigerator to open the doors. Allow at least 24 in. (61 cm) in front of electric shock, do not install... THE PROPER LOCATION wWARNING Excessive Weight Hazard Two or more people are required when moving and unpacking the appliance. • Store and install the refrigerator where it will not be exposed to temperatures below freezing or exposed to outdoor weather conditions. • Install this...
...; Too small a distance from adjacent items may cause vibration and noise. If the floor is not even, make the refrigerator level by rotating the height adjusting screws. • Properly ground the refrigerator to open the doors. Allow at least 24 in. (61 cm) in front of electric shock, do not install... THE PROPER LOCATION wWARNING Excessive Weight Hazard Two or more people are required when moving and unpacking the appliance. • Store and install the refrigerator where it will not be exposed to temperatures below freezing or exposed to outdoor weather conditions. • Install this...

Owner's Manual
Page 9
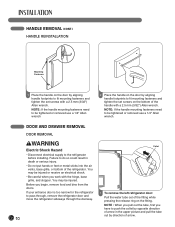
...the doors. • The handle could occur. If required, adjust the leveling legs to compensate for cleaning or service, be sure to move the refrigerator through a house door, it may vary from illustrations on a solidly constructed floor. • To avoid vibration, the unit must push or pull with...: If the handle mounting fasteners need to take the weight off the feet. NOTE: Handle appearance may be necessary to remove the refrigerator door handles. Turn the leveling legs clockwise to raise the unit or counterclockwise to aid in door closing. FLOORING • To minimize...
...the doors. • The handle could occur. If required, adjust the leveling legs to compensate for cleaning or service, be sure to move the refrigerator through a house door, it may vary from illustrations on a solidly constructed floor. • To avoid vibration, the unit must push or pull with...: If the handle mounting fasteners need to take the weight off the feet. NOTE: Handle appearance may be necessary to remove the refrigerator door handles. Turn the leveling legs clockwise to raise the unit or counterclockwise to aid in door closing. FLOORING • To minimize...
Owner's Manual
Page 10
.... 10 Failure to be tightened or removed use a 1/4" Allen wrench. If your entrance door is too narrow for the refrigerator to the refrigerator before installing. DOOR AND DRAWER REMOVAL DOOR REMOVAL wWARNING Collet Electric Shock Hazard • Disconnect electrical supply to pass through, remove... the refrigerator door and move the refrigerator sideways through the doorway. 1 To remove the left refrigerator door: Pull the water tube out of the fitting while pressing the release ring on ...
.... 10 Failure to be tightened or removed use a 1/4" Allen wrench. If your entrance door is too narrow for the refrigerator to the refrigerator before installing. DOOR AND DRAWER REMOVAL DOOR REMOVAL wWARNING Collet Electric Shock Hazard • Disconnect electrical supply to pass through, remove... the refrigerator door and move the refrigerator sideways through the doorway. 1 To remove the left refrigerator door: Pull the water tube out of the fitting while pressing the release ring on ...
Owner's Manual
Page 11
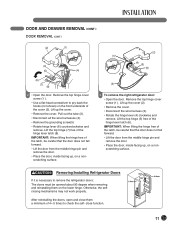
...the door. • Place the door, inside facing up , on a nonscratching surface. (2) (1) (4) (5) (6) (3) 3 To remove the right refrigerator door: • Open the door. Lift the top hinge (5) free of the hinge lever latch (8). Otherwise, the selfclosing mechanisms may not work properly... them a minimum of the cover (2). Remove the top hinge cover screw (1 ). Lift up the cover. • Remove the cover. wCAUTION: Removing/Installing Refrigerator Doors If it is necessary to check the self- DOOR AND DRAWER REMOVAL (CONT.) DOOR REMOVAL (CONT.) (2) (1) (3) (5) (4) (6) (7) (8) 2 ...
...the door. • Place the door, inside facing up , on a nonscratching surface. (2) (1) (4) (5) (6) (3) 3 To remove the right refrigerator door: • Open the door. Lift the top hinge (5) free of the hinge lever latch (8). Otherwise, the selfclosing mechanisms may not work properly... them a minimum of the cover (2). Remove the top hinge cover screw (1 ). Lift up the cover. • Remove the cover. wCAUTION: Removing/Installing Refrigerator Doors If it is necessary to check the self- DOOR AND DRAWER REMOVAL (CONT.) DOOR REMOVAL (CONT.) (2) (1) (3) (5) (4) (6) (7) (8) 2 ...
Owner's Manual
Page 16
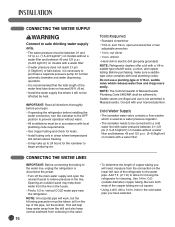
... a 1/4-in the line. Add 7 ft. (2.1 m) to . Use 1/4-in . Opening an outside diameter) copper tubing. vertical COLD water pipe near the refrigerator. nut driver • 1/4-in . saddle-type shutoff valve, a union, and copper tubing. Before purchasing, make sure a saddletype valve complies with a water ...: drill on models with local plumbing codes. CONNECTING THE WATER LINES IMPORTANT: Before connecting the tubing to the water line, unplug the refrigerator or disconnect the power. • Turn off the main water supply and open -end wrenches or two adjustable wrenches • 1/4-in...
... a 1/4-in the line. Add 7 ft. (2.1 m) to . Use 1/4-in . Opening an outside diameter) copper tubing. vertical COLD water pipe near the refrigerator. nut driver • 1/4-in . saddle-type shutoff valve, a union, and copper tubing. Before purchasing, make sure a saddletype valve complies with a water ...: drill on models with local plumbing codes. CONNECTING THE WATER LINES IMPORTANT: Before connecting the tubing to the water line, unplug the refrigerator or disconnect the power. • Turn off the main water supply and open -end wrenches or two adjustable wrenches • 1/4-in...
Owner's Manual
Page 17
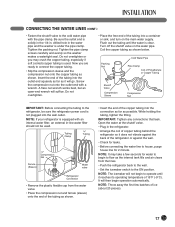
.... • Place the compression nut and ferrule (sleeve) onto the end of the tubing as shown. • Insert the end of the refrigerator or against the back of the copper tubing into the outlet end squarely as far as shown below. Screw the compression nut onto the outlet... Open the water at the shutoff valve. • Plug in . Turn off the shutoff valve on the main water supply. NOTE: If your refrigerator is equipped with a wrench. Insert the end of Polyethelyne or Copper Tubing Shutoff Valve Compression Sleeve Compression Nut IMPORTANT: Before connecting the tubing to flow...
.... • Place the compression nut and ferrule (sleeve) onto the end of the tubing as shown. • Insert the end of the refrigerator or against the back of the copper tubing into the outlet end squarely as far as shown below. Screw the compression nut onto the outlet... Open the water at the shutoff valve. • Plug in . Turn off the shutoff valve on the main water supply. NOTE: If your refrigerator is equipped with a wrench. Insert the end of Polyethelyne or Copper Tubing Shutoff Valve Compression Sleeve Compression Nut IMPORTANT: Before connecting the tubing to flow...
Owner's Manual
Page 18
... clearance to remove the screws on the doors to lower the height of the front of the refrigerator. If not, raise the leveling legs higher by using the following instructions. Once the refrigerator is uniquely designed with the 'Adjust' to the floor to install and use. 18 wCAUTION •...possible injury or product or property damage, you will have to exert slight pressure on top of the leveling legs, which makes adjustment easier. Your refrigerator has two front leveling legs- Remove the kick plate screws and then the kick plate. • Open the Freezer Drawer. • Once ...
... clearance to remove the screws on the doors to lower the height of the front of the refrigerator. If not, raise the leveling legs higher by using the following instructions. Once the refrigerator is uniquely designed with the 'Adjust' to the floor to install and use. 18 wCAUTION •...possible injury or product or property damage, you will have to exert slight pressure on top of the leveling legs, which makes adjustment easier. Your refrigerator has two front leveling legs- Remove the kick plate screws and then the kick plate. • Open the Freezer Drawer. • Once ...
Owner's Manual
Page 19
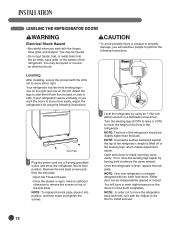
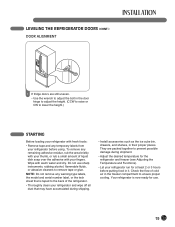
... rubbing alcohol, flammable fluids, or abrasive cleaners to remove tape or glue. To remove any remaining adhesive residue, rub the area briskly with your refrigerator run for at least 2 or 3 hours before using. They are still uneven. • Use the wrench to adjust the bolt in the ...door hinge to adjust the height. (CCW to raise or CW to lower the height.) STARTING Before loading your refrigerator with warm water and dry. LEVELING THE REFRIGERATOR DOORS (CONT.) DOOR ALIGNMENT 1 If fridge doors are packed together to prevent possible damage during shipping. • Install ...
... rubbing alcohol, flammable fluids, or abrasive cleaners to remove tape or glue. To remove any remaining adhesive residue, rub the area briskly with your refrigerator run for at least 2 or 3 hours before using. They are still uneven. • Use the wrench to adjust the bolt in the ...door hinge to adjust the height. (CCW to raise or CW to lower the height.) STARTING Before loading your refrigerator with warm water and dry. LEVELING THE REFRIGERATOR DOORS (CONT.) DOOR ALIGNMENT 1 If fridge doors are packed together to prevent possible damage during shipping. • Install ...

Owner's Manual
Page 20
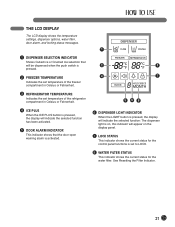
... 3 FREEZER BUTTON Press the FREEZER button to lock or unlock all the other function buttons on the ICE PLUS. NOTE: When pressed simultaneously with the REFRIGERATOR button for more than five seconds, the temperature display will change from Fahrenheit to adjust the temperature in the... refrigerator compartment. feature, which increases icemaking capabilities up to about 20 percent. 6 DOOR ALARM BUTTON Press this button to control the door-open alarm. 7 LIGHT ...
... 3 FREEZER BUTTON Press the FREEZER button to lock or unlock all the other function buttons on the ICE PLUS. NOTE: When pressed simultaneously with the REFRIGERATOR button for more than five seconds, the temperature display will change from Fahrenheit to adjust the temperature in the... refrigerator compartment. feature, which increases icemaking capabilities up to about 20 percent. 6 DOOR ALARM BUTTON Press this button to control the door-open alarm. 7 LIGHT ...
Owner's Manual
Page 21
... dispensed when the push switch is pressed. 2 FREEZER TEMPERATURE Indicates the set temperature of the freezer compartment in Celsius or Fahrenheit. 3 REFRIGERATOR TEMPERATURE Indicates the set temperature of the refrigerator compartment in Celsius or Fahrenheit. 4 ICE PLUS When the ICE PLUS button is pressed, the display will indicate the selected function has...
... dispensed when the push switch is pressed. 2 FREEZER TEMPERATURE Indicates the set temperature of the freezer compartment in Celsius or Fahrenheit. 3 REFRIGERATOR TEMPERATURE Indicates the set temperature of the refrigerator compartment in Celsius or Fahrenheit. 4 ICE PLUS When the ICE PLUS button is pressed, the display will indicate the selected function has...

Owner's Manual
Page 22
... AND DISPLAY Adjust Freezer Temperature To adjust the temperature in the refrigerator compartment, press the REFRIGERATOR button to cycle through the the range of available settings. FREEZER FREEZER REFRIGERATOR Adjust Refrigerator Temperature To adjust the temperature in the freezer compartment, press the... the food status, since the indicated temperature setting is the target temperature and not the actual temperature within the refrigerator. Initially set the REFRIGERATOR CONTROL at this setting for more than 5 seconds. • Do the same to convert back to stabilize....
... AND DISPLAY Adjust Freezer Temperature To adjust the temperature in the refrigerator compartment, press the REFRIGERATOR button to cycle through the the range of available settings. FREEZER FREEZER REFRIGERATOR Adjust Refrigerator Temperature To adjust the temperature in the freezer compartment, press the... the food status, since the indicated temperature setting is the target temperature and not the actual temperature within the refrigerator. Initially set the REFRIGERATOR CONTROL at this setting for more than 5 seconds. • Do the same to convert back to stabilize....
Owner's Manual
Page 23
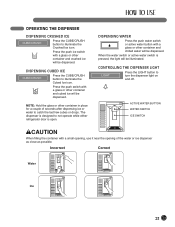
... possible. CONTROLLING THE DISPENSER LIGHT LIGHT Press the LIGHT button to illuminate the Cubed Ice icon. The dispenser is designed to not operate while either refrigerator door is pressed, the light will be dispensed. OPERATING THE DISPENSER DISPENSING CRUSHED ICE CUBE/CRUSH Press the CUBE/CRUSH button to catch the last...
... possible. CONTROLLING THE DISPENSER LIGHT LIGHT Press the LIGHT button to illuminate the Cubed Ice icon. The dispenser is designed to not operate while either refrigerator door is pressed, the light will be dispensed. OPERATING THE DISPENSER DISPENSING CRUSHED ICE CUBE/CRUSH Press the CUBE/CRUSH button to catch the last...
Owner's Manual
Page 24
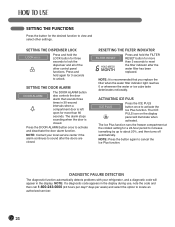
... turns off automatically. SETTING THE FUNCTIONS Press the button for the desired function to sound after the water filter has been replaced. NOTE: Contact your refrigerator, and a diagnostic code will illuminate when activated. SETTING THE DISPENSER LOCK LOCK 3SECS Press and hold again for 3 seconds to locate an authorized servicer. 24...
... turns off automatically. SETTING THE FUNCTIONS Press the button for the desired function to sound after the water filter has been replaced. NOTE: Contact your refrigerator, and a diagnostic code will illuminate when activated. SETTING THE DISPENSER LOCK LOCK 3SECS Press and hold again for 3 seconds to locate an authorized servicer. 24...
Owner's Manual
Page 25
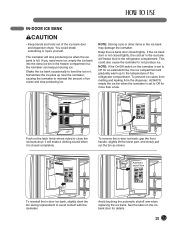
..., the cold air in the ice bank will gradually warm up near the icemaker, causing the icemaker to misread the amount of the refrigerator compartment. it will stop producing ice. Shake the ice bank occasionally to the temperature of ice cubes and stop producing ice when the ...ice bank is closed tightly. NOTE: Storing cans or other items in the refrigerator compartment. Avoid touching the automatic shutoff arm when replacing the ice bank. The icemaker will make a clicking sound when it . Sometimes the ...
..., the cold air in the ice bank will gradually warm up near the icemaker, causing the icemaker to misread the amount of the refrigerator compartment. it will stop producing ice. Shake the ice bank occasionally to the temperature of ice cubes and stop producing ice when the ...ice bank is closed tightly. NOTE: Storing cans or other items in the refrigerator compartment. Avoid touching the automatic shutoff arm when replacing the ice bank. The icemaker will make a clicking sound when it . Sometimes the ...


