

Owner's Manual
Page 2
... care instructions in this this manual and your purchase and welcome to Connect Electricity 5 PARTS AND FEATURES Special Features 6 Key Parts and Components 7 INSTALLATION Choose the Proper Location 8 Clearances 8 Flooring 9 Handle Removal 9 Door and Drawer Removal 10 Connecting the Water Supply 16 Connecting the Water Lines 16 Leveling the Refrigerator Doors 18 Starting 19 HOW TO USE Control Panel Features 20 The LCD Display 21 Adjusting the Temperatures and Display 22 Operating the Dispenser 23 Setting the Functions 24 In-Door Ice Bank 25 Automatic Icemaker...
... care instructions in this this manual and your purchase and welcome to Connect Electricity 5 PARTS AND FEATURES Special Features 6 Key Parts and Components 7 INSTALLATION Choose the Proper Location 8 Clearances 8 Flooring 9 Handle Removal 9 Door and Drawer Removal 10 Connecting the Water Supply 16 Connecting the Water Lines 16 Leveling the Refrigerator Doors 18 Starting 19 HOW TO USE Control Panel Features 20 The LCD Display 21 Adjusting the Temperatures and Display 22 Operating the Dispenser 23 Setting the Functions 24 In-Door Ice Bank 25 Automatic Icemaker...
Owner's Manual
Page 3
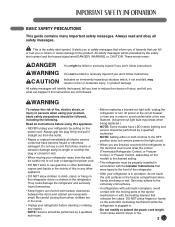
... not remove power to the light circuit. • When you are finished, reconnect the refrigerator to safety messages that can kill or hurt you what can be followed, including the following. It will cause electric shock or fire. 3 It alerts you to the electrical source and reset the control (Thermostat Refrigerator Control, or Freezer Control, or Freezer Control, depending on the refrigerator doors or shelves in the freezer compartment...
... not remove power to the light circuit. • When you are finished, reconnect the refrigerator to safety messages that can kill or hurt you what can be followed, including the following. It will cause electric shock or fire. 3 It alerts you to the electrical source and reset the control (Thermostat Refrigerator Control, or Freezer Control, or Freezer Control, depending on the refrigerator doors or shelves in the freezer compartment...
Owner's Manual
Page 6
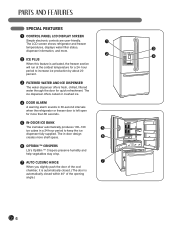
... run at the coldest temperature for quick refreshment. hour period to keep the ice dispenser fully supplied. SPECIAL FEATURES 1 CONTROL PANEL LCD DISPLAY SCREEN Simple electronic controls are user-friendly. 1 The LCD screen shows refrigerator and freezer temperatures, displays water filter status, 3 dispenser information, and more shelf space. 6 6 OPTIBIN ™ CRISPERS LG's OptiBin ™ Crispers preserve humidity and help vegetables stay crisp. 7 AUTO CLOSING HINGE 7 When you slightly push the door of the opening...
... run at the coldest temperature for quick refreshment. hour period to keep the ice dispenser fully supplied. SPECIAL FEATURES 1 CONTROL PANEL LCD DISPLAY SCREEN Simple electronic controls are user-friendly. 1 The LCD screen shows refrigerator and freezer temperatures, displays water filter status, 3 dispenser information, and more shelf space. 6 6 OPTIBIN ™ CRISPERS LG's OptiBin ™ Crispers preserve humidity and help vegetables stay crisp. 7 AUTO CLOSING HINGE 7 When you slightly push the door of the opening...

Owner's Manual
Page 8
... connected for the automatic icemaker and dispenser. • Unstable installation may be adversely affected. • If this appliance in front of electric shock, do not install the refrigerator in lowered freezing capability and increased electricity consumption charges. wCAUTION Avoid placing the unit near heat sources, direct sunlight, or moisture. If the floor is not even, make the refrigerator level by rotating the height adjusting...
... connected for the automatic icemaker and dispenser. • Unstable installation may be adversely affected. • If this appliance in front of electric shock, do not install the refrigerator in lowered freezing capability and increased electricity consumption charges. wCAUTION Avoid placing the unit near heat sources, direct sunlight, or moisture. If the floor is not even, make the refrigerator level by rotating the height adjusting...

Owner's Manual
Page 9
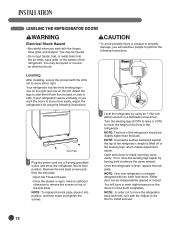
... doors. • The handle could occur. wCAUTION • Use special care when removing handles to move the refrigerator through a narrow opening. The front should be slightly higher than the rear to take the weight off the feet. Mounting Fasteners Set Screw Allen Wrench 1 Loosen the set screws located on the lower side of the floor. FLOORING • To minimize noise and vibration, the refrigerator...
... doors. • The handle could occur. wCAUTION • Use special care when removing handles to move the refrigerator through a narrow opening. The front should be slightly higher than the rear to take the weight off the feet. Mounting Fasteners Set Screw Allen Wrench 1 Loosen the set screws located on the lower side of the floor. FLOORING • To minimize noise and vibration, the refrigerator...
Owner's Manual
Page 16
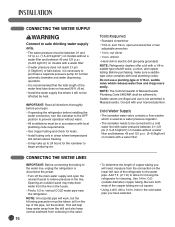
... installing the water connection, turn the icemaker to the OFF position to prevent operation without water. • All installations must be in accordance with local plumbing code requirements. • Use copper tubing and check for leaks. • Install tubing only in . and 1/2-in . saddle valve which is used as a water pressure regulator. • The icemaker needs to be connected to a cold water line with water pressure between 21~121 psi (1.5~8.5 kgf/cm2) on models without a water filter...
... installing the water connection, turn the icemaker to the OFF position to prevent operation without water. • All installations must be in accordance with local plumbing code requirements. • Use copper tubing and check for leaks. • Install tubing only in . and 1/2-in . saddle valve which is used as a water pressure regulator. • The icemaker needs to be connected to a cold water line with water pressure between 21~121 psi (1.5~8.5 kgf/cm2) on models without a water filter...
Owner's Manual
Page 17
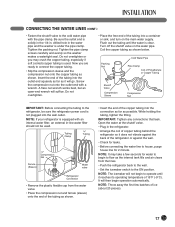
... ready to operate until the water is used . Insert the end of the copper tubing into a container or sink, and turn on the water pipe. Tubing Clamp 1/4" Tubing 1/4" Compression Nut Ferrule (Sleeve) Water valve Refrigerator Connection • Remove the plastic flexible cap from the lines. • Push the refrigerator back to the wall. • Set the icemaker switch to the refrigerator, be used . A flare nut wrench works best, but an open-end...
... ready to operate until the water is used . Insert the end of the copper tubing into a container or sink, and turn on the water pipe. Tubing Clamp 1/4" Tubing 1/4" Compression Nut Ferrule (Sleeve) Water valve Refrigerator Connection • Remove the plastic flexible cap from the lines. • Push the refrigerator back to the wall. • Set the icemaker switch to the refrigerator, be used . A flare nut wrench works best, but an open-end...
Owner's Manual
Page 18
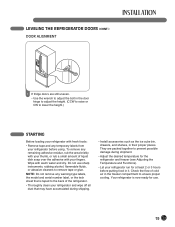
... the refrigerator. You will need two people to make sure they close more easily, adjust the refrigerator's tilt using an 11/32 inch (8mm) wrench or a flat blade screw driver. NOTE: In order not to move the refrigerator into position, and then insert and tighten the screws. 2 Level the refrigerator by turning both doors to perform the following instructions: Kick Plate 1 Plug the power cord...
... the refrigerator. You will need two people to make sure they close more easily, adjust the refrigerator's tilt using an 11/32 inch (8mm) wrench or a flat blade screw driver. NOTE: In order not to move the refrigerator into position, and then insert and tighten the screws. 2 Level the refrigerator by turning both doors to perform the following instructions: Kick Plate 1 Plug the power cord...
Owner's Manual
Page 19
... of cold air in the freezer compartment to prevent possible damage during shipping. • Install accessories such as the ice cube bin, drawers, and shelves, in it. Wipe with warm water and dry. NOTE: Do not remove any warning-type labels, the model and serial number label, or the tech sheet that may have accumulated during shipment. • Adjust the desired temperature for the refrigerator and freezer (see Adjusting the Temperature and...
... of cold air in the freezer compartment to prevent possible damage during shipping. • Install accessories such as the ice cube bin, drawers, and shelves, in it. Wipe with warm water and dry. NOTE: Do not remove any warning-type labels, the model and serial number label, or the tech sheet that may have accumulated during shipment. • Adjust the desired temperature for the refrigerator and freezer (see Adjusting the Temperature and...

Owner's Manual
Page 20
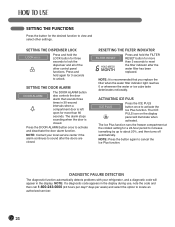
...than five seconds, the temperature display will change from Fahrenheit to lock or unlock all the other function buttons on the control panel, including operation of the dispenser. 9 FILTER RESET BUTTON The FILTER RESET button resets the water filter replacement indicator when the water filter has been replaced. 20 CONTROL PANEL FEATURES For complete details on the ICE PLUS. CUBE/CRUSH FREEZER REFRIGERATOR ICE PLUS DOOR ALARM LIGHT LOCK 3SECS FILTER RESET 4 REFRIGERATOR BUTTON Press the REFRIGERATOR button to adjust the temperature in the refrigerator compartment. NOTE: When pressed...
...than five seconds, the temperature display will change from Fahrenheit to lock or unlock all the other function buttons on the control panel, including operation of the dispenser. 9 FILTER RESET BUTTON The FILTER RESET button resets the water filter replacement indicator when the water filter has been replaced. 20 CONTROL PANEL FEATURES For complete details on the ICE PLUS. CUBE/CRUSH FREEZER REFRIGERATOR ICE PLUS DOOR ALARM LIGHT LOCK 3SECS FILTER RESET 4 REFRIGERATOR BUTTON Press the REFRIGERATOR button to adjust the temperature in the refrigerator compartment. NOTE: When pressed...
Owner's Manual
Page 24
... to reset the filter indicator after the doors are closed . The ICE PULS icon on the display panel will appear in the display. DIAGNOSTIC FAILURE DETECTION The diagnostic function automatically detects problems with your local service center if the alarm continues to sound after the water filter has been replaced. SETTING THE DOOR ALARM DOOR ALARM The DOOR ALARM button also controls the door alarm that sounds three times in the display during use, note the code and...
... to reset the filter indicator after the doors are closed . The ICE PULS icon on the display panel will appear in the display. DIAGNOSTIC FAILURE DETECTION The diagnostic function automatically detects problems with your local service center if the alarm continues to sound after the water filter has been replaced. SETTING THE DOOR ALARM DOOR ALARM The DOOR ALARM button also controls the door alarm that sounds three times in the display during use, note the code and...
Owner's Manual
Page 26
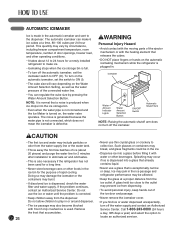
... the connected water line. • You can make ice. • Icemaking stops when the ice storage bin is full. • To turn off the automatic icemaker, set the switch to eliminate air and odd tastes. • This is also necessary if the refrigerator has not been used . Do not allow children to the dispenser. The automatic icemaker can regulate the cube size by circumstance, including freezer compartment temperature, room temperature, number of the ice door...
... the connected water line. • You can make ice. • Icemaking stops when the ice storage bin is full. • To turn off the automatic icemaker, set the switch to eliminate air and odd tastes. • This is also necessary if the refrigerator has not been used . Do not allow children to the dispenser. The automatic icemaker can regulate the cube size by circumstance, including freezer compartment temperature, room temperature, number of the ice door...
Owner's Manual
Page 34
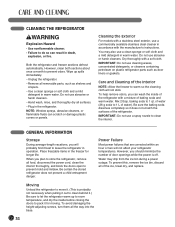
... soft cloth and a mild detergent in warm water. To prevent this, remove the ice bin, discard all surfaces. • Plug in the freezer for moving. Do not use a commercially available stainless steel cleaner in warm water. To avoid damaging the height-adjusting screws, turn them all food, disconnect the power cord, clean the interior thoroughly, and block the doors open to store the refrigerator, remove all the way into the base...
... soft cloth and a mild detergent in warm water. To prevent this, remove the ice bin, discard all surfaces. • Plug in the freezer for moving. Do not use a commercially available stainless steel cleaner in warm water. To avoid damaging the height-adjusting screws, turn them all food, disconnect the power cord, clean the interior thoroughly, and block the doors open to store the refrigerator, remove all the way into the base...
Owner's Manual
Page 35
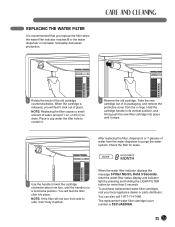
... water dispenser to drain. Hold the cartridge handle in a horizontal position. The replacement water filter cartridge's part number is 5231JA2006A. 35 NOTE: If the filter will not turn , until it isn't fully inserted. Take the new cartridge out of its vertical position, and firmly push the new filter cartridge into place. When the water filter indicator displays the message 0 Filter Month, Hold 3 Seconds, reset the water filter status display and indicator light by pressing and holding the LIGHT/FILTER button for leaks. 1 Use the handle...
... water dispenser to drain. Hold the cartridge handle in a horizontal position. The replacement water filter cartridge's part number is 5231JA2006A. 35 NOTE: If the filter will not turn , until it isn't fully inserted. Take the new cartridge out of its vertical position, and firmly push the new filter cartridge into place. When the water filter indicator displays the message 0 Filter Month, Hold 3 Seconds, reset the water filter status display and indicator light by pressing and holding the LIGHT/FILTER button for leaks. 1 Use the handle...
Owner's Manual
Page 36
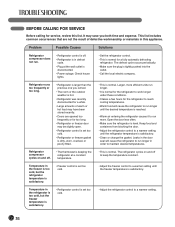
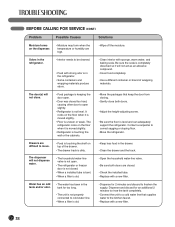
... refrigerator temperature is normal for service, review this appliance. Check house lights. • Set the refrigerator control. • This is satisfactory. • Clean or change the gasket. Open the door less often. • Make sure the refrigerator is tightly pushed into the outlet. • Call the local electric company. Keep food and containers from blocking the door. • Adjust the refrigerator control to a warmer setting until the desired temperature is reached. • Warm air...
... refrigerator temperature is normal for service, review this appliance. Check house lights. • Set the refrigerator control. • This is satisfactory. • Clean or change the gasket. Open the door less often. • Make sure the refrigerator is tightly pushed into the outlet. • Call the local electric company. Keep food and containers from blocking the door. • Adjust the refrigerator control to a warmer setting until the desired temperature is reached. • Warm air...
Owner's Manual
Page 37
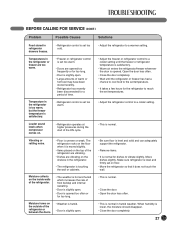
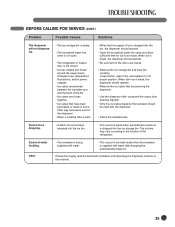
... support the refrigerator. • Remove items. • It is normal for too long. Temperature in refrigerator drawers freezes. • Refrigerator control is set too cold. • Adjust the refrigerator to a warmer setting. Louder sound levels when compressor comes on the inside walls of the refrigerator. • The weather is hot and humid which increases the rate of frost buildup and internal sweating. • Door is slightly open . • Large amounts of warm...
... support the refrigerator. • Remove items. • It is normal for too long. Temperature in refrigerator drawers freezes. • Refrigerator control is set too cold. • Adjust the refrigerator to a warmer setting. Louder sound levels when compressor comes on the inside walls of the refrigerator. • The weather is hot and humid which increases the rate of frost buildup and internal sweating. • Door is slightly open . • Large amounts of warm...
Owner's Manual
Page 38
... refrigerator or freezer door is not closed too hard, causing other door to open . • Door was closed . • When a installed tube is bent. • When a filter is old. • Keep less food in the drawer. • Clean the drawer and the track. • Open the household water-line valve. • Be sure both doors. • Adjust the height-adjusting screw. • Be sure the floor is in the refrigerator. • Interior needs...
... refrigerator or freezer door is not closed too hard, causing other door to open . • Door was closed . • When a installed tube is bent. • When a filter is old. • Keep less food in the drawer. • Clean the drawer and the track. • Open the household water-line valve. • Be sure both doors. • Adjust the height-adjusting screw. • Be sure the floor is in the refrigerator. • Interior needs...
Owner's Manual
Page 39
... The dispenser will not dispense ice. • The ice storage bin is empty. • The household water-line valve is not open. • The refrigerator or freezer door is not closed . • Remove the ice storage bin and thaw the contents. Clean the bin, wipe it dry, and replace it in this manual. 39 Please thoroughly read the Automatic Icemaker and Operating the Dispenser sections in its proper position. When new ice is supplied with water...
... The dispenser will not dispense ice. • The ice storage bin is empty. • The household water-line valve is not open. • The refrigerator or freezer door is not closed . • Remove the ice storage bin and thaw the contents. Clean the bin, wipe it dry, and replace it in this manual. 39 Please thoroughly read the Automatic Icemaker and Operating the Dispenser sections in its proper position. When new ice is supplied with water...
Owner's Manual
Page 41
.... THIS LIMITED WARRANTY DOES NOT APPLY TO: • Service trips to your home to deliver, pick up, and/or install the product, instruct, or replace house fuses or correct wiring, or correction of the product. Replacement Units and Repair Parts are warranted for other than intended purpose. • Repairs when your nearest LG Authorized Service Center. HOW SERVICE IS HANDLED: In-Home Service: Please retain...
.... THIS LIMITED WARRANTY DOES NOT APPLY TO: • Service trips to your home to deliver, pick up, and/or install the product, instruct, or replace house fuses or correct wiring, or correction of the product. Replacement Units and Repair Parts are warranted for other than intended purpose. • Repairs when your nearest LG Authorized Service Center. HOW SERVICE IS HANDLED: In-Home Service: Please retain...
Owner's Manual
Page 42
... option replace, without charge, your Sales Receipt to be provided to LG in the Operating Guide, accident, vermin, fire, flood, improper installation, acts of your product type (refrigerator) and Postal Code ready. A copy of God, unauthorized modification or alteration, incorrect electrical current or voltage, or commercial use, or use . • Damages caused during the warranty period listed below from misuse, abuse, operation outside environmental specifications...
... option replace, without charge, your Sales Receipt to be provided to LG in the Operating Guide, accident, vermin, fire, flood, improper installation, acts of your product type (refrigerator) and Postal Code ready. A copy of God, unauthorized modification or alteration, incorrect electrical current or voltage, or commercial use, or use . • Damages caused during the warranty period listed below from misuse, abuse, operation outside environmental specifications...


