User Guide
Page 2
... Instructions 5-6 Grounding Requirements 6 Parts And Features 7 Refrigerator Installation 8-17 Unpacking Your Refrigerator 8 Installation 8 Removing And Replacing Your Refrigerator Handles And Doors 9-16 Leveling And Door Alignment 17 Base Cover 17 Using Your Refrigerator 18-28 Setting The Controls 18 Ensuring Proper Air ... Ice Bucket 20 Adjusting Control Settings 21 Food Storage Guide 21 Storing Frozen Food 22 u Refrigerator Section Water Dispenser 22 Refrigerator Shelves 23 Bottle Holder 23 Snack Pan 24 Optibin Crisper 24 Crisper Cover With Lattice On ...
... Instructions 5-6 Grounding Requirements 6 Parts And Features 7 Refrigerator Installation 8-17 Unpacking Your Refrigerator 8 Installation 8 Removing And Replacing Your Refrigerator Handles And Doors 9-16 Leveling And Door Alignment 17 Base Cover 17 Using Your Refrigerator 18-28 Setting The Controls 18 Ensuring Proper Air ... Ice Bucket 20 Adjusting Control Settings 21 Food Storage Guide 21 Storing Frozen Food 22 u Refrigerator Section Water Dispenser 22 Refrigerator Shelves 23 Bottle Holder 23 Snack Pan 24 Optibin Crisper 24 Crisper Cover With Lattice On ...
User Guide
Page 3
...operation outside environmental specifications or contrary to you. THIS LIMITED WARRANTY DOES NOT APPLY TO: • Service trips to your LG refrigerator is used in material or workmanship under these excluded circumstances shall be borne by the consumer. Box 240007 201 James Record Road...wiring, or correction of unauthorized repairs. • Damages or operating problems that vary from the Date of the product. USA Your LG Refrigerator will be defective in the United States, including Alaska, Hawaii, and U.S. HOW SERVICE IS HANDLED: In-Home Service (Except Model...
...operation outside environmental specifications or contrary to you. THIS LIMITED WARRANTY DOES NOT APPLY TO: • Service trips to your LG refrigerator is used in material or workmanship under these excluded circumstances shall be borne by the consumer. Box 240007 201 James Record Road...wiring, or correction of unauthorized repairs. • Damages or operating problems that vary from the Date of the product. USA Your LG Refrigerator will be defective in the United States, including Alaska, Hawaii, and U.S. HOW SERVICE IS HANDLED: In-Home Service (Except Model...
User Guide
Page 4
... have other rights which proves to be submitted at http://www.lg.ca This warranty provides in any Canadian Province. No other than the intended purpose. A copy of the consumer. Please have product type (refrigerator) and ZIP Code ready. This warranty gives you specific legal...express warranty is in -home service. or by Internet: http://www.lg.ca To Obtain Nearest Authorized Service Center, Parts Distributor, or Sales Dealer by Internet: http://www.lg.ca 4 LIMITED WARRANTY (CANADA) LG REFRIGERATOR LG Electronics will repair or at its option replace, without charge, your ...
... have other rights which proves to be submitted at http://www.lg.ca This warranty provides in any Canadian Province. No other than the intended purpose. A copy of the consumer. Please have product type (refrigerator) and ZIP Code ready. This warranty gives you specific legal...express warranty is in -home service. or by Internet: http://www.lg.ca To Obtain Nearest Authorized Service Center, Parts Distributor, or Sales Dealer by Internet: http://www.lg.ca 4 LIMITED WARRANTY (CANADA) LG REFRIGERATOR LG Electronics will repair or at its option replace, without charge, your ...

User Guide
Page 5
...cleaning or making any other appliance. • DO NOT allow children to climb, stand, or hang on the automatic icemaking mechanism while the refrigerator is plugged in minor or moderate injury, or product damage only. It alerts you to persons when using this or any repairs. WARNING To...may adhere to roll over or damage the power cord. • DO NOT store or use gasoline or other foods. They could damage the refrigerator and seriously injure themselves. • Keep fingers out of foods, particularly fruits, vegetables and prepared foods. Thawed ice cream should be dangerous to...
...cleaning or making any other appliance. • DO NOT allow children to climb, stand, or hang on the automatic icemaking mechanism while the refrigerator is plugged in minor or moderate injury, or product damage only. It alerts you to persons when using this or any repairs. WARNING To...may adhere to roll over or damage the power cord. • DO NOT store or use gasoline or other foods. They could damage the refrigerator and seriously injure themselves. • Keep fingers out of foods, particularly fruits, vegetables and prepared foods. Thawed ice cream should be dangerous to...
User Guide
Page 6
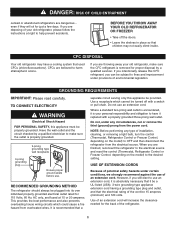
...the desired setting. even if they will increase the clearance needed for proper disposal by a qualified electrician to make sure the CFC refrigerant is properly grounded. 3-prong grounding type wall receptacle 3-prong grounding plug Ensure proper ground exists before use an extension cord. CFCs...the circuit checked by a qualified servicer. Use a receptacle which could cause a fire hazard from the electrical source. CFC DISPOSAL Your old refrigerator may not easily climb inside. However, if you can be a UL-listed (USA), 3-wire grounding type appliance extension cord having a ...
...the desired setting. even if they will increase the clearance needed for proper disposal by a qualified electrician to make sure the CFC refrigerant is properly grounded. 3-prong grounding type wall receptacle 3-prong grounding plug Ensure proper ground exists before use an extension cord. CFCs...the circuit checked by a qualified servicer. Use a receptacle which could cause a fire hazard from the electrical source. CFC DISPOSAL Your old refrigerator may not easily climb inside. However, if you can be a UL-listed (USA), 3-wire grounding type appliance extension cord having a ...
User Guide
Page 7
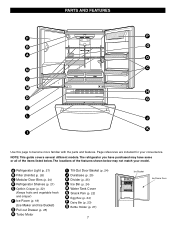
The locations of the items listed below may have purchased may not match your convenience. The refrigerator you have some or all of the features shown below . PARTS AND FEATURES F P B O A Q N C C M H D G E L J K I Tilt-Out Door Basket (p. 24) J ... (p. 23) Q Bottle Holder (p. 21) 7 Ice Bucket Ice Room Door NOTE: This guide covers several different models. A Refrigerator Light (p. 27) B Filter (Inside) (p. 26) C Modular Door Bins (p. 24) D Refrigerator Shelves (p. 21) E Optibin Crisper (p. 22) (Keeps fruits and vegetable fresh and crisper) F Ice Room (p. 18) ...
The locations of the items listed below may have purchased may not match your convenience. The refrigerator you have some or all of the features shown below . PARTS AND FEATURES F P B O A Q N C C M H D G E L J K I Tilt-Out Door Basket (p. 24) J ... (p. 23) Q Bottle Holder (p. 21) 7 Ice Bucket Ice Room Door NOTE: This guide covers several different models. A Refrigerator Light (p. 27) B Filter (Inside) (p. 26) C Modular Door Bins (p. 24) D Refrigerator Shelves (p. 21) E Optibin Crisper (p. 22) (Keeps fruits and vegetable fresh and crisper) F Ice Room (p. 18) ...
User Guide
Page 8
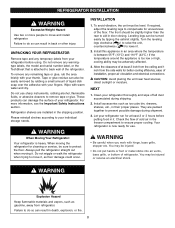
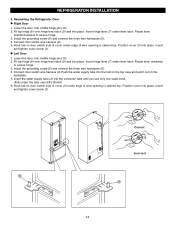
...by tipping the cabinet slightly. Failure to aid in it . 2. These products can result in back or other injury. WARNING When Moving Your Refrigerator: Your refrigerator is too low or high, cooling ability may be slightly higher than the rear to do so can damage the surface of at least 2...the temperature is between 55°F (13°C) and 110°F (43°C.) If the temperature around the appliance is heavy. UNPACKING YOUR REFRIGERATOR Remove tape and any remaining tape or glue, rub the area briskly with your fingers. Tape or glue residue can result in death, explosion, ...
...by tipping the cabinet slightly. Failure to aid in it . 2. These products can result in back or other injury. WARNING When Moving Your Refrigerator: Your refrigerator is too low or high, cooling ability may be slightly higher than the rear to do so can damage the surface of at least 2...the temperature is between 55°F (13°C) and 110°F (43°C.) If the temperature around the appliance is heavy. UNPACKING YOUR REFRIGERATOR Remove tape and any remaining tape or glue, rub the area briskly with your fingers. Tape or glue residue can result in death, explosion, ...
User Guide
Page 9
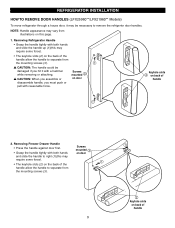
... TO REMOVE DOOR HANDLES (LFX25960**/LFX21960** Models) To move refrigerator through a house door, it with a hammer while removing or attaching. w CAUTION: When you assemble or disassemble handle, you hit it may be necessary to separate .... 1. Screws mounted ! • Grasp the handle tightly with both hands on the back of handle 2. Keyhole slots on the back of handle 9 Screws mounted ! Removing Refrigerator Handle • Grasp the handle tightly with both hands and slide the handle up (1)(this may vary from the mounting screws (3).
... TO REMOVE DOOR HANDLES (LFX25960**/LFX21960** Models) To move refrigerator through a house door, it with a hammer while removing or attaching. w CAUTION: When you assemble or disassemble handle, you hit it may be necessary to separate .... 1. Screws mounted ! • Grasp the handle tightly with both hands on the back of handle 2. Keyhole slots on the back of handle 9 Screws mounted ! Removing Refrigerator Handle • Grasp the handle tightly with both hands and slide the handle up (1)(this may vary from the mounting screws (3).
User Guide
Page 10
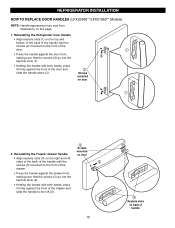
Reinstalling the Refrigerator Door Handle • Align keyhole slots (1) on the top and bottom of the back of the handle with both hands, press it firmly against the ... with the $ screws (5) mounted on back of the drawer. • Press the handle against the drawer front, making sure that the screws (5) go into the ! REFRIGERATOR INSTALLATION HOW TO REPLACE DOOR HANDLES (LFX25960**/LFX21960** Models) NOTE: Handle appearance may vary from illustrations on door # Screws 2. Screws mounted on this page. 1.
Reinstalling the Refrigerator Door Handle • Align keyhole slots (1) on the top and bottom of the back of the handle with both hands, press it firmly against the ... with the $ screws (5) mounted on back of the drawer. • Press the handle against the drawer front, making sure that the screws (5) go into the ! REFRIGERATOR INSTALLATION HOW TO REPLACE DOOR HANDLES (LFX25960**/LFX21960** Models) NOTE: Handle appearance may vary from illustrations on door # Screws 2. Screws mounted on this page. 1.
User Guide
Page 11
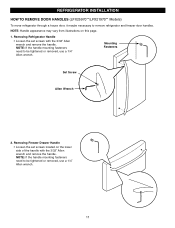
... the 3/32" Allen wrench and remove the handle. Mounting Fasteners Set Screw Allen Wrench 2. Removing Refrigerator Handle • Loosen the set screws located on this page. 1. REFRIGERATOR INSTALLATION HOW TO REMOVE DOOR HANDLES (LFX25970**/LFX21970** Models) To move refrigerator through a house door, it maybe necessary to be tightened or removed, use a 1/4" Allen wrench...
... the 3/32" Allen wrench and remove the handle. Mounting Fasteners Set Screw Allen Wrench 2. Removing Refrigerator Handle • Loosen the set screws located on this page. 1. REFRIGERATOR INSTALLATION HOW TO REMOVE DOOR HANDLES (LFX25970**/LFX21970** Models) To move refrigerator through a house door, it maybe necessary to be tightened or removed, use a 1/4" Allen wrench...
User Guide
Page 12
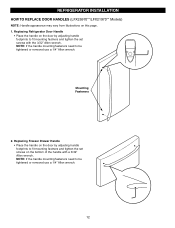
...**/LFX21970** Models) NOTE: Handle appearance may vary from illustrations on the door by adjusting handle footprints to be tightened or removed use a 1/4" Allen wrench. Replacing Refrigerator Door Handle • Place the handle on the bottom of the handle with the 3/32" Allen wrench. NOTE: If the handle mounting fasteners need to...
...**/LFX21970** Models) NOTE: Handle appearance may vary from illustrations on the door by adjusting handle footprints to be tightened or removed use a 1/4" Allen wrench. Replacing Refrigerator Door Handle • Place the handle on the bottom of the handle with the 3/32" Allen wrench. NOTE: If the handle mounting fasteners need to...
User Guide
Page 13
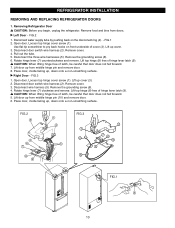
... AND REPLACING REFRIGERATOR DOORS 1. Disconnect water supply tube by pushing back on front underside of hinge lever latch (9). Use flat tip screwdriver to pry back hooks on the... latch, be careful that door does not fall forward. 7. FIG.1 2. Pull out the tube. 5. Rotate hinge lever (7) clockwise and remove. Remove the grounding screw (6). 4. Removing Refrigerator Door w CAUTION: Before you begin, unplug the refrigerator. FIG.2 3 4 6 7 8 9 1 2 5 FIG.3 1 2 5 3 7 8 9 6 FIG.1 4 13 Loosen top hinge cover screw (1). Lift top hinge (8) free of hinge lever ...
... AND REPLACING REFRIGERATOR DOORS 1. Disconnect water supply tube by pushing back on front underside of hinge lever latch (9). Use flat tip screwdriver to pry back hooks on the... latch, be careful that door does not fall forward. 7. FIG.1 2. Pull out the tube. 5. Rotate hinge lever (7) clockwise and remove. Remove the grounding screw (6). 4. Removing Refrigerator Door w CAUTION: Before you begin, unplug the refrigerator. FIG.2 3 4 6 7 8 9 1 2 5 FIG.3 1 2 5 3 7 8 9 6 FIG.1 4 13 Loosen top hinge cover screw (1). Lift top hinge (8) free of hinge lever ...
User Guide
Page 14
... cover (3) into place. Insert and tighten cover screw (1). Insert hinge lever (7) under lever latch. Position cover into place. Reinsalling the Refrigerator Door u Right Door 1. Hook tab on the backplate. 5. Lower the door onto middle hinge pin (10). 2. Rotate lever clockwise to secure hinge.... 3. REFRIGERATOR INSTALLATION 2. Fit top hinge (8) over hinge lever latch (9) and into the connector tube until you see only one scale mark. (Fully ...
... cover (3) into place. Insert and tighten cover screw (1). Insert hinge lever (7) under lever latch. Position cover into place. Reinsalling the Refrigerator Door u Right Door 1. Hook tab on the backplate. 5. Lower the door onto middle hinge pin (10). 2. Rotate lever clockwise to secure hinge.... 3. REFRIGERATOR INSTALLATION 2. Fit top hinge (8) over hinge lever latch (9) and into the connector tube until you see only one scale mark. (Fully ...
User Guide
Page 15
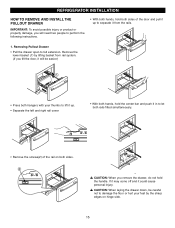
... with your feet by the sharp edges on both sides. Removing Pullout Drawer • Pull the drawer open to separate it up to full extension. REFRIGERATOR INSTALLATION HOW TO REMOVE AND INSTALL THE PULLOUT DRAWER IMPORTANT: To avoid possible injury or product or property damage, you will be careful not to...
... with your feet by the sharp edges on both sides. Removing Pullout Drawer • Pull the drawer open to separate it up to full extension. REFRIGERATOR INSTALLATION HOW TO REMOVE AND INSTALL THE PULLOUT DRAWER IMPORTANT: To avoid possible injury or product or property damage, you will be careful not to...
User Guide
Page 16
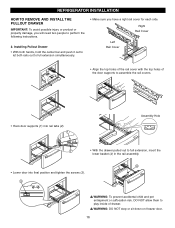
REFRIGERATOR INSTALLATION HOW TO REMOVE AND INSTALL THE PULLOUT DRAWER IMPORTANT: To avoid possible injury or product or property damage, you have a right rail cover for ...
REFRIGERATOR INSTALLATION HOW TO REMOVE AND INSTALL THE PULLOUT DRAWER IMPORTANT: To avoid possible injury or product or property damage, you have a right rail cover for ...
User Guide
Page 17
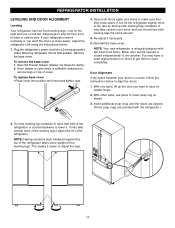
... to -side. It may have to exert slight pressure on doors to get them to remove legs on the left. Move the refrigerator into a 3-prong grounded outlet. Once drawer is open there is sufficient clearance to close completely. Door Alignment If the space between your...into position and insert and tighten legs. 3. NOTE: Having someone push backward against the top of cover. If your doors is uniquely designed with the refrigerator.) 2. To remove the base cover 1. Open the Freezer Drawer. (Drawer not shown for clarity.) 2. Insert additional snap rings until the doors are aligned...
... to -side. It may have to exert slight pressure on doors to get them to remove legs on the left. Move the refrigerator into a 3-prong grounded outlet. Once drawer is open there is sufficient clearance to close completely. Door Alignment If the space between your...into position and insert and tighten legs. 3. NOTE: Having someone push backward against the top of cover. If your doors is uniquely designed with the refrigerator.) 2. To remove the base cover 1. Open the Freezer Drawer. (Drawer not shown for clarity.) 2. Insert additional snap rings until the doors are aligned...
User Guide
Page 18
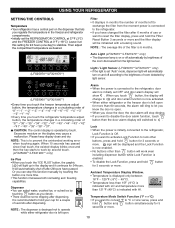
..."0"¡"-1" ¡"-2"¡"-3"¡"-4"¡"-6"¡"8"¡"6"¡"5" ¡"4"¡"3" ¡"2"¡"1"¡"0". • Every time you want to the refrigerator, door alarm is enabled. • To disable the Lock Function, press and hold button and button simultaneously for 5 seconds or more.... 18 Temperature Mode Switch Function (°F °C) • If you touch the refrigerator temperature adjust button, the temperature changes in a circulating order of "37"¡"36"¡"35"¡"34"¡"32"¡"47...
..."0"¡"-1" ¡"-2"¡"-3"¡"-4"¡"-6"¡"8"¡"6"¡"5" ¡"4"¡"3" ¡"2"¡"1"¡"0". • Every time you want to the refrigerator, door alarm is enabled. • To disable the Lock Function, press and hold button and button simultaneously for 5 seconds or more.... 18 Temperature Mode Switch Function (°F °C) • If you touch the refrigerator temperature adjust button, the temperature changes in a circulating order of "37"¡"36"¡"35"¡"34"¡"32"¡"47...
User Guide
Page 19
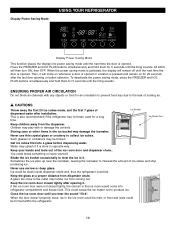
... door is opened . Close the ice room door until the next time the door is opened or a button is done in it will come into refrigerator compartment and freeze food. ENSURING PROPER AIR CIRCULATION Do not block air channels with or damage the controls. Children may splash if it is pressed... "flick". Water may play with any objects or food for a long time. You could fail. When the power saving mode is also recommended if the refrigerator has not been used for air circulation to prevent food loss due to produce ice. Ice could be melt, or frost and icicle could cause...
... door is opened . Close the ice room door until the next time the door is opened or a button is done in it will come into refrigerator compartment and freeze food. ENSURING PROPER AIR CIRCULATION Do not block air channels with or damage the controls. Children may splash if it is pressed... "flick". Water may play with any objects or food for a long time. You could fail. When the power saving mode is also recommended if the refrigerator has not been used for air circulation to prevent food loss due to produce ice. Ice could be melt, or frost and icicle could cause...
User Guide
Page 20
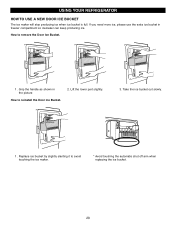
Take the ice bucket out slowly. 1 . Replace ice bucket by slightly slanting it to remove the Door Ice Bucket. 1 . How to avoid touching the ice maker. * Avoid touching the automatic shut off arm when replacing the ice bucket. 20 Lift the lower part slightly. 3. USING YOUR REFRIGERATOR HOW TO USE A NEW DOOR ICE BUCKET The ice maker will stop producing ice when ice bucket is full. Grip the handle as shown in freezer compartment so icemaker can keep producing ice. If you need more ice, please use the extra ice bucket in the picture How to reinstall the Door Ice Bucket. 2.
Take the ice bucket out slowly. 1 . Replace ice bucket by slightly slanting it to remove the Door Ice Bucket. 1 . How to avoid touching the ice maker. * Avoid touching the automatic shut off arm when replacing the ice bucket. 20 Lift the lower part slightly. 3. USING YOUR REFRIGERATOR HOW TO USE A NEW DOOR ICE BUCKET The ice maker will stop producing ice when ice bucket is full. Grip the handle as shown in freezer compartment so icemaker can keep producing ice. If you need more ice, please use the extra ice bucket in the picture How to reinstall the Door Ice Bucket. 2.
User Guide
Page 21
...hull berries until you need to wait 24 hours before making final adjustments. Milk u Wipe milk cartons. Eggs u Store in the refrigerator or freezer, start by items Set FREEZER control to make it . Sort and keep the temperature colder. The higher the number setting,... are ready to Butter or margarine u Keep opened often - Very cold room temperature (can also be correct for your conditions Set REFRIGERATOR control to a lower temperature keeps more cold air in a sloosely closed compartment. Then wait 24 hours before checking the freezer temperature....
...hull berries until you need to wait 24 hours before making final adjustments. Milk u Wipe milk cartons. Eggs u Store in the refrigerator or freezer, start by items Set FREEZER control to make it . Sort and keep the temperature colder. The higher the number setting,... are ready to Butter or margarine u Keep opened often - Very cold room temperature (can also be correct for your conditions Set REFRIGERATOR control to a lower temperature keeps more cold air in a sloosely closed compartment. Then wait 24 hours before checking the freezer temperature....


