User Guide
Page 2
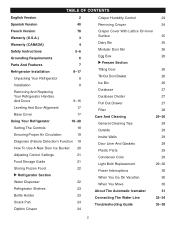
... Care And Cleaning 29-30 General Cleaning Tips 29 Outside 29 Inside Walls 29 Door Liner And Gaskets 29 Plastic Parts 29 Condenser Coils 29 Light Bulb Replacement 29-30 Power Interruptions 30 When You Go On Vacation 30 When You Move 30 About The Automatic Icemaker 31 Connecting The Water...
... Care And Cleaning 29-30 General Cleaning Tips 29 Outside 29 Inside Walls 29 Door Liner And Gaskets 29 Plastic Parts 29 Condenser Coils 29 Light Bulb Replacement 29-30 Power Interruptions 30 When You Go On Vacation 30 When You Move 30 About The Automatic Icemaker 31 Connecting The Water...

User Guide
Page 5
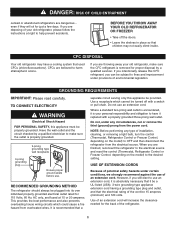
... damage along its length or at the circuit breaker or fuse box in order to avoid contact with a live wire filament. (A burned-out light bulb may break when being replaced.) NOTE: Setting either the plug or connector end. • When moving parts of the refrigerator. •... Instructions that inform you don't follow instructions. All safety messages will be preceded by a qualified technician. • Before replacing a burned-out light bulb, unplug the refrigerator or turn off -color should not be refrozen and should be eaten. NOTE: Service should not be preformed by the...
... damage along its length or at the circuit breaker or fuse box in order to avoid contact with a live wire filament. (A burned-out light bulb may break when being replaced.) NOTE: Setting either the plug or connector end. • When moving parts of the refrigerator. •... Instructions that inform you don't follow instructions. All safety messages will be preceded by a qualified technician. • Before replacing a burned-out light bulb, unplug the refrigerator or turn off -color should not be refrozen and should be eaten. NOTE: Service should not be preformed by the...
User Guide
Page 6
... a separate circuit serving only this appliance be plugged into its own individual properly grounded electrical outlet rated for the back of installation, cleaning, or removing a light bulb, turn the control (Thermostat, Refrigerator Control or Freezer Control, depending on the model) to OFF and then disconnect the refrigerator from the power cord...
... a separate circuit serving only this appliance be plugged into its own individual properly grounded electrical outlet rated for the back of installation, cleaning, or removing a light bulb, turn the control (Thermostat, Refrigerator Control or Freezer Control, depending on the model) to OFF and then disconnect the refrigerator from the power cord...
User Guide
Page 7
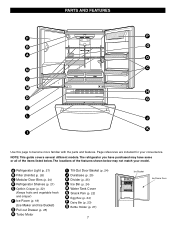
The refrigerator you have purchased may have some or all of the features shown below . A Refrigerator Light (p. 27) B Filter (Inside) (p. 26) C Modular Door Bins (p. 24) D Refrigerator Shelves (p. 21) E Optibin Crisper (p. 22) (Keeps fruits and vegetable fresh and crisper) F Ice Room (p. 18) (Ice ...
The refrigerator you have purchased may have some or all of the features shown below . A Refrigerator Light (p. 27) B Filter (Inside) (p. 26) C Modular Door Bins (p. 24) D Refrigerator Shelves (p. 21) E Optibin Crisper (p. 22) (Keeps fruits and vegetable fresh and crisper) F Ice Room (p. 18) (Ice ...
User Guide
Page 18
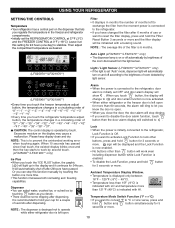
... connected to let you can select water, crushed ice, or cubed ice by touch. Leave it continues for 3 seconds or more . It will light up in the display and it at 0°F (-18°C). Then adjust the compartment temperature as you touch the "ICE PLUS" button, the ... function is now activated. • When either refrigerator door is connected to lock other than 15F (-9°C) is indicated with a buzzing sound. Auto Light (LFX25970**/LFX21970** only) • The dispenser lamp is on the display may cause a malfunction. Alarm • When the power is left open ...
... connected to let you can select water, crushed ice, or cubed ice by touch. Leave it continues for 3 seconds or more . It will light up in the display and it at 0°F (-18°C). Then adjust the compartment temperature as you touch the "ICE PLUS" button, the ... function is now activated. • When either refrigerator door is connected to lock other than 15F (-9°C) is indicated with a buzzing sound. Auto Light (LFX25970**/LFX21970** only) • The dispenser lamp is on the display may cause a malfunction. Alarm • When the power is left open ...
User Guide
Page 28
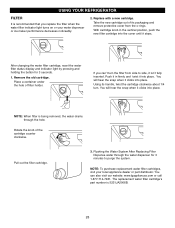
...with a new cartridge. With cartridge knob in firmly and twist it into place. If you replace the filter when the water filter indicator light turns on or your local appliance dealer or part distributor. You will hear the snap when it isn't fully inserted. Flushing the Water ... the water dispenser for 3 seconds. 1. You can 't turn . After changing the water filter cartridge, reset the water filter status display and indicator light by pressing and holding the button for 3 minutes to side, it clicks into place. Remove the old cartridge. Pull out the filter cartridge. 3. ...
...with a new cartridge. With cartridge knob in firmly and twist it into place. If you replace the filter when the water filter indicator light turns on or your local appliance dealer or part distributor. You will hear the snap when it isn't fully inserted. Flushing the Water ... the water dispenser for 3 seconds. 1. You can 't turn . After changing the water filter cartridge, reset the water filter status display and indicator light by pressing and holding the button for 3 minutes to side, it clicks into place. Remove the old cartridge. Pull out the filter cartridge. 3. ...
User Guide
Page 29
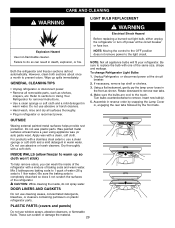
...; Use a clean sponge or soft cloth and a mild detergent in , engaging the rear tabs followed by the front tabs. To change Refrigerator Light Bulbs 1. Wax painted metal surfaces at the circuit breaker. 2. Assemble in reverse order by snapping the Lamp Cover in warm water. GENERAL CLEANING ... a soft cloth. Dry thoroughly with a stainless steel exterior, use abrasive or harsh cleaners. However, clean both sections about once a month to the light circuit. Do not wax plastic parts. If necessary, remove top shelf or shelves. 3. Do not use a clean sponge or soft cloth and a ...
...; Use a clean sponge or soft cloth and a mild detergent in , engaging the rear tabs followed by the front tabs. To change Refrigerator Light Bulbs 1. Wax painted metal surfaces at the circuit breaker. 2. Assemble in reverse order by snapping the Lamp Cover in warm water. GENERAL CLEANING ... a soft cloth. Dry thoroughly with a stainless steel exterior, use abrasive or harsh cleaners. However, clean both sections about once a month to the light circuit. Do not wax plastic parts. If necessary, remove top shelf or shelves. 3. Do not use a clean sponge or soft cloth and a ...
User Guide
Page 30
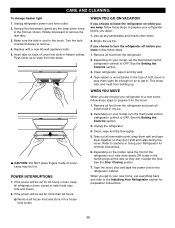
... Using your new home, put everything back and refer to the refrigerator cabinet. See the Setting the Controls section. 3. CARE AND CLEANING To change freezer light 1. Unplug refrigerator power cord form outlet. 2. Rotate downward to remove. 4. Make sure the bulb is cool to OFF. Replace with a new 60-watt appliance bulb...
... Using your new home, put everything back and refer to the refrigerator cabinet. See the Setting the Controls section. 3. CARE AND CLEANING To change freezer light 1. Unplug refrigerator power cord form outlet. 2. Rotate downward to remove. 4. Make sure the bulb is cool to OFF. Replace with a new 60-watt appliance bulb...
User Guide
Page 31
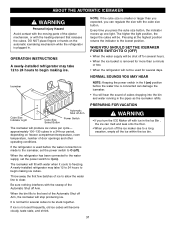
...When the bin fills to begin making ice cubes. Every time you turn off the ice maker due to begin making ice. The higher the light position, the larger the cubes will become cloudy, taste stale, and shrink. When the refrigerator has been connected to the water supply, set the... water supply will be stuck together. WARNING • If you press the cube size button, the indicator moves up one light. PREPARING FOR VACATION Cube Size Indicator Light Cube Size Select Button Automatic Shut off Arm Power Switch The icemaker will produce six cubes per cycle- ABOUT THE AUTOMATIC ICEMAKER...
...When the bin fills to begin making ice cubes. Every time you turn off the ice maker due to begin making ice. The higher the light position, the larger the cubes will become cloudy, taste stale, and shrink. When the refrigerator has been connected to the water supply, set the... water supply will be stuck together. WARNING • If you press the cube size button, the indicator moves up one light. PREPARING FOR VACATION Cube Size Indicator Light Cube Size Select Button Automatic Shut off Arm Power Switch The icemaker will produce six cubes per cycle- ABOUT THE AUTOMATIC ICEMAKER...
User Guide
Page 35
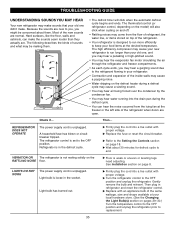
..., you might be making them . u Firmly plug the cord into a live outlet with proper voltage. Then plug in the defrost cycle. Then... LIGHTS DO NOT WORK The power supply cord is weak or uneven or leveling legs need adjusting. u Refer to the OFF position and unplug the refrigerator... floor, walls and cabinets, can hear the noise occurred from the flow of refrigerant, the water line, or items stored on page 18. Light bulb is in refrigerator and reset the refrigerator control. Because the sounds are . Most of the new sounds are open. The following describes the...
..., you might be making them . u Firmly plug the cord into a live outlet with proper voltage. Then plug in the defrost cycle. Then... LIGHTS DO NOT WORK The power supply cord is weak or uneven or leveling legs need adjusting. u Refer to the OFF position and unplug the refrigerator... floor, walls and cabinets, can hear the noise occurred from the flow of refrigerant, the water line, or items stored on page 18. Light bulb is in refrigerator and reset the refrigerator control. Because the sounds are . Most of the new sounds are open. The following describes the...


