Owner's Manual
Page 2
... ZIP/Postal Code ready. This warranty is applicable to validate warranty. LG Refrigerator / Freezer Warranty Period Product Parts Labor Refrigerator / Freezer 1 year 1 year [In-Home Service (Except Model GR-051)] Sealed System (Compressor, Condenser, Evaporator) 7 years 1 year [In-Home Service (Except Model GR-051)] No other express warranty is good only to you may...
... ZIP/Postal Code ready. This warranty is applicable to validate warranty. LG Refrigerator / Freezer Warranty Period Product Parts Labor Refrigerator / Freezer 1 year 1 year [In-Home Service (Except Model GR-051)] Sealed System (Compressor, Condenser, Evaporator) 7 years 1 year [In-Home Service (Except Model GR-051)] No other express warranty is good only to you may...
Owner's Manual
Page 7
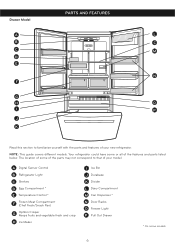
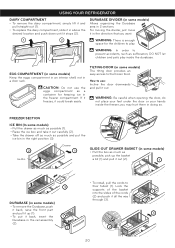
The location of some of the parts may not correspond to familiarize yourself with the parts and features of your model. Drawer Model PARTS AND FEATURES A L B C C M D E N F G H O I Ice Bin J Durabase K Divider L Dairy Compartment M Can Dispenser * N Door Racks O Freezer Light P Pull Out Drawer * On some models 6 A Digital Sensor Control B Refrigerator Light C Shelves D Egg Compartment * E Temperature Control * F Frozen Meat Compartment...
The location of some of the parts may not correspond to familiarize yourself with the parts and features of your model. Drawer Model PARTS AND FEATURES A L B C C M D E N F G H O I Ice Bin J Durabase K Divider L Dairy Compartment M Can Dispenser * N Door Racks O Freezer Light P Pull Out Drawer * On some models 6 A Digital Sensor Control B Refrigerator Light C Shelves D Egg Compartment * E Temperature Control * F Frozen Meat Compartment...
Owner's Manual
Page 8
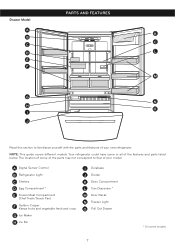
NOTE: This guide covers different models. Your refrigerator could have some models 7 Drawer Model PARTS AND FEATURES A K B C C D L E F M G N H O I Durabase J Divider K Dairy Compartment L Can Dispenser * M Door Racks N Freezer Light O Pull Out Drawer * On some or all of the features and parts listed below. A Digital Sensor Control B Refrigerator Light C Shelves D Egg ... fruits and vegetable fresh and crisp G Ice Maker H Ice Bin I J Read this section to that of your model. The location of some of the parts may not correspond to familiarize yourself with the...
NOTE: This guide covers different models. Your refrigerator could have some models 7 Drawer Model PARTS AND FEATURES A K B C C D L E F M G N H O I Durabase J Divider K Dairy Compartment L Can Dispenser * M Door Racks N Freezer Light O Pull Out Drawer * On some or all of the features and parts listed below. A Digital Sensor Control B Refrigerator Light C Shelves D Egg ... fruits and vegetable fresh and crisp G Ice Maker H Ice Bin I J Read this section to that of your model. The location of some of the parts may not correspond to familiarize yourself with the...
Owner's Manual
Page 9
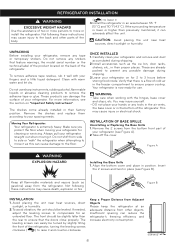
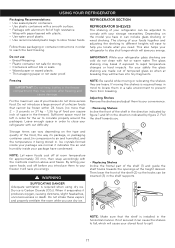
... when attempting to your hands or any tape or temporary stickers. Keep all flammable materials and vapors (such as gasoline) away from other parts of the body. ( ) to 3 hours before storing food inside. Clean with your refrigerator and remove and dust accumulated during shipping. ... EXPLOSION HAZARD Installing the Base Grille 1. Not following these instructions may cause injury to prevent any stickers that feature warnings, the model serial number or the technical label of the product located on for cleaning or servicing. Avoid placing the unit near heat sources,...
... when attempting to your hands or any tape or temporary stickers. Keep all flammable materials and vapors (such as gasoline) away from other parts of the body. ( ) to 3 hours before storing food inside. Clean with your refrigerator and remove and dust accumulated during shipping. ... EXPLOSION HAZARD Installing the Base Grille 1. Not following these instructions may cause injury to prevent any stickers that feature warnings, the model serial number or the technical label of the product located on for cleaning or servicing. Avoid placing the unit near heat sources,...
Owner's Manual
Page 10
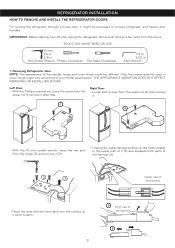
... NEED OR USE 10 mm 1/4 in 3/8 in Hex Socket Wrench Phillips Screwdriver Flat Head Screwdriver 1/4 in 3/32 in cover hinge might be necessary to your model specification. Right Door • Loose both screws from the upper lid (4) and remove it. 1 4 • With the 10 mm socket wrench, loose the two... pins from the hinge (2) and remove it (3). • Unplug the cable harness pulling up the hook located in the upper part of it (5) and separate both parts of the harness (6). 2 3 Upper view of the harness • Place the door with the inner face over the surface so it after...
... NEED OR USE 10 mm 1/4 in 3/8 in Hex Socket Wrench Phillips Screwdriver Flat Head Screwdriver 1/4 in 3/32 in cover hinge might be necessary to your model specification. Right Door • Loose both screws from the upper lid (4) and remove it. 1 4 • With the 10 mm socket wrench, loose the two... pins from the hinge (2) and remove it (3). • Unplug the cable harness pulling up the hook located in the upper part of it (5) and separate both parts of the harness (6). 2 3 Upper view of the harness • Place the door with the inner face over the surface so it after...
Owner's Manual
Page 18
...refrigerator glass shelving are heavy. By letting your warm foods cool off at the height desired. If not secured it can vary depending on the model you energy. IMPORTANT: While your stored food to spill. 17 For the maximum use : • Bread Wrapping. • Plastic container ... shelf is required keep bottles in the freezer compartment, they will save you use dry ice. 2 • Replacing Shelves Incline the frontal part of your storage necessities; If moving or relocating the shelves they are cold do not store excess food. This also helps your convenience. •...
...refrigerator glass shelving are heavy. By letting your warm foods cool off at the height desired. If not secured it can vary depending on the model you energy. IMPORTANT: While your stored food to spill. 17 For the maximum use : • Bread Wrapping. • Plastic container ... shelf is required keep bottles in the freezer compartment, they will save you use dry ice. 2 • Replacing Shelves Incline the frontal part of your storage necessities; If moving or relocating the shelves they are cold do not store excess food. This also helps your convenience. •...
Owner's Manual
Page 20
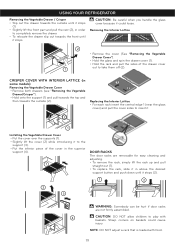
.... • To remove the rack, simply lift the rack up and pull straight out (1). • To replace the rack, slide it in some models) Removing the Vegetable Drawer Cover • Remove both drawers (see "Removing the Vegetable Drawer/Crisper"). • Hold onto the support (1) and pull towards... the top and then towards the front until it stops (1). • Slightly lift the front part and pull the rest (2), in order to take them off (2). NOTE: DO NOT adjust a rack that is loaded with baskets. Replacing the Interior Lattice...
.... • To remove the rack, simply lift the rack up and pull straight out (1). • To replace the rack, slide it in some models) Removing the Vegetable Drawer Cover • Remove both drawers (see "Removing the Vegetable Drawer/Crisper"). • Hold onto the support (1) and pull towards... the top and then towards the front until it stops (1). • Slightly lift the front part and pull the rest (2), in order to take them off (2). NOTE: DO NOT adjust a rack that is loaded with baskets. Replacing the Interior Lattice...
Owner's Manual
Page 21
..., pick up (1). • To put the ice bin in the right position (3). 2 Ice Bin Drawer 1 GLIDE-OUT DRAWER BASKET (in some models) The tilting door provides an easy access to their fullest (1). WARNING: Be careful when opening the door, do not place your feet under the door..., pull the cords to the frozen food. DURABASE DIVIDER (in some models) • To remove the Durabase, push it back, raise the front part and pull it up the basket a bit (1) and pull it out (2). 1 3 DURABASE (in some models) Allows organizing the Durabase area in 2 sections. CAUTION: Do not use...
..., pick up (1). • To put the ice bin in the right position (3). 2 Ice Bin Drawer 1 GLIDE-OUT DRAWER BASKET (in some models) The tilting door provides an easy access to their fullest (1). WARNING: Be careful when opening the door, do not place your feet under the door..., pull the cords to the frozen food. DURABASE DIVIDER (in some models) • To remove the Durabase, push it back, raise the front part and pull it up the basket a bit (1) and pull it out (2). 1 3 DURABASE (in some models) Allows organizing the Durabase area in 2 sections. CAUTION: Do not use...
Owner's Manual
Page 23
... a rag. 5.Pull out all of baked goods. If the condition of the refrigerator so it won´t scratch the floor. Consume all of the removable parts, and wrap them in an ice chest with dry ice. 2.Unplug your refrigerator. 3.Empty the water from happening. • Remove the light bulb and replace... your food as soon as possible. 22 Remove all of the frozen food and keep them with adhesive tape. 6.Depending on the model of the refrigerator, lift the top part of the food is poor or if you do not possess neither ice chest or dry ice, consume your refrigerator on when...
... a rag. 5.Pull out all of baked goods. If the condition of the refrigerator so it won´t scratch the floor. Consume all of the removable parts, and wrap them in an ice chest with dry ice. 2.Unplug your refrigerator. 3.Empty the water from happening. • Remove the light bulb and replace... your food as soon as possible. 22 Remove all of the frozen food and keep them with adhesive tape. 6.Depending on the model of the refrigerator, lift the top part of the food is poor or if you do not possess neither ice chest or dry ice, consume your refrigerator on when...
Owner's Manual
Page 24
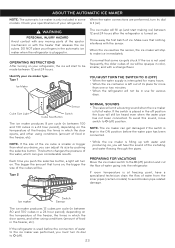
... Ice maker is only included in the freezer, etc). to be . This button changes the pressure of the ejector mechanism or with any moving parts of the water, which the door opens, and other using conditions (amount of the ice falling and water flowing through the pipes. DO NOT ... ice maker was performed, you push the selective button, a light will still be opaque in the ON position before the connection of its dial models. The bigger the amount that some When the water connections are performed, turn its place for various days. Ice maker Switch Sensor The ice maker...
... Ice maker is only included in the freezer, etc). to be . This button changes the pressure of the ejector mechanism or with any moving parts of the water, which the door opens, and other using conditions (amount of the ice falling and water flowing through the pipes. DO NOT ... ice maker was performed, you push the selective button, a light will still be opaque in the ON position before the connection of its dial models. The bigger the amount that some When the water connections are performed, turn its place for various days. Ice maker Switch Sensor The ice maker...
Owner's Manual
Page 2
...provided. A Copy of your Sales Receipt must be provided to LG in order to validate warranty. Service Assistance: Press the appropriate menu option, and have your home to your product type (Refrigerator), model number, serial number, and ZIP/Postal Code ready. Service ...you specific legal rights and you . LG Refrigerator / Freezer Warranty Period Product Parts Labor Refrigerator / Freezer 1 year 1 year [In-Home Service (Except Model GR-051)] Sealed System (Compressor, Condenser, Evaporator) 7 years 1 year [In-Home Service (Except Model GR-051)] No other express warranty ...
...provided. A Copy of your Sales Receipt must be provided to LG in order to validate warranty. Service Assistance: Press the appropriate menu option, and have your home to your product type (Refrigerator), model number, serial number, and ZIP/Postal Code ready. Service ...you specific legal rights and you . LG Refrigerator / Freezer Warranty Period Product Parts Labor Refrigerator / Freezer 1 year 1 year [In-Home Service (Except Model GR-051)] Sealed System (Compressor, Condenser, Evaporator) 7 years 1 year [In-Home Service (Except Model GR-051)] No other express warranty ...


