Owner's Manual
Page 2
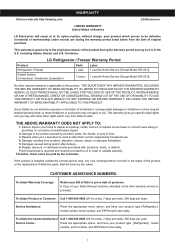
...period as long as it is applicable to be borne by the owner. Display, discount, or refurbished units purchased with scratches, dents, or defects. LG Refrigerator / Freezer Warranty Period Product Parts Labor Refrigerator / Freezer 1 year 1 year [In-Home Service (Except Model GR-051)] Sealed System (Compressor...-0000 (24 hrs a day, 7 days per week, 365 days per year). This warranty is good only to deliver and pickup, install, instruct, or replace house fuses or correct house wiring or plumbing, or correction of unauthorized repairs. 2. THE DURATION OF ANY IMPLIED WARRANTIES...
...period as long as it is applicable to be borne by the owner. Display, discount, or refurbished units purchased with scratches, dents, or defects. LG Refrigerator / Freezer Warranty Period Product Parts Labor Refrigerator / Freezer 1 year 1 year [In-Home Service (Except Model GR-051)] Sealed System (Compressor...-0000 (24 hrs a day, 7 days per week, 365 days per year). This warranty is good only to deliver and pickup, install, instruct, or replace house fuses or correct house wiring or plumbing, or correction of unauthorized repairs. 2. THE DURATION OF ANY IMPLIED WARRANTIES...
Owner's Manual
Page 4
... 30 Dairy Compartment Egg Compartment Freezer Section 4-5 Ice Bin 5 DuraBase Durabase Divider Glide Out Drawer 6-7 Tilting Door Refrigerator Installation Unpacking Installation Installation of Base Grille How to remove and Install the Refrigerator Doors How to remove and Install Pull-Out Drawer Closing and Aligning the doors 8-14 8 8 8 9-12 12-13 14 Using your Refrigerator Ensuring...
... 30 Dairy Compartment Egg Compartment Freezer Section 4-5 Ice Bin 5 DuraBase Durabase Divider Glide Out Drawer 6-7 Tilting Door Refrigerator Installation Unpacking Installation Installation of Base Grille How to remove and Install the Refrigerator Doors How to remove and Install Pull-Out Drawer Closing and Aligning the doors 8-14 8 8 8 9-12 12-13 14 Using your Refrigerator Ensuring...
Owner's Manual
Page 6
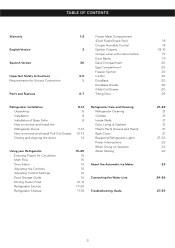
Children should only be replaced by our service center or qualified LG technician to assure that they do not recommend the use an extension cable. If you must always be supervised to avoid any risk. USE OF ... a hazard, even if they remain there "for just a few days". It is recommended that the electrical current support a minimum of 15 A and 120 V. NOTE: Before installation, cleaning or replacing light bulbs, you would like to dispose of your wall outlet to its own outlet which could be properly grounded. CAUTION This...
Children should only be replaced by our service center or qualified LG technician to assure that they do not recommend the use an extension cable. If you must always be supervised to avoid any risk. USE OF ... a hazard, even if they remain there "for just a few days". It is recommended that the electrical current support a minimum of 15 A and 120 V. NOTE: Before installation, cleaning or replacing light bulbs, you would like to dispose of your wall outlet to its own outlet which could be properly grounded. CAUTION This...
Owner's Manual
Page 9
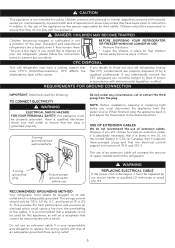
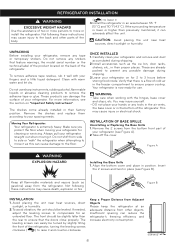
... affect the unit. These are already packed to ensure proper cooling. This may cause death, explosion or fire Figure B INSTALLATION 1. Not following these instructions may injure yourself. • DO not place your refrigerator for an unleveled floor. Remove the...and 110 °F (43 °C). The front should be slightly taller than previously mentioned, it . 3.Install the refrigerator in place (see Figure B). ONCE INSTALLED 1. REFRIGERATOR INSTALLATION WARNING EXCESSIVE WEIGHT HAZARD Use the assistance of two or more information, see the section on "Important Safety...
... affect the unit. These are already packed to ensure proper cooling. This may cause death, explosion or fire Figure B INSTALLATION 1. Not following these instructions may injure yourself. • DO not place your refrigerator for an unleveled floor. Remove the...and 110 °F (43 °C). The front should be slightly taller than previously mentioned, it . 3.Install the refrigerator in place (see Figure B). ONCE INSTALLED 1. REFRIGERATOR INSTALLATION WARNING EXCESSIVE WEIGHT HAZARD Use the assistance of two or more information, see the section on "Important Safety...
Owner's Manual
Page 10
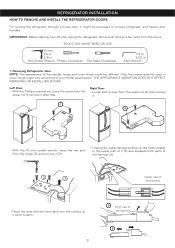
THE APPEARANCE VARIATION DOES NOT AFFECT REMOVING OR INSTALLING DOORS. Right Door • Loose both parts of the harness (6). 2 3 Upper view of the harness • Place the door with the inner face over the ..., loose the screw from the hinge (2) and remove it (3). • Unplug the cable harness pulling up the hook located in Allen Wrench 1. REFRIGERATOR INSTALLATION HOW TO REMOVE AND INSTALL THE REFRIGERATOR DOORS For moving the refrigerator through a house door, it might vary according to remove refrigerator and freezer door handles. Removing Refrigerator...
THE APPEARANCE VARIATION DOES NOT AFFECT REMOVING OR INSTALLING DOORS. Right Door • Loose both parts of the harness (6). 2 3 Upper view of the harness • Place the door with the inner face over the ..., loose the screw from the hinge (2) and remove it (3). • Unplug the cable harness pulling up the hook located in Allen Wrench 1. REFRIGERATOR INSTALLATION HOW TO REMOVE AND INSTALL THE REFRIGERATOR DOORS For moving the refrigerator through a house door, it might vary according to remove refrigerator and freezer door handles. Removing Refrigerator...
Owner's Manual
Page 11
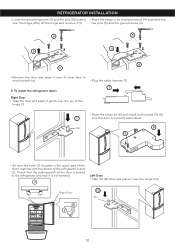
... assembly the over the hinge, after, lift the hinge and remove it over the pin of the hinge (1). • Place the hinge lid (8) and install both screws (9). Be 1 sure the door is correctly assembled. Pin 8 9 • Be sure the hook (2) (located in its inner face to the... refrigerator and that the sealing patch of the refrigerator's door (3). REFRIGERATOR INSTALLATION • Loose the grounding screw (7) and the pins (8) located • Place the hinge in the upper part of the door) matches with the divisor...
... assembly the over the hinge, after, lift the hinge and remove it over the pin of the hinge (1). • Place the hinge lid (8) and install both screws (9). Be 1 sure the door is correctly assembled. Pin 8 9 • Be sure the hook (2) (located in its inner face to the... refrigerator and that the sealing patch of the refrigerator's door (3). REFRIGERATOR INSTALLATION • Loose the grounding screw (7) and the pins (8) located • Place the hinge in the upper part of the door) matches with the divisor...
Owner's Manual
Page 12
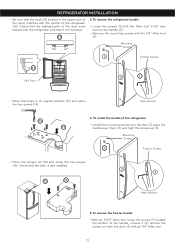
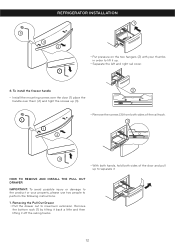
...the freezer handle • With an 3/32" Allen tool, loose the screws (1) located the bottom of the handle, remove it isn't bended. 12 3. REFRIGERATOR INSTALLATION • Be sure that the hook (11) located in its original position (13) and place the two screws (14). To remove the refrigerator handle •... from the door (3) with the splitter of the refrigerator (12). Allen Wrench 14 13 4. Check that the sealing patch of the refrigerator • Install the mounting screws over the door (1) place the handle over them (2) and tight the screws up (3). Check that the door is well...
...the freezer handle • With an 3/32" Allen tool, loose the screws (1) located the bottom of the handle, remove it isn't bended. 12 3. REFRIGERATOR INSTALLATION • Be sure that the hook (11) located in its original position (13) and place the two screws (14). To remove the refrigerator handle •... from the door (3) with the splitter of the refrigerator (12). Allen Wrench 14 13 4. Check that the sealing patch of the refrigerator • Install the mounting screws over the door (1) place the handle over them (2) and tight the screws up (3). Check that the door is well...
Owner's Manual
Page 13
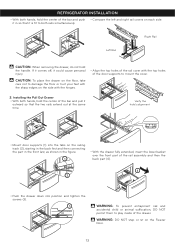
... lifting it . Removing the Pull Out Drawer • Pull the drawer out to separate it off the railing tracks. 12 REFRIGERATOR INSTALLATION 1 3 3 2 • Put pressure on the two hangers (2) with your property, please use two people to perform the following instructions: 1. To... install the freezer handle 2 • Install the mounting screws over the door (1) place the handle over them (2) and tight the screws up (3). 1 1 2 • Remove the screws (3) from...
... lifting it . Removing the Pull Out Drawer • Pull the drawer out to separate it off the railing tracks. 12 REFRIGERATOR INSTALLATION 1 3 3 2 • Put pressure on the two hangers (2) with your property, please use two people to perform the following instructions: 1. To... install the freezer handle 2 • Install the mounting screws over the door (1) place the handle over them (2) and tight the screws up (3). 1 1 2 • Remove the screws (3) from...
Owner's Manual
Page 14
... basket over the front part of the rail assembly and then the back part (4). 4 2 • Push the drawer down into the tabs on each side. Installing the Pull Out Drawer • With both hands, hold the center of the bar and pull it outward so that it is fit to play... on the side with the hinges. • Align the top holes of the rail cover with the sharp edges on the Freezer Door. 13 REFRIGERATOR INSTALLATION • With both hands, hold the center of the bar and push • Compare the left and right rail covers on the railing track (2), starting...
... basket over the front part of the rail assembly and then the back part (4). 4 2 • Push the drawer down into the tabs on each side. Installing the Pull Out Drawer • With both hands, hold the center of the bar and pull it outward so that it is fit to play... on the side with the hinges. • Align the top holes of the rail cover with the sharp edges on the Freezer Door. 13 REFRIGERATOR INSTALLATION • With both hands, hold the center of the bar and push • Compare the left and right rail covers on the railing track (2), starting...
Owner's Manual
Page 15
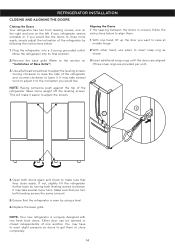
.... 6.Replace the base grille. Either door can be opened or closed independently of the refrigerator takes some weight off the leveling screws. REFRIGERATOR INSTALLATION CLOSING AND ALIGNING THE DOORS Closing the Doors Your refrigerator has two front leveling screws, one on the right and one on 3.Insert additional ...snap rings until the doors are aligned "Installation of Base Grille"). (Three snap rings are provided per unit). 3. NOTE: Having someone push against the top of one another.
.... 6.Replace the base grille. Either door can be opened or closed independently of the refrigerator takes some weight off the leveling screws. REFRIGERATOR INSTALLATION CLOSING AND ALIGNING THE DOORS Closing the Doors Your refrigerator has two front leveling screws, one on the right and one on 3.Insert additional ...snap rings until the doors are aligned "Installation of Base Grille"). (Three snap rings are provided per unit). 3. NOTE: Having someone push against the top of one another.
Owner's Manual
Page 18
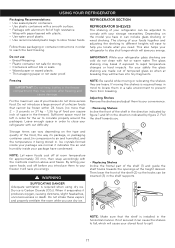
... (no more than 2 - 3 pounds or ,91 kg - 1,36 kg of food per square inch of space in . NOTE: Be careful while moving the shelves is installed in the direction indicated by figure 2. NOTE: Let warm foods cool off before you introduce them from breaking. Then lower the front of the shelf...
... (no more than 2 - 3 pounds or ,91 kg - 1,36 kg of food per square inch of space in . NOTE: Be careful while moving the shelves is installed in the direction indicated by figure 2. NOTE: Let warm foods cool off before you introduce them from breaking. Then lower the front of the shelf...
Owner's Manual
Page 20
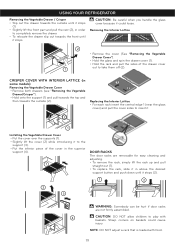
... careful when you handle the glass cover because it to the support (3). • Put the inferior piece of the drawer cover 1 out to insert it. 2 1 Installing the Vegetable Drawer Cover • Put the cover over the supports (1). • Slightly lift the cover (2) while introducing it could cause injury. Replacing the Interior...
... careful when you handle the glass cover because it to the support (3). • Put the inferior piece of the drawer cover 1 out to insert it. 2 1 Installing the Vegetable Drawer Cover • Put the cover over the supports (1). • Slightly lift the cover (2) while introducing it could cause injury. Replacing the Interior...
Owner's Manual
Page 21
... the supports of the basket into the slides of the cords (2) and push it could break easily. DURABASE DIVIDER (in the rail assembly (2). 2 • To install, pull the cords to the frozen food. TILTING DOOR (in some models) Allows organizing the Durabase area in above the desired location and push down...
... the supports of the basket into the slides of the cords (2) and push it could break easily. DURABASE DIVIDER (in the rail assembly (2). 2 • To install, pull the cords to the frozen food. TILTING DOOR (in some models) Allows organizing the Durabase area in above the desired location and push down...
Owner's Manual
Page 22
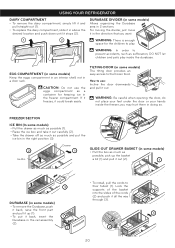
... AND GASKETS Use only a mild detergent (such as dish soap). These could damage the product. 2 • Turn the bulb counter clockwise and remove it. • Install the new light bulb. • Take the cover (1), lock the hooks (2) from sticking) In order to get an efficient performance of your refrigerator. • Pull...
... AND GASKETS Use only a mild detergent (such as dish soap). These could damage the product. 2 • Turn the bulb counter clockwise and remove it. • Install the new light bulb. • Take the cover (1), lock the hooks (2) from sticking) In order to get an efficient performance of your refrigerator. • Pull...
Owner's Manual
Page 23
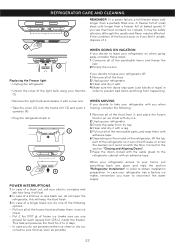
.... 3 2.Empty the ice bin. When your refrigerator arrives to your home, put everything back into place and read the section "Refrigerator Installation" in . 1 3 2 4 WHEN MOVING If you decide to obtain installation preparation. Replacing the Freezer light • Unplug the refrigerator. • Unlock the cover of the light bulb using your refrigerator with...
.... 3 2.Empty the ice bin. When your refrigerator arrives to your home, put everything back into place and read the section "Refrigerator Installation" in . 1 3 2 4 WHEN MOVING If you decide to obtain installation preparation. Replacing the Freezer light • Unplug the refrigerator. • Unlock the cover of the light bulb using your refrigerator with...
Owner's Manual
Page 25
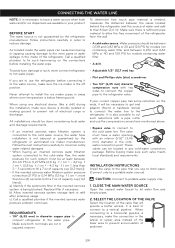
...mm) diameter in the lateral or upper area instead of the lower area to prevent accumulation of sediment. 24 Replace filter if necessary. INSTALLATION INSTRUCTIONS Install the valve to the pipe that will be at least between 0,276 and 0,82 MPa or 40 and 120 PSI for such system... local water and drainage requirements. • If an inverted osmosis water filtration system is connected to the cold water source, the water hose installation is sufficient pipe material to allow the free movement of the refrigerator from the wall • A cold water source. Call a qualified plumber...
...mm) diameter in the lateral or upper area instead of the lower area to prevent accumulation of sediment. 24 Replace filter if necessary. INSTALLATION INSTRUCTIONS Install the valve to the pipe that will be at least between 0,276 and 0,82 MPa or 40 and 120 PSI for such system... local water and drainage requirements. • If an inverted osmosis water filtration system is connected to the cold water source, the water hose installation is sufficient pipe material to allow the free movement of the refrigerator from the wall • A cold water source. Call a qualified plumber...
Owner's Manual
Page 26
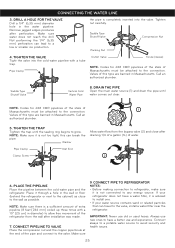
... Place the compression nut and the copper pipe ferule at the end of the refrigerator from the bypass valve (2) and close to the valve, install a water filter near the refrigerator. Remove jagged edges produces after draining 1/4 of a gallon (1L) of this type are banned in the wall... or smaller ice production. CONNECT PIPE TO REFRIGERATOR NOTES: • Before making connection to the valve. Connect always to a potable water source to install one. • If your refrigerator does not have a better use old or used hoses. Tighten nut carefully. Washer Allow water flow from the ...
... Place the compression nut and the copper pipe ferule at the end of the refrigerator from the bypass valve (2) and close to the valve, install a water filter near the refrigerator. Remove jagged edges produces after draining 1/4 of a gallon (1L) of this type are banned in the wall... or smaller ice production. CONNECT PIPE TO REFRIGERATOR NOTES: • Before making connection to the valve. Connect always to a potable water source to install one. • If your refrigerator does not have a better use old or used hoses. Tighten nut carefully. Washer Allow water flow from the ...
Owner's Manual
Page 28
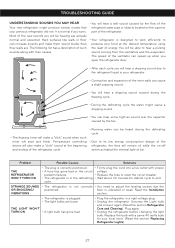
... a bell sound caused by the fan. • The thawing timer will make them sound louder than they really are actually normal and expected. Read the Installation VIBRATIONS section. • The refrigerator is unleveled or weak. Unscrew the Light bulb and screw it again (Read the section Refrigerator Care and Cleaning). TROUBLESHOOTING...
... a bell sound caused by the fan. • The thawing timer will make them sound louder than they really are actually normal and expected. Read the Installation VIBRATIONS section. • The refrigerator is unleveled or weak. Unscrew the Light bulb and screw it again (Read the section Refrigerator Care and Cleaning). TROUBLESHOOTING...
Owner's Manual
Page 29
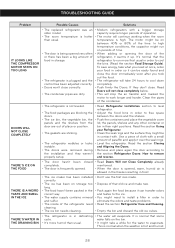
... close correctly. • The condenser pipes are sticking. • The refrigerator wobbles or looks instable. • The doors were removed during the installation and they don't close completely below. • This will stop the air transfer and marked the motor to eliminate the odors and taste problems. ...in order to free space between 40% or 80% of paraffin and apply it up. If they weren't properly setup. • Read Refrigerator Installation section to level refrigerator. • Adjust the food bins in order to cool the bins. (Read the section Food Storage Guide). Read the ...
... close correctly. • The condenser pipes are sticking. • The refrigerator wobbles or looks instable. • The doors were removed during the installation and they don't close completely below. • This will stop the air transfer and marked the motor to eliminate the odors and taste problems. ...in order to free space between 40% or 80% of paraffin and apply it up. If they weren't properly setup. • Read Refrigerator Installation section to level refrigerator. • Adjust the food bins in order to cool the bins. (Read the section Food Storage Guide). Read the ...
Owner's Manual
Page 2
...warranty gives you specific legal rights and you . Repairs when your product which vary from accident, alteration, misuse, abuse, or improper installation. 5. Proof of purchase is required and must be borne by the consumer. Display, discount, or refurbished units purchased with scratches, dents... WARRANTY United States of America LG Electronics will repair or at the time warranty service is provided. THE ABOVE WARRANTY DOES NOT APPLY TO: 1. Therefore, these limitations or exclusions may not apply to deliver and pickup, install, instruct, or replace house fuses...
...warranty gives you specific legal rights and you . Repairs when your product which vary from accident, alteration, misuse, abuse, or improper installation. 5. Proof of purchase is required and must be borne by the consumer. Display, discount, or refurbished units purchased with scratches, dents... WARRANTY United States of America LG Electronics will repair or at the time warranty service is provided. THE ABOVE WARRANTY DOES NOT APPLY TO: 1. Therefore, these limitations or exclusions may not apply to deliver and pickup, install, instruct, or replace house fuses...

