Owner's Manual
Page 2
... specific legal rights and you . CUSTOMER ASSISTANCE NUMBERS: To obtain Warranty Coverage: Retain your home to you may not apply to deliver and pickup, install, instruct, or replace house fuses or correct house wiring or plumbing, or correction of purchase. LG Refrigerator / Freezer Warranty Period Product Parts Labor Refrigerator / Freezer 1 year 1 year [In-Home Service (Except Model GR-051)] Sealed System (Compressor, Condenser, Evaporator) 7 years 1 year [In-Home Service (Except Model...
... specific legal rights and you . CUSTOMER ASSISTANCE NUMBERS: To obtain Warranty Coverage: Retain your home to you may not apply to deliver and pickup, install, instruct, or replace house fuses or correct house wiring or plumbing, or correction of purchase. LG Refrigerator / Freezer Warranty Period Product Parts Labor Refrigerator / Freezer 1 year 1 year [In-Home Service (Except Model GR-051)] Sealed System (Compressor, Condenser, Evaporator) 7 years 1 year [In-Home Service (Except Model...
Owner's Manual
Page 4
... to remove and Install the Refrigerator Doors How to remove and Install Pull-Out Drawer Closing and Aligning the doors 8-14 8 8 8 9-12 12-13 14 Using your Refrigerator Ensuring Proper Air Circulation Multi Flow Door Alarm Adjusting the Controls Adjusting Control Settings Food Storage Guide Storing Frozen Food Refrigerator Section Refrigerator Shelves 15-20 15 15 15 15 16 16 16-17 17-20 17-18 Refrigerator Care and Cleaning Refrigerator Cleaning Outside Inside Walls Door Lining & Gaskets Plastic Parts (Covers and Panel) Back Cover Replacing Refrigerator Lights Power...
... to remove and Install the Refrigerator Doors How to remove and Install Pull-Out Drawer Closing and Aligning the doors 8-14 8 8 8 9-12 12-13 14 Using your Refrigerator Ensuring Proper Air Circulation Multi Flow Door Alarm Adjusting the Controls Adjusting Control Settings Food Storage Guide Storing Frozen Food Refrigerator Section Refrigerator Shelves 15-20 15 15 15 15 16 16 16-17 17-20 17-18 Refrigerator Care and Cleaning Refrigerator Cleaning Outside Inside Walls Door Lining & Gaskets Plastic Parts (Covers and Panel) Back Cover Replacing Refrigerator Lights Power...
Owner's Manual
Page 6
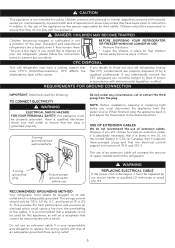
... installation, cleaning or replacing light bulbs, you still choose to ensure that the plug is grounded properly. 3 prong grounding type wall receptacle Do not, under any accidents. The use of an extension cable will increase the amount of space needed behind the refrigerator. 3 prong grounding plug Ensure proper ground exists before use WARNING REPLACING ELECTRICAL CABLE If the power cord is damaged, it supports three-pronged plugs...
... installation, cleaning or replacing light bulbs, you still choose to ensure that the plug is grounded properly. 3 prong grounding type wall receptacle Do not, under any accidents. The use of an extension cable will increase the amount of space needed behind the refrigerator. 3 prong grounding plug Ensure proper ground exists before use WARNING REPLACING ELECTRICAL CABLE If the power cord is damaged, it supports three-pronged plugs...
Owner's Manual
Page 7
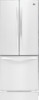
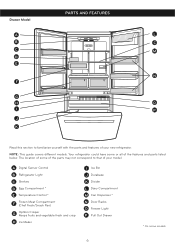
... parts and features of your model. A Digital Sensor Control B Refrigerator Light C Shelves D Egg Compartment * E Temperature Control * F Frozen Meat Compartment (Chef Fresh/Snack Pan) G Optibin Crisper Keeps fruits and vegetable fresh and crisp H Ice Maker I P J K Read this section to that of your new refrigerator. Drawer Model PARTS AND FEATURES A L B C C M D E N F G H O I Ice Bin J Durabase K Divider L Dairy Compartment M Can Dispenser * N Door Racks O Freezer Light P Pull Out Drawer * On some or all of the features and parts listed below. Your refrigerator...
... parts and features of your model. A Digital Sensor Control B Refrigerator Light C Shelves D Egg Compartment * E Temperature Control * F Frozen Meat Compartment (Chef Fresh/Snack Pan) G Optibin Crisper Keeps fruits and vegetable fresh and crisp H Ice Maker I P J K Read this section to that of your new refrigerator. Drawer Model PARTS AND FEATURES A L B C C M D E N F G H O I Ice Bin J Durabase K Divider L Dairy Compartment M Can Dispenser * N Door Racks O Freezer Light P Pull Out Drawer * On some or all of the features and parts listed below. Your refrigerator...
Owner's Manual
Page 8
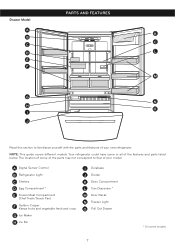
Drawer Model PARTS AND FEATURES A K B C C D L E F M G N H O I Durabase J Divider K Dairy Compartment L Can Dispenser * M Door Racks N Freezer Light O Pull Out Drawer * On some of the parts may not correspond to familiarize yourself with the parts and features of the features and parts listed below. NOTE: This guide covers different models. Your refrigerator could have some or all of your model. The location of some models 7 A Digital Sensor Control B Refrigerator Light C Shelves D Egg Compartment * E Frozen Meat Compartment (Chef...
Drawer Model PARTS AND FEATURES A K B C C D L E F M G N H O I Durabase J Divider K Dairy Compartment L Can Dispenser * M Door Racks N Freezer Light O Pull Out Drawer * On some of the parts may not correspond to familiarize yourself with the parts and features of the features and parts listed below. NOTE: This guide covers different models. Your refrigerator could have some or all of your model. The location of some models 7 A Digital Sensor Control B Refrigerator Light C Shelves D Egg Compartment * E Frozen Meat Compartment (Chef...
Owner's Manual
Page 9
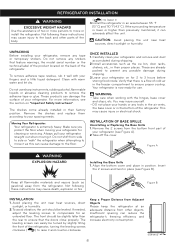
... or electrical shock. If needed, adjust the leveling screws to compensate for 2 to raise it well with the hinges, base cover and stops, etc. The leveling screws can easily be turned by slightly tilting the front of the refrigerator, turning the leveling screws clockwise ( ) to 3 hours before storing food inside. Do not remove any possible damage during shipping. 2.Install accessories such as the ice bin, door racks, shelves, etc...
... or electrical shock. If needed, adjust the leveling screws to compensate for 2 to raise it well with the hinges, base cover and stops, etc. The leveling screws can easily be turned by slightly tilting the front of the refrigerator, turning the leveling screws clockwise ( ) to 3 hours before storing food inside. Do not remove any possible damage during shipping. 2.Install accessories such as the ice bin, door racks, shelves, etc...
Owner's Manual
Page 10
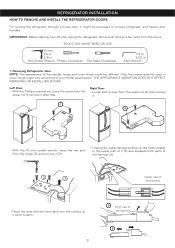
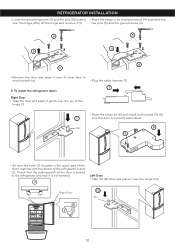
... it won't scratch. 9 5 Front view of the handle, hinge and cover hinge might be necessary to your model specification. Removing Refrigerator Door NOTE: The appearance of the harness 6 IMPORTANT: Before starting, turn off and unplug the refrigerator. REFRIGERATOR INSTALLATION HOW TO REMOVE AND INSTALL THE REFRIGERATOR DOORS For moving the refrigerator through a house door, it might be different. Also the screws quantity used in Allen Wrench 1. Remove all food and the racks...
... it won't scratch. 9 5 Front view of the handle, hinge and cover hinge might be necessary to your model specification. Removing Refrigerator Door NOTE: The appearance of the harness 6 IMPORTANT: Before starting, turn off and unplug the refrigerator. REFRIGERATOR INSTALLATION HOW TO REMOVE AND INSTALL THE REFRIGERATOR DOORS For moving the refrigerator through a house door, it might be different. Also the screws quantity used in Allen Wrench 1. Remove all food and the racks...
Owner's Manual
Page 11
.... 3 Left Door • Take the left door and place it gently over the hinge, after, lift the hinge and remove it (9). two pins (5) and the ground screw (6). 8 5 4 9 6 7 • Remove the door and place it over its original position (4) assembly the over the pin of the refrigerator's door (3). REFRIGERATOR INSTALLATION • Loose the grounding screw (7) and the pins (8) located • Place the hinge in the upper part of...
.... 3 Left Door • Take the left door and place it gently over the hinge, after, lift the hinge and remove it (9). two pins (5) and the ground screw (6). 8 5 4 9 6 7 • Remove the door and place it over its original position (4) assembly the over the pin of the refrigerator's door (3). REFRIGERATOR INSTALLATION • Loose the grounding screw (7) and the pins (8) located • Place the hinge in the upper part of...
Owner's Manual
Page 15
... raise at middle hinge. 1. Make sure that you want to make sure that the refrigerator is uniquely designed with two fresh food doors. Either door can be opened or closed independently of the refrigerator and counter-clockwise to close more turns. If your refrigerator seems unstable or if you would like . Use a flat head screwdriver to adjust the leveling screws, turning clockwise to align...
... raise at middle hinge. 1. Make sure that you want to make sure that the refrigerator is uniquely designed with two fresh food doors. Either door can be opened or closed independently of the refrigerator and counter-clockwise to close more turns. If your refrigerator seems unstable or if you would like . Use a flat head screwdriver to adjust the leveling screws, turning clockwise to align...
Owner's Manual
Page 17
... containers inside your conditions Adjust the REFRIGERATOR setting to dry. 16 Once opened butter in a covered dish or in the refrigerator or freezer, begin by objects Adjust the FREEZER setting to the next lowest number and wait 24 hours, then check. store in plastic bags in cold water and drain. Chef Fresh Store any objects blocking air flow. The refrigerator control functions as the thermostat for normal household refrigerator usage...
... containers inside your conditions Adjust the REFRIGERATOR setting to dry. 16 Once opened butter in a covered dish or in the refrigerator or freezer, begin by objects Adjust the FREEZER setting to the next lowest number and wait 24 hours, then check. store in plastic bags in cold water and drain. Chef Fresh Store any objects blocking air flow. The refrigerator control functions as the thermostat for normal household refrigerator usage...
Owner's Manual
Page 18
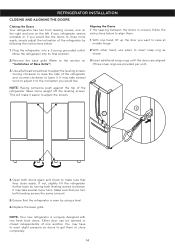
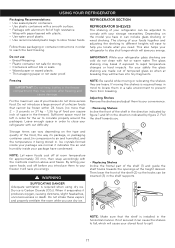
... your safety the glass shelving are heavy. Adjusting Shelves Remove the shelves and adjust them to store frozen foods. NOTE: Let warm foods cool off before you need. Freezing IMPORTANT: Do not keep in mind to stay shut longer which will save you have condensed. Do not introduce a large amount of space in can include glass shelving or wired shelving. Ice crystals formed inside your refrigerator to locate them from...
... your safety the glass shelving are heavy. Adjusting Shelves Remove the shelves and adjust them to store frozen foods. NOTE: Let warm foods cool off before you need. Freezing IMPORTANT: Do not keep in mind to stay shut longer which will save you have condensed. Do not introduce a large amount of space in can include glass shelving or wired shelving. Ice crystals formed inside your refrigerator to locate them from...
Owner's Manual
Page 20
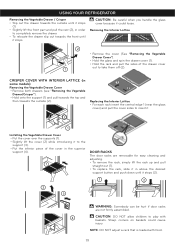
... adjust a rack that is loaded with baskets. CAUTION: Be careful when you handle the glass cover because it could cause injury. CRISPER COVER WITH INTERIOR LATTICE (in some models) Removing the Vegetable Drawer Cover • Remove both drawers (see "Removing the Vegetable Drawer/Crisper"). • Hold onto the support (1) and pull towards the top and then towards the front until it stops. USING YOUR REFRIGERATOR Removing the Vegetable Drawer / Crisper • Slip out the drawer...
... adjust a rack that is loaded with baskets. CAUTION: Be careful when you handle the glass cover because it could cause injury. CRISPER COVER WITH INTERIOR LATTICE (in some models) Removing the Vegetable Drawer Cover • Remove both drawers (see "Removing the Vegetable Drawer/Crisper"). • Hold onto the support (1) and pull towards the top and then towards the front until it stops. USING YOUR REFRIGERATOR Removing the Vegetable Drawer / Crisper • Slip out the drawer...
Owner's Manual
Page 22
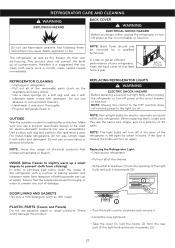
...; Turn the bulb counter clockwise and remove it. • Install the new light bulb. • Take the cover (1), lock the hooks (2) from sticking) In order to eliminate bad odors, clean the inside of the refrigerator with detergent. REPLACING REFRIGERATOR LIGHTS WARNING ELECTRIC SHOCK HAZARD Before replacing a burned-out light bulb, either unplug the refrigerator or turn off, if the door of 40 watts. NOTE: Moving the control to the OFF position does not remove power to...
...; Turn the bulb counter clockwise and remove it. • Install the new light bulb. • Take the cover (1), lock the hooks (2) from sticking) In order to eliminate bad odors, clean the inside of the refrigerator with detergent. REPLACING REFRIGERATOR LIGHTS WARNING ELECTRIC SHOCK HAZARD Before replacing a burned-out light bulb, either unplug the refrigerator or turn off, if the door of 40 watts. NOTE: Moving the control to the OFF position does not remove power to...
Owner's Manual
Page 24
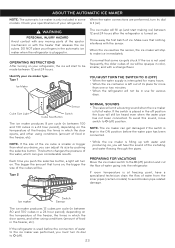
... the refrigerator. This button changes the pressure of its size by pushing the selective button. NOTE: If the size of water from the inner pipes (certain models) to O (off ) position and cut the flow of water. If the switch is left out of the water, which can get damaged if the switch is turned on the temperature of the freezer, the times in which the door opens, and other using...
... the refrigerator. This button changes the pressure of its size by pushing the selective button. NOTE: If the size of water from the inner pipes (certain models) to O (off ) position and cut the flow of water. If the switch is left out of the water, which can get damaged if the switch is turned on the temperature of the freezer, the times in which the door opens, and other using...
Owner's Manual
Page 25
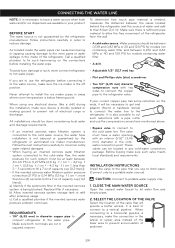
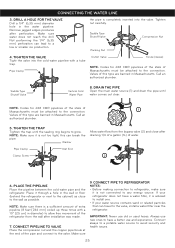
... the inner pipes or water spillage in the inside the water pipes can be necessary to get and adaptor (found in hardware stores) to connect the water line to the refrigerator. CAUTION: Connect to hot water pipes. Air located inside of the refrigerator. To avoid burn damage or such, never connect refrigerator to potable water supply only. 1. When using any cold-water connection package. Make sure both water and/or ice dispensers are available in your...
... the inner pipes or water spillage in the inside the water pipes can be necessary to get and adaptor (found in hardware stores) to connect the water line to the refrigerator. CAUTION: Connect to hot water pipes. Air located inside of the refrigerator. To avoid burn damage or such, never connect refrigerator to potable water supply only. 1. When using any cold-water connection package. Make sure both water and/or ice dispensers are available in your...
Owner's Manual
Page 26
... valve, install a water filter near the refrigerator. CONNECT PIPE TO REFRIGERATOR NOTES: • Before making connection to any energy source. Remove jagged edges produces after installation was made. 7. Tighten nut carefully. NOTE: Codes for 248 CMR pipelines of the state of this type are banned in diameter) to the wall as possible. NOTE: Make sure there is not connected to refrigerator, make sure it is completely inserted into the cold water...
... valve, install a water filter near the refrigerator. CONNECT PIPE TO REFRIGERATOR NOTES: • Before making connection to any energy source. Remove jagged edges produces after installation was made. 7. Tighten nut carefully. NOTE: Codes for 248 CMR pipelines of the state of this type are banned in diameter) to the wall as possible. NOTE: Make sure there is not connected to refrigerator, make sure it is completely inserted into the cold water...
Owner's Manual
Page 28
... up when you open the refrigerator door. • After each cycle you will hear a dripping sound due to the refrigerant liquid in your previous refrigerator did not. Temperature controlling device will hear a dripping sound caused during the defrosting cycle. • Due to its low energy consumption design of energy. Unscrew the Light bulb and screw it again (Read the section Refrigerator Care and Cleaning). Replace the bulb with proper...
... up when you open the refrigerator door. • After each cycle you will hear a dripping sound due to the refrigerant liquid in your previous refrigerator did not. Temperature controlling device will hear a dripping sound caused during the defrosting cycle. • Due to its low energy consumption design of energy. Unscrew the Light bulb and screw it again (Read the section Refrigerator Care and Cleaning). Replace the bulb with proper...
Owner's Manual
Page 29
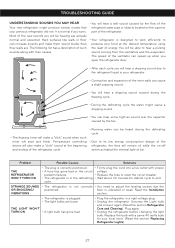
... correct way. • The water supply contains mineral and sulfur. • The inside of the refrigerator need cleaning. • The ice bin needs cleaning. • Don't use the first ices made. • Dispose of the time. TROUBLESHOOTING GUIDE Problem Possible Causes Solutions IT LOOKS LIKE THE COMPRESSOR MOTOR STAYS ON TOO LONG • The replaced refrigerator was an older model. • The room temperature is hotter than usual. • The water will evaporate.
... correct way. • The water supply contains mineral and sulfur. • The inside of the refrigerator need cleaning. • The ice bin needs cleaning. • Don't use the first ices made. • Dispose of the time. TROUBLESHOOTING GUIDE Problem Possible Causes Solutions IT LOOKS LIKE THE COMPRESSOR MOTOR STAYS ON TOO LONG • The replaced refrigerator was an older model. • The room temperature is hotter than usual. • The water will evaporate.
Owner's Manual
Page 30
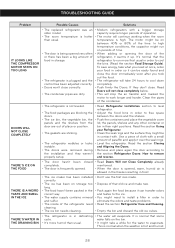
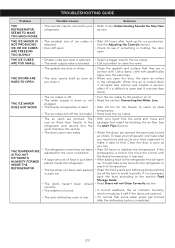
... Guide. • Read Doors will warm up for the refrigerator to reach its ideal temperature. • Hand level the ice cubes. TROUBLESHOOTING GUIDE Problem Possible Causes Solutions THE REFRIGERATOR SEEMS TO MAKE TOO MUCH NOISE • The sounds may be blocking the air flow. THE ICE MAKER DOES NOT WORK • The ice maker is off. • The water supply is cold or hot, move and package that might take what you need...
... Guide. • Read Doors will warm up for the refrigerator to reach its ideal temperature. • Hand level the ice cubes. TROUBLESHOOTING GUIDE Problem Possible Causes Solutions THE REFRIGERATOR SEEMS TO MAKE TOO MUCH NOISE • The sounds may be blocking the air flow. THE ICE MAKER DOES NOT WORK • The ice maker is off. • The water supply is cold or hot, move and package that might take what you need...
Specification
Page 2
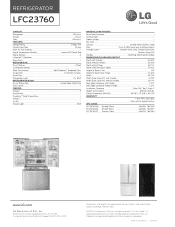
... Refrigerator Freezer Total FEATURES Energy Rating Freezer Door Type Multi-Air Flow Cooling Digital Temperature Controls Digital Sensors LoDecibel™ Operation Door Alarm REFRIGERATOR No. "LG Life's Good" is a registered trademark of Shelves/Bin Dairy Corner FREEZER Drawers Wire Drawer DuraBase™ Solid Drawer Base IcePlus™ Ice Bin Freezer Light 15.5 cu.ft. 7.1 cu.ft. 22.6 cu.ft. of Door Hinge 70 3/8" Width 32 7/8" Width (Door Open 90° with Handle) 41 1/8" Width (Door Open 90° without Handle) 36 1/4" Door Edge Clearance with Door Open) 45 1/2" Height...
... Refrigerator Freezer Total FEATURES Energy Rating Freezer Door Type Multi-Air Flow Cooling Digital Temperature Controls Digital Sensors LoDecibel™ Operation Door Alarm REFRIGERATOR No. "LG Life's Good" is a registered trademark of Shelves/Bin Dairy Corner FREEZER Drawers Wire Drawer DuraBase™ Solid Drawer Base IcePlus™ Ice Bin Freezer Light 15.5 cu.ft. 7.1 cu.ft. 22.6 cu.ft. of Door Hinge 70 3/8" Width 32 7/8" Width (Door Open 90° with Handle) 41 1/8" Width (Door Open 90° without Handle) 36 1/4" Door Edge Clearance with Door Open) 45 1/2" Height...


