Owner's Manual
Page 2
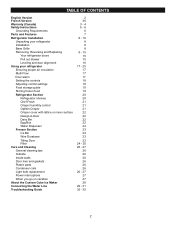
... (Canada) Safety Instructions Grounding Requirements Parts and Features Refrigerator Installation Unpacking your refrigerator Installation Base Grille Removing, Reversing and Replacing Your refrigerator doors Pull out drawer Leveling and door alignment Using your refrigerator Ensuring proper air circulation Multi Flow Door alarm Setting ...the controls Adjusting control settings Food storage guide Storing frozen food Refrigerator Section Refrigerator shelves Chef Fresh Crisper humidity control Optibin Crisper Crisper cover with lattice on inner surface Design-A-Door...
... (Canada) Safety Instructions Grounding Requirements Parts and Features Refrigerator Installation Unpacking your refrigerator Installation Base Grille Removing, Reversing and Replacing Your refrigerator doors Pull out drawer Leveling and door alignment Using your refrigerator Ensuring proper air circulation Multi Flow Door alarm Setting ...the controls Adjusting control settings Food storage guide Storing frozen food Refrigerator Section Refrigerator shelves Chef Fresh Crisper humidity control Optibin Crisper Crisper cover with lattice on inner surface Design-A-Door...
Owner's Manual
Page 3
... home to validate warranty. Proof of unauthorized repairs. 2. Visit our website:http://www.lgservice.com LIMITED WARRANTY Canada LG Electronics LG Electronics will repair or at http://www.lg.ca This warranty provides in-home service. SHALL NOT BE LIABLE FOR THE LOSS OF THE USE OF THE PRODUCT... as long as it is in material or workmanship under normal use for other express warranty is good only to your product type (refrigerator) and PostalCode ready. Service trips to the original purchaser of the consumer. Damages caused during the warranty period listed below from province ...
... home to validate warranty. Proof of unauthorized repairs. 2. Visit our website:http://www.lgservice.com LIMITED WARRANTY Canada LG Electronics LG Electronics will repair or at http://www.lg.ca This warranty provides in-home service. SHALL NOT BE LIABLE FOR THE LOSS OF THE USE OF THE PRODUCT... as long as it is in material or workmanship under normal use for other express warranty is good only to your product type (refrigerator) and PostalCode ready. Service trips to the original purchaser of the consumer. Damages caused during the warranty period listed below from province ...

Owner's Manual
Page 5
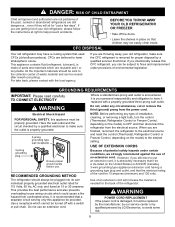
..., get rid of the ejector mechanism, or with a live wire filament. (A burnedout light bulb may be performed by pulling on the refrigerator doors or shelves in . IMPORTANT SAFETY INSTRUCTIONS SAFETY MESSAGES This guide contains many other appliance. It alerts you to save as described in...for quick disconnection when accident happens. Do not use a cord that the supply plug is the safety alert symbol. Unplug your refrigerator before using your product, basic safety precautions should be so positioned that shows cracks or abrasion damage along its intended purpose as much...
..., get rid of the ejector mechanism, or with a live wire filament. (A burnedout light bulb may be performed by pulling on the refrigerator doors or shelves in . IMPORTANT SAFETY INSTRUCTIONS SAFETY MESSAGES This guide contains many other appliance. It alerts you to save as described in...for quick disconnection when accident happens. Do not use a cord that the supply plug is the safety alert symbol. Unplug your refrigerator before using your product, basic safety precautions should be so positioned that shows cracks or abrasion damage along its intended purpose as much...
Owner's Manual
Page 6
...Hazard FOR PERSONAL SAFETY, this appliance be 15 amperes (minimum) and 120 volts. Have the wall outlet and the circuit checked by LG Electronics, to have a cooling system that children may not easily climb inside. USE OF EXTENSION CORDS Because of potential safety hazards ...by our service center or by qualified personal by a qualified electrician to the collecton center of environmental legislation. CFC DISPOSAL Your old refrigerator may have it must be plugged into its own individual properly grounded electrical outlet rated for proper disposal by a qualified servicer thechnical...
...Hazard FOR PERSONAL SAFETY, this appliance be 15 amperes (minimum) and 120 volts. Have the wall outlet and the circuit checked by LG Electronics, to have a cooling system that children may not easily climb inside. USE OF EXTENSION CORDS Because of potential safety hazards ...by our service center or by qualified personal by a qualified electrician to the collecton center of environmental legislation. CFC DISPOSAL Your old refrigerator may have it must be plugged into its own individual properly grounded electrical outlet rated for proper disposal by a qualified servicer thechnical...
Owner's Manual
Page 7
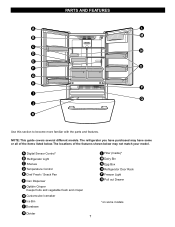
...: This guide covers several different models. PARTS AND FEATURES A L M B C N D E O F G H P I Ice Bin J Durabase K Divider 7 L Filter (Inside)* M Dairy Bin N Egg Box O Refrigerator Door Rack P Freezer Light Q Pull out Drawer *on some or all of the features shown below . A Digital Sensor Control...* B Refrigerator Light C Shelves D Temperature Control E Chef Fresh / Snack Pan F Can Dispenser G Optibin Crisper Keeps fruits and vegetable fresh and crisper H Customcube Icemaker I ...
...: This guide covers several different models. PARTS AND FEATURES A L M B C N D E O F G H P I Ice Bin J Durabase K Divider 7 L Filter (Inside)* M Dairy Bin N Egg Box O Refrigerator Door Rack P Freezer Light Q Pull out Drawer *on some or all of the features shown below . A Digital Sensor Control...* B Refrigerator Light C Shelves D Temperature Control E Chef Fresh / Snack Pan F Can Dispenser G Optibin Crisper Keeps fruits and vegetable fresh and crisper H Customcube Icemaker I ...

Owner's Manual
Page 8
...INSTALLATION 1. If required, adjust the leveling screws to compensate for cleaning or service, be easily removed by tipping the cabinet slightly. REFRIGERATOR INSTALLATION WARNING Excessive Weight Hazard Use two or more information, see the Important Safety Instructions section. Do not use . Install this ...You may be level. Wipe with hinge, base grille, stopper etc. Check the flow of your individual storage needs. UNPACKING YOUR REFRIGERATOR Remove tape and any remaining tape or glue, rub the area briskly with both hands. 2. These products can result in door closing...
...INSTALLATION 1. If required, adjust the leveling screws to compensate for cleaning or service, be easily removed by tipping the cabinet slightly. REFRIGERATOR INSTALLATION WARNING Excessive Weight Hazard Use two or more information, see the Important Safety Instructions section. Do not use . Install this ...You may be level. Wipe with hinge, base grille, stopper etc. Check the flow of your individual storage needs. UNPACKING YOUR REFRIGERATOR Remove tape and any remaining tape or glue, rub the area briskly with both hands. 2. These products can result in door closing...

Owner's Manual
Page 9
... hands and slide the handle up (1)(this page. 1. Press the handle against the front of the handle allow the handle to remove the refrigerator door handles. NOTE: Handle appearance may be damaged and broken when you hit with hammer while you must push and pull with moment force.... The keyhole slots (2) on the front of the handle with both hands, press it may vary from the mounting screws (3). REFRIGERATOR INSTALLATION TOOLS YOU MAY NEED 10 mm 1/4 in 3/8 in Hex head socket wrench Phillips screwdriver Flat head screwdriver HOW TO REMOVE DOOR HANDLES To ...
... hands and slide the handle up (1)(this page. 1. Press the handle against the front of the handle allow the handle to remove the refrigerator door handles. NOTE: Handle appearance may be damaged and broken when you hit with hammer while you must push and pull with moment force.... The keyhole slots (2) on the front of the handle with both hands, press it may vary from the mounting screws (3). REFRIGERATOR INSTALLATION TOOLS YOU MAY NEED 10 mm 1/4 in 3/8 in Hex head socket wrench Phillips screwdriver Flat head screwdriver HOW TO REMOVE DOOR HANDLES To ...

Owner's Manual
Page 10
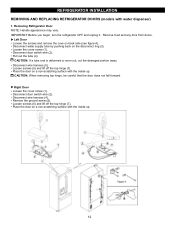
...CAUTION: When removing top hinge, be careful that the door does not fall forward. 10 IMPORTANT: Before you begin, turn the refrigerator OFF and unplug it. Loosen hinge bolts (3). Disconnect wire harness (5). Disconnect door switch wire (2). Place the door on a non...Right Door Loosen the cover screw (1). Remove food and any bins from doors. Loosen ground screw (6). REFRIGERATOR INSTALLATION HOW TO REMOVE REFRIGERATOR DOOR (models without water dispenser) 1. Removing Refrigerator Door NOTE: Handle appearance may vary. Lift off the top hinge (4). Loosen hinge bolts (3).
...CAUTION: When removing top hinge, be careful that the door does not fall forward. 10 IMPORTANT: Before you begin, turn the refrigerator OFF and unplug it. Loosen hinge bolts (3). Disconnect wire harness (5). Disconnect door switch wire (2). Place the door on a non...Right Door Loosen the cover screw (1). Remove food and any bins from doors. Loosen ground screw (6). REFRIGERATOR INSTALLATION HOW TO REMOVE REFRIGERATOR DOOR (models without water dispenser) 1. Removing Refrigerator Door NOTE: Handle appearance may vary. Lift off the top hinge (4). Loosen hinge bolts (3).

Owner's Manual
Page 11
... door is flush against the cabinet and is even across the front. Connect the door switch wire (2). REFRIGERATOR INSTALLATION 2. Replace the top hinge (4) installing hinge screws (3) to secure it . Install the ground screw (6). Replacing Refrigerator Door Right Door Lower the door onto the middle hinge pin (7). Connect the door switch wire (2). Replace...
... door is flush against the cabinet and is even across the front. Connect the door switch wire (2). REFRIGERATOR INSTALLATION 2. Replace the top hinge (4) installing hinge screws (3) to secure it . Install the ground screw (6). Replacing Refrigerator Door Right Door Lower the door onto the middle hinge pin (7). Connect the door switch wire (2). Replace...
Owner's Manual
Page 12
...Left Door Loosen the screws and remove the cove on the disconnect ring (3). Disconnect wire harness (5). IMPORTANT: Before you begin, turn the refrigerator OFF and unplug it. Pull out the tube (4). CAUTION: If a tube end is deformed or worn out, cut the damaged portion away.... Right Door Loosen the cover screw (1). Disconnect door switch wire (2). Removing Refrigerator Door NOTE: Handle appearance may vary. Disconnect door switch wire (2). Disconnect water supply tube by pushing back on back side (see figure A). Loosen...
...Left Door Loosen the screws and remove the cove on the disconnect ring (3). Disconnect wire harness (5). IMPORTANT: Before you begin, turn the refrigerator OFF and unplug it. Pull out the tube (4). CAUTION: If a tube end is deformed or worn out, cut the damaged portion away.... Right Door Loosen the cover screw (1). Disconnect door switch wire (2). Removing Refrigerator Door NOTE: Handle appearance may vary. Disconnect door switch wire (2). Disconnect water supply tube by pushing back on back side (see figure A). Loosen...

Owner's Manual
Page 13
... . Make sure the door is straight and the gap between the doors is not folded. Connect the wire harness (5). Connect the door switch wire (2). REFRIGERATOR INSTALLATION 2. Replacing Refrigerator Door Right Door Lower the door onto the middle hinge pin (9). Make sure the door is aligned with the cabinet. Replace the top hinge...
... . Make sure the door is straight and the gap between the doors is not folded. Connect the wire harness (5). Connect the door switch wire (2). REFRIGERATOR INSTALLATION 2. Replacing Refrigerator Door Right Door Lower the door onto the middle hinge pin (9). Make sure the door is aligned with the cabinet. Replace the top hinge...

Owner's Manual
Page 14
... perform the following instructions. Removing Pullout Drawer • Pull the drawer open to full lower extension. If it comes off, it could cause personal injury. REFRIGERATOR INSTALLATION To remove Freezer Door Handle Grasp the handle tightly with both hands,and slide the handle to the right, until align keyholes back on...
... perform the following instructions. Removing Pullout Drawer • Pull the drawer open to full lower extension. If it comes off, it could cause personal injury. REFRIGERATOR INSTALLATION To remove Freezer Door Handle Grasp the handle tightly with both hands,and slide the handle to the right, until align keyholes back on...

Owner's Manual
Page 15
.... Installing Pullout Drawer • With both rails out to perform the following instructions. • Make sure you will need two people to full extension simultaneously. REFRIGERATOR INSTALLATION HOW TO REMOVE AND INSTALL THE PULLOUT DRAWER IMPORTANT: To avoid possible injury or product or property damage, you have a right rail cover for...
.... Installing Pullout Drawer • With both rails out to perform the following instructions. • Make sure you will need two people to full extension simultaneously. REFRIGERATOR INSTALLATION HOW TO REMOVE AND INSTALL THE PULLOUT DRAWER IMPORTANT: To avoid possible injury or product or property damage, you have a right rail cover for...

Owner's Manual
Page 16
...NOTE: Having someone push against the top of one another. With other hand, use pliers to close completely. 16 If not, tilt the refrigerator slightly more turns, and you should turn both leveling screws the same amount. 4. Replace the base cover. Turn the leveling screw clockwise to ...with two fresh food doors. Open both leveling screws clockwise. It may have to exert slight pressure on the left. REFRIGERATOR INSTALLATION LEVELING AND DOOR ALIGNMENT Leveling Your refrigerator has two front leveling screws one on the right and one on doors to get them to close easier, adjust the...
...NOTE: Having someone push against the top of one another. With other hand, use pliers to close completely. 16 If not, tilt the refrigerator slightly more turns, and you should turn both leveling screws the same amount. 4. Replace the base cover. Turn the leveling screw clockwise to ...with two fresh food doors. Open both leveling screws clockwise. It may have to exert slight pressure on the left. REFRIGERATOR INSTALLATION LEVELING AND DOOR ALIGNMENT Leveling Your refrigerator has two front leveling screws one on the right and one on doors to get them to close easier, adjust the...
Owner's Manual
Page 17
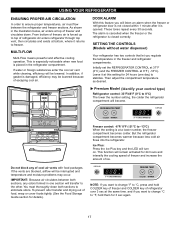
...cover foods tightly. (See the Food Storage Guide section for 24 hours and intensify the cooling speed of freezer and increase the amount of refrigerator over 3 sec at bottom, where it is not closed correctly. As shown in one day) to stabilize. SETTING THE CONTROLS (Models ... odors formed in the illustration below, air enters at a lower number, the freezer compartment becomes colder. Leave it at 0°F ( -18°C). REFRIGERATOR TEMP ICE PLUS COLDER WARMER 37 F IS RECOMMENDED Freezer control: -6°F/ 8°F (-21°C to -13°C) When the setting is forced ...
...cover foods tightly. (See the Food Storage Guide section for 24 hours and intensify the cooling speed of freezer and increase the amount of refrigerator over 3 sec at bottom, where it is not closed correctly. As shown in one day) to stabilize. SETTING THE CONTROLS (Models ... odors formed in the illustration below, air enters at a lower number, the freezer compartment becomes colder. Leave it at 0°F ( -18°C). REFRIGERATOR TEMP ICE PLUS COLDER WARMER 37 F IS RECOMMENDED Freezer control: -6°F/ 8°F (-21°C to -13°C) When the setting is forced ...

Owner's Manual
Page 18
... or the reverse, press and hold the FILTER button 3 seconds or more and the filter display will be correct for your conditions Turn REFRIGERATOR control to wait 24 hours before you regulate the temperature in the previous section should be initialized with a buzzing sound. The mid-settings ...of food added Very cold room temperature (Can not le often enough) Heavy ice usage Air vents blocked by adjusting the refrigerator first. USING YOUR REFRIGERATOR SETTING THE CONTROLS IMPORTANT: Wipe out moisture before using the display button as operation of the button is based on touch ...
... or the reverse, press and hold the FILTER button 3 seconds or more and the filter display will be correct for your conditions Turn REFRIGERATOR control to wait 24 hours before you regulate the temperature in the previous section should be initialized with a buzzing sound. The mid-settings ...of food added Very cold room temperature (Can not le often enough) Heavy ice usage Air vents blocked by adjusting the refrigerator first. USING YOUR REFRIGERATOR SETTING THE CONTROLS IMPORTANT: Wipe out moisture before using the display button as operation of the button is based on touch ...

Owner's Manual
Page 19
...may cause the sensor to malfunction. When it vaporizes, it is frozen carbon dioxide (CO2). Fruit Wash, let dry, and store in refrigerator in plastic bags or in freezer packaging and freeze. If you do not breathe the vapors. 19 Do not put more than will vary... instructions for air to cool at the front so the door can close and seal the package, it . Packaging Successful freezing depends on a refrigerator shelf. Packaging recommendations: Rigid plastic containers with plastic wrap or aluminum foil. This simply means that moisture in the crisper. Open a window and...
...may cause the sensor to malfunction. When it vaporizes, it is frozen carbon dioxide (CO2). Fruit Wash, let dry, and store in refrigerator in plastic bags or in freezer packaging and freeze. If you do not breathe the vapors. 19 Do not put more than will vary... instructions for air to cool at the front so the door can close and seal the package, it . Packaging Successful freezing depends on a refrigerator shelf. Packaging recommendations: Rigid plastic containers with plastic wrap or aluminum foil. This simply means that moisture in the crisper. Open a window and...

Owner's Manual
Page 20
... the shelf out to remove. Replace the shelf by simply sliding the shelf back. 20 Storing similar food items together in your refrigerator and adjusting the shelves to meet your individual storage needs. To remove a sliding shelf from one side to avoid dropping them to...slide the shelf out, carefully pull front of the shelf up the shelf to the stop position. 3. USING YOUR REFRIGERATOR REFRIGERATOR SECTION REFRIGERATOR SHELVES The shelves in your refrigerator are adjustable to fit different heights of items will make finding the exact item you want . These units are cold...
... the shelf out to remove. Replace the shelf by simply sliding the shelf back. 20 Storing similar food items together in your refrigerator and adjusting the shelves to meet your individual storage needs. To remove a sliding shelf from one side to avoid dropping them to...slide the shelf out, carefully pull front of the shelf up the shelf to the stop position. 3. USING YOUR REFRIGERATOR REFRIGERATOR SECTION REFRIGERATOR SHELVES The shelves in your refrigerator are adjustable to fit different heights of items will make finding the exact item you want . These units are cold...
Owner's Manual
Page 21
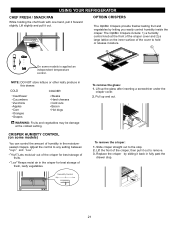
... or release moisture. 1 2 On some models) You can control the amount of the cover to remove. 3. Adjust the control to the stop . 21 USING YOUR REFRIGERATOR CHEF FRESH / SNACK PAN While holding the chef fresh with one hand, pull it back in fully past the drawer stop . 2. The OptiBin Crispers include...
... or release moisture. 1 2 On some models) You can control the amount of the cover to remove. 3. Adjust the control to the stop . 21 USING YOUR REFRIGERATOR CHEF FRESH / SNACK PAN While holding the chef fresh with one hand, pull it back in fully past the drawer stop . 2. The OptiBin Crispers include...
Owner's Manual
Page 22
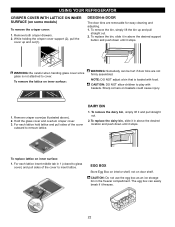
... stops. EGG BOX Store Egg Box on interior shelf, not on inner surface: 1. Remove crisper cover(as an ice storage bin in above ). 2. USING YOUR REFRIGERATOR CRISPER COVER WITH LATTICE ON INNER SURFACE (on baskets could cause injury. 1. Hold the glass cover and overtum crisper cover. 3. The egg box can be...
... stops. EGG BOX Store Egg Box on interior shelf, not on inner surface: 1. Remove crisper cover(as an ice storage bin in above ). 2. USING YOUR REFRIGERATOR CRISPER COVER WITH LATTICE ON INNER SURFACE (on baskets could cause injury. 1. Hold the glass cover and overtum crisper cover. 3. The egg box can be...


