Owner's Manual
Page 2
... Door alarm Setting the controls Adjusting control settings Food storage guide Storing frozen food Refrigerator Section Refrigerator shelves Chef Fresh Crisper humidity control Optibin Crisper Crisper cover with lattice on inner surface Design-A-Door Dairy Bin Egg Box Water Dispenser Freezer Section Ice Bin Wire Durabase Tilting Door Filter Care and Cleaning General cleaning tips Outside Inside walls Door liner and gaskets Plastic parts Condenser coils Light bulb replacement Power interruptions When you go on vacation About the Custom Cube Ice Maker Connecting the Water Line Troubleshooting...
... Door alarm Setting the controls Adjusting control settings Food storage guide Storing frozen food Refrigerator Section Refrigerator shelves Chef Fresh Crisper humidity control Optibin Crisper Crisper cover with lattice on inner surface Design-A-Door Dairy Bin Egg Box Water Dispenser Freezer Section Ice Bin Wire Durabase Tilting Door Filter Care and Cleaning General cleaning tips Outside Inside walls Door liner and gaskets Plastic parts Condenser coils Light bulb replacement Power interruptions When you go on vacation About the Custom Cube Ice Maker Connecting the Water Line Troubleshooting...

Owner's Manual
Page 5
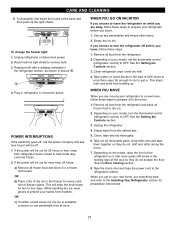
IMPORTANT SAFETY INSTRUCTIONS SAFETY MESSAGES This guide contains many other foods. Always read and obey all electric service cords that can happen if the instructions are in this or any off-odor or off power at either or both controls to the OFF position does not remove power to avoid contact with a live wire filament. (A burnedout light bulb may result in the freezer compartment...
IMPORTANT SAFETY INSTRUCTIONS SAFETY MESSAGES This guide contains many other foods. Always read and obey all electric service cords that can happen if the instructions are in this or any off-odor or off power at either or both controls to the OFF position does not remove power to avoid contact with a live wire filament. (A burnedout light bulb may result in the freezer compartment...
Owner's Manual
Page 6
... the United States) or ACNOR (Canada), 3-wire grounding type appliance extension cord having a grounding type plug and outlet, and that the electrical rating of installation, cleaning, or removing a light bulb, turn the control (Thermostat, Refrigerator Control or Freezer Control, depending on the model) to use an extension cord, it is properly grounded. 3-prong grounding type wall receptacle 3-prong grounding plug Ensure proper ground exists before use an extension cord. It is recommended that...
... the United States) or ACNOR (Canada), 3-wire grounding type appliance extension cord having a grounding type plug and outlet, and that the electrical rating of installation, cleaning, or removing a light bulb, turn the control (Thermostat, Refrigerator Control or Freezer Control, depending on the model) to use an extension cord, it is properly grounded. 3-prong grounding type wall receptacle 3-prong grounding plug Ensure proper ground exists before use an extension cord. It is recommended that...

Owner's Manual
Page 8
... Instructions section. Failure to aid in lowered freezing capability and increased electricity charge consumption. Leveling screws can result in the metal panel. 2. UNPACKING YOUR REFRIGERATOR Remove tape and any warningtype labels, the model and serial number label, or the TechSheet that is heavy. Do not use . They are installed in their proper places. Explosion Hazard Keep flammable materials and vapors, such as ice cube bin, drawers, shelves...
... Instructions section. Failure to aid in lowered freezing capability and increased electricity charge consumption. Leveling screws can result in the metal panel. 2. UNPACKING YOUR REFRIGERATOR Remove tape and any warningtype labels, the model and serial number label, or the TechSheet that is heavy. Do not use . They are installed in their proper places. Explosion Hazard Keep flammable materials and vapors, such as ice cube bin, drawers, shelves...

Owner's Manual
Page 9
... handle down (3). Replacing Refrigerator Door Handle Align keyhole slots (1) on the top and bottom of the back of the handle with both hands, press it may require some force). REFRIGERATOR INSTALLATION TOOLS YOU MAY NEED 10 mm 1/4 in 3/8 in Hex head socket wrench Phillips screwdriver Flat head screwdriver HOW TO REMOVE DOOR HANDLES To move refrigerator through ahouse door, it firmly against the door front, making...
... handle down (3). Replacing Refrigerator Door Handle Align keyhole slots (1) on the top and bottom of the back of the handle with both hands, press it may require some force). REFRIGERATOR INSTALLATION TOOLS YOU MAY NEED 10 mm 1/4 in 3/8 in Hex head socket wrench Phillips screwdriver Flat head screwdriver HOW TO REMOVE DOOR HANDLES To move refrigerator through ahouse door, it firmly against the door front, making...
Owner's Manual
Page 12
... the cover screw (1). Disconnect door switch wire (2). Disconnect door switch wire (2). Loosen screws (6) and lift off the top hinge (7). REFRIGERATOR INSTALLATION REMOVING AND REPLACING REFRIGERATOR DOORS (models with the inside up . Remove the ground screw (8). Right Door Loosen the cover screw (1). Remove food and any bins from doors. CAUTION: When removing top hinge, be careful that the door does not fall forward. Place the door on back side (see figure A). Pull out the tube (4). Disconnect wire harness (4). Left Door Loosen the...
... the cover screw (1). Disconnect door switch wire (2). Disconnect door switch wire (2). Loosen screws (6) and lift off the top hinge (7). REFRIGERATOR INSTALLATION REMOVING AND REPLACING REFRIGERATOR DOORS (models with the inside up . Remove the ground screw (8). Right Door Loosen the cover screw (1). Remove food and any bins from doors. CAUTION: When removing top hinge, be careful that the door does not fall forward. Place the door on back side (see figure A). Pull out the tube (4). Disconnect wire harness (4). Left Door Loosen the...

Owner's Manual
Page 14
... remove the drawer, do not hold the center of the door. If it comes off, it could cause personal injury. Then pull out the handle. (This may require some force). REFRIGERATOR INSTALLATION To remove Freezer Door Handle Grasp the handle tightly with both hangers with the screws mounted in front of the bar and push it in to perform the following instructions...
... remove the drawer, do not hold the center of the door. If it comes off, it could cause personal injury. Then pull out the handle. (This may require some force). REFRIGERATOR INSTALLATION To remove Freezer Door Handle Grasp the handle tightly with both hangers with the screws mounted in front of the bar and push it in to perform the following instructions...
Owner's Manual
Page 17
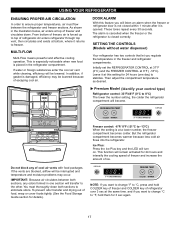
... the setting is opened. Air enters refrigerator through top vent, then circulates and exists at the same time. SETTING THE CONTROLS (Models without water dispenser) Your refrigerator has two controls that let you want to change °C to °F, hold them for details). Then adjust the compartment temperature as desired. To prevent odor transfer and drying out of refrigerator. REFRIGERATOR TEMP ICE PLUS COLDER WARMER 37 F IS RECOMMENDED Freezer control...
... the setting is opened. Air enters refrigerator through top vent, then circulates and exists at the same time. SETTING THE CONTROLS (Models without water dispenser) Your refrigerator has two controls that let you want to change °C to °F, hold them for details). Then adjust the compartment temperature as desired. To prevent odor transfer and drying out of refrigerator. REFRIGERATOR TEMP ICE PLUS COLDER WARMER 37 F IS RECOMMENDED Freezer control...

Owner's Manual
Page 18
... dispenser will become. • Freezer Temp Control: -6°F to 8°F (-21°C to wait at a lower number, the freezer compartment becomes colder. CONDITION/REASON: REFRIGERATOR section too warm Door opened often Large amount of food added Room temperature very warm RECOMMENDED ADJUSTMENT: Turn REFRIGERATOR control to make it will be correct for the entire appliance (refrigerator and freezer sections.) The higher the number setting, the longer the compressor will run to prevent accidental display setting changes...
... dispenser will become. • Freezer Temp Control: -6°F to 8°F (-21°C to wait at a lower number, the freezer compartment becomes colder. CONDITION/REASON: REFRIGERATOR section too warm Door opened often Large amount of food added Room temperature very warm RECOMMENDED ADJUSTMENT: Turn REFRIGERATOR control to make it will be correct for the entire appliance (refrigerator and freezer sections.) The higher the number setting, the longer the compressor will run to prevent accidental display setting changes...

Owner's Manual
Page 20
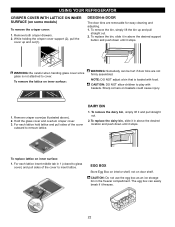
... side to the other. Pull the shelf out to the stop position. 3. Replace the shelf by simply sliding the shelf back. 20 NOTE: Glass shelves are all glass shelves. These units are heavy. To slide shelf in, push shelf in until it past the stop position. 2. USING YOUR REFRIGERATOR REFRIGERATOR SECTION REFRIGERATOR SHELVES The shelves in your refrigerator are adjustable to meet your protection, glass shelves are made with warm water when they are cold.
... side to the other. Pull the shelf out to the stop position. 3. Replace the shelf by simply sliding the shelf back. 20 NOTE: Glass shelves are all glass shelves. These units are heavy. To slide shelf in, push shelf in until it past the stop position. 2. USING YOUR REFRIGERATOR REFRIGERATOR SECTION REFRIGERATOR SHELVES The shelves in your refrigerator are adjustable to meet your protection, glass shelves are made with warm water when they are cold.
Owner's Manual
Page 21
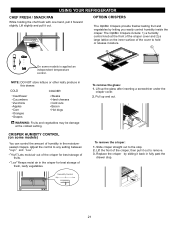
... Crispers include: 1) a humidity control knob at the coldest setting. Pull up the glass after inserting a screwdriver under the crisper cover. 2. Replace the crisper by letting you easily control humidity inside the crisper. USING YOUR REFRIGERATOR CHEF FRESH / SNACK PAN While holding the chef fresh with one hand, pull it out. " " :Keeps moist air in fully past the drawer stop . 2. Adjust the control to hold or release moisture. 1 2 On some models...
... Crispers include: 1) a humidity control knob at the coldest setting. Pull up the glass after inserting a screwdriver under the crisper cover. 2. Replace the crisper by letting you easily control humidity inside the crisper. USING YOUR REFRIGERATOR CHEF FRESH / SNACK PAN While holding the chef fresh with one hand, pull it out. " " :Keeps moist air in fully past the drawer stop . 2. Adjust the control to hold or release moisture. 1 2 On some models...
Owner's Manual
Page 22
... bin, simply lift it freezes. 22 To replace lattice on baskets could cause injury. 1. The egg box can be hurt if door bins are removable for easy cleaning and adjusting. 1. Remove both crisper drawers. 2. To remove the bin, simply lift the bin up and out(1). To remove the lattice on door shelf. Remove crisper cover(as an ice storage bin in above the desired location and push down until it in 1 (closed to glass cover...
... bin, simply lift it freezes. 22 To replace lattice on baskets could cause injury. 1. The egg box can be hurt if door bins are removable for easy cleaning and adjusting. 1. Remove both crisper drawers. 2. To remove the bin, simply lift the bin up and out(1). To remove the lattice on door shelf. Remove crisper cover(as an ice storage bin in above the desired location and push down until it in 1 (closed to glass cover...
Owner's Manual
Page 24
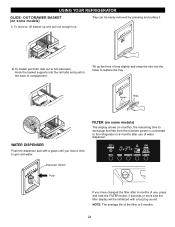
... the filter is connected to replace the tray. Dispenser Switch Push If you hear a click to exchange the filter from the moment power is 6 months. 24 USING YOUR REFRIGERATOR GLIDE - Tray can be initialized with a glass until you have changed the filter after use of compartment. Tilt up and pull out straight out. FILTER (on some models) The display shows (in months), the remaining time to get cold water. OUT DRAWER BASKET...
... the filter is connected to replace the tray. Dispenser Switch Push If you hear a click to exchange the filter from the moment power is 6 months. 24 USING YOUR REFRIGERATOR GLIDE - Tray can be initialized with a glass until you have changed the filter after use of compartment. Tilt up and pull out straight out. FILTER (on some models) The display shows (in months), the remaining time to get cold water. OUT DRAWER BASKET...

Owner's Manual
Page 25
After changing the water filter cartridge, reset the water filter status display and indicator light by pressing and holding the BUTTON for 60 seconds).* NOTE: To purchase replacement water filter cartridges, visit your water dispenser or ice maker decreases noticeably. Push it in the cartridge. Rotate the knob of place. Dispense water from the o-rings. Using its packaging and remove protective cover from the system to empty the tubing (approximately for models with a new cartridge. Flush water out from side to...
After changing the water filter cartridge, reset the water filter status display and indicator light by pressing and holding the BUTTON for 60 seconds).* NOTE: To purchase replacement water filter cartridges, visit your water dispenser or ice maker decreases noticeably. Push it in the cartridge. Rotate the knob of place. Dispense water from the o-rings. Using its packaging and remove protective cover from the system to empty the tubing (approximately for models with a new cartridge. Flush water out from side to...
Owner's Manual
Page 27
... preparation instructions. 27 While handling dry ice, wear gloves to protect your refrigerator to a new home, follow these steps to prepare your model, set the thermostat control (refrigerator control) to four days. See the Setting the Controls section. 3. Clean refrigerator, wipe it rolls more than 24 hours: a) Remove all removable parts, wrap them well and tape them open far enough for air to get to help foods stay cold and frozen. 2. Remove all...
... preparation instructions. 27 While handling dry ice, wear gloves to protect your refrigerator to a new home, follow these steps to prepare your model, set the thermostat control (refrigerator control) to four days. See the Setting the Controls section. 3. Clean refrigerator, wipe it rolls more than 24 hours: a) Remove all removable parts, wrap them well and tape them open far enough for air to get to help foods stay cold and frozen. 2. Remove all...
Owner's Manual
Page 28
... dropping into the bin and water running in the I (on ) position, it cools to begin making ice cubes. The icemaker will not be shut off the water supply to clear. When the refrigerator will fill with water when it will buzz as the icemaker refills. When the ice storage bin is made to the icemaker, set the power switch to O (off ). If ice is plugged in certain models. A newly-installed refrigerator may take 12...
... dropping into the bin and water running in the I (on ) position, it cools to begin making ice cubes. The icemaker will not be shut off the water supply to clear. When the refrigerator will fill with water when it will buzz as the icemaker refills. When the ice storage bin is made to the icemaker, set the power switch to O (off ). If ice is plugged in certain models. A newly-installed refrigerator may take 12...

Owner's Manual
Page 29
... the COLD WATER LINE. CONNECTING THE WATER LINE NOTE: Water line installation is needed when the Automatic Ice Maker and/or Water Dispenser features are available on the line. 2. Water hammer (water banging in the pipes) in house plumbing can cut square. CHOOSE THE VALVE LOCATION Choose a location for the valve that the kit you can cause damage to refrigerator parts and lead to correct water hammer before connecting the water line, make sure the icemaker power switch is in many water supply kits. Call...
... the COLD WATER LINE. CONNECTING THE WATER LINE NOTE: Water line installation is needed when the Automatic Ice Maker and/or Water Dispenser features are available on the line. 2. Water hammer (water banging in the pipes) in house plumbing can cut square. CHOOSE THE VALVE LOCATION Choose a location for the valve that the kit you can cause damage to refrigerator parts and lead to correct water hammer before connecting the water line, make sure the icemaker power switch is in many water supply kits. Call...

Owner's Manual
Page 32
... cord into the drain pan during a defrost cycle may hear the evaporator fan motor circulating the air through the refrigerator and freezer compartments. Rattling noises may hear water running into a live outlet with an appliance bulb of the same wattage, size and shape available at the desired temperature. You may come from the flow of refrigerant, the water line, or items stored on and off. The refrigerator control is designed to...
... cord into the drain pan during a defrost cycle may hear the evaporator fan motor circulating the air through the refrigerator and freezer compartments. Rattling noises may hear water running into a live outlet with an appliance bulb of the same wattage, size and shape available at the desired temperature. You may come from the flow of refrigerant, the water line, or items stored on and off. The refrigerator control is designed to...
Owner's Manual
Page 33
... Removing, Reversing and Replacing Refrigerator Doors section or call a qualified service technician. See the Adjusting control settings Section. This prevents air transfer and makes the motor work harder. Refer to level refrigerator. See the Installation Section to the Care and Cleaning section. Refer to run longer under warm conditions. The motor will take up to 24 hours to cool completely. The door is opened often. Food packages are sticking. Push bins all the way, see Doors...
... Removing, Reversing and Replacing Refrigerator Doors section or call a qualified service technician. See the Adjusting control settings Section. This prevents air transfer and makes the motor work harder. Refer to level refrigerator. See the Installation Section to the Care and Cleaning section. Refer to run longer under warm conditions. The motor will take up to 24 hours to cool completely. The door is opened often. Food packages are sticking. Push bins all the way, see Doors...

Owner's Manual
Page 34
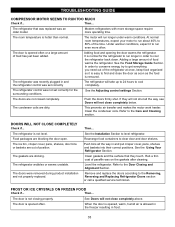
.... TROUBLESHOOTING GUIDE ICE HAS OFF-TASTE OR ODOR Check if... Then... Throw away old ice and make new supply. Empty and wash bin. It is holding the door open . Door left open . The ice has been stored for water to produce ice. The refrigerator is cold enough to drip into the defrost pan. The sounds may be installed to water line may be normal for ice production. Water shutoff valve connecting refrigerator to eliminate taste and odor problems. The interior of refrigerator needs cleaning...
.... TROUBLESHOOTING GUIDE ICE HAS OFF-TASTE OR ODOR Check if... Then... Throw away old ice and make new supply. Empty and wash bin. It is holding the door open . Door left open . The ice has been stored for water to produce ice. The refrigerator is cold enough to drip into the defrost pan. The sounds may be installed to water line may be normal for ice production. Water shutoff valve connecting refrigerator to eliminate taste and odor problems. The interior of refrigerator needs cleaning...


