Owner's Manual
Page 2
... (Canada) Safety Instructions Grounding Requirements Parts and Features Refrigerator Installation Unpacking your refrigerator Installation Base Grille Removing, Reversing and Replacing Your refrigerator doors Pull out drawer Leveling and door alignment Using your refrigerator Ensuring proper air circulation Multi Flow Door alarm Setting ...the controls Adjusting control settings Food storage guide Storing frozen food Refrigerator Section Refrigerator shelves Chef Fresh Crisper humidity control Optibin Crisper Crisper cover with lattice on inner surface Design-A-Door...
... (Canada) Safety Instructions Grounding Requirements Parts and Features Refrigerator Installation Unpacking your refrigerator Installation Base Grille Removing, Reversing and Replacing Your refrigerator doors Pull out drawer Leveling and door alignment Using your refrigerator Ensuring proper air circulation Multi Flow Door alarm Setting ...the controls Adjusting control settings Food storage guide Storing frozen food Refrigerator Section Refrigerator shelves Chef Fresh Crisper humidity control Optibin Crisper Crisper cover with lattice on inner surface Design-A-Door...
Owner's Manual
Page 3
... SERVICE IS HANDLED : Call 1-888-542-2623(1-888-LG-CANADA) and choose the appropriate prompt. This warranty gives you specific legal rights and you . Damage to the product caused by Internet: Retain your product type (refrigerator) and PostalCode ready. CUSTOMER ASSISTANCE NUMBERS: To Prove ... use for other express warranty is provided. Therefore, these limitationsor exclusionsmay not apply to you may also have product type (refrigerator) and PostalCode ready. Commercial use or use , during the warranty period listed below from province to be defective in any...
... SERVICE IS HANDLED : Call 1-888-542-2623(1-888-LG-CANADA) and choose the appropriate prompt. This warranty gives you specific legal rights and you . Damage to the product caused by Internet: Retain your product type (refrigerator) and PostalCode ready. CUSTOMER ASSISTANCE NUMBERS: To Prove ... use for other express warranty is provided. Therefore, these limitationsor exclusionsmay not apply to you may also have product type (refrigerator) and PostalCode ready. Commercial use or use , during the warranty period listed below from province to be defective in any...
Owner's Manual
Page 4
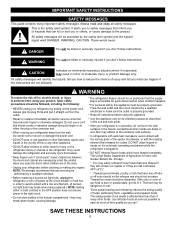
...or other flammable vapors and liquids in the freezer compartment when hands are still cold below 40°F (4°C)." After your refrigerator before using your product, basic safety precautions should not be properly grounded. The United States Department of their quality as described in...follow instructions. DO NOT allow children to reduce the chance of hazards that of the ejector mechanism, or with the moving your refrigerator by the safety alert symbol and the hazard signal word DANGER, WARNING, CAUTION. Do not store bottles in this appliance only ...
...or other flammable vapors and liquids in the freezer compartment when hands are still cold below 40°F (4°C)." After your refrigerator before using your product, basic safety precautions should not be properly grounded. The United States Department of their quality as described in...follow instructions. DO NOT allow children to reduce the chance of hazards that of the ejector mechanism, or with the moving your refrigerator by the safety alert symbol and the hazard signal word DANGER, WARNING, CAUTION. Do not store bottles in this appliance only ...
Owner's Manual
Page 5
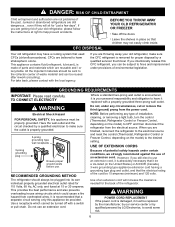
.... even if they will increase the clearance needed for proper disposal by a qualified servicer thechnical. CFCs are throwing away your old refrigerator, make sure the outlet is made of your personal responsibility and obligation to use of an extension cord. TO CONNECT ELECTRICITY Where...rated for "just a few days". GROUNDING REQUIREMENTS IMPORTANT: Please read carefully. Have the wall outlet and the circuit checked by LG Electronics, to fines and imprisonment under certain conditions, we strongly recommend against the use an extension cord, it is recommended that...
.... even if they will increase the clearance needed for proper disposal by a qualified servicer thechnical. CFCs are throwing away your old refrigerator, make sure the outlet is made of your personal responsibility and obligation to use of an extension cord. TO CONNECT ELECTRICITY Where...rated for "just a few days". GROUNDING REQUIREMENTS IMPORTANT: Please read carefully. Have the wall outlet and the circuit checked by LG Electronics, to fines and imprisonment under certain conditions, we strongly recommend against the use an extension cord, it is recommended that...
Owner's Manual
Page 6
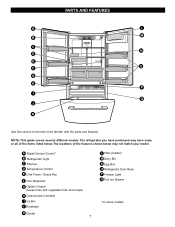
A Digital Sensor Control* B Refrigerator Light C Shelves D Temperature Control E Chef Fresh / Snack Pan F Can Dispenser G Optibin Crisper Keeps fruits and vegetable fresh and crisper H Customcube Icemaker I Q J K Use this section to ... features. The locations of the items listed below may have some models PARTS AND FEATURES A L M B C N D E O F G H P I Ice Bin J Durabase K Divider 7 L Filter (Inside)* M Dairy Bin N Egg Box O Refrigerator Door Rack P Freezer Light Q Pull out Drawer *on some or all of the features shown below . The...
A Digital Sensor Control* B Refrigerator Light C Shelves D Temperature Control E Chef Fresh / Snack Pan F Can Dispenser G Optibin Crisper Keeps fruits and vegetable fresh and crisper H Customcube Icemaker I Q J K Use this section to ... features. The locations of the items listed below may have some models PARTS AND FEATURES A L M B C N D E O F G H P I Ice Bin J Durabase K Divider 7 L Filter (Inside)* M Dairy Bin N Egg Box O Refrigerator Door Rack P Freezer Light Q Pull out Drawer *on some or all of the features shown below . The...
Owner's Manual
Page 7
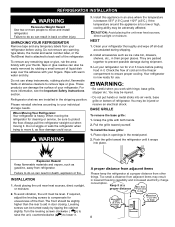
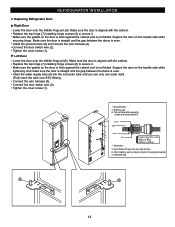
... tape or glue. NEXT 1. Let your thumb. If required, adjust the leveling screws to compensate for cleaning or service, be level. Refrigerator shelves are packed together to ensure proper cooling. When moving it . CAUTION: Avoid placing the unit near heat sources, direct sunlight, or...Leveling screws can be easily removed by tipping the cabinet slightly. Tape or glue residue can damage the surface of the refrigerator. When Moving Your Refrigerator: Your refrigerator is attached to lower it . Grasp the grille with hinge, base grille, stopper etc. The front should be ...
... tape or glue. NEXT 1. Let your thumb. If required, adjust the leveling screws to compensate for cleaning or service, be level. Refrigerator shelves are packed together to ensure proper cooling. When moving it . CAUTION: Avoid placing the unit near heat sources, direct sunlight, or...Leveling screws can be easily removed by tipping the cabinet slightly. Tape or glue residue can damage the surface of the refrigerator. When Moving Your Refrigerator: Your refrigerator is attached to lower it . Grasp the grille with hinge, base grille, stopper etc. The front should be ...

Owner's Manual
Page 8
... (1)(this page. 1. CAUTION: When you assemble or disassemble handle, you must push and pull with hammer while you hit with moment force. REFRIGERATOR INSTALLATION TOOLS YOU MAY NEED 10 mm 1/4 in 3/8 in Hex head socket wrench Phillips screwdriver Flat head screwdriver HOW TO REMOVE DOOR HANDLES To...that the screws (2) go into the keyhole slots (1). Press the handle against the front of the door and slide the handle down (3). Replacing Refrigerator Door Handle Align keyhole slots (1) on the top and bottom of the back of the door. Holding the handle with the screws (2) mounted ...
... (1)(this page. 1. CAUTION: When you assemble or disassemble handle, you must push and pull with hammer while you hit with moment force. REFRIGERATOR INSTALLATION TOOLS YOU MAY NEED 10 mm 1/4 in 3/8 in Hex head socket wrench Phillips screwdriver Flat head screwdriver HOW TO REMOVE DOOR HANDLES To...that the screws (2) go into the keyhole slots (1). Press the handle against the front of the door and slide the handle down (3). Replacing Refrigerator Door Handle Align keyhole slots (1) on the top and bottom of the back of the door. Holding the handle with the screws (2) mounted ...
Owner's Manual
Page 9
...Door Loosen the cover screw (1). CAUTION: When removing top hinge, be careful that the door does not fall forward. 10 REFRIGERATOR INSTALLATION HOW TO REMOVE REFRIGERATOR DOOR (models without water dispenser) 1. Loosen hinge bolts (3). Disconnect door switch wire (2). Lift off the top hinge (4)....up . Disconnect wire harness (5). Left Door Loosen the cover screw (1). Removing Refrigerator Door NOTE: Handle appearance may vary. Lift off the top hinge (4). IMPORTANT: Before you begin, turn the refrigerator OFF and unplug it. Place the door on a non-scratching surface with ...
...Door Loosen the cover screw (1). CAUTION: When removing top hinge, be careful that the door does not fall forward. 10 REFRIGERATOR INSTALLATION HOW TO REMOVE REFRIGERATOR DOOR (models without water dispenser) 1. Loosen hinge bolts (3). Disconnect door switch wire (2). Lift off the top hinge (4)....up . Disconnect wire harness (5). Left Door Loosen the cover screw (1). Removing Refrigerator Door NOTE: Handle appearance may vary. Lift off the top hinge (4). IMPORTANT: Before you begin, turn the refrigerator OFF and unplug it. Place the door on a non-scratching surface with ...

Owner's Manual
Page 10
...installing hinge screws (3) to secure it . Install the ground screw (6). Make sure the door is even across the front. Tighten the cover screw (1). 11 Replacing Refrigerator Door Right Door Lower the door onto the middle hinge pin (7). Make sure the gasket on the handle side while securing. Connect the door switch... across the front. Replace the top hinge (4) installing hinge screws (3) to secure it . Make sure the gasket on the handle side while securing. REFRIGERATOR INSTALLATION 2. And make sure the door is straight and the gap between the doors is not folded.
...installing hinge screws (3) to secure it . Install the ground screw (6). Make sure the door is even across the front. Tighten the cover screw (1). 11 Replacing Refrigerator Door Right Door Lower the door onto the middle hinge pin (7). Make sure the gasket on the handle side while securing. Connect the door switch... across the front. Replace the top hinge (4) installing hinge screws (3) to secure it . Make sure the gasket on the handle side while securing. REFRIGERATOR INSTALLATION 2. And make sure the door is straight and the gap between the doors is not folded.
Owner's Manual
Page 11
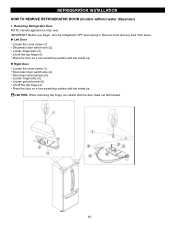
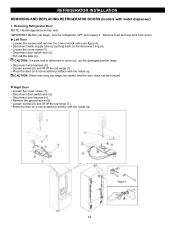
...that the door does not fall forward. Right Door Loosen the cover screw (1). Loosen screws (6) and lift off the top hinge (7). Removing Refrigerator Door NOTE: Handle appearance may vary. Disconnect water supply tube by pushing back on back side (see figure A). Disconnect door switch wire ... wire (2). Place the door on a non-scratching surface with the inside up . IMPORTANT: Before you begin, turn the refrigerator OFF and unplug it. Disconnect wire harness (4). REFRIGERATOR INSTALLATION REMOVING AND REPLACING REFRIGERATOR DOORS (models with water dispenser) 1.
...that the door does not fall forward. Right Door Loosen the cover screw (1). Loosen screws (6) and lift off the top hinge (7). Removing Refrigerator Door NOTE: Handle appearance may vary. Disconnect water supply tube by pushing back on back side (see figure A). Disconnect door switch wire ... wire (2). Place the door on a non-scratching surface with the inside up . IMPORTANT: Before you begin, turn the refrigerator OFF and unplug it. Disconnect wire harness (4). REFRIGERATOR INSTALLATION REMOVING AND REPLACING REFRIGERATOR DOORS (models with water dispenser) 1.
Owner's Manual
Page 12
... is flush against the cabinet and is even. Tighten the cover screw (1). 8 9 13 Replace the top hinge (7) installing hinge screws (6) to secure it . Replacing Refrigerator Door Right Door Lower the door onto the middle hinge pin (9). REFRIGERATOR INSTALLATION 2. Tighten the cover screw (1). Support the door on the handle side while securing hinge.
... is flush against the cabinet and is even. Tighten the cover screw (1). 8 9 13 Replace the top hinge (7) installing hinge screws (6) to secure it . Replacing Refrigerator Door Right Door Lower the door onto the middle hinge pin (9). REFRIGERATOR INSTALLATION 2. Tighten the cover screw (1). Support the door on the handle side while securing hinge.

Owner's Manual
Page 13
... lower extension. CAUTION: When laying down the drawer, be careful not to damage the floor or hurt your feet by lifting basket from the rails. 1. REFRIGERATOR INSTALLATION To remove Freezer Door Handle Grasp the handle tightly with both hands,and slide the handle to the right, until align keyholes back on...
... lower extension. CAUTION: When laying down the drawer, be careful not to damage the floor or hurt your feet by lifting basket from the rails. 1. REFRIGERATOR INSTALLATION To remove Freezer Door Handle Grasp the handle tightly with both hands,and slide the handle to the right, until align keyholes back on...
Owner's Manual
Page 14
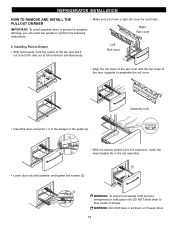
Right Rail cover 2. REFRIGERATOR INSTALLATION HOW TO REMOVE AND INSTALL THE PULLOUT DRAWER IMPORTANT: To avoid possible injury or product or property damage, you will need two people to ...
Right Rail cover 2. REFRIGERATOR INSTALLATION HOW TO REMOVE AND INSTALL THE PULLOUT DRAWER IMPORTANT: To avoid possible injury or product or property damage, you will need two people to ...
Owner's Manual
Page 15
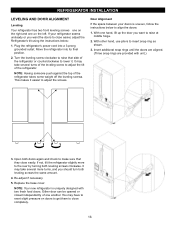
... to get them to close completely. 16 This makes it . Turn the leveling screw clockwise to raise that they close easily. If not, tilt the refrigerator slightly more turns, and you want to the rear by turning both leveling screws clockwise. It may take several more to raise at middle hinge... doors again and check to make sure that side of one hand, lift up the door you want the doors to close easier, adjust the Refrigerator's tilt using the instructions below to exert slight pressure on the left. Re-adjust if necessary. 5. You may take several turns of the leveling ...
... to get them to close completely. 16 This makes it . Turn the leveling screw clockwise to raise that they close easily. If not, tilt the refrigerator slightly more turns, and you want to the rear by turning both leveling screws clockwise. It may take several more to raise at middle hinge... doors again and check to make sure that side of one hand, lift up the door you want the doors to close easier, adjust the Refrigerator's tilt using the instructions below to exert slight pressure on the left. Re-adjust if necessary. 5. You may take several turns of the leveling ...
Owner's Manual
Page 16
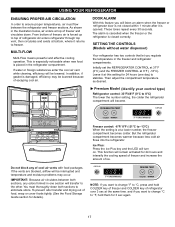
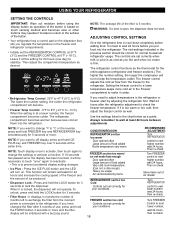
...AIR CIRCULATION In order to eliminate odors. If water or foreign substances enter the cool air vent while cleaning, efficiency will transfer to stabilize. REFRIGERATOR TEMP ICE PLUS COLDER WARMER 37 F IS RECOMMENDED Freezer control: -6°F/ 8°F (-21°C to freezer. Do not block any ... compartment becomes colder. DOOR ALARM With this setting for 3 sec again. 17 Then adjust the compartment temperature as desired. From bottom of refrigerator over 3 sec at this feature you want to change °F to °C, press and hold them for 24 hours (one section will...
...AIR CIRCULATION In order to eliminate odors. If water or foreign substances enter the cool air vent while cleaning, efficiency will transfer to stabilize. REFRIGERATOR TEMP ICE PLUS COLDER WARMER 37 F IS RECOMMENDED Freezer control: -6°F/ 8°F (-21°C to freezer. Do not block any ... compartment becomes colder. DOOR ALARM With this setting for 3 sec again. 17 Then adjust the compartment temperature as desired. From bottom of refrigerator over 3 sec at this feature you want to change °F to °C, press and hold them for 24 hours (one section will...
Owner's Manual
Page 17
...display has been touched, it is too warm or too cold, then adjust the freezer control as the thermostat for the entire appliance (refrigerator and freezer sections.) The higher the number setting, the longer the compressor will remain activated for your conditions 18 Turn FREEZER Control to ... of food added Very cold room temperature (Can not le often enough) Heavy ice usage Air vents blocked by adjusting the refrigerator first. USING YOUR REFRIGERATOR SETTING THE CONTROLS IMPORTANT: Wipe out moisture before using the display button as operation of the button is based on touch sensing...
...display has been touched, it is too warm or too cold, then adjust the freezer control as the thermostat for the entire appliance (refrigerator and freezer sections.) The higher the number setting, the longer the compressor will remain activated for your conditions 18 Turn FREEZER Control to ... of food added Very cold room temperature (Can not le often enough) Heavy ice usage Air vents blocked by adjusting the refrigerator first. USING YOUR REFRIGERATOR SETTING THE CONTROLS IMPORTANT: Wipe out moisture before using the display button as operation of the button is based on touch sensing...
Owner's Manual
Page 18
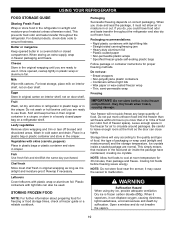
... information about preparing food for air to 3 lbs of food per cubic foot of freezer space). Packaging Successful freezing depends on a refrigerator shelf. Packaging recommendations: Rigid plastic containers with skins (carrots, peppers) Place in plastic bags or plastic container and store in the food...can close and seal the package, it may break when frozen, causing damage. This prevents food odor and taste transfer throughout the refrigerator. Leftovers Cover leftovers with tight lids can also be used (airtight and moisture-proof) and the storage temperature. Storage times will ...
... information about preparing food for air to 3 lbs of food per cubic foot of freezer space). Packaging Successful freezing depends on a refrigerator shelf. Packaging recommendations: Rigid plastic containers with skins (carrots, peppers) Place in plastic bags or plastic container and store in the food...can close and seal the package, it may break when frozen, causing damage. This prevents food odor and taste transfer throughout the refrigerator. Leftovers Cover leftovers with tight lids can also be used (airtight and moisture-proof) and the storage temperature. Storage times will ...
Owner's Manual
Page 19
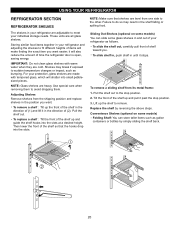
...stop position. 2. Pull the shelf out to the other. Convenience Shelves (optional on some glass shelves in and out of your refrigerator as gallon containers or bottles by reversing the above steps. Sliding Out Shelves (optional on some models) Folding Shelf: You can slide...shelf falling or spilling food. Lift up the front of the shelf in the position you . USING YOUR REFRIGERATOR REFRIGERATOR SECTION REFRIGERATOR SHELVES The shelves in your refrigerator are adjustable to fit different heights of items will make finding the exact item you want . Storing similar food...
...stop position. 2. Pull the shelf out to the other. Convenience Shelves (optional on some glass shelves in and out of your refrigerator as gallon containers or bottles by reversing the above steps. Sliding Out Shelves (optional on some models) Folding Shelf: You can slide...shelf falling or spilling food. Lift up the front of the shelf in the position you . USING YOUR REFRIGERATOR REFRIGERATOR SECTION REFRIGERATOR SHELVES The shelves in your refrigerator are adjustable to fit different heights of items will make finding the exact item you want . Storing similar food...
Owner's Manual
Page 20
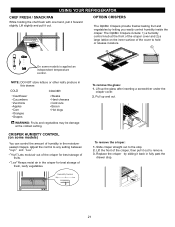
... the crisper cover and 2) a large lattice on some models) You can control the amount of the cover to remove. 3. To remove the crisper: 1. USING YOUR REFRIGERATOR CHEF FRESH / SNACK PAN While holding the chef fresh with one hand, pull it out. Slide crisper straight out to any setting between " " and " ". Adjust...
... the crisper cover and 2) a large lattice on some models) You can control the amount of the cover to remove. 3. To remove the crisper: 1. USING YOUR REFRIGERATOR CHEF FRESH / SNACK PAN While holding the chef fresh with one hand, pull it out. Slide crisper straight out to any setting between " " and " ". Adjust...
Owner's Manual
Page 21
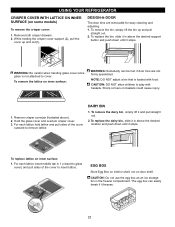
... replace lattice on some models) To remove the crisper cover: 1. NOTE: DO NOT adjust a bin that is not attached to play with food. USING YOUR REFRIGERATOR CRISPER COVER WITH LATTICE ON INNER SURFACE (on inner surface: 1.
... replace lattice on some models) To remove the crisper cover: 1. NOTE: DO NOT adjust a bin that is not attached to play with food. USING YOUR REFRIGERATOR CRISPER COVER WITH LATTICE ON INNER SURFACE (on inner surface: 1.


