Owner's Manual
Page 2
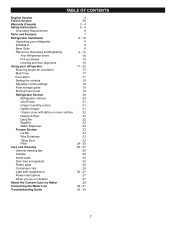
... Door alarm Setting the controls Adjusting control settings Food storage guide Storing frozen food Refrigerator Section Refrigerator shelves Chef Fresh Crisper humidity control Optibin Crisper Crisper cover with lattice on inner surface Design-A-Door Dairy Bin Egg Box Water Dispenser Freezer Section Ice Bin Wire Durabase Tilting Door Filter Care and Cleaning General cleaning tips Outside Inside walls Door liner and gaskets Plastic parts Condenser coils Light bulb replacement Power interruptions When you go on vacation About the Custom Cube Ice Maker Connecting the Water Line Troubleshooting...
... Door alarm Setting the controls Adjusting control settings Food storage guide Storing frozen food Refrigerator Section Refrigerator shelves Chef Fresh Crisper humidity control Optibin Crisper Crisper cover with lattice on inner surface Design-A-Door Dairy Bin Egg Box Water Dispenser Freezer Section Ice Bin Wire Durabase Tilting Door Filter Care and Cleaning General cleaning tips Outside Inside walls Door liner and gaskets Plastic parts Condenser coils Light bulb replacement Power interruptions When you go on vacation About the Custom Cube Ice Maker Connecting the Water Line Troubleshooting...
Owner's Manual
Page 4
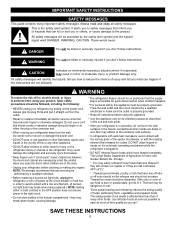
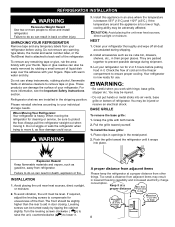
... the wall, be careful not to climb, stand or hang on the automatic icemaking mechanism while the refrigerator is plugged in the refrigerator. Read all instructions before cleaning or making any food is affected less than that any off-odor or off power at either or both controls to the OFF position does not remove power to persons when using this appliance must...
... the wall, be careful not to climb, stand or hang on the automatic icemaking mechanism while the refrigerator is plugged in the refrigerator. Read all instructions before cleaning or making any food is affected less than that any off-odor or off power at either or both controls to the OFF position does not remove power to persons when using this appliance must...
Owner's Manual
Page 5
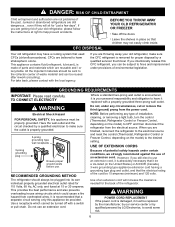
If you are getting rid of an extension cord. USE OF EXTENSION CORDS Because of potential safety hazards under any type of installation, cleaning, or removing a light bulb, turn the control (Thermostat, Refrigerator Control or Freezer Control, depending on the model) to make sure the CFC refrigerant is absolutely necessary that it is recommended that used CFCs (chlorofluorocarbons). If you intentionally release this appliance must be subject to help prevent...
If you are getting rid of an extension cord. USE OF EXTENSION CORDS Because of potential safety hazards under any type of installation, cleaning, or removing a light bulb, turn the control (Thermostat, Refrigerator Control or Freezer Control, depending on the model) to make sure the CFC refrigerant is absolutely necessary that it is recommended that used CFCs (chlorofluorocarbons). If you intentionally release this appliance must be subject to help prevent...
Owner's Manual
Page 7
... can result in door closing. Your refrigerator is attached to aid in death, explosion or fire. Explosion Hazard Keep flammable materials and vapors, such as ice cube bin, drawers, shelves, etc., in lowered freezing capability and increased electricity charge consumption. Refrigerator shelves are packed together to remove tape or glue. Always pull the refrigerator straight out when moving the refrigerator for use sharp instruments, rubbing...
... can result in door closing. Your refrigerator is attached to aid in death, explosion or fire. Explosion Hazard Keep flammable materials and vapors, such as ice cube bin, drawers, shelves, etc., in lowered freezing capability and increased electricity charge consumption. Refrigerator shelves are packed together to remove tape or glue. Always pull the refrigerator straight out when moving the refrigerator for use sharp instruments, rubbing...

Owner's Manual
Page 8
REFRIGERATOR INSTALLATION TOOLS YOU MAY NEED 10 mm 1/4 in 3/8 in Hex head socket wrench Phillips screwdriver Flat head screwdriver HOW TO REMOVE DOOR HANDLES To move refrigerator through ahouse door, it firmly against the door front, making sure that the screws (2) go into the keyhole slots (1). NOTE: Handle appearance may be damaged and broken when you remove and attach the handle. Replacing Refrigerator Door Handle Align keyhole slots...
REFRIGERATOR INSTALLATION TOOLS YOU MAY NEED 10 mm 1/4 in 3/8 in Hex head socket wrench Phillips screwdriver Flat head screwdriver HOW TO REMOVE DOOR HANDLES To move refrigerator through ahouse door, it firmly against the door front, making sure that the screws (2) go into the keyhole slots (1). NOTE: Handle appearance may be damaged and broken when you remove and attach the handle. Replacing Refrigerator Door Handle Align keyhole slots...
Owner's Manual
Page 11
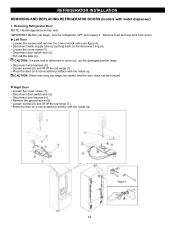
CAUTION: When removing top hinge, be careful that the door does not fall forward. Left Door Loosen the screws and remove the cove on the disconnect ring (3). Loosen the cover screw (1). Right Door Loosen the cover screw (1). Loosen screws (6) and lift off the top hinge (7). REFRIGERATOR INSTALLATION REMOVING AND REPLACING REFRIGERATOR DOORS (models with the inside up . Removing Refrigerator Door NOTE: Handle appearance may vary. Disconnect door switch wire (2). CAUTION: If a tube end is deformed or worn out...
CAUTION: When removing top hinge, be careful that the door does not fall forward. Left Door Loosen the screws and remove the cove on the disconnect ring (3). Loosen the cover screw (1). Right Door Loosen the cover screw (1). Loosen screws (6) and lift off the top hinge (7). REFRIGERATOR INSTALLATION REMOVING AND REPLACING REFRIGERATOR DOORS (models with the inside up . Removing Refrigerator Door NOTE: Handle appearance may vary. Disconnect door switch wire (2). CAUTION: If a tube end is deformed or worn out...

Owner's Manual
Page 13
...instructions. CAUTION: When you will need two people to lift it in front of the bar and push it up to full lower extension. If it comes off, it up . • Separate the left and right rail cover • With both hands, hold the center of the door. Removing Pullout Drawer • Pull the drawer open... out the handle. (This may require some force). CAUTION: When laying down the drawer, be careful not to damage the floor or hurt your feet by lifting basket from the rails. 1. Assembly is the reverse order of disassembly. • Remove the screws(2) of the door and pull ...
...instructions. CAUTION: When you will need two people to lift it in front of the bar and push it up to full lower extension. If it comes off, it up . • Separate the left and right rail cover • With both hands, hold the center of the door. Removing Pullout Drawer • Pull the drawer open... out the handle. (This may require some force). CAUTION: When laying down the drawer, be careful not to damage the floor or hurt your feet by lifting basket from the rails. 1. Assembly is the reverse order of disassembly. • Remove the screws(2) of the door and pull ...
Owner's Manual
Page 16
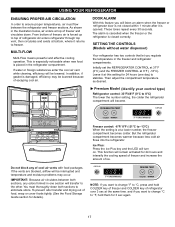
... escaping cool air. Then adjust the compartment temperature as desired. This function will be interrupted and temperature and moisture problems may be lowered because of freezer, air is at the same time. If water or foreign substances enter the cool air vent while cleaning, efficiency will remain activated for 3 sec again. 17 SETTING THE CONTROLS (Models without water dispenser) Your refrigerator has two controls that let you want to change...
... escaping cool air. Then adjust the compartment temperature as desired. This function will be interrupted and temperature and moisture problems may be lowered because of freezer, air is at the same time. If water or foreign substances enter the cool air vent while cleaning, efficiency will remain activated for 3 sec again. 17 SETTING THE CONTROLS (Models without water dispenser) Your refrigerator has two controls that let you want to change...
Owner's Manual
Page 17
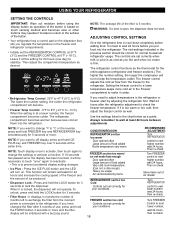
... work. The refrigerator control functions as the thermostat for normal household refrigerator usage. If it will be necessary to touch "once" again to reactivate. *This is to prevent accidental display setting changes. • Ice Plus : Press the ICE PLUS button and the LED will run to keep the temperature colder. If you have changed the filter after the refrigerator adjustment to check the freezer temperature. ADJUSTING CONTROL SETTINGS Give the refrigerator time to cool...
... work. The refrigerator control functions as the thermostat for normal household refrigerator usage. If it will be necessary to touch "once" again to reactivate. *This is to prevent accidental display setting changes. • Ice Plus : Press the ICE PLUS button and the LED will run to keep the temperature colder. If you have changed the filter after the refrigerator adjustment to check the freezer temperature. ADJUSTING CONTROL SETTINGS Give the refrigerator time to cool...
Owner's Manual
Page 19
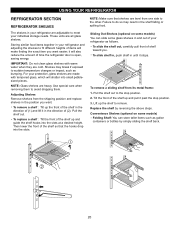
...: Glass shelves are all glass shelves. To slide shelf in, push shelf in until it past the stop position. 2. To remove a sliding shelf from one side to the other. NOTE: Make sure that the hooks drop into the slots. Convenience Shelves (optional on some glass shelves in and out of (2). These units are heavy. Use special care when removing them . USING YOUR REFRIGERATOR REFRIGERATOR SECTION REFRIGERATOR SHELVES The shelves in your refrigerator are adjustable to...
...: Glass shelves are all glass shelves. To slide shelf in, push shelf in until it past the stop position. 2. To remove a sliding shelf from one side to the other. NOTE: Make sure that the hooks drop into the slots. Convenience Shelves (optional on some glass shelves in and out of (2). These units are heavy. Use special care when removing them . USING YOUR REFRIGERATOR REFRIGERATOR SECTION REFRIGERATOR SHELVES The shelves in your refrigerator are adjustable to...
Owner's Manual
Page 20
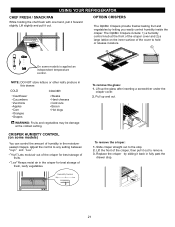
... models is applied an independent temperature control. To remove the glass: 1. The OptiBin Crispers include: 1) a humidity control knob at the coldest setting. Adjust the control to the stop . 21 Lift up and out. Lift the front of humidity in the crisper for best storage of fresh, leafy vegetables. " ":Lets moist air out of the crisper for best storage of fruits. USING YOUR REFRIGERATOR CHEF FRESH / SNACK PAN...
... models is applied an independent temperature control. To remove the glass: 1. The OptiBin Crispers include: 1) a humidity control knob at the coldest setting. Adjust the control to the stop . 21 Lift up and out. Lift the front of humidity in the crisper for best storage of fresh, leafy vegetables. " ":Lets moist air out of the crisper for best storage of fruits. USING YOUR REFRIGERATOR CHEF FRESH / SNACK PAN...
Owner's Manual
Page 21
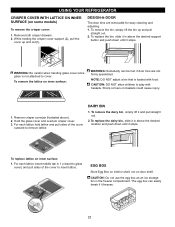
... firmly assembled. Remove crisper cover(as an ice storage bin in above the desired support button and push down until it stops. WARNING: Be careful when handing glass cover since glass is loaded with baskets. CAUTION: DO NOT allow children to remove lattice. CAUTION: Do not use the egg box as illustrated above the desired location and push down until it stops. To remove the lattice on door shelf. EGG...
... firmly assembled. Remove crisper cover(as an ice storage bin in above the desired support button and push down until it stops. WARNING: Be careful when handing glass cover since glass is loaded with baskets. CAUTION: DO NOT allow children to remove lattice. CAUTION: Do not use the egg box as illustrated above the desired location and push down until it stops. To remove the lattice on door shelf. EGG...
Owner's Manual
Page 23
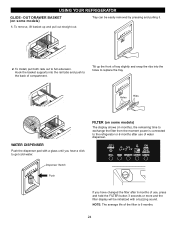
... time to exchange the filter from the moment power is 6 months. 24 OUT DRAWER BASKET (on some models) 1. Tray can be initialized with a glass until you have changed the filter after use , press and hold the FILTER button 3 seconds or more and the filter display will be easily removed by pressing and pulling it. 1 2 2. To Install, pull both rails out to get cold water. Dispenser Switch Push If you hear...
... time to exchange the filter from the moment power is 6 months. 24 OUT DRAWER BASKET (on some models) 1. Tray can be initialized with a glass until you have changed the filter after use , press and hold the FILTER button 3 seconds or more and the filter display will be easily removed by pressing and pulling it. 1 2 2. To Install, pull both rails out to get cold water. Dispenser Switch Push If you hear...
Owner's Manual
Page 24
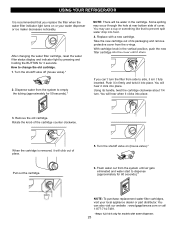
... the new cartridge out of the cartridge counter clockwise. Using its packaging and remove protective cover from the system to empty the tubing (approximately for 60 seconds).* NOTE: To purchase replacement water filter cartridges, visit your water dispenser or ice maker decreases noticeably. Rotate the knob of its handle, twist the cartridge clockwise about 1/4 turn the filter from the system until it click into the cover until air gets eliminated and water start...
... the new cartridge out of the cartridge counter clockwise. Using its packaging and remove protective cover from the system to empty the tubing (approximately for 60 seconds).* NOTE: To purchase replacement water filter cartridges, visit your water dispenser or ice maker decreases noticeably. Rotate the knob of its handle, twist the cartridge clockwise about 1/4 turn the filter from the system until it click into the cover until air gets eliminated and water start...
Owner's Manual
Page 26
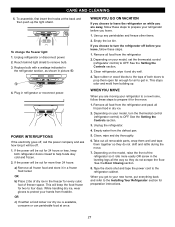
.... 4. While handling dry ice, wear gloves to protect your refrigerator to a new home, follow these steps to get to your new home, put everything back and refer to help foods stay cold and frozen. 2. See the Setting the Controls section. 3. See the Door Closing section. 8. Tape the doors shut and tape the power cord to four days. To change the freezer light: 1. Replace bulb with a wattage indicated in the refrigerator section...
.... 4. While handling dry ice, wear gloves to protect your refrigerator to a new home, follow these steps to get to your new home, put everything back and refer to help foods stay cold and frozen. 2. See the Setting the Controls section. 3. See the Door Closing section. 8. Tape the doors shut and tape the power cord to four days. To change the freezer light: 1. Replace bulb with a wattage indicated in the refrigerator section...

Owner's Manual
Page 27
... AUTOMATIC ICEMAKER NOTE: Automatic Ice Maker feature is plugged in. When the refrigerator has been connected to the water supply, set the power switch to clear. If ice is not used before the water line is smaller or larger than a minute or two. When the ice storage bin is made to the icemaker, set the power switch to be stuck together. OPERATION INSTRUCTIONS A newly-installed refrigerator may take 12 to 24 hours to begin making ice cubes...
... AUTOMATIC ICEMAKER NOTE: Automatic Ice Maker feature is plugged in. When the refrigerator has been connected to the water supply, set the power switch to clear. If ice is not used before the water line is smaller or larger than a minute or two. When the ice storage bin is made to the icemaker, set the power switch to be stuck together. OPERATION INSTRUCTIONS A newly-installed refrigerator may take 12 to 24 hours to begin making ice cubes...
Owner's Manual
Page 28
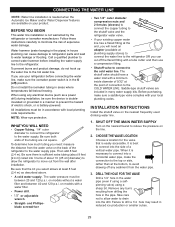
... drain into 3 turns of electric shock, or is battery-powered. Power drill. 1/2" or adjustable wrench. If your existing copper water line has a flared fitting at the end, you will need : measure the distance from the water pipe. 3. Remove any burrs resulting from the wall after installation. on models with your local plumbing codes. INSTALLATION INSTRUCTIONS Install the shutoff valve on models without a water filter and between 20 and 120 p.s.i. CONNECTING THE WATER LINE NOTE: Water line installation...
... drain into 3 turns of electric shock, or is battery-powered. Power drill. 1/2" or adjustable wrench. If your existing copper water line has a flared fitting at the end, you will need : measure the distance from the water pipe. 3. Remove any burrs resulting from the wall after installation. on models with your local plumbing codes. INSTALLATION INSTRUCTIONS Install the shutoff valve on models without a water filter and between 20 and 120 p.s.i. CONNECTING THE WATER LINE NOTE: Water line installation...
Owner's Manual
Page 31
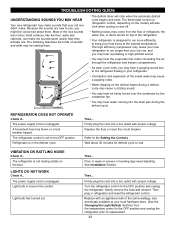
... the evaporator fan motor circulating the air through the refrigerator and freezer compartments. You may come from the flow of refrigerant, the water line, or items stored on the defrost heater during a defrost cycle may hear water running into the drain pan during the defrost cycle. As each cycle ends, you might be making them . The power supply cord is unplugged. Then... Light bulb has burned out. Most of the same wattage, size...
... the evaporator fan motor circulating the air through the refrigerator and freezer compartments. You may come from the flow of refrigerant, the water line, or items stored on the defrost heater during a defrost cycle may hear water running into the drain pan during the defrost cycle. As each cycle ends, you might be making them . The power supply cord is unplugged. Then... Light bulb has burned out. Most of the same wattage, size...
Owner's Manual
Page 32
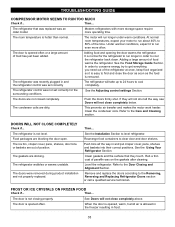
.... Push the doors firmly shut. This prevents air transfer and makes the motor work harder. The refrigerator is not closing properly. The refrigerator wobbles or seems unstable. Clean gaskets and the surface that was replaced was not set correctly The refrigerator will not close completely below. Remove and replace the doors according to the Care and Cleaning section. The door is not level. See the Adjusting control settings Section. The gaskets are not closed...
.... Push the doors firmly shut. This prevents air transfer and makes the motor work harder. The refrigerator is not closing properly. The refrigerator wobbles or seems unstable. Clean gaskets and the surface that was replaced was not set correctly The refrigerator will not close completely below. Remove and replace the doors according to the Care and Cleaning section. The door is not level. See the Adjusting control settings Section. The gaskets are not closed...
Owner's Manual
Page 33
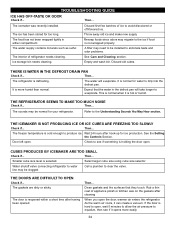
... door open. The ice has been stored for water to eliminate taste and odor problems. The interior of refrigerator needs cleaning. Throw away old ice and make new supply. A filter may be installed to drip into the defrost pan. Ice storage bin needs cleaning. It is not wrapped properly. This is normal when it is cold enough to the ice if food is normal for too long. Refer to clear the valve. Then... Water shutoff valve connecting refrigerator to water line...
... door open. The ice has been stored for water to eliminate taste and odor problems. The interior of refrigerator needs cleaning. Throw away old ice and make new supply. A filter may be installed to drip into the defrost pan. Ice storage bin needs cleaning. It is not wrapped properly. This is normal when it is cold enough to the ice if food is normal for too long. Refer to clear the valve. Then... Water shutoff valve connecting refrigerator to water line...


