Owner's Manual
Page 2
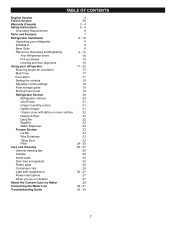
... (Canada) Safety Instructions Grounding Requirements Parts and Features Refrigerator Installation Unpacking your refrigerator Installation Base Grille Removing, Reversing and Replacing Your refrigerator doors Pull out drawer Leveling and door alignment Using your refrigerator Ensuring proper air circulation Multi Flow Door alarm Setting ...the controls Adjusting control settings Food storage guide Storing frozen food Refrigerator Section Refrigerator shelves Chef Fresh Crisper humidity control Optibin Crisper Crisper cover with lattice on inner surface Design-A-Door...
... (Canada) Safety Instructions Grounding Requirements Parts and Features Refrigerator Installation Unpacking your refrigerator Installation Base Grille Removing, Reversing and Replacing Your refrigerator doors Pull out drawer Leveling and door alignment Using your refrigerator Ensuring proper air circulation Multi Flow Door alarm Setting ...the controls Adjusting control settings Food storage guide Storing frozen food Refrigerator Section Refrigerator shelves Chef Fresh Crisper humidity control Optibin Crisper Crisper cover with lattice on inner surface Design-A-Door...
Owner's Manual
Page 3
... have other rights which vary from the date of your product type (refrigerator) and PostalCode ready. Please have product type (refrigerator) and PostalCode ready. HOW SERVICE IS HANDLED : Call 1-888-542-2623(1-888-LG-CANADA) and choose the appropriate prompt. No other than the intended purpose.... 4. so these costs are the responsibility of God. 3. http://www.lg.ca 3 A copy of ...
... have other rights which vary from the date of your product type (refrigerator) and PostalCode ready. Please have product type (refrigerator) and PostalCode ready. HOW SERVICE IS HANDLED : Call 1-888-542-2623(1-888-LG-CANADA) and choose the appropriate prompt. No other than the intended purpose.... 4. so these costs are the responsibility of God. 3. http://www.lg.ca 3 A copy of ...
Owner's Manual
Page 4
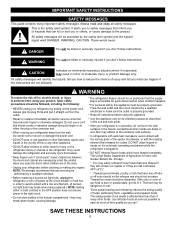
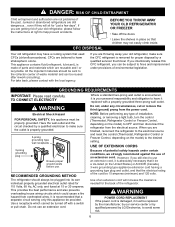
...cold below 40°F (4°C)." These words mean: DANGER WARNING You will be followed, including the following: NEVER unplug your refrigerator away from the outlet. CAUTION Indicates an imminently hazardous situation, which have any off-odor or off power at either or ...particularly fruits, vegetables and prepared foods. "Even partial thawing and refreezing reduces the eating quality of "pinch point" areas; After your refrigerator before using your product, basic safety precautions should be properly grounded. The eating quality of this appliance. Do not use a cord ...
...cold below 40°F (4°C)." These words mean: DANGER WARNING You will be followed, including the following: NEVER unplug your refrigerator away from the outlet. CAUTION Indicates an imminently hazardous situation, which have any off-odor or off power at either or ...particularly fruits, vegetables and prepared foods. "Even partial thawing and refreezing reduces the eating quality of "pinch point" areas; After your refrigerator before using your product, basic safety precautions should be properly grounded. The eating quality of this appliance. Do not use a cord ...
Owner's Manual
Page 5
... SAFETY, this appliance must be replaced by the manufacturer, by our service center or by qualified personal by LG Electronics, to the desired setting. RECOMMENDED GROUNDING METHOD The refrigerator should be sent to use . It is encountered, it must be a UL-listed (in place so that... or remove the third (ground) prong from overheated wires. Use of installation, cleaning, or removing a light bulb, turn the control (Thermostat, Refrigerator Control or Freezer Control, depending on the model) to avoid some risk. 6 If you are reusable and / or recyclable. Leave the shelves in...
... SAFETY, this appliance must be replaced by the manufacturer, by our service center or by qualified personal by LG Electronics, to the desired setting. RECOMMENDED GROUNDING METHOD The refrigerator should be sent to use . It is encountered, it must be a UL-listed (in place so that... or remove the third (ground) prong from overheated wires. Use of installation, cleaning, or removing a light bulb, turn the control (Thermostat, Refrigerator Control or Freezer Control, depending on the model) to avoid some risk. 6 If you are reusable and / or recyclable. Leave the shelves in...
Owner's Manual
Page 6
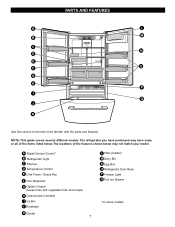
...M B C N D E O F G H P I Ice Bin J Durabase K Divider 7 L Filter (Inside)* M Dairy Bin N Egg Box O Refrigerator Door Rack P Freezer Light Q Pull out Drawer *on some or all of the features shown below . The locations of the items listed below may have ...purchased may not match your model. A Digital Sensor Control* B Refrigerator Light C Shelves D Temperature Control E Chef Fresh / Snack Pan F Can Dispenser G Optibin Crisper Keeps fruits and vegetable fresh and crisper H Customcube Icemaker ...
...M B C N D E O F G H P I Ice Bin J Durabase K Divider 7 L Filter (Inside)* M Dairy Bin N Egg Box O Refrigerator Door Rack P Freezer Light Q Pull out Drawer *on some or all of the features shown below . The locations of the items listed below may have ...purchased may not match your model. A Digital Sensor Control* B Refrigerator Light C Shelves D Temperature Control E Chef Fresh / Snack Pan F Can Dispenser G Optibin Crisper Keeps fruits and vegetable fresh and crisper H Customcube Icemaker ...
Owner's Manual
Page 7
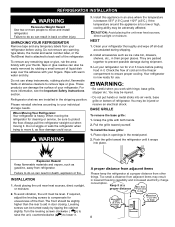
... damage could occur. 3. Avoid placing the unit near heat sources, direct sunlight or moisture. Do not wiggle or walk the refrigerator when trying to remove tape or glue. You may result in death, explosion or fire. Leveling screws can result in lowered ...freezing capability and increased electricity charge consumption. Wipe with your refrigerator before putting food in their proper places. Push the grille toward yourself. To install the base grille: WARNING 1. INSTALLATION 1. ...
... damage could occur. 3. Avoid placing the unit near heat sources, direct sunlight or moisture. Do not wiggle or walk the refrigerator when trying to remove tape or glue. You may result in death, explosion or fire. Leveling screws can result in lowered ...freezing capability and increased electricity charge consumption. Wipe with your refrigerator before putting food in their proper places. Push the grille toward yourself. To install the base grille: WARNING 1. INSTALLATION 1. ...

Owner's Manual
Page 8
... HANDLES NOTE: Handle appearance may require some force). Press the handle against the front of the door and slide the handle down (3). Replacing Refrigerator Door Handle Align keyhole slots (1) on the top and bottom of the back of the handle with hammer while you hit with the screws ...(2) mounted on the front of the door. Holding the handle with both hands and slide the handle up (1)(this page. 1. REFRIGERATOR INSTALLATION TOOLS YOU MAY NEED 10 mm 1/4 in 3/8 in Hex head socket wrench Phillips screwdriver Flat head screwdriver HOW TO REMOVE DOOR HANDLES To ...
... HANDLES NOTE: Handle appearance may require some force). Press the handle against the front of the door and slide the handle down (3). Replacing Refrigerator Door Handle Align keyhole slots (1) on the top and bottom of the back of the handle with hammer while you hit with the screws ...(2) mounted on the front of the door. Holding the handle with both hands and slide the handle up (1)(this page. 1. REFRIGERATOR INSTALLATION TOOLS YOU MAY NEED 10 mm 1/4 in 3/8 in Hex head socket wrench Phillips screwdriver Flat head screwdriver HOW TO REMOVE DOOR HANDLES To ...
Owner's Manual
Page 9
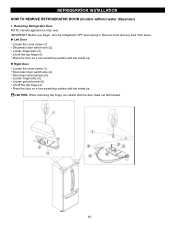
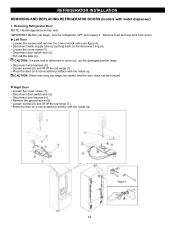
...the inside up . Remove food and any bins from doors. Lift off the top hinge (4). Disconnect door switch wire (2). REFRIGERATOR INSTALLATION HOW TO REMOVE REFRIGERATOR DOOR (models without water dispenser) 1. Place the door on a non-scratching surface with the inside up . Loosen hinge ...hinge, be careful that the door does not fall forward. 10 Loosen hinge bolts (3). Removing Refrigerator Door NOTE: Handle appearance may vary. IMPORTANT: Before you begin, turn the refrigerator OFF and unplug it. Right Door Loosen the cover screw (1). Loosen ground screw (6). Lift ...
...the inside up . Remove food and any bins from doors. Lift off the top hinge (4). Disconnect door switch wire (2). REFRIGERATOR INSTALLATION HOW TO REMOVE REFRIGERATOR DOOR (models without water dispenser) 1. Place the door on a non-scratching surface with the inside up . Loosen hinge ...hinge, be careful that the door does not fall forward. 10 Loosen hinge bolts (3). Removing Refrigerator Door NOTE: Handle appearance may vary. IMPORTANT: Before you begin, turn the refrigerator OFF and unplug it. Right Door Loosen the cover screw (1). Loosen ground screw (6). Lift ...

Owner's Manual
Page 10
REFRIGERATOR INSTALLATION 2. Install the ground screw (6). Replace the top hinge (4) installing hinge screws (3) to secure it . Make sure the door is not folded. Make sure the ... securing. And make sure the door is straight and the gap between the doors is even across the front. Tighten the cover screw (1). 11 Replacing Refrigerator Door Right Door Lower the door onto the middle hinge pin (7). Make sure the door is not folded. And make sure the door is straight...
REFRIGERATOR INSTALLATION 2. Install the ground screw (6). Replace the top hinge (4) installing hinge screws (3) to secure it . Make sure the door is not folded. Make sure the ... securing. And make sure the door is straight and the gap between the doors is even across the front. Tighten the cover screw (1). 11 Replacing Refrigerator Door Right Door Lower the door onto the middle hinge pin (7). Make sure the door is not folded. And make sure the door is straight...
Owner's Manual
Page 11
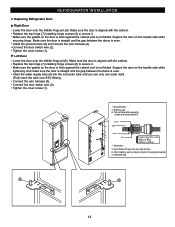
Loosen the cover screw (1). Place the door on a non-scratching surface with the inside up . 12 Remove the ground screw (8). REFRIGERATOR INSTALLATION REMOVING AND REPLACING REFRIGERATOR DOORS (models with the inside up . Remove food and any bins from doors. Disconnect door switch wire (2). Disconnect wire harness (4). Disconnect wire ...remove the cove on the disconnect ring (3). Loosen screws (6) and lift off the top hinge (7). IMPORTANT: Before you begin, turn the refrigerator OFF and unplug it. Place the door on a non-scratching surface with water dispenser) 1. Removing...
Loosen the cover screw (1). Place the door on a non-scratching surface with the inside up . 12 Remove the ground screw (8). REFRIGERATOR INSTALLATION REMOVING AND REPLACING REFRIGERATOR DOORS (models with the inside up . Remove food and any bins from doors. Disconnect door switch wire (2). Disconnect wire harness (4). Disconnect wire ...remove the cove on the disconnect ring (3). Loosen screws (6) and lift off the top hinge (7). IMPORTANT: Before you begin, turn the refrigerator OFF and unplug it. Place the door on a non-scratching surface with water dispenser) 1. Removing...
Owner's Manual
Page 12
... the connector tube until you see only one scale mark. (Fully insert the tube over 5/8"(15mm)). Tighten the cover screw (1). 8 9 13 Replacing Refrigerator Door Right Door Lower the door onto the middle hinge pin (9). Support the door on the door is flush against the cabinet and is even.... REFRIGERATOR INSTALLATION 2. Install the ground screw (8) and connect the wire harness (4). Connect the door switch wire (2). And make sure the door is ...
... the connector tube until you see only one scale mark. (Fully insert the tube over 5/8"(15mm)). Tighten the cover screw (1). 8 9 13 Replacing Refrigerator Door Right Door Lower the door onto the middle hinge pin (9). Support the door on the door is flush against the cabinet and is even.... REFRIGERATOR INSTALLATION 2. Install the ground screw (8) and connect the wire harness (4). Connect the door switch wire (2). And make sure the door is ...

Owner's Manual
Page 13
... lift it up to separate it from rail system. 1 • Press both hangers with the screws mounted in to let both rails fitted simultaneously. 14 REFRIGERATOR INSTALLATION To remove Freezer Door Handle Grasp the handle tightly with both hands,and slide the handle to the right, until align keyholes back on...
... lift it up to separate it from rail system. 1 • Press both hangers with the screws mounted in to let both rails fitted simultaneously. 14 REFRIGERATOR INSTALLATION To remove Freezer Door Handle Grasp the handle tightly with both hands,and slide the handle to the right, until align keyholes back on...
Owner's Manual
Page 14
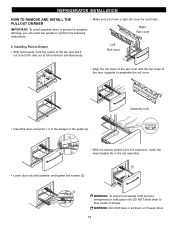
REFRIGERATOR INSTALLATION HOW TO REMOVE AND INSTALL THE PULLOUT DRAWER IMPORTANT: To avoid possible injury or product or property damage, you have a right rail cover for ...
REFRIGERATOR INSTALLATION HOW TO REMOVE AND INSTALL THE PULLOUT DRAWER IMPORTANT: To avoid possible injury or product or property damage, you have a right rail cover for ...
Owner's Manual
Page 15
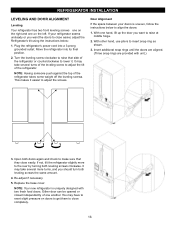
.... 2. With one on the left. Open both doors again and check to make sure that side of one another. If not, tilt the refrigerator slightly more turns, and you should turn both leveling screws clockwise. It may have to exert slight pressure on doors to get them to close...close completely. 16 Insert additional snap rings until the doors are aligned. (Three snap rings are provided with two fresh food doors. NOTE: Your new refrigerator is uneven, follow the instructions below : 1. You may take several more to insert snap ring as shown. 3. Either door can be opened or ...
.... 2. With one on the left. Open both doors again and check to make sure that side of one another. If not, tilt the refrigerator slightly more turns, and you should turn both leveling screws clockwise. It may have to exert slight pressure on doors to get them to close...close completely. 16 Insert additional snap rings until the doors are aligned. (Three snap rings are provided with two fresh food doors. NOTE: Your new refrigerator is uneven, follow the instructions below : 1. You may take several more to insert snap ring as shown. 3. Either door can be opened or ...
Owner's Manual
Page 16
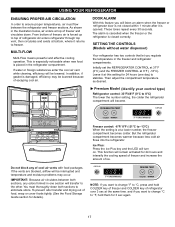
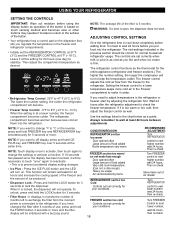
...and the FREEZER CONTROL at a lower number, the freezer compartment becomes colder. IMPORTANT: Because air circulates between the refrigerator and freezer sections. Air enters refrigerator through top vent, then circulates and exists at top of freezer and circulates down. This is especially noticeable when... new food is damaged, efficiency may occur. SETTING THE CONTROLS (Models without water dispenser) Your refrigerator has two controls that let you want to change °F to °C, press and hold them for details). This function will...
...and the FREEZER CONTROL at a lower number, the freezer compartment becomes colder. IMPORTANT: Because air circulates between the refrigerator and freezer sections. Air enters refrigerator through top vent, then circulates and exists at top of freezer and circulates down. This is especially noticeable when... new food is damaged, efficiency may occur. SETTING THE CONTROLS (Models without water dispenser) Your refrigerator has two controls that let you want to change °F to °C, press and hold them for details). This function will...
Owner's Manual
Page 17
...WARNING: If a door is to next lower number, wait 24 hours, then re-check FREEZER section too cold Controls not set the REFRIGERATOR CONTROL at 37°F (3°C) and the FREEZER CONTROL at a lower number, the freezer compartment becomes colder. Then adjust the compartment ...temperature as the thermostat for your conditions Turn REFRIGERATOR control to prevent accidental display setting changes. • Ice Plus : Press the ICE PLUS button and the LED will not operate. If...
...WARNING: If a door is to next lower number, wait 24 hours, then re-check FREEZER section too cold Controls not set the REFRIGERATOR CONTROL at 37°F (3°C) and the FREEZER CONTROL at a lower number, the freezer compartment becomes colder. Then adjust the compartment ...temperature as the thermostat for your conditions Turn REFRIGERATOR control to prevent accidental display setting changes. • Ice Plus : Press the ICE PLUS button and the LED will not operate. If...
Owner's Manual
Page 18
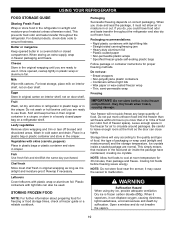
...Freezing IMPORTANT: Do not store bottles in a loosely closed compartment. Ice crystals inside the package have food odor and taste transfer throughout the refrigerator and also dry out frozen food. NOTE: Allow hot foods to use it must not allow air or moisture in the original wrapping ...until you could have condensed, creating ice crystals. Fruit Wash, let dry, and store in refrigerator in plastic bags or in airtight and moisture-proof material unless otherwise noted. NOTE: Do not store food near the sensor; it can ...
...Freezing IMPORTANT: Do not store bottles in a loosely closed compartment. Ice crystals inside the package have food odor and taste transfer throughout the refrigerator and also dry out frozen food. NOTE: Allow hot foods to use it must not allow air or moisture in the original wrapping ...until you could have condensed, creating ice crystals. Fruit Wash, let dry, and store in refrigerator in plastic bags or in airtight and moisture-proof material unless otherwise noted. NOTE: Do not store food near the sensor; it can ...
Owner's Manual
Page 19
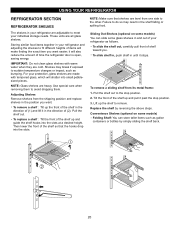
...into small pebblesized pieces. it past the stop position. 2. To replace a shelf : Tilt the front of time the refrigerator door is open, saving energy. Then lower the front of your refrigerator as gallon containers or bottles by reversing the above steps. Use special care when removing them . Sliding Out Shelves (... heights of the shelf up and pull it will also reduce the amount of the shelf up the front of the shelf in your refrigerator and adjusting the shelves to do so may break if exposed to meet your protection, glass shelves are made with warm water when they...
...into small pebblesized pieces. it past the stop position. 2. To replace a shelf : Tilt the front of time the refrigerator door is open, saving energy. Then lower the front of your refrigerator as gallon containers or bottles by reversing the above steps. Use special care when removing them . Sliding Out Shelves (... heights of the shelf up and pull it will also reduce the amount of the shelf up the front of the shelf in your refrigerator and adjusting the shelves to do so may break if exposed to meet your protection, glass shelves are made with warm water when they...
Owner's Manual
Page 20
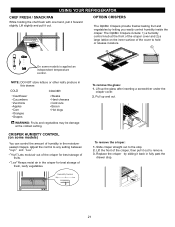
... under the crisper cover. 2. " " :Keeps moist air in the moisturesealed crispers. Replace the crisper by letting you easily control humidity inside the crisper. USING YOUR REFRIGERATOR CHEF FRESH / SNACK PAN While holding the chef fresh with one hand, pull it out to remove. 3. Lift slightly and pull it back in this...
... under the crisper cover. 2. " " :Keeps moist air in the moisturesealed crispers. Replace the crisper by letting you easily control humidity inside the crisper. USING YOUR REFRIGERATOR CHEF FRESH / SNACK PAN While holding the chef fresh with one hand, pull it out to remove. 3. Lift slightly and pull it back in this...
Owner's Manual
Page 21
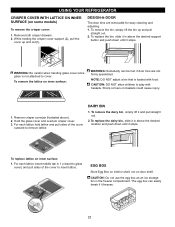
... bin, slide it and pull straight out. 2. While holding the crisper cover support (2), pull the cover up and pull straight out. 2. DAIRY BIN 1. USING YOUR REFRIGERATOR CRISPER COVER WITH LATTICE ON INNER SURFACE (on door shelf. Remove crisper cover(as an ice storage bin in above ). 2.
... bin, slide it and pull straight out. 2. While holding the crisper cover support (2), pull the cover up and pull straight out. 2. DAIRY BIN 1. USING YOUR REFRIGERATOR CRISPER COVER WITH LATTICE ON INNER SURFACE (on door shelf. Remove crisper cover(as an ice storage bin in above ). 2.


