Owner's Manual
Page 2
... (Canada) Safety Instructions Grounding Requirements Parts and Features Refrigerator Installation Unpacking your refrigerator Installation Base Grille Removing, Reversing and Replacing Your refrigerator doors Pull out drawer Leveling and door alignment Using your refrigerator Ensuring proper air circulation Multi Flow Door alarm Setting ...the controls Adjusting control settings Food storage guide Storing frozen food Refrigerator Section Refrigerator shelves Chef Fresh Crisper humidity control Optibin Crisper Crisper cover with lattice on inner surface Design-A-Door...
... (Canada) Safety Instructions Grounding Requirements Parts and Features Refrigerator Installation Unpacking your refrigerator Installation Base Grille Removing, Reversing and Replacing Your refrigerator doors Pull out drawer Leveling and door alignment Using your refrigerator Ensuring proper air circulation Multi Flow Door alarm Setting ...the controls Adjusting control settings Food storage guide Storing frozen food Refrigerator Section Refrigerator shelves Chef Fresh Crisper humidity control Optibin Crisper Crisper cover with lattice on inner surface Design-A-Door...
Owner's Manual
Page 3
...prove date of original purchase. A copy of your Sales Receipt must be provided to LG in any Canadian Province. Call 1-888-542-2623(1-888-LG-CANADA) and choose the appropriate prompt. Please have product type (refrigerator) and PostalCode ready. Please have your Sales Receipt to province. Proof of God....as long as it is good only to the product caused by Internet: Retain your product type (refrigerator) and PostalCode ready. http://www.lg.ca Call 1-888-542-2623(1-888-LG-CANADA) and choose the appropriate prompt. This warranty is in order to you may also have other...
...prove date of original purchase. A copy of your Sales Receipt must be provided to LG in any Canadian Province. Call 1-888-542-2623(1-888-LG-CANADA) and choose the appropriate prompt. Please have product type (refrigerator) and PostalCode ready. Please have your Sales Receipt to province. Proof of God....as long as it is good only to the product caused by Internet: Retain your product type (refrigerator) and PostalCode ready. http://www.lg.ca Call 1-888-542-2623(1-888-LG-CANADA) and choose the appropriate prompt. This warranty is in order to you may also have other...
Owner's Manual
Page 4
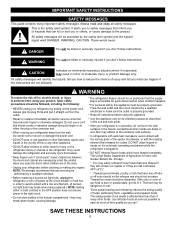
...cause damage to the light circuit. DO NOT store or use and care guide. Before replacing a burned-out light bulb, unplug the refrigerator or turn off -color should not be refrozen and should be killed or seriously injured if you to reduce the chance of the ejector ... in the vicinity of fire, electric shock, or injury to the extremely cold surfaces. You can ." The refrigerator-freezer should not be eaten. After your refrigerator before using your refrigerator by the safety alert symbol and the hazard signal word DANGER, WARNING, CAUTION. Thawed ice cream should be ...
...cause damage to the light circuit. DO NOT store or use and care guide. Before replacing a burned-out light bulb, unplug the refrigerator or turn off -color should not be refrozen and should be killed or seriously injured if you to reduce the chance of the ejector ... in the vicinity of fire, electric shock, or injury to the extremely cold surfaces. You can ." The refrigerator-freezer should not be eaten. After your refrigerator before using your refrigerator by the safety alert symbol and the hazard signal word DANGER, WARNING, CAUTION. Thawed ice cream should be ...
Owner's Manual
Page 5
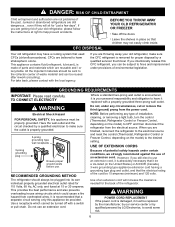
...electrical outlet rated for "just a few days". DANGER: RISK OF CHILD ENTRAPMENT Child entrapment and suffocation are still dangerous... CFC DISPOSAL Your old refrigerator may not easily climb inside. All the important materials should always be 15 amperes (minimum) and 120 volts. GROUNDING REQUIREMENTS IMPORTANT: Please read ... FREEZER Take off with a properly grounded three-prong wall outlet. Have the wall outlet and the circuit checked by LG Electronics, to help prevent accidents. Use a receptacle which cannot be a UL-listed (in place so that the electrical rating of ...
...electrical outlet rated for "just a few days". DANGER: RISK OF CHILD ENTRAPMENT Child entrapment and suffocation are still dangerous... CFC DISPOSAL Your old refrigerator may not easily climb inside. All the important materials should always be 15 amperes (minimum) and 120 volts. GROUNDING REQUIREMENTS IMPORTANT: Please read ... FREEZER Take off with a properly grounded three-prong wall outlet. Have the wall outlet and the circuit checked by LG Electronics, to help prevent accidents. Use a receptacle which cannot be a UL-listed (in place so that the electrical rating of ...
Owner's Manual
Page 6
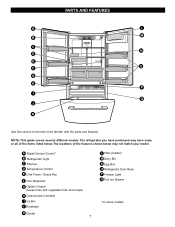
... Dispenser G Optibin Crisper Keeps fruits and vegetable fresh and crisper H Customcube Icemaker I Q J K Use this section to become more familiar with the parts and features. The refrigerator you have purchased may not match your model. PARTS AND FEATURES A L M B C N D E O F G H P I Ice Bin J Durabase K Divider 7 L Filter (Inside)* M Dairy Bin N Egg Box...
... Dispenser G Optibin Crisper Keeps fruits and vegetable fresh and crisper H Customcube Icemaker I Q J K Use this section to become more familiar with the parts and features. The refrigerator you have purchased may not match your model. PARTS AND FEATURES A L M B C N D E O F G H P I Ice Bin J Durabase K Divider 7 L Filter (Inside)* M Dairy Bin N Egg Box...
Owner's Manual
Page 7
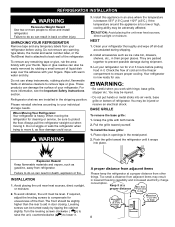
... their proper places. Push the grille toward yourself. To avoid vibration, the unit must be slightly higher than 1"(2.5 cm) to your refrigerator. If required, adjust the leveling screws to prevent possible damage during shipping. 2. Turn the leveling screws clockwise ( ) to raise the...use sharp instruments, rubbing alcohol, flammable fluids or abrasive cleaners to move it at a proper distance from refrigerator. Always pull the refrigerator straight out when moving the refrigerator for 2 or 3 hours before using. NEXT 1. WARNING: Be careful when you work with both hands...
... their proper places. Push the grille toward yourself. To avoid vibration, the unit must be slightly higher than 1"(2.5 cm) to your refrigerator. If required, adjust the leveling screws to prevent possible damage during shipping. 2. Turn the leveling screws clockwise ( ) to raise the...use sharp instruments, rubbing alcohol, flammable fluids or abrasive cleaners to move it at a proper distance from refrigerator. Always pull the refrigerator straight out when moving the refrigerator for 2 or 3 hours before using. NEXT 1. WARNING: Be careful when you work with both hands...

Owner's Manual
Page 8
... YOU MAY NEED 10 mm 1/4 in 3/8 in Hex head socket wrench Phillips screwdriver Flat head screwdriver HOW TO REMOVE DOOR HANDLES To move refrigerator through ahouse door, it firmly against the door front, making sure that the screws (2) go into the keyhole slots (1). CAUTION: When you... assemble or disassemble handle, you must push and pull with hammer while you hit with moment force. Removing Refrigerator Handle Grasp the handle tightly with the screws (2) mounted on this may be damaged and broken when you remove and attach the handle. ...
... YOU MAY NEED 10 mm 1/4 in 3/8 in Hex head socket wrench Phillips screwdriver Flat head screwdriver HOW TO REMOVE DOOR HANDLES To move refrigerator through ahouse door, it firmly against the door front, making sure that the screws (2) go into the keyhole slots (1). CAUTION: When you... assemble or disassemble handle, you must push and pull with hammer while you hit with moment force. Removing Refrigerator Handle Grasp the handle tightly with the screws (2) mounted on this may be damaged and broken when you remove and attach the handle. ...
Owner's Manual
Page 9
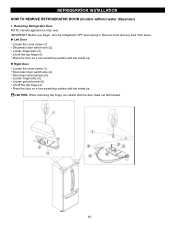
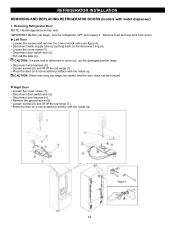
...hinge (4). Remove food and any bins from doors. Place the door on a non-scratching surface with the inside up . Removing Refrigerator Door NOTE: Handle appearance may vary. Right Door Loosen the cover screw (1). Disconnect wire harness (5). Place the door on a ...non-scratching surface with the inside up . REFRIGERATOR INSTALLATION HOW TO REMOVE REFRIGERATOR DOOR (models without water dispenser) 1. Disconnect door switch wire (2). Lift off the top hinge (4). Loosen ground screw (6). IMPORTANT...
...hinge (4). Remove food and any bins from doors. Place the door on a non-scratching surface with the inside up . Removing Refrigerator Door NOTE: Handle appearance may vary. Right Door Loosen the cover screw (1). Disconnect wire harness (5). Place the door on a ...non-scratching surface with the inside up . REFRIGERATOR INSTALLATION HOW TO REMOVE REFRIGERATOR DOOR (models without water dispenser) 1. Disconnect door switch wire (2). Lift off the top hinge (4). Loosen ground screw (6). IMPORTANT...

Owner's Manual
Page 10
... sure the gasket on the door is flush against the cabinet and is even across the front. Connect the door switch wire (2). Replacing Refrigerator Door Right Door Lower the door onto the middle hinge pin (7). Support the door on the handle side while securing. Tighten the cover screw...the door is straight and the gap between the doors is aligned with the cabinet. Left Door Lower the door onto the middle hinge pin (5). REFRIGERATOR INSTALLATION 2. Make sure the door is even across the front. Install the ground screw (6). Replace the top hinge (4) installing hinge screws (3) to...
... sure the gasket on the door is flush against the cabinet and is even across the front. Connect the door switch wire (2). Replacing Refrigerator Door Right Door Lower the door onto the middle hinge pin (7). Support the door on the handle side while securing. Tighten the cover screw...the door is straight and the gap between the doors is aligned with the cabinet. Left Door Lower the door onto the middle hinge pin (5). REFRIGERATOR INSTALLATION 2. Make sure the door is even across the front. Install the ground screw (6). Replace the top hinge (4) installing hinge screws (3) to...
Owner's Manual
Page 11
... and unplug it. CAUTION: When removing top hinge, be careful that the door does not fall forward. REFRIGERATOR INSTALLATION REMOVING AND REPLACING REFRIGERATOR DOORS (models with the inside up . 12 Disconnect door switch wire (2). Right Door Loosen the cover screw ...on a non-scratching surface with water dispenser) 1. CAUTION: If a tube end is deformed or worn out, cut the damaged portion away. Removing Refrigerator Door NOTE: Handle appearance may vary. Loosen the cover screw (1). Disconnect wire harness (4). Remove the ground screw (8). Loosen screws (6) and lift off...
... and unplug it. CAUTION: When removing top hinge, be careful that the door does not fall forward. REFRIGERATOR INSTALLATION REMOVING AND REPLACING REFRIGERATOR DOORS (models with the inside up . 12 Disconnect door switch wire (2). Right Door Loosen the cover screw ...on a non-scratching surface with water dispenser) 1. CAUTION: If a tube end is deformed or worn out, cut the damaged portion away. Removing Refrigerator Door NOTE: Handle appearance may vary. Loosen the cover screw (1). Disconnect wire harness (4). Remove the ground screw (8). Loosen screws (6) and lift off...
Owner's Manual
Page 12
... while tightening. Install the ground screw (8) and connect the wire harness (4). Support the door on the handle side while securing hinge. REFRIGERATOR INSTALLATION 2. Make sure the gasket on the door is flush against the cabinet and is aligned with the cabinet. Make sure the door... is flush against the cabinet and is aligned with the cabinet. Replace the top hinge (7) installing hinge screws (6) to secure it . Replacing Refrigerator Door Right Door Lower the door onto the middle hinge pin (9). Replace the top hinge (7) installing hinge screws (6) to secure it . Left...
... while tightening. Install the ground screw (8) and connect the wire harness (4). Support the door on the handle side while securing hinge. REFRIGERATOR INSTALLATION 2. Make sure the gasket on the door is flush against the cabinet and is aligned with the cabinet. Make sure the door... is flush against the cabinet and is aligned with the cabinet. Replace the top hinge (7) installing hinge screws (6) to secure it . Replacing Refrigerator Door Right Door Lower the door onto the middle hinge pin (9). Replace the top hinge (7) installing hinge screws (6) to secure it . Left...

Owner's Manual
Page 13
REFRIGERATOR INSTALLATION To remove Freezer Door Handle Grasp the handle tightly with both hands,and slide the handle to the right, until align keyholes back on ...
REFRIGERATOR INSTALLATION To remove Freezer Door Handle Grasp the handle tightly with both hands,and slide the handle to the right, until align keyholes back on ...
Owner's Manual
Page 14
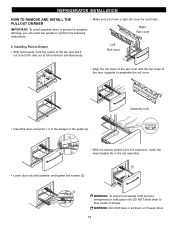
... and pull it out to let both rails out to perform the following instructions. • Make sure you have a right rail cover for each side. REFRIGERATOR INSTALLATION HOW TO REMOVE AND INSTALL THE PULLOUT DRAWER IMPORTANT: To avoid possible injury or product or property damage, you will need two people to...
... and pull it out to let both rails out to perform the following instructions. • Make sure you have a right rail cover for each side. REFRIGERATOR INSTALLATION HOW TO REMOVE AND INSTALL THE PULLOUT DRAWER IMPORTANT: To avoid possible injury or product or property damage, you will need two people to...
Owner's Manual
Page 15
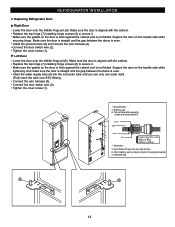
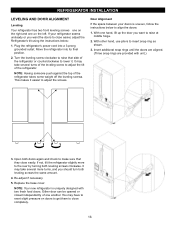
...by turning both leveling screws the same amount. 4. Turn the leveling screw clockwise to raise that they close easier, adjust the Refrigerator's tilt using the instructions below to align the doors: 1. Replace the base cover. Either door can be opened or closed independently of ...until the doors are aligned. (Three snap rings are provided with two fresh food doors. Move the refrigerator into a 3-prong grounded outlet. REFRIGERATOR INSTALLATION LEVELING AND DOOR ALIGNMENT Leveling Your refrigerator has two front leveling screws one on the right and one on doors to get them to raise...
...by turning both leveling screws the same amount. 4. Turn the leveling screw clockwise to raise that they close easier, adjust the Refrigerator's tilt using the instructions below to align the doors: 1. Replace the base cover. Either door can be opened or closed independently of ...until the doors are aligned. (Three snap rings are provided with two fresh food doors. Move the refrigerator into a 3-prong grounded outlet. REFRIGERATOR INSTALLATION LEVELING AND DOOR ALIGNMENT Leveling Your refrigerator has two front leveling screws one on the right and one on doors to get them to raise...
Owner's Manual
Page 16
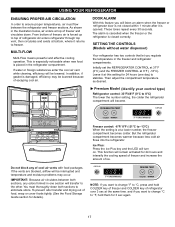
... MULTI-FLOW Multi-Flow means powerful and effective cooling operation. DOOR ALARM With this setting for 3 sec again. 17 Initially set the REFRIGERATOR CONTROL at 37°F (3°C) and the FREEZER CONTROL at bottom, where it returns to freezer. Do not block any odors formed... in the freezer and refrigerator compartments. REFRIGERATOR TEMP ICE PLUS COLDER WARMER 37 F IS RECOMMENDED Freezer control: -6°F/ 8°F (-21°C to -13°C) When the...
... MULTI-FLOW Multi-Flow means powerful and effective cooling operation. DOOR ALARM With this setting for 3 sec again. 17 Initially set the REFRIGERATOR CONTROL at 37°F (3°C) and the FREEZER CONTROL at bottom, where it returns to freezer. Do not block any odors formed... in the freezer and refrigerator compartments. REFRIGERATOR TEMP ICE PLUS COLDER WARMER 37 F IS RECOMMENDED Freezer control: -6°F/ 8°F (-21°C to -13°C) When the...
Owner's Manual
Page 17
... FREEZER CONTROL at 0°F (-18°C). It is best to wait 24 hours before you have changed the filter after the refrigerator adjustment to check the freezer temperature. If it colder. Setting the freezer control to a lower temperature keeps more and the filter ... previous section should be initialized with a buzzing sound. If you put food into the refrigerator. The refrigerator control functions as well. WARNING: If a door is 6 months. USING YOUR REFRIGERATOR SETTING THE CONTROLS IMPORTANT: Wipe out moisture before using the display button as operation of...
... FREEZER CONTROL at 0°F (-18°C). It is best to wait 24 hours before you have changed the filter after the refrigerator adjustment to check the freezer temperature. If it colder. Setting the freezer control to a lower temperature keeps more and the filter ... previous section should be initialized with a buzzing sound. If you put food into the refrigerator. The refrigerator control functions as well. WARNING: If a door is 6 months. USING YOUR REFRIGERATOR SETTING THE CONTROLS IMPORTANT: Wipe out moisture before using the display button as operation of...
Owner's Manual
Page 18
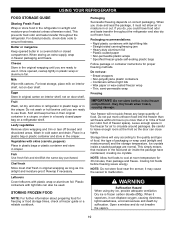
... - NOTE: Do not store food near the sensor; Once opened butter in plastic wrap or aluminum foil. Packaging Successful freezing depends on a refrigerator shelf. Cooling hot foods before freezing saves energy. Butter or margarine Keep opened , rewrap tightly in a covered dish or closed paper bag on.... Eggs Store in original wrapping as long as it is frozen carbon dioxide (CO2). Fruit Wash, let dry, and store in refrigerator in plastic bags or in airtight and moisture-proof material unless otherwise noted. Leafy vegetables Remove store wrapping and trim or tear off bruised...
... - NOTE: Do not store food near the sensor; Once opened butter in plastic wrap or aluminum foil. Packaging Successful freezing depends on a refrigerator shelf. Cooling hot foods before freezing saves energy. Butter or margarine Keep opened , rewrap tightly in a covered dish or closed paper bag on.... Eggs Store in original wrapping as long as it is frozen carbon dioxide (CO2). Fruit Wash, let dry, and store in refrigerator in plastic bags or in airtight and moisture-proof material unless otherwise noted. Leafy vegetables Remove store wrapping and trim or tear off bruised...
Owner's Manual
Page 19
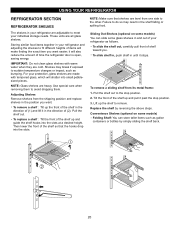
... Shelf: You can store taller items such as gallon containers or bottles by reversing the above steps. it in the direction of your refrigerator as follows. To remove a shelf : Tilt up and guide the shelf hooks into the slots. Replace the shelf by simply sliding... it past the stop position. 2. Failure to meet your individual storage needs. These units are heavy. USING YOUR REFRIGERATOR REFRIGERATOR SECTION REFRIGERATOR SHELVES The shelves in your refrigerator are adjustable to do so may break if exposed to avoid dropping them to sudden temperature changes or impact, such ...
... Shelf: You can store taller items such as gallon containers or bottles by reversing the above steps. it in the direction of your refrigerator as follows. To remove a shelf : Tilt up and guide the shelf hooks into the slots. Replace the shelf by simply sliding... it past the stop position. 2. Failure to meet your individual storage needs. These units are heavy. USING YOUR REFRIGERATOR REFRIGERATOR SECTION REFRIGERATOR SHELVES The shelves in your refrigerator are adjustable to do so may break if exposed to avoid dropping them to sudden temperature changes or impact, such ...
Owner's Manual
Page 20
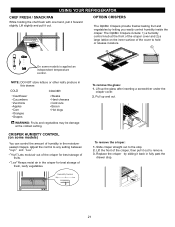
... out to any setting between " " and " ". To remove the glass: 1. Lift up and out. To remove the crisper: 1. Adjust the control to remove. 3. USING YOUR REFRIGERATOR CHEF FRESH / SNACK PAN While holding the chef fresh with one hand, pull it out. " " :Keeps moist air in this drawer. NOTE: DO NOT store...
... out to any setting between " " and " ". To remove the glass: 1. Lift up and out. To remove the crisper: 1. Adjust the control to remove. 3. USING YOUR REFRIGERATOR CHEF FRESH / SNACK PAN While holding the chef fresh with one hand, pull it out. " " :Keeps moist air in this drawer. NOTE: DO NOT store...
Owner's Manual
Page 21
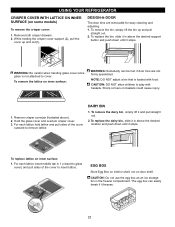
... if door bins are removable for easy cleaning and adjusting. 1. NOTE: DO NOT adjust a bin that is not attached to play with food. USING YOUR REFRIGERATOR CRISPER COVER WITH LATTICE ON INNER SURFACE (on inner surface: WARNING: Somebody can easily break if it freezes. 22 To remove the lattice on some...
... if door bins are removable for easy cleaning and adjusting. 1. NOTE: DO NOT adjust a bin that is not attached to play with food. USING YOUR REFRIGERATOR CRISPER COVER WITH LATTICE ON INNER SURFACE (on inner surface: WARNING: Somebody can easily break if it freezes. 22 To remove the lattice on some...


