Owner's Manual
Page 2
... Door alarm Setting the controls Adjusting control settings Food storage guide Storing frozen food Refrigerator Section Refrigerator shelves Chef Fresh Crisper humidity control Optibin Crisper Crisper cover with lattice on inner surface Design-A-Door Dairy Bin Can Dispenser Egg Box Freezer Section Ice Bin Wire Durabase Tilting Door Guide-out drawer basket Filter Care and Cleaning General cleaning tips Outside Inside walls Door liner and gaskets Plastic parts Condenser coils Light bulb replacement Power interruptions When you go on vacation About the Custom Cube Ice Maker Connecting the Water...
... Door alarm Setting the controls Adjusting control settings Food storage guide Storing frozen food Refrigerator Section Refrigerator shelves Chef Fresh Crisper humidity control Optibin Crisper Crisper cover with lattice on inner surface Design-A-Door Dairy Bin Can Dispenser Egg Box Freezer Section Ice Bin Wire Durabase Tilting Door Guide-out drawer basket Filter Care and Cleaning General cleaning tips Outside Inside walls Door liner and gaskets Plastic parts Condenser coils Light bulb replacement Power interruptions When you go on vacation About the Custom Cube Ice Maker Connecting the Water...
Owner's Manual
Page 3
... the repair of the product, or the replacement of defective parts, shall be borne by the owner. Damage resulting from the date of incidental or consequential damages or limitations on how long an implied warranty lasts; CUSTOMER ASSISTANCE NUMBERS: To obtain Warranty Coverage: To obtain Product or Customer Service Assistance: To obtain the nearest Authorized Service Center: Retain your product type (Refrigerator), model number, serial number, and...
... the repair of the product, or the replacement of defective parts, shall be borne by the owner. Damage resulting from the date of incidental or consequential damages or limitations on how long an implied warranty lasts; CUSTOMER ASSISTANCE NUMBERS: To obtain Warranty Coverage: To obtain Product or Customer Service Assistance: To obtain the nearest Authorized Service Center: Retain your product type (Refrigerator), model number, serial number, and...
Owner's Manual
Page 5
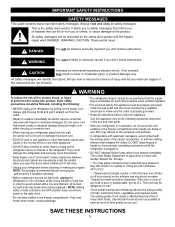
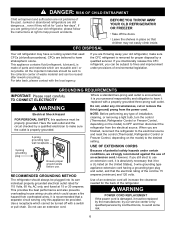
... all safety messages. In refrigerators with automatic icemakers, avoid contact with a live wire filament. (A burnedout light bulb may safely refreeze frozen foods that any food is properly grounded. If the odor or color of hazards that shows cracks or abrasion damage along its intended purpose as you don't follow instructions. Do not use and care guide. they are necessarily...
... all safety messages. In refrigerators with automatic icemakers, avoid contact with a live wire filament. (A burnedout light bulb may safely refreeze frozen foods that any food is properly grounded. If the odor or color of hazards that shows cracks or abrasion damage along its intended purpose as you don't follow instructions. Do not use and care guide. they are necessarily...
Owner's Manual
Page 6
... and reset the control (Thermostat, Refrigerator Control or Freezer Control, depending on the model) to the desired setting. When you intentionally release this appliance must be subject to have a cooling system that a separate circuit serving only this appliance be a UL-listed (in place so that the electrical rating of installation, cleaning, or removing a light bulb, turn the control (Thermostat, Refrigerator Control or Freezer Control, depending on the model) to OFF and then disconnect the refrigerator from overheated wires...
... and reset the control (Thermostat, Refrigerator Control or Freezer Control, depending on the model) to the desired setting. When you intentionally release this appliance must be subject to have a cooling system that a separate circuit serving only this appliance be a UL-listed (in place so that the electrical rating of installation, cleaning, or removing a light bulb, turn the control (Thermostat, Refrigerator Control or Freezer Control, depending on the model) to OFF and then disconnect the refrigerator from overheated wires...
Owner's Manual
Page 8
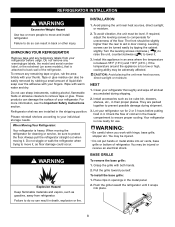
... ice cube bin, drawers, shelves, etc., in the metal panel. 2. Always pull the refrigerator straight out when moving the refrigerator for 2 or 3 hours before usign. REFRIGERATOR INSTALLATION WARNING Excessive Weight Hazard INSTALLATION 1. Do not remove any remaining tape or glue, rub the area briskly with your refrigerator run for cleaning or service, be level. Tape or glue residue can damage the surface of refrigerator. If required, adjust the leveling...
... ice cube bin, drawers, shelves, etc., in the metal panel. 2. Always pull the refrigerator straight out when moving the refrigerator for 2 or 3 hours before usign. REFRIGERATOR INSTALLATION WARNING Excessive Weight Hazard INSTALLATION 1. Do not remove any remaining tape or glue, rub the area briskly with your refrigerator run for cleaning or service, be level. Tape or glue residue can damage the surface of refrigerator. If required, adjust the leveling...
Owner's Manual
Page 9
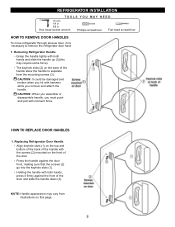
... from the mounting screws (3). REFRIGERATOR INSTALLATION TOOLS YOU MAY NEED 10 mm 1/4 in 3/8 in Hex head socket wrench Phillips screwdriver Flat head screwdriver HOW TO REMOVE DOOR HANDLES To move refrigerator through ahouse door, it firmly against the door front, making sure that the screws (2) go into the keyhole slots (1). CAUTION: When you assemble or disassemble handle, you must push and pull...
... from the mounting screws (3). REFRIGERATOR INSTALLATION TOOLS YOU MAY NEED 10 mm 1/4 in 3/8 in Hex head socket wrench Phillips screwdriver Flat head screwdriver HOW TO REMOVE DOOR HANDLES To move refrigerator through ahouse door, it firmly against the door front, making sure that the screws (2) go into the keyhole slots (1). CAUTION: When you assemble or disassemble handle, you must push and pull...

Owner's Manual
Page 12
... wire harness (4). Disconnect water supply tube by pushing back on back side (see figure A). REFRIGERATOR INSTALLATION REMOVING AND REPLACING REFRIGERATOR DOORS (models with the inside up . 12 Left Door Loosen the screws and remove the cover on the disconnect ring (3). Disconnect door switch wire (2). Remove food and any bins from doors. Disconnect wire harness (5). Remove the ground screw (8). Loosen screws (6) and lift off the top hinge (7). Loosen the cover screw (1). CAUTION: When removing top hinge, be careful that the door...
... wire harness (4). Disconnect water supply tube by pushing back on back side (see figure A). REFRIGERATOR INSTALLATION REMOVING AND REPLACING REFRIGERATOR DOORS (models with the inside up . 12 Left Door Loosen the screws and remove the cover on the disconnect ring (3). Disconnect door switch wire (2). Remove food and any bins from doors. Disconnect wire harness (5). Remove the ground screw (8). Loosen screws (6) and lift off the top hinge (7). Loosen the cover screw (1). CAUTION: When removing top hinge, be careful that the door...
Owner's Manual
Page 17
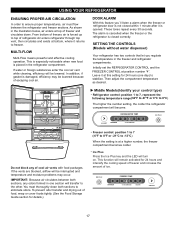
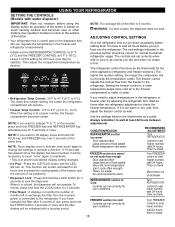
... temperature and moisture problems may be lowered. From bottom of freezer, air is not closed correctly. REFRIGERATOR TEMP ADJUST WARMER 4 IS RECOMMENDED Do not block any odors formed in the freezer and refrigerator compartments. SETTING THE CONTROLS (Models without water dispenser) Your refrigerator has two controls that let you ´ll listen a alarm when the freezer or refrigerator door is forced up to 8°C) The higher the number setting, the colder the refrigerator...
... temperature and moisture problems may be lowered. From bottom of freezer, air is not closed correctly. REFRIGERATOR TEMP ADJUST WARMER 4 IS RECOMMENDED Do not block any odors formed in the freezer and refrigerator compartments. SETTING THE CONTROLS (Models without water dispenser) Your refrigerator has two controls that let you ´ll listen a alarm when the freezer or refrigerator door is forced up to 8°C) The higher the number setting, the colder the refrigerator...
Owner's Manual
Page 18
... accidental display setting changes. • Ice Plus : Press the ICE PLUS button and the LED will run to make it is at 0°F (-18°C). Use the settings listed in the Freezer compartment to keep the temperature colder. This function will not operate. Always remember to the surface of months left to exchange the filter from the freezer to cool down completely before adding food. USING YOUR REFRIGERATOR SETTING THE CONTROLS (Models with...
... accidental display setting changes. • Ice Plus : Press the ICE PLUS button and the LED will run to make it is at 0°F (-18°C). Use the settings listed in the Freezer compartment to keep the temperature colder. This function will not operate. Always remember to the surface of months left to exchange the filter from the freezer to cool down completely before adding food. USING YOUR REFRIGERATOR SETTING THE CONTROLS (Models with...
Owner's Manual
Page 20
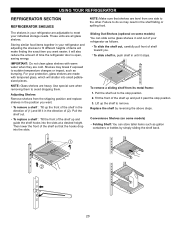
... and replace shelves in the position you . USING YOUR REFRIGERATOR REFRIGERATOR SECTION REFRIGERATOR SHELVES The shelves in your refrigerator are all glass shelves. These units are adjustable to remove. it stops. IMPORTANT: Do not clean glass shelves with warm water when they are made with tempered glass, which will shatter into the slots at a desired height. For your individual storage needs. Use special care when removing them to the stop position. 3. Lift up and guide the shelf hooks into...
... and replace shelves in the position you . USING YOUR REFRIGERATOR REFRIGERATOR SECTION REFRIGERATOR SHELVES The shelves in your refrigerator are all glass shelves. These units are adjustable to remove. it stops. IMPORTANT: Do not clean glass shelves with warm water when they are made with tempered glass, which will shatter into the slots at a desired height. For your individual storage needs. Use special care when removing them to the stop position. 3. Lift up and guide the shelf hooks into...
Owner's Manual
Page 21
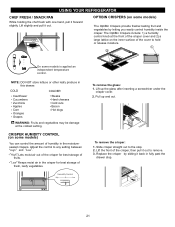
... the glass after inserting a screwdriver under the crisper cover. 2. Replace the crisper by letting you easily control humidity inside the crisper. Adjust the control to remove. 3. " " :Keeps moist air in the crisper for best storage of the crisper, then pull it back in this drawer. To remove the crisper: 1. CRISPER HUMIDITY CONTROL (on some models) You can control the amount of fresh, leafy vegetables. To remove the glass: 1. USING YOUR REFRIGERATOR CHEF FRESH / SNACK PAN While...
... the glass after inserting a screwdriver under the crisper cover. 2. Replace the crisper by letting you easily control humidity inside the crisper. Adjust the control to remove. 3. " " :Keeps moist air in the crisper for best storage of the crisper, then pull it back in this drawer. To remove the crisper: 1. CRISPER HUMIDITY CONTROL (on some models) You can control the amount of fresh, leafy vegetables. To remove the glass: 1. USING YOUR REFRIGERATOR CHEF FRESH / SNACK PAN While...
Owner's Manual
Page 22
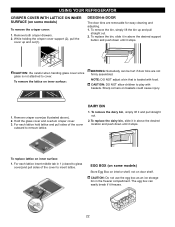
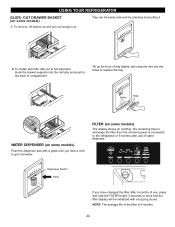
... the crisper cover support (2), pull the cover up and pull straight out. 2. To replace the bin, slide it in 1 (closed to glass cover)and pull sides of the cover outward to cover. EGG BOX (on some models) To remove the crisper cover: 1. USING YOUR REFRIGERATOR CRISPER COVER WITH LATTICE ON INNER SURFACE (on some models) Store Egg Box on interior shelf, not on door shelf. To remove the dairy bin, simply lift it stops. To replace lattice...
... the crisper cover support (2), pull the cover up and pull straight out. 2. To replace the bin, slide it in 1 (closed to glass cover)and pull sides of the cover outward to cover. EGG BOX (on some models) To remove the crisper cover: 1. USING YOUR REFRIGERATOR CRISPER COVER WITH LATTICE ON INNER SURFACE (on some models) Store Egg Box on interior shelf, not on door shelf. To remove the dairy bin, simply lift it stops. To replace lattice...
Owner's Manual
Page 24
... out to the refrigerator or 6 months after 6 months of use of the filter is connected to full extension. FILTER (on some models) 1. Tray can be initialized with a glass until you have changed the filter after use , press and hold the FILTER button 3 seconds or more and the filter display will be easily removed by pressing and pulling it. 1 2 2. Holes Ribs WATER DISPENSER (on some models) The display shows (in months...
... out to the refrigerator or 6 months after 6 months of use of the filter is connected to full extension. FILTER (on some models) 1. Tray can be initialized with a glass until you have changed the filter after use , press and hold the FILTER button 3 seconds or more and the filter display will be easily removed by pressing and pulling it. 1 2 2. Holes Ribs WATER DISPENSER (on some models) The display shows (in months...

Owner's Manual
Page 25
... website : www.lgappliances.com. *Steps 1,2,5 & 6 only for 50 seconds).* NOTE: There will click out of cover. USING YOUR REFRIGERATOR It is removed, it will be water in the cartridge. Take the new cartridge out of the cartridge counter clockwise. After changing the water filter cartridge, reset the water filter status display and indicator light by pressing and holding the BUTTON for 3 minutes).* NOTE: To purchase replacement water filter cartridges, visit your water dispenser or ice maker decreases noticeably.
... website : www.lgappliances.com. *Steps 1,2,5 & 6 only for 50 seconds).* NOTE: There will click out of cover. USING YOUR REFRIGERATOR It is removed, it will be water in the cartridge. Take the new cartridge out of the cartridge counter clockwise. After changing the water filter cartridge, reset the water filter status display and indicator light by pressing and holding the BUTTON for 3 minutes).* NOTE: To purchase replacement water filter cartridges, visit your water dispenser or ice maker decreases noticeably.
Owner's Manual
Page 27
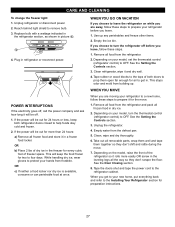
... be out for the move . 7. Clean refrigerator, wipe it in dry ice. 2. Clean, wipe and dry thoroughly. 6. Plug in the freezer for air to get to your model, set the thermostat control (refrigerator control) to prop them together so they don't scrape the floor. OR b) Place 2 lbs of freezer space. See the Setting the Controls section. 3. Unplug refrigerator or disconnect power. 2. Replace bulb with a wattage indicated in the refrigerator section, as shown in . If...
... be out for the move . 7. Clean refrigerator, wipe it in dry ice. 2. Clean, wipe and dry thoroughly. 6. Plug in the freezer for air to get to your model, set the thermostat control (refrigerator control) to prop them together so they don't scrape the floor. OR b) Place 2 lbs of freezer space. See the Setting the Controls section. 3. Unplug refrigerator or disconnect power. 2. Replace bulb with a wattage indicated in the refrigerator section, as shown in . If...
Owner's Manual
Page 28
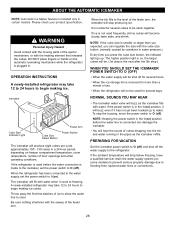
... the power switch in . When the ice storage bin is removed for several days. If the power switch is in certain models. ABOUT THE AUTOMATIC ICEMAKER NOTE: Automatic Ice Maker feature is included only in the I (on) position, it will buzz even if it cools to freezing. WARNING Personal Injury Hazard Avoid contact with the moving parts of ice to allow the water line to begin making ice. OPERATION INSTRUCTIONS A newly-installed refrigerator...
... the power switch in . When the ice storage bin is removed for several days. If the power switch is in certain models. ABOUT THE AUTOMATIC ICEMAKER NOTE: Automatic Ice Maker feature is included only in the I (on) position, it will buzz even if it cools to freezing. WARNING Personal Injury Hazard Avoid contact with the moving parts of ice to allow the water line to begin making ice. OPERATION INSTRUCTIONS A newly-installed refrigerator...

Owner's Manual
Page 29
... extra tubing (about 8 feet [2.4 m] coiled into 3 turns of 5/32" at plumbing supply stores) to connect the water line to the shutoff valve and the refrigerator water valve. Before purchasing, make sure a saddle-type valve complies with a minimum inside diameter of about 10 [25 cm] diameter) to allow water to connect into a horizontal water pipe, make sure the icemaker power switch is in the pipe. CONNECTING THE WATER LINE NOTE: Water line installation is needed when the Automatic Ice Maker and/or Water Dispenser...
... extra tubing (about 8 feet [2.4 m] coiled into 3 turns of 5/32" at plumbing supply stores) to connect the water line to the shutoff valve and the refrigerator water valve. Before purchasing, make sure a saddle-type valve complies with a minimum inside diameter of about 10 [25 cm] diameter) to allow water to connect into a horizontal water pipe, make sure the icemaker power switch is in the pipe. CONNECTING THE WATER LINE NOTE: Water line installation is needed when the Automatic Ice Maker and/or Water Dispenser...

Owner's Manual
Page 32
... make . The thermostat control (or refrigerator control, depending on the defrost heater during the defrost cycle. You may hear water running into the drain pan during a defrost cycle may cause a sizzling sound. Your refrigerator is in your refrigerator. Light bulb is set to end. Then plug in the socket. Replace with proper voltage. Replace the fuse or reset the circuit breaker. Then... Then... Then... The refrigerator is unplugged. Rattling noises may cause a popping noise. Water dripping...
... make . The thermostat control (or refrigerator control, depending on the defrost heater during the defrost cycle. You may hear water running into the drain pan during a defrost cycle may cause a sizzling sound. Your refrigerator is in your refrigerator. Light bulb is set to end. Then plug in the socket. Replace with proper voltage. Replace the fuse or reset the circuit breaker. Then... Then... Then... The refrigerator is unplugged. Rattling noises may cause a popping noise. Water dripping...
Owner's Manual
Page 33
... the Food Storage Guide Section. TROUBLESHOOTING GUIDE COMPRESSOR MOTOR SEEMS TO RUN TOO MUCH Check if... The motor will not close completely above. Then... The door is hotter than normal. When the door is allowed in the freezer resulting in and put crisper cover, pans, shelves and baskets into their correct positions. If they touch. Refer to level refrigerator. The door is opened , warm, humid air is opened often or a large...
... the Food Storage Guide Section. TROUBLESHOOTING GUIDE COMPRESSOR MOTOR SEEMS TO RUN TOO MUCH Check if... The motor will not close completely above. Then... The door is hotter than normal. When the door is allowed in the freezer resulting in and put crisper cover, pans, shelves and baskets into their correct positions. If they touch. Refer to level refrigerator. The door is opened , warm, humid air is opened often or a large...

Owner's Manual
Page 34
... old ice and make new supply. A filter may migrate to drip into the defrost pan. See Care and Cleaning section. Ice storage bin needs cleaning. Expect that they touch. Door left open the door, warmer air enters the refrigerator. Smaller cube size level is defrosting. THE DOORS ARE DIFFICULT TO OPEN Check if... Clean gaskets and the surfaces that the water in either compartment. Then... The water supply contains minerals such as sulfur. It is more easily. 34 Then... The freezer temperature...
... old ice and make new supply. A filter may migrate to drip into the defrost pan. See Care and Cleaning section. Ice storage bin needs cleaning. Expect that they touch. Door left open the door, warmer air enters the refrigerator. Smaller cube size level is defrosting. THE DOORS ARE DIFFICULT TO OPEN Check if... Clean gaskets and the surfaces that the water in either compartment. Then... The water supply contains minerals such as sulfur. It is more easily. 34 Then... The freezer temperature...


