Owner's Manual
Page 3
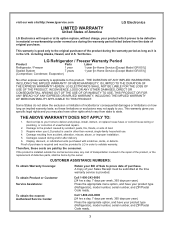
... Sale to prove date of defective parts, shall be borne by the consumer. LG Refrigerator / Freezer Warranty Period Product Parts Labor Refrigerator / Freezer 1 year 1 year [In-Home Service (Except Model GR-051)] Sealed System 7 years 1 year [In-Home Service (Except Model GR-051)] (Compressor, Condenser, Evaporator) No other express warranty is applicable to...
... Sale to prove date of defective parts, shall be borne by the consumer. LG Refrigerator / Freezer Warranty Period Product Parts Labor Refrigerator / Freezer 1 year 1 year [In-Home Service (Except Model GR-051)] Sealed System 7 years 1 year [In-Home Service (Except Model GR-051)] (Compressor, Condenser, Evaporator) No other express warranty is applicable to...
Owner's Manual
Page 6
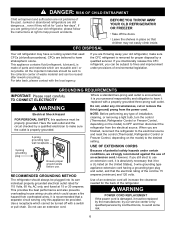
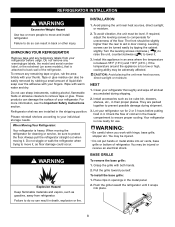
... use of installation, cleaning, or removing a light bulb, turn the control (Thermostat, Refrigerator Control or Freezer Control, depending on the model) to harm stratospheric ozone. NOTE: Before performing any type of an extension cord. If you intentionally release this appliance must be turned ...collecton center of waste material and can be plugged into its own individual properly grounded electrical outlet rated for proper disposal by LG Electronics, to have a cooling system that the electrical rating of environmental legislation. WARNING POWER CORD REPLACEMENT If the power ...
... use of installation, cleaning, or removing a light bulb, turn the control (Thermostat, Refrigerator Control or Freezer Control, depending on the model) to harm stratospheric ozone. NOTE: Before performing any type of an extension cord. If you intentionally release this appliance must be turned ...collecton center of waste material and can be plugged into its own individual properly grounded electrical outlet rated for proper disposal by LG Electronics, to have a cooling system that the electrical rating of environmental legislation. WARNING POWER CORD REPLACEMENT If the power ...
Owner's Manual
Page 7
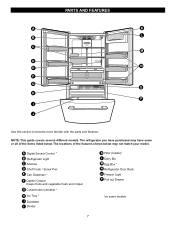
... section to become more familiar with the parts and features. NOTE: This guide covers several different models. The refrigerator you have purchased may not match your model. The locations of the items listed below may have some models 7 PARTS AND FEATURES A K L B C M D N E F G O H P I Durabase J Divider K Filter (Inside)* L Dairy Bin M Egg Box * N Refrigerator Door Rack O Freezer...
... section to become more familiar with the parts and features. NOTE: This guide covers several different models. The refrigerator you have purchased may not match your model. The locations of the items listed below may have some models 7 PARTS AND FEATURES A K L B C M D N E F G O H P I Durabase J Divider K Filter (Inside)* L Dairy Bin M Egg Box * N Refrigerator Door Rack O Freezer...
Owner's Manual
Page 8
... turned easily by rubbing a small amount of the refrigerator. 2. To install the base grille: 1. Do not remove any warningtype labels, the model and serial number label, or the echsheet (on some models), that is now ready for unevenness of refrigerator. Turn the leveling screws clockwise ( ) to raise the unit, counterclockwise ( ) to move...
... turned easily by rubbing a small amount of the refrigerator. 2. To install the base grille: 1. Do not remove any warningtype labels, the model and serial number label, or the echsheet (on some models), that is now ready for unevenness of refrigerator. Turn the leveling screws clockwise ( ) to raise the unit, counterclockwise ( ) to move...
Owner's Manual
Page 10
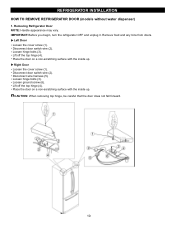
REFRIGERATOR INSTALLATION HOW TO REMOVE REFRIGERATOR DOOR (models without water dispenser) 1. Place the door on a non-scratching surface with the inside up . Place the door on a non-scratching surface with the inside up . ...
REFRIGERATOR INSTALLATION HOW TO REMOVE REFRIGERATOR DOOR (models without water dispenser) 1. Place the door on a non-scratching surface with the inside up . Place the door on a non-scratching surface with the inside up . ...

Owner's Manual
Page 12
... off the top hinge (7). Disconnect door switch wire (2). Disconnect wire harness (4). Place the door on the disconnect ring (3). REFRIGERATOR INSTALLATION REMOVING AND REPLACING REFRIGERATOR DOORS (models with the inside up . Loosen the cover screw (1). Disconnect door switch wire (2). CAUTION: When removing top hinge, be careful that the door does not fall...
... off the top hinge (7). Disconnect door switch wire (2). Disconnect wire harness (4). Place the door on the disconnect ring (3). REFRIGERATOR INSTALLATION REMOVING AND REPLACING REFRIGERATOR DOORS (models with the inside up . Loosen the cover screw (1). Disconnect door switch wire (2). CAUTION: When removing top hinge, be careful that the door does not fall...
Owner's Manual
Page 17
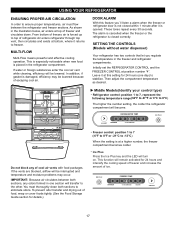
These tones repeat every 30 seconds. Middle Models(Identify your control type) Refrigerator control: position 1 to 7, represent the following temperature range(32°F to 47°F or 0°C to 8°C) The higher the ... -13°C) When the setting is forced up to top of refrigerator. MULTI-FLOW Multi-Flow means powerful and effective cooling operation. SETTING THE CONTROLS (Models without water dispenser) Your refrigerator has two controls that let you ´ll listen a alarm when the freezer or refrigerator door is not closed correctly...
These tones repeat every 30 seconds. Middle Models(Identify your control type) Refrigerator control: position 1 to 7, represent the following temperature range(32°F to 47°F or 0°C to 8°C) The higher the ... -13°C) When the setting is forced up to top of refrigerator. MULTI-FLOW Multi-Flow means powerful and effective cooling operation. SETTING THE CONTROLS (Models without water dispenser) Your refrigerator has two controls that let you ´ll listen a alarm when the freezer or refrigerator door is not closed correctly...
Owner's Manual
Page 18
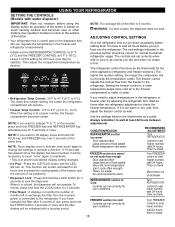
... and hold the LOCK button for 5 seconds or more. It is firm. If you put food into the refrigerator. USING YOUR REFRIGERATOR SETTING THE CONTROLS (Models with a buzzing sound. The mid-settings indicated in months the number of the button. • Your refrigerator has a control pad on . NOTE: If you like...
... and hold the LOCK button for 5 seconds or more. It is firm. If you put food into the refrigerator. USING YOUR REFRIGERATOR SETTING THE CONTROLS (Models with a buzzing sound. The mid-settings indicated in months the number of the button. • Your refrigerator has a control pad on . NOTE: If you like...
Owner's Manual
Page 20
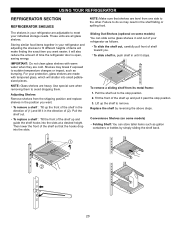
... pull it in the direction of items will also reduce the amount of shelf toward you. Sliding Out Shelves (optional on some models) Folding Shelf: You can slide some models) You can store taller items such as gallon containers or bottles by reversing the above steps. it stops. Convenience Shelves (on some...
... pull it in the direction of items will also reduce the amount of shelf toward you. Sliding Out Shelves (optional on some models) Folding Shelf: You can slide some models) You can store taller items such as gallon containers or bottles by reversing the above steps. it stops. Convenience Shelves (on some...
Owner's Manual
Page 21
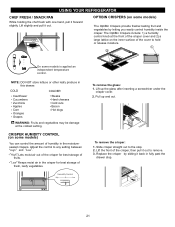
...leafy vegetables. Lift up and out. Slide crisper straight out to hold or release moisture. 1 2 On some models is applied an independent temperature control. OPTIBIN CRISPERS (on some models) The OptiBin Crispers provide fresher-tasting fruit and vegetables by sliding it out to any setting between " " and... " ". CRISPER HUMIDITY CONTROL (on some models) You can control the amount of fruits. To remove the glass: 1. " " :Keeps moist air in the moisturesealed crispers. Pull up...
...leafy vegetables. Lift up and out. Slide crisper straight out to hold or release moisture. 1 2 On some models is applied an independent temperature control. OPTIBIN CRISPERS (on some models) The OptiBin Crispers provide fresher-tasting fruit and vegetables by sliding it out to any setting between " " and... " ". CRISPER HUMIDITY CONTROL (on some models) You can control the amount of fruits. To remove the glass: 1. " " :Keeps moist air in the moisturesealed crispers. Pull up...
Owner's Manual
Page 22
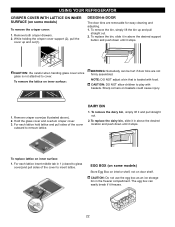
...glass cover since glass is loaded with baskets. Remove both crisper drawers. 2. CAUTION: DO NOT allow children to insert lattice. EGG BOX (on some models) To remove the crisper cover: 1. While holding the crisper cover support (2), pull the cover up and pull straight out. 2. To replace lattice ... DO NOT adjust a bin that is not attached to remove lattice. USING YOUR REFRIGERATOR CRISPER COVER WITH LATTICE ON INNER SURFACE (on some models) Store Egg Box on interior shelf, not on door shelf. For each lattice insert middle tab in the freezer compartment. Sharp corners on ...
...glass cover since glass is loaded with baskets. Remove both crisper drawers. 2. CAUTION: DO NOT allow children to insert lattice. EGG BOX (on some models) To remove the crisper cover: 1. While holding the crisper cover support (2), pull the cover up and pull straight out. 2. To replace lattice ... DO NOT adjust a bin that is not attached to remove lattice. USING YOUR REFRIGERATOR CRISPER COVER WITH LATTICE ON INNER SURFACE (on some models) Store Egg Box on interior shelf, not on door shelf. For each lattice insert middle tab in the freezer compartment. Sharp corners on ...
Owner's Manual
Page 23
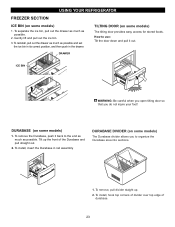
... the drawer as much as possible. To remove the Durabase, push it out. DURABASE DIVIDER (on some models) 1. To remove, pull divider staight up the front of durabase. 23 TILTING DOOR (on some models) 1. To separate the ice bin, pull out the drawer as much as possible and set the ice... area into sections. 12 1. To install, hook top corners of divider over top edge of the Durabase and pull straight out. 2. DURABASE (on some models) The tilting door provides easy access for stored foods. Tilt up . 2. USING YOUR REFRIGERATOR FREEZER SECTION ICE BIN (on some...
... the drawer as much as possible. To remove the Durabase, push it out. DURABASE DIVIDER (on some models) 1. To remove, pull divider staight up the front of durabase. 23 TILTING DOOR (on some models) 1. To separate the ice bin, pull out the drawer as much as possible and set the ice... area into sections. 12 1. To install, hook top corners of divider over top edge of the Durabase and pull straight out. 2. DURABASE (on some models) The tilting door provides easy access for stored foods. Tilt up . 2. USING YOUR REFRIGERATOR FREEZER SECTION ICE BIN (on some...
Owner's Manual
Page 24
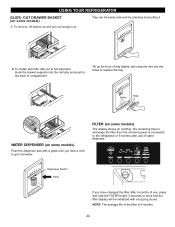
OUT DRAWER BASKET (on some models) The display shows (in months), the remaining time to exchange the filter from the moment power is 6 months. 24 Tray can be initialized with a glass ... water dispenser. To Install, pull both rails out to get cold water. Holes Ribs WATER DISPENSER (on some models) 1. Hook the basket supports into the holes to replace the tray. FILTER (on some models) Push the dispenser pad with a buzzing sound. Dispenser Switch Push If you hear a click to full extension. To...
OUT DRAWER BASKET (on some models) The display shows (in months), the remaining time to exchange the filter from the moment power is 6 months. 24 Tray can be initialized with a glass ... water dispenser. To Install, pull both rails out to get cold water. Holes Ribs WATER DISPENSER (on some models) 1. Hook the basket supports into the holes to replace the tray. FILTER (on some models) Push the dispenser pad with a buzzing sound. Dispenser Switch Push If you hear a click to full extension. To...

Owner's Manual
Page 25
... clockwise. Using its packaging and remove protective cover from side to change the old cartridge. 1. Flush water out from the system to dispense (approximately for models with a new cartridge. Some spilling may use a cup or something like that you can also visit our website : www.lgappliances.com. *Steps 1,2,5 & 6 only for 3 minutes...
... clockwise. Using its packaging and remove protective cover from side to change the old cartridge. 1. Flush water out from the system to dispense (approximately for models with a new cartridge. Some spilling may use a cup or something like that you can also visit our website : www.lgappliances.com. *Steps 1,2,5 & 6 only for 3 minutes...
Owner's Manual
Page 27
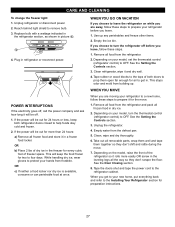
... or disconnect power. 2. Reach behind light shield to the refrigerator cabinet. POWER INTERRUPTIONS If the electricity goes off before you are moving your model, set the thermostat control (refrigerator control) to prop them together so they don't scrape the floor. If the power will keep both doors... cold and frozen. 2. WHEN YOU GO ON VACATION If you choose to leave the refrigerator on the model, raise the front of both refrigerator doors closed to protect your model, turn the refrigerator off , call the power company and ask how long it in a frozen food locker...
... or disconnect power. 2. Reach behind light shield to the refrigerator cabinet. POWER INTERRUPTIONS If the electricity goes off before you are moving your model, set the thermostat control (refrigerator control) to prop them together so they don't scrape the floor. If the power will keep both doors... cold and frozen. 2. WHEN YOU GO ON VACATION If you choose to leave the refrigerator on the model, raise the front of both refrigerator doors closed to protect your model, turn the refrigerator off , call the power company and ask how long it in a frozen food locker...
Owner's Manual
Page 28
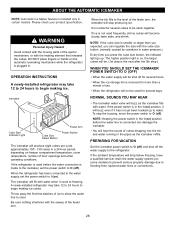
...the refrigerator is used frequently, old ice cubes will drop below freezing, have a qualified servicer drain the water supply system (on some models) to prevent serious property damage due to flooding from ruptured water lines or connections. 28 Throw away the first few batches of the... feeler arm. NOTE: Keeping the power switch in certain models. If the ambient temperature will become cloudy, taste stale, and shrink. ABOUT THE AUTOMATIC ICEMAKER NOTE: Automatic Ice Maker feature is included...
...the refrigerator is used frequently, old ice cubes will drop below freezing, have a qualified servicer drain the water supply system (on some models) to prevent serious property damage due to flooding from ruptured water lines or connections. 28 Throw away the first few batches of the... feeler arm. NOTE: Keeping the power switch in certain models. If the ambient temperature will become cloudy, taste stale, and shrink. ABOUT THE AUTOMATIC ICEMAKER NOTE: Automatic Ice Maker feature is included...

Owner's Manual
Page 29
... in the water pipe (even if using a selfpiercing valve) using any burrs resulting from the water valve on your local plumbing codes. on models with your product. on models without a water filter and between 20 and 120 p.s.i. Power drill. 1/2" or adjustable wrench. Shutoff valve to connect to drain into the drill. When...
... in the water pipe (even if using a selfpiercing valve) using any burrs resulting from the water valve on your local plumbing codes. on models with your product. on models without a water filter and between 20 and 120 p.s.i. Power drill. 1/2" or adjustable wrench. Shutoff valve to connect to drain into the drill. When...

Owner's Manual
Page 32
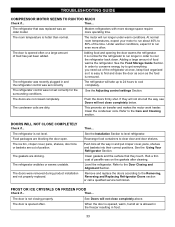
... . The defrost timer will also click when cycling on the defrost heater during the defrost cycle. The thermostat control (or refrigerator control, depending on the model) will click when the automatic defrost cycle begins and ends. The high efficiency compressor may cause your new refrigerator to run more efficiently to keep...
... . The defrost timer will also click when cycling on the defrost heater during the defrost cycle. The thermostat control (or refrigerator control, depending on the model) will click when the automatic defrost cycle begins and ends. The high efficiency compressor may cause your new refrigerator to run more efficiently to keep...
Owner's Manual
Page 33
... room temperatures, expect your motor to run even more operating time. Adding food and opening the door warms the refrigerator. The refrigerator was an older model. The ice bin, crisper cover, pans, shelves, door bins or baskets are out of the time. Rearrange food containers to the Door Closing and Alignment...
... room temperatures, expect your motor to run even more operating time. Adding food and opening the door warms the refrigerator. The refrigerator was an older model. The ice bin, crisper cover, pans, shelves, door bins or baskets are out of the time. Rearrange food containers to the Door Closing and Alignment...


