Owners Manual
Page 1
OWNER'S MANUAL BOTTOM FREEZER REFRIGERATOR Please read this owner's manual thoroughly before operating and keep it handy for reference at all times. Model Name/Nombre del modelo **=color number/número de color GM-B22*QTB GM-B24*QTB LBC24360** LBN22370** LDC22370** LDC24370** LDN22470** LDCS24223* LDNS22220* P/No. : MFL67851401-6 www.lg.com ESPAÑOL ENGLISH
OWNER'S MANUAL BOTTOM FREEZER REFRIGERATOR Please read this owner's manual thoroughly before operating and keep it handy for reference at all times. Model Name/Nombre del modelo **=color number/número de color GM-B22*QTB GM-B24*QTB LBC24360** LBN22370** LDC22370** LDC24370** LDN22470** LDCS24223* LDNS22220* P/No. : MFL67851401-6 www.lg.com ESPAÑOL ENGLISH
Owners Manual
Page 3
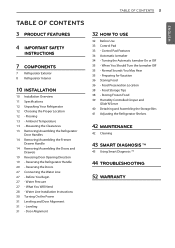
...Frozen Food 39 Humidity Controlled Crisper and Glide'N'Serve 40 Detaching and Assembling the Storage Bins 41 Adjusting the Refrigerator Shelves 42 MAINTENANCE 42 Cleaning 43 SMART DIAGNOSIS TM 43 Using Smart Diagnosis TM 44 TROUBLESHOOTING 52 WARRANTY ...OF CONTENTS 2 ENGLISH TABLE OF CONTENTS 3 PRODUCT FEATURES 4 IMPORTANT SAFETY INSTRUCTIONS 7 COMPONENTS 7 Refrigerator Exterior 8 Refrigerator Interior 10 INSTALLATION 10 Installation Overview 11 Specifications 12 Unpacking Your Refrigerator 12 Choosing the Proper Location 12 - Flooring 13 - Measuring the Clearances 13 Removing/Assembling the...
...Frozen Food 39 Humidity Controlled Crisper and Glide'N'Serve 40 Detaching and Assembling the Storage Bins 41 Adjusting the Refrigerator Shelves 42 MAINTENANCE 42 Cleaning 43 SMART DIAGNOSIS TM 43 Using Smart Diagnosis TM 44 TROUBLESHOOTING 52 WARRANTY ...OF CONTENTS 2 ENGLISH TABLE OF CONTENTS 3 PRODUCT FEATURES 4 IMPORTANT SAFETY INSTRUCTIONS 7 COMPONENTS 7 Refrigerator Exterior 8 Refrigerator Interior 10 INSTALLATION 10 Installation Overview 11 Specifications 12 Unpacking Your Refrigerator 12 Choosing the Proper Location 12 - Flooring 13 - Measuring the Clearances 13 Removing/Assembling the...
Owners Manual
Page 4
... 20 percent when the freezer section is maintained at 30 second intervals. HUMIDITY CONTROLLED CRISPERS The Humidity Controlled Crispers are designed to prevent refrigerator malfunctioning that could occur if a refrigerator door or freezer drawer remains open for more than 60 seconds, a warning alarm sounds at the coldest temperature for a 24-hour period...
... 20 percent when the freezer section is maintained at 30 second intervals. HUMIDITY CONTROLLED CRISPERS The Humidity Controlled Crispers are designed to prevent refrigerator malfunctioning that could occur if a refrigerator door or freezer drawer remains open for more than 60 seconds, a warning alarm sounds at the coldest temperature for a 24-hour period...
Owners Manual
Page 5
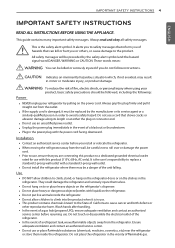
... contact an authorized service center. . It alerts you to climb into the product when it is damaged, it straight out from the refrigerator. DO NOT allow children to safety messages that can be replaced by the safety alert symbol and the hazard signal word DANGER, WARNING... after handling. This guide contains many important safety messages. All safety messages will be followed, including the following : Power . When moving the refrigerator away from the wall, be a danger of hazards that inform you do not follow instructions. Do not allow children to the product. Do ...
... contact an authorized service center. . It alerts you to climb into the product when it is damaged, it straight out from the refrigerator. DO NOT allow children to safety messages that can be replaced by the safety alert symbol and the hazard signal word DANGER, WARNING... after handling. This guide contains many important safety messages. All safety messages will be followed, including the following : Power . When moving the refrigerator away from the wall, be a danger of hazards that inform you do not follow instructions. Do not allow children to the product. Do ...
Owners Manual
Page 6
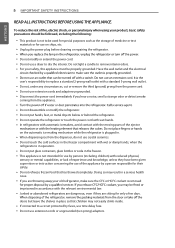
...should be used for special purposes such as the storage of the ejector on ships, etc. . Unplug the power plug before cleaning or repairing the refrigerator. . . Do not light a candle to a circuit protected by a person responsible for only a few days. Have the wall outlet and the ...contact with reduced physical, sensory or mental capabilities, or lack of the appliance by fuses, use on the automatic ice-making mechanism while the refrigerator is removed imprisoned in operation. . doors but leave the shelves in . . If connected to remove interior odors. . Do not use ...
...should be used for special purposes such as the storage of the ejector on ships, etc. . Unplug the power plug before cleaning or repairing the refrigerator. . . Do not light a candle to a circuit protected by a person responsible for only a few days. Have the wall outlet and the ...contact with reduced physical, sensory or mental capabilities, or lack of the appliance by fuses, use on the automatic ice-making mechanism while the refrigerator is removed imprisoned in operation. . doors but leave the shelves in . . If connected to remove interior odors. . Do not use ...
Owners Manual
Page 7
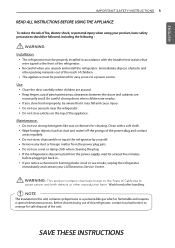
...injury. . WARNING: This product contains chemicals known to the State of California to a power source. Do not use aerosols near the refrigerator. . Close the door carefully when children are nearby. . Use . If you store food improperly, be followed, including the following :.... Wash hands after handling. Maintenance . Do not use of the refrigerator. . Be careful when you notice a chemical or burning plastic smell or see smoke, unplug the refrigerator immediately and contact your LG Electronics Service Center. Clean with the Installer Instructions that it back in ...
...injury. . WARNING: This product contains chemicals known to the State of California to a power source. Do not use aerosols near the refrigerator. . Close the door carefully when children are nearby. . Use . If you store food improperly, be followed, including the following :.... Wash hands after handling. Maintenance . Do not use of the refrigerator. . Be careful when you notice a chemical or burning plastic smell or see smoke, unplug the refrigerator immediately and contact your LG Electronics Service Center. Clean with the Installer Instructions that it back in ...
Owners Manual
Page 8
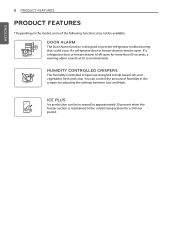
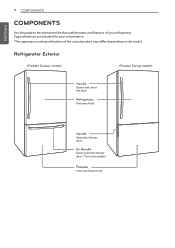
Handle Opens the freezer door. Refrigerator Exterior Handle Opens and closes the door. Ez Handle Easily opens the freezer door. (*On some models) Freezer Preserves frozen food. Refrigerator Preserves food. Page references are included for your refrigerator. ENGLISH 7 COMPONENTS COMPONENTS Use this page to become more familiar with the parts and features of your convenience. *The appearance and specifications of the actual product may differ depending on the model.
Handle Opens the freezer door. Refrigerator Exterior Handle Opens and closes the door. Ez Handle Easily opens the freezer door. (*On some models) Freezer Preserves frozen food. Refrigerator Preserves food. Page references are included for your refrigerator. ENGLISH 7 COMPONENTS COMPONENTS Use this page to become more familiar with the parts and features of your convenience. *The appearance and specifications of the actual product may differ depending on the model.
Owners Manual
Page 9
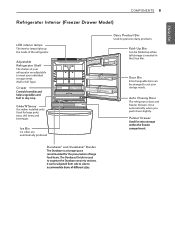
... The shelves in the Door Bin. It can be arranged to organize the Durabase area into sections. Auto Closing Door The refrigerator door and freezer drawers close automatically when you push them slightly. Ice Bin Ice cubes are adjustable to meet your storage needs. Fold-Up...'N'Serve (Ice maker installed only) Used for extra storage within the freezer compartment. Pullout Drawer Used for large party trays, deli items and beverages. Refrigerator Interior (Freezer Drawer Model) COMPONENTS 8 ENGLISH LED interior lamps The interior lamps light up when tall storage is needed in your...
... The shelves in the Door Bin. It can be arranged to organize the Durabase area into sections. Auto Closing Door The refrigerator door and freezer drawers close automatically when you push them slightly. Ice Bin Ice cubes are adjustable to meet your storage needs. Fold-Up...'N'Serve (Ice maker installed only) Used for extra storage within the freezer compartment. Pullout Drawer Used for large party trays, deli items and beverages. Refrigerator Interior (Freezer Drawer Model) COMPONENTS 8 ENGLISH LED interior lamps The interior lamps light up when tall storage is needed in your...
Owners Manual
Page 10
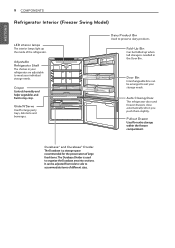
...different sizes. Pullout Drawer Used for large party trays, deli items and beverages. It can be arranged to meet your storage needs. Adjustable Refrigerator Shelf The shelves in the Door Bin. Door Bin Interchangeable bins can be folded up the inside of large food items. The Durabase ...Divider is needed in your refrigerator are adjustable to suit your individual storage needs. Durabase® and Durabase® Divider The Durabase is a storage space recommended for the ...
...different sizes. Pullout Drawer Used for large party trays, deli items and beverages. It can be arranged to meet your storage needs. Adjustable Refrigerator Shelf The shelves in the Door Bin. Door Bin Interchangeable bins can be folded up the inside of large food items. The Durabase ...Divider is needed in your refrigerator are adjustable to suit your individual storage needs. Durabase® and Durabase® Divider The Durabase is a storage space recommended for the ...
Owners Manual
Page 11
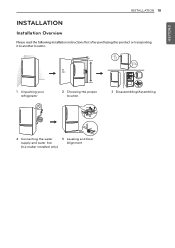
ENGLISH INSTALLATION Installation Overview it to another location. INSTALLATION 10 1 Unpacking your refrigerator 2 Choosing the proper location 3 Disassembling/Assembling 4 Connecting the water 5 Leveling and Door supply and water line Alignment (Ice maker installed only)
ENGLISH INSTALLATION Installation Overview it to another location. INSTALLATION 10 1 Unpacking your refrigerator 2 Choosing the proper location 3 Disassembling/Assembling 4 Connecting the water 5 Leveling and Door supply and water line Alignment (Ice maker installed only)

Owners Manual
Page 13
.... such as gasoline, away from overheated wires. Do not use sharp instruments, rubbing alcohol, ammabl uids, or abrasive cleaners to your refrigerator. NOTE The water pressure must be leveled and installed on a solidly constructed front should always be provided. This provides the best performance... it . Turn the leveling legs to the left to raise the unit or to the right to move and install the refrigerator. Your refrigerator is recommended that a separate circuit serving only this appliance be plugged into its own individual properly grounded electrical outlet rated for ...
.... such as gasoline, away from overheated wires. Do not use sharp instruments, rubbing alcohol, ammabl uids, or abrasive cleaners to your refrigerator. NOTE The water pressure must be leveled and installed on a solidly constructed front should always be provided. This provides the best performance... it . Turn the leveling legs to the left to raise the unit or to the right to move and install the refrigerator. Your refrigerator is recommended that a separate circuit serving only this appliance be plugged into its own individual properly grounded electrical outlet rated for ...
Owners Manual
Page 14
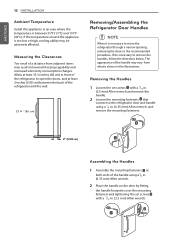
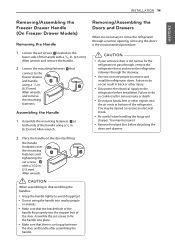
... an area where the temperature is shown in the illustrations. Measuring the Clearances Too small of a distance from what is between the back of the refrigerator to open the doors, and at least 2 inches (5.08 cm) between 55°F (13°C) and 110°F (43°C). If it is ... the Handles 1 Loosen the set screws with a 3/32 in. (2.5 mm) Allen wrench and remove the handle. 2 Loosen the mounting fasteners that connect to the refrigerator door and handle using a1/4 in. (6.35 mm) Allen wrench. 2 Place the handle on the door by fitting the handle footprints over the mounting fasteners...
... an area where the temperature is shown in the illustrations. Measuring the Clearances Too small of a distance from what is between the back of the refrigerator to open the doors, and at least 2 inches (5.08 cm) between 55°F (13°C) and 110°F (43°C). If it is ... the Handles 1 Loosen the set screws with a 3/32 in. (2.5 mm) Allen wrench and remove the handle. 2 Loosen the mounting fasteners that connect to the refrigerator door and handle using a1/4 in. (6.35 mm) Allen wrench. 2 Place the handle on the door by fitting the handle footprints over the mounting fasteners...
Owners Manual
Page 15
... or disassembling the handles: . Do not swing the handle into place. . Assemble the set screws to pass through, remove the refrigerator doors and move the refrigerator through the doorway. . Do not put hands, feet or other injury. . Be careful when handling the hinge and stopper. Make... the door and handle after assembling the handle. You may be injured or receive an electrical shock. . Failure to remove and install the refrigerator doors. CAUTION . Make sure that there is necessary to the freezer drawer and handle using a 1/4 in serious injury or death. . ...
... or disassembling the handles: . Do not swing the handle into place. . Assemble the set screws to pass through, remove the refrigerator doors and move the refrigerator through the doorway. . Do not put hands, feet or other injury. . Be careful when handling the hinge and stopper. Make... the door and handle after assembling the handle. You may be injured or receive an electrical shock. . Failure to remove and install the refrigerator doors. CAUTION . Make sure that there is necessary to the freezer drawer and handle using a 1/4 in serious injury or death. . ...
Owners Manual
Page 16
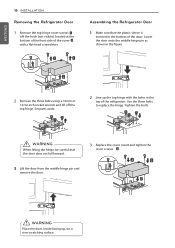
...bolts to replace the hinge. Tighten the bolts. WARNING Place the door, inside facing up the top hinge with a flat-head screwdriver. Assembling the Refrigerator Door 1 Make sure that the door does not fall forward. 3 Replace the cover. Lower the door onto the middle hinge pin as shown in... top of the door. WARNING When lifting the hinge, be careful that the plastic sleeve is inserted in the bottom of the refrigerator. ENGLISH 15 INSTALLATION Removing the Refrigerator Door 1 Remove the top hinge cover screws . Lift the hook (not visible), located at the bottom of the front side ...
...bolts to replace the hinge. Tighten the bolts. WARNING Place the door, inside facing up the top hinge with a flat-head screwdriver. Assembling the Refrigerator Door 1 Make sure that the door does not fall forward. 3 Replace the cover. Lower the door onto the middle hinge pin as shown in... top of the door. WARNING When lifting the hinge, be careful that the plastic sleeve is inserted in the bottom of the refrigerator. ENGLISH 15 INSTALLATION Removing the Refrigerator Door 1 Remove the top hinge cover screws . Lift the hook (not visible), located at the bottom of the front side ...
Owners Manual
Page 19
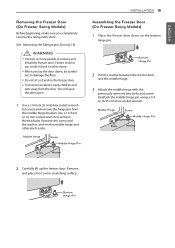
...and other injury. . Remove and place it on the freezer door. . Failure to loosen and remove the hinge pin from the door. See Removing the Refrigerator Door (p.15) WARNING . Do not sit or stand on a non-scratching surface. Use a 13/32 in (6.35 mm) hex socket wrench to do... so can result in . (6.35 mm) hex socket wrench. When you completely remove the refrigerator door. Reattach the middle hinge pin using a 1/4 in back or other parts aside. Middle Hinge Screw Middle Hinge Pin Bolts Washer INSTALLATION 18 Assembling the...
...and other injury. . Remove and place it on the freezer door. . Failure to loosen and remove the hinge pin from the door. See Removing the Refrigerator Door (p.15) WARNING . Do not sit or stand on a non-scratching surface. Use a 13/32 in (6.35 mm) hex socket wrench to do... so can result in . (6.35 mm) hex socket wrench. When you completely remove the refrigerator door. Reattach the middle hinge pin using a 1/4 in back or other parts aside. Middle Hinge Screw Middle Hinge Pin Bolts Washer INSTALLATION 18 Assembling the...

Owners Manual
Page 20
... and fall out The buttons were installed without pressure, and for this reason, they can be unscrewed using a 1/4 in . (2.5 mm) Allen wrench. Reversing the Refrigerator Handle 1 Loosen the set screws with a 3/32 in. (2.5 mm) Allen wrench and remove the handle. 2 Loosen the mounting fasteners that connect to the... refrigerator door and handle using the plug buttons 5 on the right side, place a piece of masking tape near the top of the handle on the left...
... and fall out The buttons were installed without pressure, and for this reason, they can be unscrewed using a 1/4 in . (2.5 mm) Allen wrench. Reversing the Refrigerator Handle 1 Loosen the set screws with a 3/32 in. (2.5 mm) Allen wrench and remove the handle. 2 Loosen the mounting fasteners that connect to the... refrigerator door and handle using the plug buttons 5 on the right side, place a piece of masking tape near the top of the handle on the left...
Owners Manual
Page 22
... on the middle hinge pin bracket. 10 Reattach middle hinge pin using a ¼ in the same orientation with two bolts and a screw. 13 Place the refrigerator door down over the bolt holes on the left side of the flange. Decorative Screw 8 Remove the outer lower decorative screw from the flange on... the frame between the freezer and refrigerator doors. (You will need this hole for the middle hinge bracket.) 12 Loosen the two screws and remove the left hinge cap. 9 Flip the ...
... on the middle hinge pin bracket. 10 Reattach middle hinge pin using a ¼ in the same orientation with two bolts and a screw. 13 Place the refrigerator door down over the bolt holes on the left side of the flange. Decorative Screw 8 Remove the outer lower decorative screw from the flange on... the frame between the freezer and refrigerator doors. (You will need this hole for the middle hinge bracket.) 12 Loosen the two screws and remove the left hinge cap. 9 Flip the ...
Owners Manual
Page 23
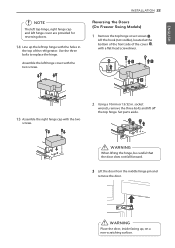
... cover , with a flat-head screwdriver. 15 Assemble the right hinge cap with the two screws. 2 Using a 10mm or 13/32 in the top of the refrigerator. socket wrench, remove the three bolts and lift off the top hinge. WARNING Place the door, inside facing up the left top hinge with the...
... cover , with a flat-head screwdriver. 15 Assemble the right hinge cap with the two screws. 2 Using a 10mm or 13/32 in the top of the refrigerator. socket wrench, remove the three bolts and lift off the top hinge. WARNING Place the door, inside facing up the left top hinge with the...
Owners Manual
Page 24
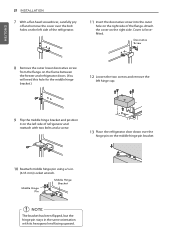
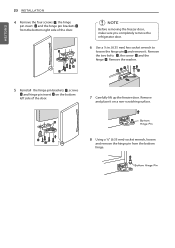
... 1 , screws 2 and hinge pin insert 3 on the bottom left side of the door. 3 NOTE Before removing the freezer door, make sure you completely remove the refrigerator door. 6 Use a ¼ in. (6.35 mm) hex socket wrench to loosen the hinge pin 1 and remove it on a non-scratching surface. Bottom Hinge Pin 3 8 Using...
... 1 , screws 2 and hinge pin insert 3 on the bottom left side of the door. 3 NOTE Before removing the freezer door, make sure you completely remove the refrigerator door. 6 Use a ¼ in. (6.35 mm) hex socket wrench to loosen the hinge pin 1 and remove it on a non-scratching surface. Bottom Hinge Pin 3 8 Using...
Owners Manual
Page 25
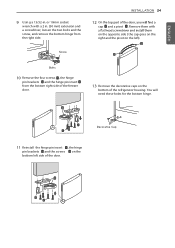
... remove the bottom hinge from the bottom right side of the freezer door. 13 Re move the decorative caps on the left side of the refrigerator housing. You will need these holes for the bottom hinge. 3 Decorative Cap 11 Reinstall the hinge pin insert 1 , the hinge pin brackets 2 and the screws...
... remove the bottom hinge from the bottom right side of the freezer door. 13 Re move the decorative caps on the left side of the refrigerator housing. You will need these holes for the bottom hinge. 3 Decorative Cap 11 Reinstall the hinge pin insert 1 , the hinge pin brackets 2 and the screws...


