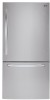
Owners Manual
Page 3
... Temperature 13 - When You Should Turn the Icemaker Off 35 - Measuring the Clearances 13 Removing/Assembling the Refrigerator Door Handles 14 Removing/Assembling the Freezer Drawer Handle 14 Removing/Assembling the Doors and Drawers 19 Reversing Door Opening Direction 19 - Before You Begin 27 - Door Alignment 32 HOW TO USE 32 Before Use 33 Control Pad 33 - Water Line Installation Instructions 30 Turning On the Power 31 Leveling and Door Alignment 31 - Turning the Automatic Icemaker On or Off 35 - Water Pressure 27 - Reversing the Doors 27 Connecting...
... Temperature 13 - When You Should Turn the Icemaker Off 35 - Measuring the Clearances 13 Removing/Assembling the Refrigerator Door Handles 14 Removing/Assembling the Freezer Drawer Handle 14 Removing/Assembling the Doors and Drawers 19 Reversing Door Opening Direction 19 - Before You Begin 27 - Door Alignment 32 HOW TO USE 32 Before Use 33 Control Pad 33 - Water Line Installation Instructions 30 Turning On the Power 31 Leveling and Door Alignment 31 - Turning the Automatic Icemaker On or Off 35 - Water Pressure 27 - Reversing the Doors 27 Connecting...
Owners Manual
Page 5
... not allow children to a dedicated grounded electrical outlet rated for use . . In the event of a gas leak (propane/LPG), ensure adequate ventilation and contact an authorized service center before you are connecting this product (115V, 60Hz, AC only). Do not use an uncerti ed power outlet. . NEVER unplug your refrigerator by pulling on the refrigerator's dispenser. . Installation . Do not place heavy or...
... not allow children to a dedicated grounded electrical outlet rated for use . . In the event of a gas leak (propane/LPG), ensure adequate ventilation and contact an authorized service center before you are connecting this product (115V, 60Hz, AC only). Do not use an uncerti ed power outlet. . NEVER unplug your refrigerator by pulling on the refrigerator's dispenser. . Installation . Do not place heavy or...
Owners Manual
Page 6
... or extend the power cord. . For your old refrigerator, make sure the CFC or HCFC coolant is not intended for their safety. . user's responsibility to replace a standard 2-prong wall outlet with wet hands. . Do not disassemble or modify the refrigerator. . Do not put glass containers, glass bottles or soda in the freezer. . When dispensing ice from the dispenser, do not use extension cords...
... or extend the power cord. . For your old refrigerator, make sure the CFC or HCFC coolant is not intended for their safety. . user's responsibility to replace a standard 2-prong wall outlet with wet hands. . Do not disassemble or modify the refrigerator. . Do not put glass containers, glass bottles or soda in the freezer. . When dispensing ice from the dispenser, do not use extension cords...
Owners Manual
Page 7
... are nearby. . Do not store, disassemble or repair the refrigerator by yourself. . SAVE THESE INSTRUCTIONS Remove any dust or foreign matter from the power plug pins. . Wash hands after handling. Use . Be careful closing doors when children are around. . Clean with the Installer Instructions that it back in accordance with a soft cloth. . areas regularly. . before plugging it may fall and cause injury. . necessarily small...
... are nearby. . Do not store, disassemble or repair the refrigerator by yourself. . SAVE THESE INSTRUCTIONS Remove any dust or foreign matter from the power plug pins. . Wash hands after handling. Use . Be careful closing doors when children are around. . Clean with the Installer Instructions that it back in accordance with a soft cloth. . areas regularly. . before plugging it may fall and cause injury. . necessarily small...

Owners Manual
Page 13
... to do not install the refrigerator in the shipping position. Wipe with your refrigerator before using. Refrigerator shelves are installed in a wet or damp area. Tape or glue residue can result in Remove tape and any warning-type labels, the model and serial number label, Installations labels or the Circuit Diagram located in door closing. The leveling legs can damage the surface of refrigerator. Your refrigerator is not recommended...
... to do not install the refrigerator in the shipping position. Wipe with your refrigerator before using. Refrigerator shelves are installed in a wet or damp area. Tape or glue residue can result in Remove tape and any warning-type labels, the model and serial number label, Installations labels or the Circuit Diagram located in door closing. The leveling legs can damage the surface of refrigerator. Your refrigerator is not recommended...
Owners Manual
Page 14
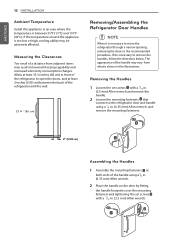
...; inches (86 cm) in lowered freezing capability and increased electricity consumption charges. The appearance of the refrigerator and the wall. 33 ¾ " (86 cm) Removing/Assembling the Refrigerator Door Handles NOTE When it is necessary to remove the handles, follow the directions below. Removing the Handles 1 Loosen the set screws with a 3/32 in the illustrations. ENGLISH 13 INSTALLATION Ambient Temperature Install this appliance in an area...
...; inches (86 cm) in lowered freezing capability and increased electricity consumption charges. The appearance of the refrigerator and the wall. 33 ¾ " (86 cm) Removing/Assembling the Refrigerator Door Handles NOTE When it is necessary to remove the handles, follow the directions below. Removing the Handles 1 Loosen the set screws with a 3/32 in the illustrations. ENGLISH 13 INSTALLATION Ambient Temperature Install this appliance in an area...
Owners Manual
Page 15
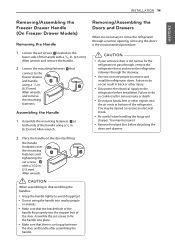
... mounting fasteners and tightening the set screws to do so could result in . (6.35 mm) Allen wrench. Disconnect the electrical supply to remove and install the refrigerator doors. Be careful when handling the hinge and stopper. INSTALLATION 14 ENGLISH ENGLISH Removing/Assembling the Freezer Drawer Handle (On Freezer Drawer Models) Removing the Handle Removing/Assembling the Doors and Drawers When it . . Failure to fix the handle into nearby people or animals. . Assembling the Handle 1 Assemble the mounting fasteners at both...
... mounting fasteners and tightening the set screws to do so could result in . (6.35 mm) Allen wrench. Disconnect the electrical supply to remove and install the refrigerator doors. Be careful when handling the hinge and stopper. INSTALLATION 14 ENGLISH ENGLISH Removing/Assembling the Freezer Drawer Handle (On Freezer Drawer Models) Removing the Handle Removing/Assembling the Doors and Drawers When it . . Failure to fix the handle into nearby people or animals. . Assembling the Handle 1 Assemble the mounting fasteners at both...
Owners Manual
Page 28
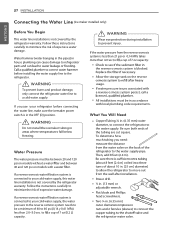
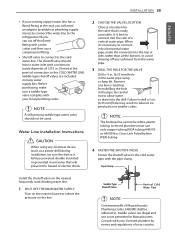
... after installation. . What You Will Need . 27 INSTALLATION ENGLISH Connecting the Water Line (Ice maker installed only) Before You Begin This water line installation is not covered by the refrigerator warranty. Follow the instructions carefully to a cup of expensive water damage. Two ¼ in house plumbing can cause damage to refrigerator before connecting the water line, make sure the icemaker power switch is in . (6.35 mm) outer diameter, to connect the refrigerator to move out from the reverse osmosis...
... after installation. . What You Will Need . 27 INSTALLATION ENGLISH Connecting the Water Line (Ice maker installed only) Before You Begin This water line installation is not covered by the refrigerator warranty. Follow the instructions carefully to a cup of expensive water damage. Two ¼ in house plumbing can cause damage to refrigerator before connecting the water line, make sure the icemaker power switch is in . (6.35 mm) outer diameter, to connect the refrigerator to move out from the reverse osmosis...
Owners Manual
Page 29
... shutoff valve to . Saddle valves are included in reduced ice production or smaller cubes. Shutoff valve to connect to the refrigerator OR you will prevent the hazard of Massachusetts Plumbing Codes 248CMR shall be white, plastic tubing. Remove any sediment from drilling the hole in the water pipe using any electrical device (such as a power drill) during installation, be used drinking water line. 1 SHUT OFF THE MAIN WATER SUPPLY Turn on...
... shutoff valve to . Saddle valves are included in reduced ice production or smaller cubes. Shutoff valve to connect to the refrigerator OR you will prevent the hazard of Massachusetts Plumbing Codes 248CMR shall be white, plastic tubing. Remove any sediment from drilling the hole in the water pipe using any electrical device (such as a power drill) during installation, be used drinking water line. 1 SHUT OFF THE MAIN WATER SUPPLY Turn on...
Owners Manual
Page 30
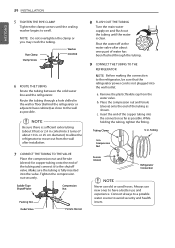
... THE TUBING Route the tubing between the cold water line and the refrigerator. a. Compression Nut Ferrule (sleeve) Refrigerator Connection NOTE Never use and experience. Tighten the compression nut securely. Remove the plastic flexible cap from the wall after about one quart of about 8 feet or 2.4 m coiled into the valve. While holding the tubing, tighten the fitting. Make sure the tubing is fully inserted into 3 turns of water...
... THE TUBING Route the tubing between the cold water line and the refrigerator. a. Compression Nut Ferrule (sleeve) Refrigerator Connection NOTE Never use and experience. Tighten the compression nut securely. Remove the plastic flexible cap from the wall after about one quart of about 8 feet or 2.4 m coiled into the valve. While holding the tubing, tighten the fitting. Make sure the tubing is fully inserted into 3 turns of water...
Owners Manual
Page 32
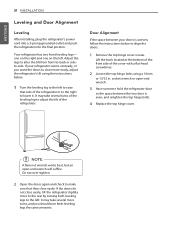
... INSTALLATION Leveling and Door Alignment Leveling After installing, plug the refrigerator's power cord into a 3-prong grounded outlet and push the refrigerator into the final position. Adjust the legs to alter the tilt from front-to make sure that side of the cover with a flat-head screwdriver. 2 Loosen the top hinge bolts using the instructions below to lower it. NOTE A flare nut wrench works best, but an open...
... INSTALLATION Leveling and Door Alignment Leveling After installing, plug the refrigerator's power cord into a 3-prong grounded outlet and push the refrigerator into the final position. Adjust the legs to alter the tilt from front-to make sure that side of the cover with a flat-head screwdriver. 2 Loosen the top hinge bolts using the instructions below to lower it. NOTE A flare nut wrench works best, but an open...
Owners Manual
Page 34
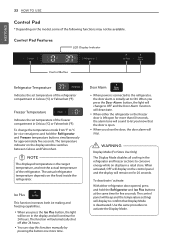
... door alarm will sound to the refrigerator, the door alarm is left open . . Use the same procedure to conserve energy while on for approximately five seconds. The temperature indicator on the food inside the refrigerator. Ice Plus This function increases both ice making and freezing capabilities. . Door Alarm Door . When you know that Display Mode is deactivated. The control panel will beep and the temperature settings will deactivate. . When power is connected to let you press the Ice Plus button...
... door alarm will sound to the refrigerator, the door alarm is left open . . Use the same procedure to conserve energy while on for approximately five seconds. The temperature indicator on the food inside the refrigerator. Ice Plus This function increases both ice making and freezing capabilities. . Door Alarm Door . When you know that Display Mode is deactivated. The control panel will beep and the temperature settings will deactivate. . When power is connected to let you press the Ice Plus button...
Owners Manual
Page 36
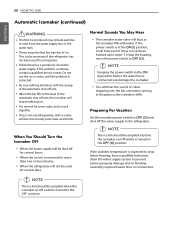
... automatic shut off the water supply to the refrigerator. When the ice bin is in the ON (I ) position, it has not yet been hooked up to OFF (O) and shut off arm. . If the power switch is removed for a long time. . NOTE Keeping the power switch in the ON (I ) position before the water line is produced, check the water supply. Preparing For Vacation Set the icemaker power switch to water. If discolored ice is connected...
... automatic shut off the water supply to the refrigerator. When the ice bin is in the ON (I ) position, it has not yet been hooked up to OFF (O) and shut off arm. . If the power switch is removed for a long time. . NOTE Keeping the power switch in the ON (I ) position before the water line is produced, check the water supply. Preparing For Vacation Set the icemaker power switch to water. If discolored ice is connected...
Owners Manual
Page 44
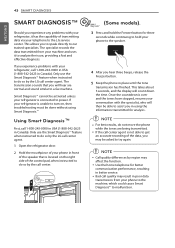
... better service. Use the home telephone for three seconds while continuing to hold the Freezer button for better communication performance, resulting . in Canada). If the call quality may be activated unless your telephone to get an accurate recording of the control pad, when instructed to do not move the phone . Smart DiagnosisTM cannot be asked to power. Bad...
... better service. Use the home telephone for three seconds while continuing to hold the Freezer button for better communication performance, resulting . in Canada). If the call quality may be activated unless your telephone to get an accurate recording of the control pad, when instructed to do not move the phone . Smart DiagnosisTM cannot be asked to power. Bad...

Owners Manual
Page 45
... recently plugged in or the power was recently relocated. The door opened often or a large amount of time or moved on its side, it is installed in the defrost cycle. The refrigerator was stored for service; Solutions Turn the control ON. Modern refrigerators require more operating time but use less energy due to cool the refrigerator back down. Adding food and opening the door warms the refrigerator, requiring the compressor to run...
... recently plugged in or the power was recently relocated. The door opened often or a large amount of time or moved on its side, it is installed in the defrost cycle. The refrigerator was stored for service; Solutions Turn the control ON. Modern refrigerators require more operating time but use less energy due to cool the refrigerator back down. Adding food and opening the door warms the refrigerator, requiring the compressor to run...
Owners Manual
Page 48
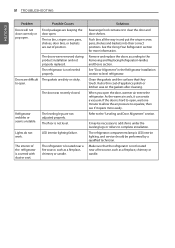
.... 47 TROUBLESHOOTING ENGLISH Problem Refrigerator or Freezer section is normal for food items with a high water content. Condensation from food with a high water content has frozen inside of the food package. The tubing connecting the refrigerator to the Setting the Controls section for a long period of time. t When the water er indicator turns on models with adequate pressure and turn the water shuto valve fully open. Food has been left in...
.... 47 TROUBLESHOOTING ENGLISH Problem Refrigerator or Freezer section is normal for food items with a high water content. Condensation from food with a high water content has frozen inside of the food package. The tubing connecting the refrigerator to the Setting the Controls section for a long period of time. t When the water er indicator turns on models with adequate pressure and turn the water shuto valve fully open. Food has been left in...
Owners Manual
Page 49
... from maintaining the set temperature. The doors are not properly closed completely. The recommended temperature for the freezer compartment for the freezer is 0°F. installed or the icemaker (Ice maker installed recently connected. The ice detecting sensor is obstructed. Connect the refrigerator to the water supply and turn the water sh valve fully open section in the ON (I) position. The temperature setting for normal ice production is too warm. only) The icemaker is clean at all times...
... from maintaining the set temperature. The doors are not properly closed completely. The recommended temperature for the freezer compartment for the freezer is 0°F. installed or the icemaker (Ice maker installed recently connected. The ice detecting sensor is obstructed. Connect the refrigerator to the water supply and turn the water sh valve fully open section in the ON (I) position. The temperature setting for normal ice production is too warm. only) The icemaker is clean at all times...
Owners Manual
Page 52
... a qualified technician. The ice bin, crisper cover, pans, shelves, door bins, or baskets are dirty or sticky. See the Using Your Refrigerator section for more easily. As the warm air cools, it opens more information. to complete installation. The refrigerator is hard to open . The doors were removed during product installation and not properly replaced. When you open . The interior of appliance polish or kitchen wax on the gaskets after cleaning. If the door is located near a fire...
... a qualified technician. The ice bin, crisper cover, pans, shelves, door bins, or baskets are dirty or sticky. See the Using Your Refrigerator section for more easily. As the warm air cools, it opens more information. to complete installation. The refrigerator is hard to open . The doors were removed during product installation and not properly replaced. When you open . The interior of appliance polish or kitchen wax on the gaskets after cleaning. If the door is located near a fire...
Owners Manual
Page 53
... published installation instructions, including LG's owner's and installation manuals. 17. The removal and reinstallation of Purchase: Territories. WARRANTY PERIOD Refrigerator Sealed System (Condenser, Dryer, Connecting Tube, Compressor, Refrigerant and Evaporator) Linear Compressor One (1) year from the date One (1) year from the date Seven (7) years from Ten (10) years from defects in an unsuitable environment will at www.lg.com Or by incorrect electrical current, voltage, or plumbing codes...
... published installation instructions, including LG's owner's and installation manuals. 17. The removal and reinstallation of Purchase: Territories. WARRANTY PERIOD Refrigerator Sealed System (Condenser, Dryer, Connecting Tube, Compressor, Refrigerant and Evaporator) Linear Compressor One (1) year from the date One (1) year from the date Seven (7) years from Ten (10) years from defects in an unsuitable environment will at www.lg.com Or by incorrect electrical current, voltage, or plumbing codes...
Owners Manual
Page 54
... serial numbers that are not approved by LG. 9. You may be verified, the warranty will at its option repair or replace the Product upon receipt of proof of God. 6. instruct the customer on applicable provincial laws. Damage to province depending on operation of unauthorized repairs/installation. 2. Damage or failure caused by incorrect electrical current, voltage, or plumbing codes, commercial or industrial use...
... serial numbers that are not approved by LG. 9. You may be verified, the warranty will at its option repair or replace the Product upon receipt of proof of God. 6. instruct the customer on applicable provincial laws. Damage to province depending on operation of unauthorized repairs/installation. 2. Damage or failure caused by incorrect electrical current, voltage, or plumbing codes, commercial or industrial use...


