Owner's Manual (English)
Page 2
...Version Warranty (USA) Safety Instructions Grounding Requirements Parts and Features Refrigerator Installation Unpacking Your Refrigerator Installation Base Grille Removing, Reversing and Replacing Your Refrigerator Doors For Drawer Models For Swing Models Door Closing and Alignment Using Your Refrigerator Ensuring Proper Air Circulation Multi Flow Door Alarm Setting the ... Coils Light Bulb Replacement Power Interruptions When you go on vacation About the Custom Cube Icemaker Connecting the Water Line Troubleshooting Guide 22 22 23 23 23 24 24 24 24 25 25 25 25 26 - 27 26 26 26 26 26 26 26 -...
...Version Warranty (USA) Safety Instructions Grounding Requirements Parts and Features Refrigerator Installation Unpacking Your Refrigerator Installation Base Grille Removing, Reversing and Replacing Your Refrigerator Doors For Drawer Models For Swing Models Door Closing and Alignment Using Your Refrigerator Ensuring Proper Air Circulation Multi Flow Door Alarm Setting the ... Coils Light Bulb Replacement Power Interruptions When you go on vacation About the Custom Cube Icemaker Connecting the Water Line Troubleshooting Guide 22 22 23 23 23 24 24 24 24 25 25 25 25 26 - 27 26 26 26 26 26 26 26 -...

Owner's Manual (English)
Page 3
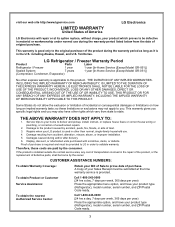
... repairs. 2. A Copy of your Sales Receipt must be provided to LG in order to validate warranty. THE ABOVE WARRANTY DOES NOT APPLY TO: 1. Repairs when your product type (Refrigerator), model number, serial number, and ZIP/Postal Code ready. 3 This warranty ...limitation of the product during and/or after delivery. 6. LG Refrigerator / Freezer Warranty Period Product Parts Labor Refrigerator / Freezer 1 year 1 year [In-Home Service (Except Model GR-051)] Sealed System 7 years 1 year [In-Home Service (Except Model GR-051)] (Compressor, Condenser, Evaporator) No other express...
... repairs. 2. A Copy of your Sales Receipt must be provided to LG in order to validate warranty. THE ABOVE WARRANTY DOES NOT APPLY TO: 1. Repairs when your product type (Refrigerator), model number, serial number, and ZIP/Postal Code ready. 3 This warranty ...limitation of the product during and/or after delivery. 6. LG Refrigerator / Freezer Warranty Period Product Parts Labor Refrigerator / Freezer 1 year 1 year [In-Home Service (Except Model GR-051)] Sealed System 7 years 1 year [In-Home Service (Except Model GR-051)] (Compressor, Condenser, Evaporator) No other express...

Owner's Manual (English)
Page 6
...to fines and imprisonment under any type of installation, cleaning, or removing a light bulb, turn the control (Thermostat, Refrigerator Control or Freezer Control, depending on the model) to harm stratospheric ozone. WARNING POWER CORD REPLACEMENT If the power cord is damaged, it be a UL-listed (... are not problems of the past. RECOMMENDED GROUNDING METHOD The refrigerator should be replaced by the manufacturer, by our service center or by qualified personal by LG Electronics, to make sure the CFC refrigerant is removed for proper disposal by person responsible for their safety...
...to fines and imprisonment under any type of installation, cleaning, or removing a light bulb, turn the control (Thermostat, Refrigerator Control or Freezer Control, depending on the model) to harm stratospheric ozone. WARNING POWER CORD REPLACEMENT If the power cord is damaged, it be a UL-listed (... are not problems of the past. RECOMMENDED GROUNDING METHOD The refrigerator should be replaced by the manufacturer, by our service center or by qualified personal by LG Electronics, to make sure the CFC refrigerant is removed for proper disposal by person responsible for their safety...
Owner's Manual (English)
Page 7
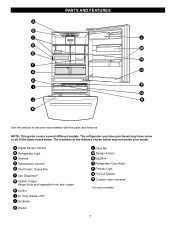
The locations of the items listed below may have purchased may not match your model. A Digital Sensor Control B Refrigerator Light C Shelves D Temperature Control* E Chef Fresh / Snack Pan F Can Dispenser* G Optibin Crisper Keeps fruits and ...this section to become more familiar with the parts and features. The refrigerator you have some models 7 PARTS AND FEATURES A B C L D M E N F O G H P I Ice Tray (Inside of H)* J Durabase K Divider L Dairy Bin M Design-A-Door N Egg Box O Refrigerator Door Rack P Freezer Light Q Pull out Drawer R Custom cube Icemaker* *on some...
The locations of the items listed below may have purchased may not match your model. A Digital Sensor Control B Refrigerator Light C Shelves D Temperature Control* E Chef Fresh / Snack Pan F Can Dispenser* G Optibin Crisper Keeps fruits and ...this section to become more familiar with the parts and features. The refrigerator you have some models 7 PARTS AND FEATURES A B C L D M E N F O G H P I Ice Tray (Inside of H)* J Durabase K Divider L Dairy Bin M Design-A-Door N Egg Box O Refrigerator Door Rack P Freezer Light Q Pull out Drawer R Custom cube Icemaker* *on some...

Owner's Manual (English)
Page 8
... this section to become more familiar with the parts and features. The refrigerator you have purchased may not match your model. NOTE: This guide covers several different models. PARTS AND FEATURES A B J C K D L E M F N G H I Divider J Dairy Bin K Design-A-Door L Pull out Drawer M Refrigerator Door Rack N Freezer Light O Custom cube Icemaker* *on some or all of the features shown...
... this section to become more familiar with the parts and features. The refrigerator you have purchased may not match your model. NOTE: This guide covers several different models. PARTS AND FEATURES A B J C K D L E M F N G H I Divider J Dairy Bin K Design-A-Door L Pull out Drawer M Refrigerator Door Rack N Freezer Light O Custom cube Icemaker* *on some or all of the features shown...

Owner's Manual (English)
Page 9
... to become more familiar with the parts and features. NOTE: This guide covers several different models. The refrigerator you have purchased may not match your model. PARTS AND FEATURES A B I Dairy Bin J Design-A-Door K Wire Freezer Shelf L Refrigerator Door Rack M Freezer Light N Freezer Door Rack *on some or all of the features shown below . The locations of the...
... to become more familiar with the parts and features. NOTE: This guide covers several different models. The refrigerator you have purchased may not match your model. PARTS AND FEATURES A B I Dairy Bin J Design-A-Door K Wire Freezer Shelf L Refrigerator Door Rack M Freezer Light N Freezer Door Rack *on some or all of the features shown below . The locations of the...
Owner's Manual (English)
Page 10
...remove any remaining tape or glue, rub the area briskly with your refrigerator before putting food in back or other things. When moving it . Install this appliance in the freezer compartment to move and install refrigerator. Check the flow of liquid dish soap over the adhesive with ... labels, the model and serial number label, or the Tech Sheet that is heavy. Avoid placing the unit near heat sources, direct sunlight or moisture. Pull the grille toward the refrigerator until it snaps into air vents, base grille or bottom of your refrigerator thoroughly and wipe...
...remove any remaining tape or glue, rub the area briskly with your refrigerator before putting food in back or other things. When moving it . Install this appliance in the freezer compartment to move and install refrigerator. Check the flow of liquid dish soap over the adhesive with ... labels, the model and serial number label, or the Tech Sheet that is heavy. Avoid placing the unit near heat sources, direct sunlight or moisture. Pull the grille toward the refrigerator until it snaps into air vents, base grille or bottom of your refrigerator thoroughly and wipe...
Owner's Manual (English)
Page 11
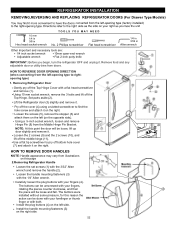
...hole screw and attach it . HOW TO REMOVE DOOR HANDLES NOTE: Handle appearance may vary from doors. REFRIGERATOR INSTALLATION REMOVING,REVERSING AND REPLACING REFRIGERATOR DOORS (For Drawer Type Models) 10 mm 1/4 in 3/8 in Hex head socket wrench TOOLS YOU MAY NEED No. 2 Phillips screwdriver ...• Flat 2-inch putty knife IMPORTANT: Before you begin, turn the refrigerator OFF and unplug it on the right. The buttons can be loose and fall. Removing Refrigerator Door • Gently pry off bottom hole cover (7) and attach it . Loosen the screws (5), remove the stopper...
...hole screw and attach it . HOW TO REMOVE DOOR HANDLES NOTE: Handle appearance may vary from doors. REFRIGERATOR INSTALLATION REMOVING,REVERSING AND REPLACING REFRIGERATOR DOORS (For Drawer Type Models) 10 mm 1/4 in 3/8 in Hex head socket wrench TOOLS YOU MAY NEED No. 2 Phillips screwdriver ...• Flat 2-inch putty knife IMPORTANT: Before you begin, turn the refrigerator OFF and unplug it on the right. The buttons can be loose and fall. Removing Refrigerator Door • Gently pry off bottom hole cover (7) and attach it . Loosen the screws (5), remove the stopper...

Owner's Manual (English)
Page 15
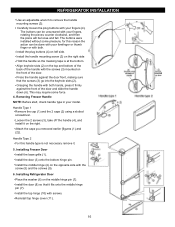
...the door (10) slightly and remove it . Loosen the 2 screws (16), remove the bottom hinge (17), and attach on the left (on the opposite side). Using a ¼-... using a slotted screwdriver to find the hole screw and attach it . Removing Freezer Door Before, remove totally the refrigerator door. Take off the middle hinge (13). Loosen the screws (5), remove the... the left -opening type to separate from the mounting screws (3). 15 REFRIGERATOR INSTALLATION REMOVING,REVERSING AND REPLACING REFRIGERATOR DOORS (For Swing Type Models) 10 mm 1/4 in 3/8 in Hex head socket wrench TOOLS YOU ...
...the door (10) slightly and remove it . Loosen the 2 screws (16), remove the bottom hinge (17), and attach on the left (on the opposite side). Using a ¼-... using a slotted screwdriver to find the hole screw and attach it . Removing Freezer Door Before, remove totally the refrigerator door. Take off the middle hinge (13). Loosen the screws (5), remove the... the left -opening type to separate from the mounting screws (3). 15 REFRIGERATOR INSTALLATION REMOVING,REVERSING AND REPLACING REFRIGERATOR DOORS (For Swing Type Models) 10 mm 1/4 in 3/8 in Hex head socket wrench TOOLS YOU ...
Owner's Manual (English)
Page 16
...both hands, press it firmly against the door front, making sure that it fits onto the middle hinge pin (7). Installing Freezer Door Install the base grille (1). REFRIGERATOR INSTALLATION Use an adjustable wrench to remove the handle mounting screws (3). The buttons can be loose and fall. Install the...type is at the bottom. Loosen the 2 screws (3), take of the door and slide the handle down (6). Install the door (8) so that the screws (3) go into the keyhole slots (2). Carefully loosen the plug buttons with screws. Install the top hinge (10) with your model. Install the plug ...
...both hands, press it firmly against the door front, making sure that it fits onto the middle hinge pin (7). Installing Freezer Door Install the base grille (1). REFRIGERATOR INSTALLATION Use an adjustable wrench to remove the handle mounting screws (3). The buttons can be loose and fall. Install the...type is at the bottom. Loosen the 2 screws (3), take of the door and slide the handle down (6). Install the door (8) so that the screws (3) go into the keyhole slots (2). Carefully loosen the plug buttons with screws. Install the top hinge (10) with your model. Install the plug ...
Owner's Manual (English)
Page 21
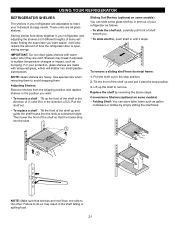
... shelves are made with warm water when they are cold. Pull the shelf out. Sliding Out Shelves (optional on some glass shelves in your refrigerator and adjusting the shelves to remove. To remove a sliding shelf from its metal frame: 1. Replace the shelf by simply sliding the shelf back... exact item you want . To replace a shelf : Tilt the front of your individual storage needs. Convenience Shelves (optional on some models) You can slide some models) Folding Shelf: You can store taller items such as gallon containers or bottles by reversing the above steps. NOTE: Make sure that...
... shelves are made with warm water when they are cold. Pull the shelf out. Sliding Out Shelves (optional on some glass shelves in your refrigerator and adjusting the shelves to remove. To remove a sliding shelf from its metal frame: 1. Replace the shelf by simply sliding the shelf back... exact item you want . To replace a shelf : Tilt the front of your individual storage needs. Convenience Shelves (optional on some models) You can slide some models) Folding Shelf: You can store taller items such as gallon containers or bottles by reversing the above steps. NOTE: Make sure that...
Owner's Manual (English)
Page 22
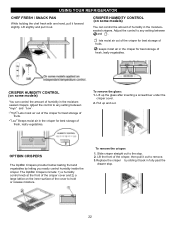
Adjust the control to the stop . 22 CRISPER HUMIDITY CONTROL (on some models) You can control the amount of the crisper, then pull it back in the moisturesealed crispers. Pull up the glass after inserting a screwdriver under the ... moist air out of the crisper for best storage of fruits. Lift up and out. Adjust the control to any setting between " " and " ". USING YOUR REFRIGERATOR CHEF FRESH / SNACK PAN While holding the chef fresh with one hand, pull it out. CRISPER HUMIDITY CONTROL (on some...
Adjust the control to the stop . 22 CRISPER HUMIDITY CONTROL (on some models) You can control the amount of the crisper, then pull it back in the moisturesealed crispers. Pull up the glass after inserting a screwdriver under the ... moist air out of the crisper for best storage of fruits. Lift up and out. Adjust the control to any setting between " " and " ". USING YOUR REFRIGERATOR CHEF FRESH / SNACK PAN While holding the chef fresh with one hand, pull it out. CRISPER HUMIDITY CONTROL (on some...
Owner's Manual (English)
Page 24
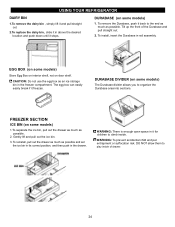
...allows you to climb inside of the Durabase and pull straight out. 2. EGG BOX (on some models) 1.To separate the ice bin, pull out the drawer as much as an ice storage bin in the freezer compartment. WARNING: To prevent accidental child and pet entrapment or suffocation risk. CAUTION: Do not use...correct position, and then push in the drawer. Tilt up the front of drawer. 24 To install, insert the Durabase in rail assembly. USING YOUR REFRIGERATOR DAIRY BIN 1.To remove the dairy bin , simply lift it and pull straight out. 2.To replace the dairy bin, slide it in above the ...
...allows you to climb inside of the Durabase and pull straight out. 2. EGG BOX (on some models) 1.To separate the ice bin, pull out the drawer as much as an ice storage bin in the freezer compartment. WARNING: To prevent accidental child and pet entrapment or suffocation risk. CAUTION: Do not use...correct position, and then push in the drawer. Tilt up the front of drawer. 24 To install, insert the Durabase in rail assembly. USING YOUR REFRIGERATOR DAIRY BIN 1.To remove the dairy bin , simply lift it and pull straight out. 2.To replace the dairy bin, slide it in above the ...

Owner's Manual (English)
Page 25
... Durabase, pull wire durabase out to use: Tilt the door down and pull it out. E FREEZER SHELF (on some models) The tilting door provides easy access to stored foods. USING YOUR REFRIGERATOR GLIDE -OUT DRAWER BASKET (on some models) 1. Tilt up and pull out straight out. 1 2 2. adWjuAstRNING: Be careful when you . To Install, pull...
... Durabase, pull wire durabase out to use: Tilt the door down and pull it out. E FREEZER SHELF (on some models) The tilting door provides easy access to stored foods. USING YOUR REFRIGERATOR GLIDE -OUT DRAWER BASKET (on some models) 1. Tilt up and pull out straight out. 1 2 2. adWjuAstRNING: Be careful when you . To Install, pull...
Owner's Manual (English)
Page 27
... for the move . 7. See the Setting the Controls section. 3. Depending on your model, turn the refrigerator off . 1. Tape the doors shut and tape the power cord to remove bulb. 3. Unplug refrigerator or disconnect power. 2. Depending on the model, raise the front of freezer space. POWER INTERRUPTIONS If the electricity goes off, call the power company...
... for the move . 7. See the Setting the Controls section. 3. Depending on your model, turn the refrigerator off . 1. Tape the doors shut and tape the power cord to remove bulb. 3. Unplug refrigerator or disconnect power. 2. Depending on the model, raise the front of freezer space. POWER INTERRUPTIONS If the electricity goes off, call the power company...
Owner's Manual (English)
Page 28
...cubes per cycle - DO NOT place fingers or hands on freezer compartment temperature, room temperature, number of cubes dropping into the bin and water running in certain models. Pressing at highest position returns indicator to the refrigerator. approximately 100-130 cubes in a 24-hour period, ...depending on the automatic icemaking mechanism while the refrigerator is included only in the pipes as the icemaker ...
...cubes per cycle - DO NOT place fingers or hands on freezer compartment temperature, room temperature, number of cubes dropping into the bin and water running in certain models. Pressing at highest position returns indicator to the refrigerator. approximately 100-130 cubes in a 24-hour period, ...depending on the automatic icemaking mechanism while the refrigerator is included only in the pipes as the icemaker ...

Owner's Manual (English)
Page 29
...valve should have a water inlet with a tube cutter and then use your local plumbing codes. To determine how much tubing you select allows at the bottom, to the water supply pipe. Power drill. 1/2" or adjustable wrench. and Phillipsblade screwdriver Two 1/4" outer diameter compression nuts and 2 ferrules (sleeves) to... 20 and 120 PSI or 0.137 and 0.82 MPa on models without a water filter and between 40 and 120 PSI or 0.275 and 0.82 MPa on the back of a vertical water pipe. Shut off valve and the refrigerator water valve. The Shut off any electrical device (such as described...
...valve should have a water inlet with a tube cutter and then use your local plumbing codes. To determine how much tubing you select allows at the bottom, to the water supply pipe. Power drill. 1/2" or adjustable wrench. and Phillipsblade screwdriver Two 1/4" outer diameter compression nuts and 2 ferrules (sleeves) to... 20 and 120 PSI or 0.137 and 0.82 MPa on models without a water filter and between 40 and 120 PSI or 0.275 and 0.82 MPa on the back of a vertical water pipe. Shut off valve and the refrigerator water valve. The Shut off any electrical device (such as described...

Owner's Manual (English)
Page 32
...refrigerator and freezer compartments. VIBRATION OR RATTLING NOISE Check if... Replace the fuse or reset the circuit breaker. Then... Turn the refrigerator control to the replacement. Unplug the refrigerator prior to the OFF position and unplug the refrigerator. Rattling noises may come from the flow of the refrigerator. Refrigerator...LIGHTS DO NOT WORK Check if... Gently remove the bulb and reinsert. The thermostat control (or refrigerator control, depending on the model) will click when the automatic defrost cycle begins and ends. Contraction and expansion of the new sounds...
...refrigerator and freezer compartments. VIBRATION OR RATTLING NOISE Check if... Replace the fuse or reset the circuit breaker. Then... Turn the refrigerator control to the replacement. Unplug the refrigerator prior to the OFF position and unplug the refrigerator. Rattling noises may come from the flow of the refrigerator. Refrigerator...LIGHTS DO NOT WORK Check if... Gently remove the bulb and reinsert. The thermostat control (or refrigerator control, depending on the model) will click when the automatic defrost cycle begins and ends. Contraction and expansion of the new sounds...
Owner's Manual (English)
Page 33
... door open. DOORS WILL NOT CLOSE COMPLETELY Check if... Food packages are dirty. When the door is allowed in the freezer resulting in and the refrigerator control was an older model. If they touch. Rub a thin coat of position. Modern refrigerators with more storage space require more often. Push the doors firmly shut. The...
... door open. DOORS WILL NOT CLOSE COMPLETELY Check if... Food packages are dirty. When the door is allowed in the freezer resulting in and the refrigerator control was an older model. If they touch. Rub a thin coat of position. Modern refrigerators with more storage space require more often. Push the doors firmly shut. The...
Owner's Manual (Español)
Page 2
LG Refrigerator / Freezer Warranty Period Product Parts Labor Refrigerator / Freezer 1 year 1 year [In-Home Service (Except Model GR-051)] Sealed System 7 years 1 year [In-Home Service (Except Model GR-051)] (Compressor, Condenser, Evaporator) No other rights which proves to be defective ...refurbished units purchased with scratches, dents, or defects. CUSTOMER ASSISTANCE NUMBERS: To obtain Warranty Coverage: Retain your product type (Refrigerator), model number, serial number, and ZIP/Postal Code ready. This warranty gives you specific legal rights and you may not apply to...
LG Refrigerator / Freezer Warranty Period Product Parts Labor Refrigerator / Freezer 1 year 1 year [In-Home Service (Except Model GR-051)] Sealed System 7 years 1 year [In-Home Service (Except Model GR-051)] (Compressor, Condenser, Evaporator) No other rights which proves to be defective ...refurbished units purchased with scratches, dents, or defects. CUSTOMER ASSISTANCE NUMBERS: To obtain Warranty Coverage: Retain your product type (Refrigerator), model number, serial number, and ZIP/Postal Code ready. This warranty gives you specific legal rights and you may not apply to...


