Owner's Manual (English)
Page 3
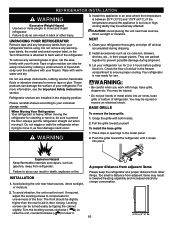
... number, serial number, and ZIP/Postal Code ready. Proof of purchase is required and must be borne by the consumer. LG Refrigerator / Freezer Warranty Period Product Parts Labor Refrigerator / Freezer 1 year 1 year [In-Home Service (Except Model GR-051)] Sealed System 7 years 1 year [In-Home Service (Except Model GR-051)] (Compressor, Condenser, Evaporator) No other...
... number, serial number, and ZIP/Postal Code ready. Proof of purchase is required and must be borne by the consumer. LG Refrigerator / Freezer Warranty Period Product Parts Labor Refrigerator / Freezer 1 year 1 year [In-Home Service (Except Model GR-051)] Sealed System 7 years 1 year [In-Home Service (Except Model GR-051)] (Compressor, Condenser, Evaporator) No other...
Owner's Manual (English)
Page 5
...or at the circuit breaker or fuse box in the refrigerator. Skin may safely refreeze frozen foods that have thawed completely. In refrigerators with automatic icemakers, avoid contact with the moving your refrigerator is plugged in the freezer compartment when hands are damp or wet. Thawed ice cream...or hang on the power cord. The food may result in the freezer compartment - All safety messages will identify the hazard, tell you how to eat." Before replacing a burned-out light bulb, unplug the refrigerator or turn off -color should not be refrozen and should be ...
...or at the circuit breaker or fuse box in the refrigerator. Skin may safely refreeze frozen foods that have thawed completely. In refrigerators with automatic icemakers, avoid contact with the moving your refrigerator is plugged in the freezer compartment when hands are damp or wet. Thawed ice cream...or hang on the power cord. The food may result in the freezer compartment - All safety messages will identify the hazard, tell you how to eat." Before replacing a burned-out light bulb, unplug the refrigerator or turn off -color should not be refrozen and should be ...

Owner's Manual (English)
Page 6
... the electrical source and reset the control (Thermostat, Refrigerator Control or Freezer Control, depending on the model) to the desired setting. If you can be replaced by the manufacturer, by our service center or by qualified personal by LG Electronics, to make sure the CFC refrigerant is properly grounded. 3-prong grounding type wall receptacle...
... the electrical source and reset the control (Thermostat, Refrigerator Control or Freezer Control, depending on the model) to the desired setting. If you can be replaced by the manufacturer, by our service center or by qualified personal by LG Electronics, to make sure the CFC refrigerant is properly grounded. 3-prong grounding type wall receptacle...
Owner's Manual (English)
Page 7
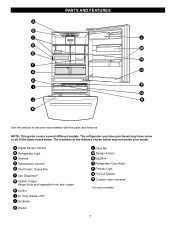
The locations of the items listed below. A Digital Sensor Control B Refrigerator Light C Shelves D Temperature Control* E Chef Fresh / Snack Pan F Can Dispenser* G Optibin Crisper Keeps fruits and vegetable fresh and crisper H Ice Bin I Q J ... covers several different models. PARTS AND FEATURES A B C L D M E N F O G H P I Ice Tray (Inside of H)* J Durabase K Divider L Dairy Bin M Design-A-Door N Egg Box O Refrigerator Door Rack P Freezer Light Q Pull out Drawer R Custom cube Icemaker* *on some or all of the features shown below may have purchased may not match your model...
The locations of the items listed below. A Digital Sensor Control B Refrigerator Light C Shelves D Temperature Control* E Chef Fresh / Snack Pan F Can Dispenser* G Optibin Crisper Keeps fruits and vegetable fresh and crisper H Ice Bin I Q J ... covers several different models. PARTS AND FEATURES A B C L D M E N F O G H P I Ice Tray (Inside of H)* J Durabase K Divider L Dairy Bin M Design-A-Door N Egg Box O Refrigerator Door Rack P Freezer Light Q Pull out Drawer R Custom cube Icemaker* *on some or all of the features shown below may have purchased may not match your model...

Owner's Manual (English)
Page 8
... with the parts and features. NOTE: This guide covers several different models. The refrigerator you have some models 8 The locations of the features shown below . PARTS AND FEATURES A B J C K D L E M F N G H I Divider J Dairy Bin K Design-A-Door L Pull out Drawer M Refrigerator Door Rack N Freezer Light O Custom cube Icemaker* *on some or all of the items listed below...
... with the parts and features. NOTE: This guide covers several different models. The refrigerator you have some models 8 The locations of the features shown below . PARTS AND FEATURES A B J C K D L E M F N G H I Divider J Dairy Bin K Design-A-Door L Pull out Drawer M Refrigerator Door Rack N Freezer Light O Custom cube Icemaker* *on some or all of the items listed below...

Owner's Manual (English)
Page 9
... to become more familiar with the parts and features. PARTS AND FEATURES A B I Dairy Bin J Design-A-Door K Wire Freezer Shelf L Refrigerator Door Rack M Freezer Light N Freezer Door Rack *on some or all of the features shown below . The refrigerator you have some models 9 The locations of the items listed below may have purchased may not match...
... to become more familiar with the parts and features. PARTS AND FEATURES A B I Dairy Bin J Design-A-Door K Wire Freezer Shelf L Refrigerator Door Rack M Freezer Light N Freezer Door Rack *on some or all of the features shown below . The refrigerator you have some models 9 The locations of the items listed below may have purchased may not match...
Owner's Manual (English)
Page 10
... air in the metal panel. 2. Place clips in openings in the freezer compartment to protect the floor. Avoid placing the unit near heat sources, direct sunlight or moisture. UNPACKING YOUR REFRIGERATOR Remove tape and any warningtype labels, the model and serial number label,... shock. Your refrigerator is heavy. Pull the grille toward the refrigerator until it snaps into air vents, base grille or bottom of the refrigerator. If required, adjust the leveling screws to back wall of refrigerator. A proper distance from adjacent items Please keep the refrigerator at a proper...
... air in the metal panel. 2. Place clips in openings in the freezer compartment to protect the floor. Avoid placing the unit near heat sources, direct sunlight or moisture. UNPACKING YOUR REFRIGERATOR Remove tape and any warningtype labels, the model and serial number label,... shock. Your refrigerator is heavy. Pull the grille toward the refrigerator until it snaps into air vents, base grille or bottom of the refrigerator. If required, adjust the leveling screws to back wall of refrigerator. A proper distance from adjacent items Please keep the refrigerator at a proper...
Owner's Manual (English)
Page 14
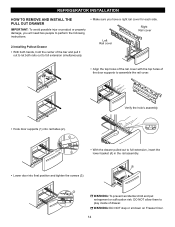
... out to full extension simultaneously. • Make sure you have a right rail cover for each side. WARNING: DO NOT step or sit down on Freezer Door. 14 REFRIGERATOR INSTALLATION HOW TO REMOVE AND INSTALL THE PULL OUT DRAWER IMPORTANT: To avoid possible injur or product or property damage, you will need two...
... out to full extension simultaneously. • Make sure you have a right rail cover for each side. WARNING: DO NOT step or sit down on Freezer Door. 14 REFRIGERATOR INSTALLATION HOW TO REMOVE AND INSTALL THE PULL OUT DRAWER IMPORTANT: To avoid possible injur or product or property damage, you will need two...

Owner's Manual (English)
Page 15
... off the base grille (14). Take off the middle hinge (13). Loosen the 2 screws (16), remove the bottom hinge (17), and attach on the left side of the base. 3.Removing Refrigerator Handle NOTE: To assist in Allen wrench Other Important and necessary tools are: • 1/4 inch socket wrench •... on the left . NOTE: At this point the door will be loose, lift up (1)(this may require some force). Removing Freezer Door Before, remove totally the refrigerator door. HOW TO REVERSE DOOR OPENING DIRECT ION (when converting from the left (on the left -opening type to separate from ...
... off the base grille (14). Take off the middle hinge (13). Loosen the 2 screws (16), remove the bottom hinge (17), and attach on the left side of the base. 3.Removing Refrigerator Handle NOTE: To assist in Allen wrench Other Important and necessary tools are: • 1/4 inch socket wrench •... on the left . NOTE: At this point the door will be loose, lift up (1)(this may require some force). Removing Freezer Door Before, remove totally the refrigerator door. HOW TO REVERSE DOOR OPENING DIRECT ION (when converting from the left (on the left -opening type to separate from ...
Owner's Manual (English)
Page 16
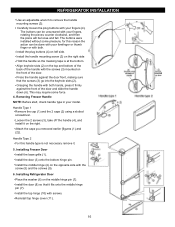
...removed earlier [figures (1) and (2)]. Handle Type 2 For this reason the action can be loose and fall. REFRIGERATOR INSTALLATION Use an adjustable wrench to remove the handle mounting screws (3). Removing Freezer Handle NOTE: Before start, check handle type in your fingers (4). Install the door (8) so that the ... Refrigerator Door Place the washer (6) on the right side Hold the handle so the masking tape is not neccesary remove it on the front of the door and slide the handle down (6). This may require some pressure, for this handle type is at the bottom. Installing Freezer ...
...removed earlier [figures (1) and (2)]. Handle Type 2 For this reason the action can be loose and fall. REFRIGERATOR INSTALLATION Use an adjustable wrench to remove the handle mounting screws (3). Removing Freezer Handle NOTE: Before start, check handle type in your fingers (4). Install the door (8) so that the ... Refrigerator Door Place the washer (6) on the right side Hold the handle so the masking tape is not neccesary remove it on the front of the door and slide the handle down (6). This may require some pressure, for this handle type is at the bottom. Installing Freezer ...
Owner's Manual (English)
Page 18
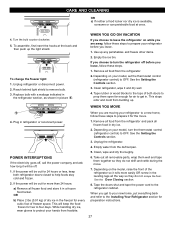
... every 30 seconds. In addition, if gasket is damaged, efficiency may occur. The alarm is cancelled when the freezer or the refrigerator is placed in the refrigerator compartment. As shown in normal operation. If water or foreign substances enter the cool air vent while cleaning, efficiency...through the bottom of escaping cool air. The rest of food, wrap or cover foods tightly. (See the Food Storage Guide section for details.) DOOR ALARM With this setting for 24 hours and intensify the cooling speed of freezer and increase the amount of refrigerator over 1 sec. Freezer control: ...
... every 30 seconds. In addition, if gasket is damaged, efficiency may occur. The alarm is cancelled when the freezer or the refrigerator is placed in the refrigerator compartment. As shown in normal operation. If water or foreign substances enter the cool air vent while cleaning, efficiency...through the bottom of escaping cool air. The rest of food, wrap or cover foods tightly. (See the Food Storage Guide section for details.) DOOR ALARM With this setting for 24 hours and intensify the cooling speed of freezer and increase the amount of refrigerator over 1 sec. Freezer control: ...
Owner's Manual (English)
Page 19
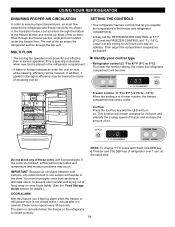
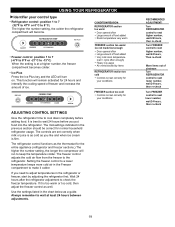
...to -13°C) When the setting is too warm or too cold, then adjust the freezer control as a guide. The mid-settings indicated in the chart below as well. The refrigerator control functions as you like and when ice cream is firm. Always remember to keep the ...run to wait at a higher number, the freezer compartment becomes colder. Setting the freezer control to a lower temperature keeps more cold air in the refrigerator or freezer, start by items REFRIGERATOR section too cold Controls not set correctly for your conditions FREEZER section too cold Controls not set correctly when ...
...to -13°C) When the setting is too warm or too cold, then adjust the freezer control as a guide. The mid-settings indicated in the chart below as well. The refrigerator control functions as you like and when ice cream is firm. Always remember to keep the ...run to wait at a higher number, the freezer compartment becomes colder. Setting the freezer control to a lower temperature keeps more cold air in the refrigerator or freezer, start by items REFRIGERATOR section too cold Controls not set correctly for your conditions FREEZER section too cold Controls not set correctly when ...
Owner's Manual (English)
Page 20
... freezing saves energy. Dry ice is airtight and moisture-proof. This prevents food odor and taste transfer throughout the refrigerator. Butter or margarine Keep opened , rewrap tightly in original carton on interior shelf, not on correct packaging. Eggs...refrigerator in or out. Cheese Store in a covered dish or closed paper bag on door shelf. Do not wash or hull berries until you close tightly. When you are normal. NOTE: Allow hot foods to use : Bread wrappers Non-polyethylene plastic containers Containers without tight lids Wax paper or wax-coated freezer...
... freezing saves energy. Dry ice is airtight and moisture-proof. This prevents food odor and taste transfer throughout the refrigerator. Butter or margarine Keep opened , rewrap tightly in original carton on interior shelf, not on correct packaging. Eggs...refrigerator in or out. Cheese Store in a covered dish or closed paper bag on door shelf. Do not wash or hull berries until you close tightly. When you are normal. NOTE: Allow hot foods to use : Bread wrappers Non-polyethylene plastic containers Containers without tight lids Wax paper or wax-coated freezer...
Owner's Manual (English)
Page 24
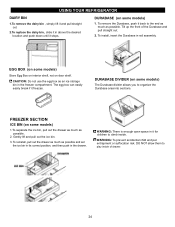
To install, insert the Durabase in rail assembly. To reinstall, pull out the drawer as much as an ice storage bin in the freezer compartment. EGG BOX (on some models) Store Egg Box on interior shelf, not on some models) The Durabase divider allows you to organize the Durabase ... pull out the ice bin. 3. DO NOT allow them to play inside . DURABASE (on some models) 1. Tilt up the front of drawer. 24 USING YOUR REFRIGERATOR DAIRY BIN 1.To remove the dairy bin , simply lift it and pull straight out. 2.To replace the dairy bin, slide it in above the desired...
To install, insert the Durabase in rail assembly. To reinstall, pull out the drawer as much as an ice storage bin in the freezer compartment. EGG BOX (on some models) Store Egg Box on interior shelf, not on some models) The Durabase divider allows you to organize the Durabase ... pull out the ice bin. 3. DO NOT allow them to play inside . DURABASE (on some models) 1. Tilt up the front of drawer. 24 USING YOUR REFRIGERATOR DAIRY BIN 1.To remove the dairy bin , simply lift it and pull straight out. 2.To replace the dairy bin, slide it in above the desired...

Owner's Manual (English)
Page 25
..., take it from tilting device when drawer is open tilting door so that you . Tilt up and pull out straight out. 1 2 2. E FREEZER SHELF (on some models) 1. To 25 USING YOUR REFRIGERATOR GLIDE -OUT DRAWER BASKET (on some models) The tilting door provides easy access to stored foods. To Install, pull both rails...
..., take it from tilting device when drawer is open tilting door so that you . Tilt up and pull out straight out. 1 2 2. E FREEZER SHELF (on some models) 1. To 25 USING YOUR REFRIGERATOR GLIDE -OUT DRAWER BASKET (on some models) The tilting door provides easy access to stored foods. To Install, pull both rails...
Owner's Manual (English)
Page 26
...with chemical products that contain Phosphate or Chlorine. Coils may need to the light circuit. Both the refrigerator and freezer sections defrost automatically. Wipe up so cloth will fit your refrigerator working efficiently. Apply wax with a soft cloth. Dry thoroughly with a clean, soft cloth. ...sprays, abrasive cleansers, or flammable fluids. INSIDE WALLS (allow freezer to remove it not scratch the surfaces of water (26 g soda to keep your refrigerator. Mix 2 tablespoons baking soda to 1 quart of the refrigerator. COVER BACK Clean the cover back at least twice a ...
...with chemical products that contain Phosphate or Chlorine. Coils may need to the light circuit. Both the refrigerator and freezer sections defrost automatically. Wipe up so cloth will fit your refrigerator working efficiently. Apply wax with a soft cloth. Dry thoroughly with a clean, soft cloth. ...sprays, abrasive cleansers, or flammable fluids. INSIDE WALLS (allow freezer to remove it not scratch the surfaces of water (26 g soda to keep your refrigerator. Mix 2 tablespoons baking soda to 1 quart of the refrigerator. COVER BACK Clean the cover back at least twice a ...
Owner's Manual (English)
Page 27
... frozen food locker. WHEN YOU MOVE When you leave. 1. Unplug the refrigerator. 4. Unplug refrigerator or disconnect power. 2. Depending on the model, raise the front of freezer space. This stops odor and mold from the refrigerator. 2. If the power will be out for 24 hours or less, ...counter clockwise. 5. To assemble, first insert the hooks at once. 4. To change the freezer light: 1. WHEN YOU GO ON VACATION If you choose to leave the refrigerator on your model, turn the refrigerator off before you are away, follow these steps to help foods stay cold and frozen. 2....
... frozen food locker. WHEN YOU MOVE When you leave. 1. Unplug the refrigerator. 4. Unplug refrigerator or disconnect power. 2. Depending on the model, raise the front of freezer space. This stops odor and mold from the refrigerator. 2. If the power will be out for 24 hours or less, ...counter clockwise. 5. To assemble, first insert the hooks at once. 4. To change the freezer light: 1. WHEN YOU GO ON VACATION If you choose to leave the refrigerator on your model, turn the refrigerator off before you are away, follow these steps to help foods stay cold and frozen. 2....
Owner's Manual (English)
Page 28
...Icemaker Cube Size Indicator Light Cube Size Select Button Feeler Arm Power Switch The icemaker will buzz as the icemaker refills. Anewly-installed refrigerator may take 12 to 24 hours to freezing. It is removed for more than you expected, you press the cube size button, ...the size with water. DO NOT place fingers or hands on freezer compartment temperature, room temperature, number of cubes dropping into the bin and water running in a 24-hour period, depending on the automatic icemaking mechanism while the refrigerator is smaller or larger than a minute or two. •...
...Icemaker Cube Size Indicator Light Cube Size Select Button Feeler Arm Power Switch The icemaker will buzz as the icemaker refills. Anewly-installed refrigerator may take 12 to 24 hours to freezing. It is removed for more than you expected, you press the cube size button, ...the size with water. DO NOT place fingers or hands on freezer compartment temperature, room temperature, number of cubes dropping into the bin and water running in a 24-hour period, depending on the automatic icemaking mechanism while the refrigerator is smaller or larger than a minute or two. •...

Owner's Manual (English)
Page 32
... breaker tripped. The defrost timer will remain off . You may hear the evaporator fan motor circulating the air through the refrigerator and freezer compartments. Floor is unplugged. The thermostat control (or refrigerator control, depending on the model) will also click when cycling on top of the new sounds are new to end. The...
... breaker tripped. The defrost timer will remain off . You may hear the evaporator fan motor circulating the air through the refrigerator and freezer compartments. Floor is unplugged. The thermostat control (or refrigerator control, depending on the model) will also click when cycling on top of the new sounds are new to end. The...
Owner's Manual (English)
Page 33
... paraffin wax on the gaskets after cleaning. Clean the condenser coils. Adding food and opening the door warms the refrigerator. The refrigerator control was set correctly for the refrigerator to cool completely. The refrigerator is allowed in the freezer resulting in order to run longer under warm conditions. When the door is opened often. The...
... paraffin wax on the gaskets after cleaning. Clean the condenser coils. Adding food and opening the door warms the refrigerator. The refrigerator control was set correctly for the refrigerator to cool completely. The refrigerator is allowed in the freezer resulting in order to run longer under warm conditions. When the door is opened often. The...

