Owner's Manual
Page 2
...Territories. Damage resulting from the date of original purchase. A Copy of your product which vary from state to state. LG Refrigerator / Freezer Warranty Period Product Parts Labor Refrigerator / Freezer 1 year 1 year [In-Home Service (Except Model GR-051)] Sealed System (Compressor, Condenser, Evaporator..., shall be defective in order to validate warranty. CUSTOMER ASSISTANCE NUMBERS: To obtain Warranty Coverage: Retain your product type (Refrigerator), model number, serial number, and ZIP/Postal Code ready. To obtain Product or Customer: Call 1-800-243-0000 (24...
...Territories. Damage resulting from the date of original purchase. A Copy of your product which vary from state to state. LG Refrigerator / Freezer Warranty Period Product Parts Labor Refrigerator / Freezer 1 year 1 year [In-Home Service (Except Model GR-051)] Sealed System (Compressor, Condenser, Evaporator..., shall be defective in order to validate warranty. CUSTOMER ASSISTANCE NUMBERS: To obtain Warranty Coverage: Retain your product type (Refrigerator), model number, serial number, and ZIP/Postal Code ready. To obtain Product or Customer: Call 1-800-243-0000 (24...

Owner's Manual
Page 4
...1-2 English Version 3 Spanish Version 34 Important Safety Instructions 4-5 Requirements for Ground Connection 5 Parts and Features 6-7 Refrigerator Installation Unpacking Installation Installation of Base Grille Refrigerator Doors: How to remove and reverse For Models with Pull-out Drawer For Models with Swinging Door How to ... 18 18 18 19 19 19-20 20-23 20-21 21 21 Optibin Crispers Crisper cover with interior lattice Fixed Refrigerator Rack Door Racks Dairy Compartment Egg Compartment Freezer Section Ice Bin DuraBase Durabase Divider Glide Out Drawer Tilting Door Wired Durabase...
...1-2 English Version 3 Spanish Version 34 Important Safety Instructions 4-5 Requirements for Ground Connection 5 Parts and Features 6-7 Refrigerator Installation Unpacking Installation Installation of Base Grille Refrigerator Doors: How to remove and reverse For Models with Pull-out Drawer For Models with Swinging Door How to ... 18 18 18 19 19 19-20 20-23 20-21 21 21 Optibin Crispers Crisper cover with interior lattice Fixed Refrigerator Rack Door Racks Dairy Compartment Egg Compartment Freezer Section Ice Bin DuraBase Durabase Divider Glide Out Drawer Tilting Door Wired Durabase...

Owner's Manual
Page 5
...danger, advise you do not follow after freezing and cause damage. • For your safety, this guide. • Once the refrigerator is discolored or has an unpleasant odor should be dangerous to ensure a proper ground connection. • Immediately repair or replace all faulty... being replaced). Be careful closing the doors when children are cold and below 40 °F (4 °C)". • Unplug the refrigerator before utilizing the product. Always read and obey all instructions before cleaning or repairing. These words mean: DANGER WARNING CAUTION You may result...
...danger, advise you do not follow after freezing and cause damage. • For your safety, this guide. • Once the refrigerator is discolored or has an unpleasant odor should be dangerous to ensure a proper ground connection. • Immediately repair or replace all faulty... being replaced). Be careful closing the doors when children are cold and below 40 °F (4 °C)". • Unplug the refrigerator before utilizing the product. Always read and obey all instructions before cleaning or repairing. These words mean: DANGER WARNING CAUTION You may result...

Owner's Manual
Page 6
... accidents. NOTE: Before installation, cleaning or replacing light bulbs, you could cause a fire from the overheating of space needed behind the refrigerator. USE OF EXTENSION CABLES We do not play with environmental legislation in them. C. This provides the best performance and prevents an overload...Leave the shelves in place so that of by our service center or qualified LG technician to its own outlet which could be used for their safety. If you intentionally remove the CFC refrigerant, you must be disconnected with that children cannot easily become stuck in effect....
... accidents. NOTE: Before installation, cleaning or replacing light bulbs, you could cause a fire from the overheating of space needed behind the refrigerator. USE OF EXTENSION CABLES We do not play with environmental legislation in them. C. This provides the best performance and prevents an overload...Leave the shelves in place so that of by our service center or qualified LG technician to its own outlet which could be used for their safety. If you intentionally remove the CFC refrigerant, you must be disconnected with that children cannot easily become stuck in effect....

Owner's Manual
Page 7
...and crisp F Ice Bin G Ice Tray (Inside H) * H Durabase I Read this section to that of your new refrigerator. The location of some models 6 NOTE: This guide covers different models. Your refrigerator could have some or all of the features and parts listed below. PARTS AND FEATURES Drawer Model A A J BB C... K D E L F M G N H O I Divider J Dairy Compartment K Door Racks L Fixed Refrigerator Rack M Freezer Light N Pull Out Drawer O Ice maker * * On some of the parts may not correspond to familiarize yourself with the parts and ...
...and crisp F Ice Bin G Ice Tray (Inside H) * H Durabase I Read this section to that of your new refrigerator. The location of some models 6 NOTE: This guide covers different models. Your refrigerator could have some or all of the features and parts listed below. PARTS AND FEATURES Drawer Model A A J BB C... K D E L F M G N H O I Divider J Dairy Compartment K Door Racks L Fixed Refrigerator Rack M Freezer Light N Pull Out Drawer O Ice maker * * On some of the parts may not correspond to familiarize yourself with the parts and ...

Owner's Manual
Page 8
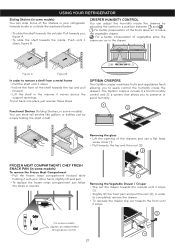
...J Door Racks K Freezer Light L Fixed Refrigerator Rack M Wire Freezer Shelf N Freezer Door Rack * On some of the parts may not correspond to familiarize yourself with the parts and features of the features and parts listed below. Your refrigerator could have some or all of your model.... The location of some models 7 A Digital Sensor Control B Refrigerator Light C Shelves D Frozen Meat Compartment (Chef Fresh/Snack Pan)* E Optibin Crisper...
...J Door Racks K Freezer Light L Fixed Refrigerator Rack M Wire Freezer Shelf N Freezer Door Rack * On some of the parts may not correspond to familiarize yourself with the parts and features of the features and parts listed below. Your refrigerator could have some or all of your model.... The location of some models 7 A Digital Sensor Control B Refrigerator Light C Shelves D Frozen Meat Compartment (Chef Fresh/Snack Pan)* E Optibin Crisper...

Owner's Manual
Page 9
...Replacing the Base Grille 1. Insert the 2 screws and twist in place (see the section on for cleaning or servicing. Moving Your Refrigerator: Your refrigerator is lower or higher than the rear to the back and other objects. These are already packed to move it . Not following ...., in position. For more persons to prevent any stickers that there is now ready for an unleveled floor. Do not shift from the refrigerator. Not following these instructions may injure yourself. • DO not place your fingers and a little liquid detergent. Remove the shelves and ...
...Replacing the Base Grille 1. Insert the 2 screws and twist in place (see the section on for cleaning or servicing. Moving Your Refrigerator: Your refrigerator is lower or higher than the rear to the back and other objects. These are already packed to move it . Not following ...., in position. For more persons to prevent any stickers that there is now ready for an unleveled floor. Do not shift from the refrigerator. Not following these instructions may injure yourself. • DO not place your fingers and a little liquid detergent. Remove the shelves and ...

Owner's Manual
Page 10
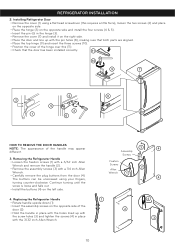
...Out Drawer You may find it more convenient to have the doors converted from the left -opening side mode to right-opening type. REFRIGERATOR INSTALLATION REFRIGERATOR DOORS: HOW TO REMOVE AND REVERSE (Optional) For models with a flat head screwdriver and remove it (1). • Using 10 ...socket wrench. • Adjustable Wrench. • 10 mm open-end wrench • Flat 2 inch putty knife IMPORTANT: Before you begin, unplug the refrigerator or disconnect the power source. TOOLS YOU MIGHT NEED OR USE 10 mm 1/4 in 3/8 in Hex Socket Wrench Phillips Screwdriver Flat Head Screwdriver 1/4 in...
...Out Drawer You may find it more convenient to have the doors converted from the left -opening side mode to right-opening type. REFRIGERATOR INSTALLATION REFRIGERATOR DOORS: HOW TO REMOVE AND REVERSE (Optional) For models with a flat head screwdriver and remove it (1). • Using 10 ...socket wrench. • Adjustable Wrench. • 10 mm open-end wrench • Flat 2 inch putty knife IMPORTANT: Before you begin, unplug the refrigerator or disconnect the power source. TOOLS YOU MIGHT NEED OR USE 10 mm 1/4 in 3/8 in Hex Socket Wrench Phillips Screwdriver Flat Head Screwdriver 1/4 in...
Owner's Manual
Page 11
... force), loosen the two screws (2) and place on the opposite side. • Place the hinge (3) on the left side. 4. Replacing the Refrigerator Handle • Rotate handle upside down (1). • Insert the assembly screws on the opposite side of the door (2). • Hold the handle...8226; Place the top hinge (9) and insert the three screws (10). • Position the cover of the handle may appear different. 3. Removing the Refrigerator Handle • Loosen the fixation screws (1) with a 3/32 inch Allen Wrench and remove the handle (2). • Remove the assembly screws (3) with ...
... force), loosen the two screws (2) and place on the opposite side. • Place the hinge (3) on the left side. 4. Replacing the Refrigerator Handle • Rotate handle upside down (1). • Insert the assembly screws on the opposite side of the door (2). • Hold the handle...8226; Place the top hinge (9) and insert the three screws (10). • Position the cover of the handle may appear different. 3. Removing the Refrigerator Handle • Loosen the fixation screws (1) with a 3/32 inch Allen Wrench and remove the handle (2). • Remove the assembly screws (3) with ...

Owner's Manual
Page 12
... lifting it could cause personal injury. If it comes off, it off the railing tracks. 1 CAUTION: When removing the drawer, do not hold the handle. REFRIGERATOR INSTALLATION HOW TO REMOVE AND INSTALL THE PULL OUT • With both hands, hold the center of the bar and push DRAWER it in so...
... lifting it could cause personal injury. If it comes off, it off the railing tracks. 1 CAUTION: When removing the drawer, do not hold the handle. REFRIGERATOR INSTALLATION HOW TO REMOVE AND INSTALL THE PULL OUT • With both hands, hold the center of the bar and push DRAWER it in so...

Owner's Manual
Page 13
Verify the hole's alignment • With the drawer fully extended, insert the lower basket over the front part of the rail assembly and then the back part (4). 4 WARNING: To prevent entrapment risk and accidental child or animal suffocation, DO NOT permit them to play inside of the door supports to mount the cover. Left Rail Right Rail • Align the top holes of the rail cover with the top holes of the drawer. REFRIGERATOR INSTALLATION • Compare the left and right rail covers on the Freezer Door. 12 WARNING: DO NOT step or sit on each side.
Verify the hole's alignment • With the drawer fully extended, insert the lower basket over the front part of the rail assembly and then the back part (4). 4 WARNING: To prevent entrapment risk and accidental child or animal suffocation, DO NOT permit them to play inside of the door supports to mount the cover. Left Rail Right Rail • Align the top holes of the rail cover with the top holes of the drawer. REFRIGERATOR INSTALLATION • Compare the left and right rail covers on the Freezer Door. 12 WARNING: DO NOT step or sit on each side.

Owner's Manual
Page 14
... Flat Head Screwdriver 1/4 in 3/32 in the door (3). • Carefully loosen the plug buttons (4) with your fingers. Removing and Installing the Refrigerator Handles NOTE: To assist in the installation of the handles on the right side, place a piece of masking tape near the top of the...buttons can be screws in in the back of the handle allow the handle to open -end wrench. • Flat 2 inch putty knife. REFRIGERATOR INSTALLATION REFRIGERATOR DOORS: HOW TO REMOVE AND REVERSE (Optional) For Swing models You may require some force). • The keyhole slots (2) on the front ...
... Flat Head Screwdriver 1/4 in 3/32 in the door (3). • Carefully loosen the plug buttons (4) with your fingers. Removing and Installing the Refrigerator Handles NOTE: To assist in the installation of the handles on the right side, place a piece of masking tape near the top of the...buttons can be screws in in the back of the handle allow the handle to open -end wrench. • Flat 2 inch putty knife. REFRIGERATOR INSTALLATION REFRIGERATOR DOORS: HOW TO REMOVE AND REVERSE (Optional) For Swing models You may require some force). • The keyhole slots (2) on the front ...

Owner's Manual
Page 15
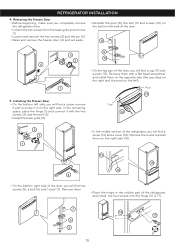
...2 3 8 7 9 6 5 • Take off , remove the screws (6), the bolt (7) and the pivot (8) located below this type of your model. REFRIGERATOR INSTALLATION 2. Removing the Refrigerator Door • Gently remove the top hinge cover with a flat head screwdriver. • Loosen the two screws (3), remove the handle (4) and install all on... side. • Attach the cap and the two screws (that were previously removed) on the left side). • Slightly raise the refrigerator door (5) and remove it. • Once the door has been taken off the washer (14). • Using the 1/4 inch hex...
...2 3 8 7 9 6 5 • Take off , remove the screws (6), the bolt (7) and the pivot (8) located below this type of your model. REFRIGERATOR INSTALLATION 2. Removing the Refrigerator Door • Gently remove the top hinge cover with a flat head screwdriver. • Loosen the two screws (3), remove the handle (4) and install all on... side. • Attach the cap and the two screws (that were previously removed) on the left side). • Slightly raise the refrigerator door (5) and remove it. • Once the door has been taken off the washer (14). • Using the 1/4 inch hex...
Owner's Manual
Page 16
...of the door, you will find a screw (13) and a cover (14). Removing the Freezer Door • Before beginning, make sure you completely remove the refrigerator door. • Loosen the two screws from the base grille and remove (1). • Loosen and remove the two screws (2) and the pin (3). • ...bottom right side of the door, you will find a cap (11) and a pivot (12). Cap 12 2 3 1 • In the middle section of the refrigerator and install the four screws into the hinge (16 & 17). 7 16 17 6 5 15 In the remaining space, place the hinge (1) and connect it in the...
...of the door, you will find a screw (13) and a cover (14). Removing the Freezer Door • Before beginning, make sure you completely remove the refrigerator door. • Loosen the two screws from the base grille and remove (1). • Loosen and remove the two screws (2) and the pin (3). • ...bottom right side of the door, you will find a cap (11) and a pivot (12). Cap 12 2 3 1 • In the middle section of the refrigerator and install the four screws into the hinge (16 & 17). 7 16 17 6 5 15 In the remaining space, place the hinge (1) and connect it in the...

Owner's Manual
Page 17
REFRIGERATOR INSTALLATION • Take the freezer door and align the pivot holes up with • Install the hinge (3), assemble the three screws (4) the bolt holes and ... on them (18). and replace the hinge cover (5). 5 4 18 3 • Insert the pin into the hinge (19). (Ensure that both doors close correctly. Installing the Refrigerator Door • Insert the door over the axis of the door seals are not folded over the pin (20). To ensure a good seal, apply a little...
REFRIGERATOR INSTALLATION • Take the freezer door and align the pivot holes up with • Install the hinge (3), assemble the three screws (4) the bolt holes and ... on them (18). and replace the hinge cover (5). 5 4 18 3 • Insert the pin into the hinge (19). (Ensure that both doors close correctly. Installing the Refrigerator Door • Insert the door over the axis of the door seals are not folded over the pin (20). To ensure a good seal, apply a little...

Owner's Manual
Page 18
...hold the door in place or place a spacer between the doors is even by following the instructions below to make it . Plug the refrigerator into its final position. 2.Remove the base grille (Refer to close easily. Have someone push against the top of Base Grille"). If ...not, slightly tilt the refrigerator further back by turning both leveling screws the same amount. 5. REFRIGERATOR INSTALLATION CLOSING AND ALIGNING THE DOORS Closing the Doors Your refrigerator has two front leveling screws, one on the right and one on "Installation...
...hold the door in place or place a spacer between the doors is even by following the instructions below to make it . Plug the refrigerator into its final position. 2.Remove the base grille (Refer to close easily. Have someone push against the top of Base Grille"). If ...not, slightly tilt the refrigerator further back by turning both leveling screws the same amount. 5. REFRIGERATOR INSTALLATION CLOSING AND ALIGNING THE DOORS Closing the Doors Your refrigerator has two front leveling screws, one on the right and one on "Installation...

Owner's Manual
Page 19
...eliminate odors. This can interrupt the flow of air and cause temperature and moisture problems. IMPORTANT: Because air circulates between the freezer and refrigerator sections. To prevent odor transfer and drying out of food, make sure you to the other substances could enter through the cool air...new food is ajar for 24 hours (one day) in one section will transfer to regulate the temperature the freezer and refrigerator compartments. • Initially set the REFRIGERATOR CONTROL and the FREEZER CONTROL at position number "4". Leave it on . The LED light will repeat every 30 seconds. ...
...eliminate odors. This can interrupt the flow of air and cause temperature and moisture problems. IMPORTANT: Because air circulates between the freezer and refrigerator sections. To prevent odor transfer and drying out of food, make sure you to the other substances could enter through the cool air...new food is ajar for 24 hours (one day) in one section will transfer to regulate the temperature the freezer and refrigerator compartments. • Initially set the REFRIGERATOR CONTROL and the FREEZER CONTROL at position number "4". Leave it on . The LED light will repeat every 30 seconds. ...

Owner's Manual
Page 20
... freezer to ensure freshness. FOOD STORAGE GUIDE ITEMS HOW TO STORE Storing Fresh Food Wrap or store food in the refrigerator in the refrigerator. For dated products, check date code to the refrigerator. Once opened butter in a covered dish or in a way to see the period they can also be stored... is any meat in original packaging until you package the food. FREEZER section is too cold • Controls not set correctly for your refrigerator and will run to the next lowest number and wait 24 hours, then check. Do not wash or pit berries until you remove all...
... freezer to ensure freshness. FOOD STORAGE GUIDE ITEMS HOW TO STORE Storing Fresh Food Wrap or store food in the refrigerator in the refrigerator. For dated products, check date code to the refrigerator. Once opened butter in a covered dish or in a way to see the period they can also be stored... is any meat in original packaging until you package the food. FREEZER section is too cold • Controls not set correctly for your refrigerator and will run to the next lowest number and wait 24 hours, then check. Do not wash or pit berries until you remove all...
Owner's Manual
Page 21
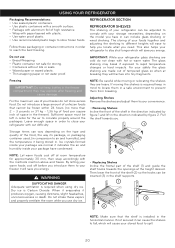
...Adequate ventilation is Carbon Dioxide. If not secured it can cause the shelves to fall, which will save you energy. REFRIGERATOR SECTION REFRIGERATOR SHELVES The shelving of your storage necessities; IMPORTANT: While your convenience. • Removing Shelves Incline the front of the...NOTE: Be careful while moving the shelves is installed in comparison to your warm foods cool off at the height desired. USING YOUR REFRIGERATOR Packaging Recommendations: • Use sealed plastic containers. • Use plastic containers with a smooth surface. • Package with aluminum...
...Adequate ventilation is Carbon Dioxide. If not secured it can cause the shelves to fall, which will save you energy. REFRIGERATOR SECTION REFRIGERATOR SHELVES The shelving of your storage necessities; IMPORTANT: While your convenience. • Removing Shelves Incline the front of the...NOTE: Be careful while moving the shelves is installed in comparison to your warm foods cool off at the height desired. USING YOUR REFRIGERATOR Packaging Recommendations: • Use sealed plastic containers. • Use plastic containers with a smooth surface. • Package with aluminum...
Owner's Manual
Page 22
... CRISPERS The OptiBin crisper maintains fruits and vegetables fresh allowing you , figure A. • To slide the shelf towards the inside: Push until it with your refrigerator towards inside or outside like gallons or bottles just by adjusting the control in a position between and . USING YOUR... REFRIGERATOR Sliding Shelves (in some models) You can slide some of the shelves in your other hand, slightly lift and pull. • To replace the frozen ...
... CRISPERS The OptiBin crisper maintains fruits and vegetables fresh allowing you , figure A. • To slide the shelf towards the inside: Push until it with your refrigerator towards inside or outside like gallons or bottles just by adjusting the control in a position between and . USING YOUR... REFRIGERATOR Sliding Shelves (in some models) You can slide some of the shelves in your other hand, slightly lift and pull. • To replace the frozen ...


