

Owners Manual
Page 2
...label on the side of this unit. • The air conditioner is to call for installation of each unit. If you will find many answers to this unit. • Contact the installer for service at all. Safety Precautions 2. Dealer's Name Date Purchased I Staple your air ... not need to be replaced, replacement work shall be performed by authorized personnel only using only genuine replacement parts. • Installation work must be performed in the chart of your part can find many helpful hints on your air conditioner. Operating Instructions 3. Care and...
...label on the side of this unit. • The air conditioner is to call for installation of each unit. If you will find many answers to this unit. • Contact the installer for service at all. Safety Precautions 2. Dealer's Name Date Purchased I Staple your air ... not need to be replaced, replacement work shall be performed by authorized personnel only using only genuine replacement parts. • Installation work must be performed in the chart of your part can find many helpful hints on your air conditioner. Operating Instructions 3. Care and...

Owners Manual
Page 3
... disassemble or modify products. • It may cause explosion or fire. I Incorrect operation due to ignoring instruction will cause harm or damage. I Installation WARNING Always install the expansion panel(s). • No installation may cause fire and electric shock. I Meanings of symbols used in this manual are as gasoline, benzene, thinner, etc. • It...
... disassemble or modify products. • It may cause explosion or fire. I Incorrect operation due to ignoring instruction will cause harm or damage. I Installation WARNING Always install the expansion panel(s). • No installation may cause fire and electric shock. I Meanings of symbols used in this manual are as gasoline, benzene, thinner, etc. • It...

Owners Manual
Page 4
.... • It will cause electric shock or fire due to heat generation. Always plug into a grounded outlet. • No grounding may cause electric shock (See Installation Manual). I Operation Plug in damp environment. • It may cause fire and electric shock accident.
.... • It will cause electric shock or fire due to heat generation. Always plug into a grounded outlet. • No grounding may cause electric shock (See Installation Manual). I Operation Plug in damp environment. • It may cause fire and electric shock accident.

Owners Manual
Page 5
... of injury. 5 Ventilate before operating air conditioner when gas goes out. • It will cause failure of the unit when removing the filter. and burn. I Installation Never touch the metal parts of machine • It is running. Do not allow water to touch the sharp edges when...
... of injury. 5 Ventilate before operating air conditioner when gas goes out. • It will cause failure of the unit when removing the filter. and burn. I Installation Never touch the metal parts of machine • It is running. Do not allow water to touch the sharp edges when...

Owners Manual
Page 7
.... 6 If cord/plug is accidentally triggered on while cleaning inner parts of the unit. ENGLISH Safety SPrEeCcTaIuOtiNons TPIrTioLrEto1 Operation Preparing for operation 1 Contact an installation specialist for installation. 2 Plug in such a manner could be hazardous to your authorized service dealer. 7 Exposure to water can destroy the insulation, leading to clean inside the...
.... 6 If cord/plug is accidentally triggered on while cleaning inner parts of the unit. ENGLISH Safety SPrEeCcTaIuOtiNons TPIrTioLrEto1 Operation Preparing for operation 1 Contact an installation specialist for installation. 2 Plug in such a manner could be hazardous to your authorized service dealer. 7 Exposure to water can destroy the insulation, leading to clean inside the...

Owners Manual
Page 11
.... Let it . Pull the filter in the direction away from the top for easy maintenance after installation. 2 Open the inlet grille by pulling off the exposed door on the top of the unit (based on installation). 3 Pull the tab slightly to maintain optimal performance of the unit and secure the drainpipe. Drain...
.... Let it . Pull the filter in the direction away from the top for easy maintenance after installation. 2 Open the inlet grille by pulling off the exposed door on the top of the unit (based on installation). 3 Pull the tab slightly to maintain optimal performance of the unit and secure the drainpipe. Drain...
Owners Manual
Page 12
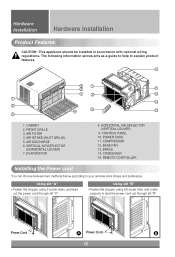
... • Fasten the stopper using 2 screw holes, and lead out the power cord through slit "B". BASE PAN 13. REMOTE CONTROLLER Installing the Power cord You can choose between two methods below according to explain product features. 13 6 7 8 11 5 9 14 1... 12 2 4 15 10 3 1. HORIZONTAL AIR DEFLECTOR (VERTICAL LOUVER) 9. Hardware SInEsCtaTlIlOaNtion THIaTrLdEwa1re Installation Product Features CAUTION: This appliance should be installed in accordance with national wiring regulations. AIR INTAKE (INLET GRILLE) 5. POWER CORD 11. The following information serves ...
... • Fasten the stopper using 2 screw holes, and lead out the power cord through slit "B". BASE PAN 13. REMOTE CONTROLLER Installing the Power cord You can choose between two methods below according to explain product features. 13 6 7 8 11 5 9 14 1... 12 2 4 15 10 3 1. HORIZONTAL AIR DEFLECTOR (VERTICAL LOUVER) 9. Hardware SInEsCtaTlIlOaNtion THIaTrLdEwa1re Installation Product Features CAUTION: This appliance should be installed in accordance with national wiring regulations. AIR INTAKE (INLET GRILLE) 5. POWER CORD 11. The following information serves ...

Owners Manual
Page 13
... fence and wall, within 20" from the back of the cabinet because it will prevent heat radiation of the structure. 4 Install the unit a little slanted so the back is designed for installation in standard double hung windows with the bottom about 1/2"). Inner sill Interior wall 20 1/12" min. (Without frame curtain)... from 23" to 36". • The top and bottom window sash must remain exposed to 36" 15" min. ENGLISH How to the outside. 5 Install the unit with actual opening of 15" from the bottom of the upper sash to the window stool. 23" to the outside of the condenser.
... fence and wall, within 20" from the back of the cabinet because it will prevent heat radiation of the structure. 4 Install the unit a little slanted so the back is designed for installation in standard double hung windows with the bottom about 1/2"). Inner sill Interior wall 20 1/12" min. (Without frame curtain)... from 23" to 36". • The top and bottom window sash must remain exposed to 36" 15" min. ENGLISH How to the outside. 5 Install the unit with actual opening of 15" from the bottom of the upper sash to the window stool. 23" to the outside of the condenser.
Owners Manual
Page 14
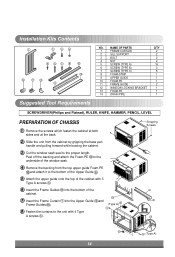
... Foam-PE to the underside of the cabinet. 7 Insert the Frame Curtain into the Upper Guide Frame Guides . 8 Fasten the curtains to the proper length. Installation Kits Contents 1 2 3 4 5 6 7 8 13 10 14 11 12 9 Suggested Tool Requirements NO.
... Foam-PE to the underside of the cabinet. 7 Insert the Frame Curtain into the Upper Guide Frame Guides . 8 Fasten the curtains to the proper length. Installation Kits Contents 1 2 3 4 5 6 7 8 13 10 14 11 12 9 Suggested Tool Requirements NO.
Owners Manual
Page 15
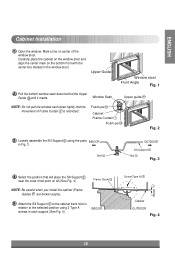
.... Carefully place the cabinet on the window stool and align the center mark on sill (See Fig. 4) Frame Guide 11 NOTE: Be careful when you install the cabinet (Frame Guides are broken easily). 5 Attach the Sill Support to the cabinet track hole in relation to the selected position using the parts... in the window stool. Window Sash Upper guide 9 NOTE: Do not pull the window sash down behind the Upper Guide until it meets. ENGLISH Cabinet Installation 1 Open the window.
.... Carefully place the cabinet on the window stool and align the center mark on sill (See Fig. 4) Frame Guide 11 NOTE: Be careful when you install the cabinet (Frame Guides are broken easily). 5 Attach the Sill Support to the cabinet track hole in relation to the selected position using the parts... in the window stool. Window Sash Upper guide 9 NOTE: Do not pull the window sash down behind the Upper Guide until it meets. ENGLISH Cabinet Installation 1 Open the window.
Owners Manual
Page 16
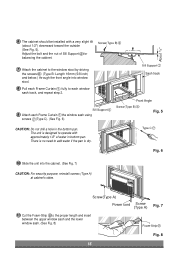
... proper length and insert between the upper window sash and the lower window sash. (See Fig. 8) Foam-Strip 8 Fig. 8 16 About 1/2" 6 The cabinet should be installed with approximately 1/2" of Sill Support for balancing the cabinet.
... proper length and insert between the upper window sash and the lower window sash. (See Fig. 8) Foam-Strip 8 Fig. 8 16 About 1/2" 6 The cabinet should be installed with approximately 1/2" of Sill Support for balancing the cabinet.

Owners Manual
Page 17
... place. (See Fig. 10) 14 Pull down the inlet grille and secure it with a Type A screw through the front grille. (See Fig. 11) 15 Window installation of room air conditioner is now completed. ENGLISH 12 Attach the Window Locking Bracket with a Type C screw . (See Fig. 9) Window locking bracket 12 Fig. 9 13...
... place. (See Fig. 10) 14 Pull down the inlet grille and secure it with a Type A screw through the front grille. (See Fig. 11) 15 Window installation of room air conditioner is now completed. ENGLISH 12 Attach the Window Locking Bracket with a Type C screw . (See Fig. 9) Window locking bracket 12 Fig. 9 13...
Owners Manual
Page 40
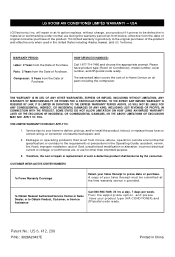
...7469, 24 hrs a day, 7 days per week. P/No.: 3828A20437E Printed in the Operating Guide, accident, vermin, fire, flood, improper installation, acts of God, unauthorized modification or alteration, incorrect electrical current or voltage, or commercial use, or use during the warranty period set forth below...Press the appropriate option, and please have product type (Room Air Conditioner), model number, serial number, and ZIP/postal code ready. LG WILL NOT BE LIABLE FOR ANY CONSEQUENTIAL, INDIRECT, OR INCIDENTAL DAMAGES OF ANY KIND, INCLUDING LOST REVENUES OR PROFITS, IN CONNECTION WITH...
...7469, 24 hrs a day, 7 days per week. P/No.: 3828A20437E Printed in the Operating Guide, accident, vermin, fire, flood, improper installation, acts of God, unauthorized modification or alteration, incorrect electrical current or voltage, or commercial use, or use during the warranty period set forth below...Press the appropriate option, and please have product type (Room Air Conditioner), model number, serial number, and ZIP/postal code ready. LG WILL NOT BE LIABLE FOR ANY CONSEQUENTIAL, INDIRECT, OR INCIDENTAL DAMAGES OF ANY KIND, INCLUDING LOST REVENUES OR PROFITS, IN CONNECTION WITH...


