User Guide
Page 1
User's Guide L246WP L246WPM Make sure to your dealer when you ask for furture reference. Keep the User's Guide(CD) in an accessible place for service. See the label attached on the product and give the information to read the Important Precautions before using the product.
User's Guide L246WP L246WPM Make sure to your dealer when you ask for furture reference. Keep the User's Guide(CD) in an accessible place for service. See the label attached on the product and give the information to read the Important Precautions before using the product.
User Guide
Page 2
...the manufacturer. Keep children from a power source indicated in a shock or fire hazard. Some internal parts carry hazardous voltages. In case you use , and servicing. The power supply cord is to be left unattended for an extended period of time, unplug it is not operating properly...way, please contact the manufacturer or the nearest authorized repair service provider for a replacement. During a lightning storm or when the display is used as the main disconnection device. Ensure that have in this manual or listed on a sloping shelf unless properly secured. Do not add ...
...the manufacturer. Keep children from a power source indicated in a shock or fire hazard. Some internal parts carry hazardous voltages. In case you use , and servicing. The power supply cord is to be left unattended for an extended period of time, unplug it is not operating properly...way, please contact the manufacturer or the nearest authorized repair service provider for a replacement. During a lightning storm or when the display is used as the main disconnection device. Ensure that have in this manual or listed on a sloping shelf unless properly secured. Do not add ...
User Guide
Page 3
...Therefore, NEVER: Block the bottom ventilation slots by placing the display on the display performance. If used in enclosure unless proper ventilation is characteristic of the fixed-resolution LCD panel. On Repacking Do not throw away the carton and packing materials. They make an ideal ... as this product with cloth or other material. On Cleaning Unplug the display before cleaning the face of your LCD display. On Disposal The fluorescent lamp used under any mode except the recommended resolution, some afterimages. Disposal of this may result in its original material...
...Therefore, NEVER: Block the bottom ventilation slots by placing the display on the display performance. If used in enclosure unless proper ventilation is characteristic of the fixed-resolution LCD panel. On Repacking Do not throw away the carton and packing materials. They make an ideal ... as this product with cloth or other material. On Cleaning Unplug the display before cleaning the face of your LCD display. On Disposal The fluorescent lamp used under any mode except the recommended resolution, some afterimages. Disposal of this may result in its original material...
User Guide
Page 5
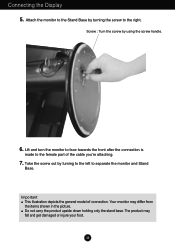
... face towards the front after the connection is made to separate the monitor and Stand Base. The product may differ from the items shown in the picture. Do not carry the product upside down holding only the stand ... general model of the cable you're attaching. 7. A4 Take the screw out by turning to the left to the female part of connection. Your monitor may fall and get damaged or injure your foot. Screw : Turn the screw by turning the screw to the right. Attach the...
... face towards the front after the connection is made to separate the monitor and Stand Base. The product may differ from the items shown in the picture. Do not carry the product upside down holding only the stand ... general model of the cable you're attaching. 7. A4 Take the screw out by turning to the left to the female part of connection. Your monitor may fall and get damaged or injure your foot. Screw : Turn the screw by turning the screw to the right. Attach the...

User Guide
Page 7
For detailed information, please refer to utilize the Pivot function. 2. If the monitor head touches the Stand Base, then the Stand Base could crack. A6 Lift the monitor to its highest height to the Pivot Software CD provided. Landscape & Portrait : You can rotate the panel 90o clockwise. Head section Stand section 3. Please be cautious and avoid contact between the monitor head and the Stand Base when rotating the screen to access the Pivot function. Connecting the Display Using the Pivot function 1.
For detailed information, please refer to utilize the Pivot function. 2. If the monitor head touches the Stand Base, then the Stand Base could crack. A6 Lift the monitor to its highest height to the Pivot Software CD provided. Landscape & Portrait : You can rotate the panel 90o clockwise. Head section Stand section 3. Please be cautious and avoid contact between the monitor head and the Stand Base when rotating the screen to access the Pivot function. Connecting the Display Using the Pivot function 1.

User Guide
Page 8
.../DVI OUT AUDIO 2 1 DC-OUT HDMI/DVI COMPONENT Y PB PR D-SUB 2. When using a PC or other component, simply connect to the appropriate female socket of the monitor's back slot until you can connect the monitor's to its lowest height, with the speaker fully equipped. 4. L246WPM Connecting the speaker 1....Cable DC-OUT Notice Be cautious to avoid your hand being caught between the speaker and Stand Base when lowering the monitor to the AUDIO-IN terminal. When using HDMI, you hear the clicking sound. 3. After connecting the speaker, connect the Audio DC-IN cable to the...
.../DVI OUT AUDIO 2 1 DC-OUT HDMI/DVI COMPONENT Y PB PR D-SUB 2. When using a PC or other component, simply connect to the appropriate female socket of the monitor's back slot until you can connect the monitor's to its lowest height, with the speaker fully equipped. 4. L246WPM Connecting the speaker 1....Cable DC-OUT Notice Be cautious to avoid your hand being caught between the speaker and Stand Base when lowering the monitor to the AUDIO-IN terminal. When using HDMI, you hear the clicking sound. 3. After connecting the speaker, connect the Audio DC-IN cable to the...
User Guide
Page 9
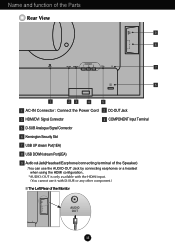
.../Earphone/connecting terminal of the Speaker) : You can use the AUDIO-OUT Jack by connecting earphones or a headset when using the HDMI configuration.. *AUDIO-OUT is only available with the HDMI input. (You cannot use it with D-SUB or any other component.) The Left Rear of the Monitor OUT AUDIO 2 1 AUDIO OUT UB A8
.../Earphone/connecting terminal of the Speaker) : You can use the AUDIO-OUT Jack by connecting earphones or a headset when using the HDMI configuration.. *AUDIO-OUT is only available with the HDMI input. (You cannot use it with D-SUB or any other component.) The Left Rear of the Monitor OUT AUDIO 2 1 AUDIO OUT UB A8
User Guide
Page 10
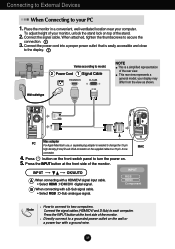
...your PC 1. connection. Wall-outlet type PC Mac adapter For Apple Macintosh use, a separate plug adapter is needed to change the 15 pin high density (3 row) D-sub VGA connector on top of the monitor. A9 NOTE This is easily accessible and close to the display. 2... a simplified representation OUT AUDIO 2 1 DC-OUT HDMI/DVI COMPONENT Y PB PR D-SUB 2 Power Cord 1 Signal Cable of the monitor. Place the monitor in a convenient, well-ventilated location near your display may differ from the view as shown. When attached, tighten the thumbscrews to each computer...
...your PC 1. connection. Wall-outlet type PC Mac adapter For Apple Macintosh use, a separate plug adapter is needed to change the 15 pin high density (3 row) D-sub VGA connector on top of the monitor. A9 NOTE This is easily accessible and close to the display. 2... a simplified representation OUT AUDIO 2 1 DC-OUT HDMI/DVI COMPONENT Y PB PR D-SUB 2 Power Cord 1 Signal Cable of the monitor. Place the monitor in a convenient, well-ventilated location near your display may differ from the view as shown. When attached, tighten the thumbscrews to each computer...
User Guide
Page 13
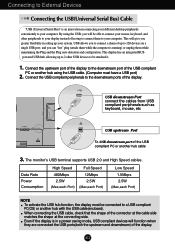
and you to connect a chain of the display. A12 The monitor's USB terminal supports USB 2.0 and High Speed cables. Data Rate Power Consumption High Speed 480Mbps 2.5W (Max,each Port) Full Speed 12Mbps 2.5W (Max,each ... integrated BUSpowered USB hub, allowing up your computer. When connecting the USB cable, check that the shape of the USB compliant PC or another hub using the USB, you greater flexibility in a power saving mode, USB compliant devices will be able to connect your mouse, keyboard, and other USB devices to...
and you to connect a chain of the display. A12 The monitor's USB terminal supports USB 2.0 and High Speed cables. Data Rate Power Consumption High Speed 480Mbps 2.5W (Max,each Port) Full Speed 12Mbps 2.5W (Max,each ... integrated BUSpowered USB hub, allowing up your computer. When connecting the USB cable, check that the shape of the USB compliant PC or another hub using the USB, you greater flexibility in a power saving mode, USB compliant devices will be able to connect your mouse, keyboard, and other USB devices to...

User Guide
Page 14
To connect your audio component, plug the cable into the external audio component. - To connect your PC, plug the cable into the Audio-Out of your monitor. Rear AUDIO IN Audio Input - To connect HDMI, plug the cable into the sound card *Line Out on the PC. - Using the speakers - The feature is only for speaker models - L246WPM Side Jack Headphone/Earphone Input Automatically mutes the speaker volume when the headphones are plugged in. Speaker Out *Line Out A13
To connect your audio component, plug the cable into the external audio component. - To connect your PC, plug the cable into the Audio-Out of your monitor. Rear AUDIO IN Audio Input - To connect HDMI, plug the cable into the sound card *Line Out on the PC. - Using the speakers - The feature is only for speaker models - L246WPM Side Jack Headphone/Earphone Input Automatically mutes the speaker volume when the headphones are plugged in. Speaker Out *Line Out A13

User Guide
Page 15
... length of the cable which connects the monitor's AUDIO-OUT and the speaker's AUDIO-IN can be too long. After connecting the cables neatly, arrange the cables to External Devices To arrange the cables 1. It is only for speaker models - AUDIO *The speaker is used to connect the components at the appropriate...
... length of the cable which connects the monitor's AUDIO-OUT and the speaker's AUDIO-IN can be too long. After connecting the cables neatly, arrange the cables to External Devices To arrange the cables 1. It is only for speaker models - AUDIO *The speaker is used to connect the components at the appropriate...

User Guide
Page 16
... SET-TOP BOX,Video,DVD : HDMI/DVI digital signal DTV SET-TOP BOX,Video,DVD INPUT RGB HDMI Component MENU Button Controls locked Controls unlocked Use this button to lock the current control settings, so that they cannot be inadvertently changed. The message "Controls locked" should appear.
... SET-TOP BOX,Video,DVD : HDMI/DVI digital signal DTV SET-TOP BOX,Video,DVD INPUT RGB HDMI Component MENU Button Controls locked Controls unlocked Use this button to lock the current control settings, so that they cannot be inadvertently changed. The message "Controls locked" should appear.
User Guide
Page 17
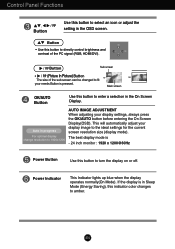
... Mode). Button Sub screen • (Picture In Picture) Button The size of the PC signal (RGB, HDMI/DVI). Main screen OK/AUTO Button Use this button to select an icon or adjust the setting in the OSD screen. If the display is pressed. Control Panel Functions Button...AUTO button before entering the On Screen Display(OSD). The best display mode is - 24 inch monitor : 1920 x 1200@60Hz Power Button Use this indicator color changes to turn the display on or off. Button • Use this button to directly control brightness and contrast of the sub-screen can be changed to...
... Mode). Button Sub screen • (Picture In Picture) Button The size of the PC signal (RGB, HDMI/DVI). Main screen OK/AUTO Button Use this button to select an icon or adjust the setting in the OSD screen. If the display is pressed. Control Panel Functions Button...AUTO button before entering the On Screen Display(OSD). The best display mode is - 24 inch monitor : 1920 x 1200@60Hz Power Button Use this indicator color changes to turn the display on or off. Button • Use this button to directly control brightness and contrast of the sub-screen can be changed to...
User Guide
Page 18
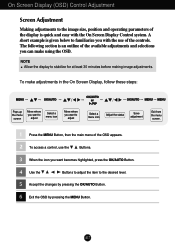
... from the menu screen. 1 Press the MENU Button, then the main menu of the OSD appears. 2 To access a control, use of the controls. The following section is quick and easy with the use the Buttons. 3 When the icon you with the On Screen Display Control system. A17 On Screen Display (OSD) Control... Adjustment Screen Adjustment Making adjustments to familiarize you want becomes highlighted, press the OK/AUTO Button. 4 Use the Buttons to adjust the item to stabilize for at least 30 minutes before making image adjustments.
... from the menu screen. 1 Press the MENU Button, then the main menu of the OSD appears. 2 To access a control, use of the controls. The following section is quick and easy with the use the Buttons. 3 When the icon you with the On Screen Display Control system. A17 On Screen Display (OSD) Control... Adjustment Screen Adjustment Making adjustments to familiarize you want becomes highlighted, press the OK/AUTO Button. 4 Use the Buttons to adjust the item to stabilize for at least 30 minutes before making image adjustments.
User Guide
Page 20
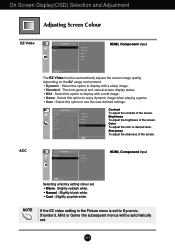
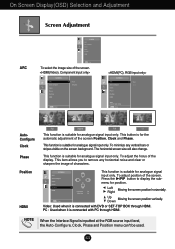
... be automatically set . • Warm : Slightly reddish white. • Normal : Slightly bluish white. • Cool : Slightly purplish white. A19 Color To adjust the color to use the user-defined settings. Sharpness To adjust the clearness of the screen. On Screen Display(OSD) Selection and Adjustment Adjusting Screen Colour EZ Video HDMI...
... be automatically set . • Warm : Slightly reddish white. • Normal : Slightly bluish white. • Cool : Slightly purplish white. A19 Color To adjust the color to use the user-defined settings. Sharpness To adjust the clearness of the screen. On Screen Display(OSD) Selection and Adjustment Adjusting Screen Colour EZ Video HDMI...
User Guide
Page 21
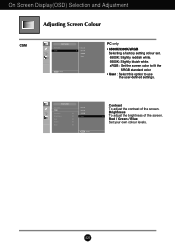
EZ Video Contrast Brightness Red Green Blue 50 50 User 50 50 50 Contrast To adjust the contrast of the screen. On Screen Display(OSD) Selection and Adjustment Adjusting Screen Colour CSM EZ Video CSM User PC only • 6500K/9300K/sRGB Selecting a factory setting colour set. 6500K: Slightly reddish white. 9300K: Slightly bluish white. Brightness To adjust the brightness of the screen. A20 sRGB : Set the screen color to fit the SRGB standard color • User : Select this option to use the user-defined settings. Red / Green / Blue Set your own colour levels.
EZ Video Contrast Brightness Red Green Blue 50 50 User 50 50 50 Contrast To adjust the contrast of the screen. On Screen Display(OSD) Selection and Adjustment Adjusting Screen Colour CSM EZ Video CSM User PC only • 6500K/9300K/sRGB Selecting a factory setting colour set. 6500K: Slightly reddish white. 9300K: Slightly bluish white. Brightness To adjust the brightness of the screen. A20 sRGB : Set the screen color to fit the SRGB standard color • User : Select this option to use the user-defined settings. Red / Green / Blue Set your own colour levels.
User Guide
Page 22
... function to reset the product to the factory default. Reset DDC-CI Use this function to set the Child lock tab to unlock it possible to On or Off. In order to the 'On' position. However, language selection will appear. Monitor can prevent unauthorized viewing. A21 On Screen Display(OSD) Selection and...
... function to reset the product to the factory default. Reset DDC-CI Use this function to set the Child lock tab to unlock it possible to On or Off. In order to the 'On' position. However, language selection will appear. Monitor can prevent unauthorized viewing. A21 On Screen Display(OSD) Selection and...
User Guide
Page 23
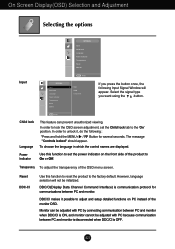
... allows you to display the submenu for analogue signal input only. Left Moving the screen position horizontally. Down Video: Used when it is connected with PC through HDMI. PC : Used when it is connected with DVD or SET-TOP BOX through HDMI. Right Up Moving the screen position vertically. NOTE...analogue signal input only. This button is inputted at the RGB source input level, the Auto-Configure, Clock, Phase and Position menu can't be used. To adjust the focus of the screen. To adjust position of characters. To minimize any horizontal noise and clear or sharpen the image of ...
... allows you to display the submenu for analogue signal input only. Left Moving the screen position horizontally. Down Video: Used when it is connected with PC through HDMI. PC : Used when it is connected with DVD or SET-TOP BOX through HDMI. Right Up Moving the screen position vertically. NOTE...analogue signal input only. This button is inputted at the RGB source input level, the Auto-Configure, Clock, Phase and Position menu can't be used. To adjust the focus of the screen. To adjust position of characters. To minimize any horizontal noise and clear or sharpen the image of ...
User Guide
Page 24
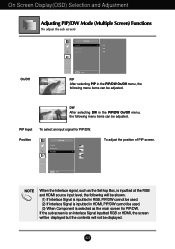
... will be displayed but the contents will be shown. (1) If Interlace Signal is inputted in RGB, PIP/DW cannot be used. (2) If Interlace Signal is inputted in HDMI, PIP/DW cannot be used. (3) When Component is inputted at the RGB and HDMI source input level, the following will not be displayed. On...
... will be displayed but the contents will be shown. (1) If Interlace Signal is inputted in RGB, PIP/DW cannot be used. (2) If Interlace Signal is inputted in HDMI, PIP/DW cannot be used. (3) When Component is inputted at the RGB and HDMI source input level, the following will not be displayed. On...
User Guide
Page 26
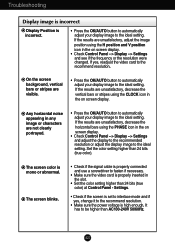
... resolution or adjust the display image to the ideal setting. The screen blinks. • Check if the signal cable is properly connected and use a screwdriver to fasten if necessary. • Make sure the video card is properly inserted in the slot. • Set the color setting ... If the results are unsatisfactory, decrease the vertical bars or stripes using the CLOCK icon in any image or characters are unsatisfactory, adjust the image position using the PHASE icon in the on screen display. Set the color setting higher than 24 bits (true color) at Control Panel - Settings. • ...
... resolution or adjust the display image to the ideal setting. The screen blinks. • Check if the signal cable is properly connected and use a screwdriver to fasten if necessary. • Make sure the video card is properly inserted in the slot. • Set the color setting ... If the results are unsatisfactory, decrease the vertical bars or stripes using the CLOCK icon in any image or characters are unsatisfactory, adjust the image position using the PHASE icon in the on screen display. Set the color setting higher than 24 bits (true color) at Control Panel - Settings. • ...


