
User Guide
Page 8
... not touch the floor when rotating. Rotate the panel at an angle of the monitor's back slot until you can connect the monitor's to its lowest height, with the speaker fully equipped. 4. Insert the projecting hook of the speaker in the direction of 90 degrees as shown in the picture, after lifting the.../DVI PR P B COMPONENT Y DC-OUT HDMI/DVI 3 Audio DC-In Cable DC-OUT Notice Be cautious to avoid your hand being caught between the speaker and Stand Base when lowering the monitor to the AUDIO-IN terminal. When using HDMI, you hear the clicking sound. 3. The feature is only for...
... not touch the floor when rotating. Rotate the panel at an angle of the monitor's back slot until you can connect the monitor's to its lowest height, with the speaker fully equipped. 4. Insert the projecting hook of the speaker in the direction of 90 degrees as shown in the picture, after lifting the.../DVI PR P B COMPONENT Y DC-OUT HDMI/DVI 3 Audio DC-In Cable DC-OUT Notice Be cautious to avoid your hand being caught between the speaker and Stand Base when lowering the monitor to the AUDIO-IN terminal. When using HDMI, you hear the clicking sound. 3. The feature is only for...
User Guide
Page 9
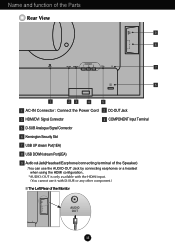
... Analogue Signal Connector 6 Kensington Security Slot 7 USB UP stream Port(1EA) 8 USB DOWN stream Port(2EA) 9 Audio out Jack(Headset/Earphone/connecting terminal of the Speaker) : You can use the AUDIO-OUT Jack by connecting earphones or a headset when using the HDMI configuration.. *AUDIO-OUT is only available with the HDMI...
... Analogue Signal Connector 6 Kensington Security Slot 7 USB UP stream Port(1EA) 8 USB DOWN stream Port(2EA) 9 Audio out Jack(Headset/Earphone/connecting terminal of the Speaker) : You can use the AUDIO-OUT Jack by connecting earphones or a headset when using the HDMI configuration.. *AUDIO-OUT is only available with the HDMI...
User Guide
Page 11
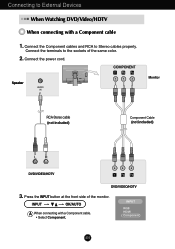
Connect the power cord. Speaker AUDIO IN DC-OUT HDMI/DVI COMPONENT Y PB PR D-SUB 1 2 AUDIO OUT PB PR PB PR Monitor RCA-Stereo cable (not included) Component Cable (not included) DVD/VIDEO/HDTV PB PR PB PR DVD/VIDEO/HDTV 3. Connecting to External Devices When Watching ... a Component cable 1. Press the INPUT button at the front side of the same color. 2. Connect the Component cables and RCA to the sockets of the monitor.
Connect the power cord. Speaker AUDIO IN DC-OUT HDMI/DVI COMPONENT Y PB PR D-SUB 1 2 AUDIO OUT PB PR PB PR Monitor RCA-Stereo cable (not included) Component Cable (not included) DVD/VIDEO/HDTV PB PR PB PR DVD/VIDEO/HDTV 3. Connecting to External Devices When Watching ... a Component cable 1. Press the INPUT button at the front side of the same color. 2. Connect the Component cables and RCA to the sockets of the monitor.
User Guide
Page 12
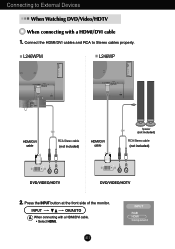
Connecting to Stereo cables properly. L246WPM L246WP OUT AUDIO OUT AUDIO 2 2 1 1 COMPONENT DC-OUT HDMI/DVI Y PB PR D-SUB AUDIO IN COMPONENT DC-OUT HDMI/DVI Y PB PR D-SUB HDMI/DVI cable RCA-Stereo cable (not included) HDMI/DVI cable Speaker (not included) RCA-Stereo cable (not included...) DVD/VIDEO/HDTV DVD/VIDEO/HDTV 2. Press the INPUT button at the front side of the monitor. A11 INPUT RGB HDMI Component INPUT OK/AUTO A When connecting with a...
Connecting to Stereo cables properly. L246WPM L246WP OUT AUDIO OUT AUDIO 2 2 1 1 COMPONENT DC-OUT HDMI/DVI Y PB PR D-SUB AUDIO IN COMPONENT DC-OUT HDMI/DVI Y PB PR D-SUB HDMI/DVI cable RCA-Stereo cable (not included) HDMI/DVI cable Speaker (not included) RCA-Stereo cable (not included...) DVD/VIDEO/HDTV DVD/VIDEO/HDTV 2. Press the INPUT button at the front side of the monitor. A11 INPUT RGB HDMI Component INPUT OK/AUTO A When connecting with a...

User Guide
Page 14
Rear AUDIO IN Audio Input - Speaker Out *Line Out A13 To connect HDMI, plug the cable into the Audio-Out of your PC, plug the cable into the external audio component. - The feature is only for speaker models - To connect your monitor. Using the speakers - To connect your audio component, plug the cable into the sound card *Line Out on the PC. - L246WPM Side Jack Headphone/Earphone Input Automatically mutes the speaker volume when the headphones are plugged in.
Rear AUDIO IN Audio Input - Speaker Out *Line Out A13 To connect HDMI, plug the cable into the Audio-Out of your PC, plug the cable into the external audio component. - The feature is only for speaker models - To connect your monitor. Using the speakers - To connect your audio component, plug the cable into the sound card *Line Out on the PC. - L246WPM Side Jack Headphone/Earphone Input Automatically mutes the speaker volume when the headphones are plugged in.

User Guide
Page 15
... connected to External Devices To arrange the cables 1. After connecting the cables neatly, arrange the cables to avoid the bumping the speaker against its head when removing a cable. AUDIO *The speaker is used to connect the components at the appropriate distance when the AUDIO-IN terminal and the... speaker are plugged in as shown in the diagram. A14 Cable Holder *The length of the cable which connects the monitor's AUDIO-OUT and the speaker's AUDIO-IN can be ...
... connected to External Devices To arrange the cables 1. After connecting the cables neatly, arrange the cables to avoid the bumping the speaker against its head when removing a cable. AUDIO *The speaker is used to connect the components at the appropriate distance when the AUDIO-IN terminal and the... speaker are plugged in as shown in the diagram. A14 Cable Holder *The length of the cable which connects the monitor's AUDIO-OUT and the speaker's AUDIO-IN can be ...

User Guide
Page 30
... (61.3 cm) Flat Panel Active matrix-TFT LCD Anti-glare coating 24 inches viewable 0.270 mm pixel pitch Sync Input Video Input Horizontal Freq. Input Form Signal Input Analog : 30 - 83 kHz (Automatic) Digital : 30 - 83 kHz (... Resolution Plug&Play Max Recommend DDC 2B Analog : VESA 1920 x 1200 @60Hz Digital : VESA 1920 x 1200 @60Hz VESA 1920 x 1200 @60Hz PowerConsumption 0n Mode (without Speaker & Sleep Mode USB) Off Mode : 85 W(Typ.) ≤ 3W ≤ 2W Dimensions &Weight Width Height With Stand Without Stand 56.00 cm / 22.05 inches...
... (61.3 cm) Flat Panel Active matrix-TFT LCD Anti-glare coating 24 inches viewable 0.270 mm pixel pitch Sync Input Video Input Horizontal Freq. Input Form Signal Input Analog : 30 - 83 kHz (Automatic) Digital : 30 - 83 kHz (... Resolution Plug&Play Max Recommend DDC 2B Analog : VESA 1920 x 1200 @60Hz Digital : VESA 1920 x 1200 @60Hz VESA 1920 x 1200 @60Hz PowerConsumption 0n Mode (without Speaker & Sleep Mode USB) Off Mode : 85 W(Typ.) ≤ 3W ≤ 2W Dimensions &Weight Width Height With Stand Without Stand 56.00 cm / 22.05 inches...

User Guide
Page 31
Specifications L246WPM Stand Base Power cord USB Audio Attached ( ), Detached ( O ) Wall-outlet type or PC-outlet type Standard USB 2.0, Self-Power Data Rate Max 480 Mbps Power Consumption Max 2.5W x 2 RMS Audio Output 2W+2W(R+L) Input Sensitivity 0.7Wrms Speaker Impendance 16Ω NOTE Information in this document is subject to change without notice. A30
Specifications L246WPM Stand Base Power cord USB Audio Attached ( ), Detached ( O ) Wall-outlet type or PC-outlet type Standard USB 2.0, Self-Power Data Rate Max 480 Mbps Power Consumption Max 2.5W x 2 RMS Audio Output 2W+2W(R+L) Input Sensitivity 0.7Wrms Speaker Impendance 16Ω NOTE Information in this document is subject to change without notice. A30


