
Owner's Manual (English)
Page 2
... are Dangerous High Voltages inside . Overloaded AC outlets and extension cords are frayed power cords and broken plugs. Do not Open the Display. Use only a stand recommended by the supplier. It can cause injury to human, problem to allow the proper operation of thunder and lightning, never touch the power cord...
... are Dangerous High Voltages inside . Overloaded AC outlets and extension cords are frayed power cords and broken plugs. Do not Open the Display. Use only a stand recommended by the supplier. It can cause injury to human, problem to allow the proper operation of thunder and lightning, never touch the power cord...
Owner's Manual (English)
Page 4
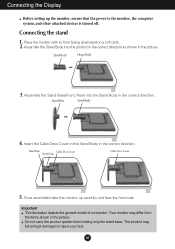
...Important This illustration depicts the general model of connection. Connecting the stand 1. Place the monitor with its front facing downward on a soft cloth. 2. Assemble the Stand Body into the Stand Body in the picture. Assemble the Stand Base(Front, Rear) into the product in the correct direction ... power to the monitor, the computer system, and other attached devices is turned off. Stand Body Hinge Body 3. Do not carry the product upside down holding only the stand base. Stand Base Stand Body 4. Your monitor may fall and get damaged or injure your foot. Insert the ...
...Important This illustration depicts the general model of connection. Connecting the stand 1. Place the monitor with its front facing downward on a soft cloth. 2. Assemble the Stand Body into the Stand Body in the picture. Assemble the Stand Base(Front, Rear) into the product in the correct direction ... power to the monitor, the computer system, and other attached devices is turned off. Stand Body Hinge Body 3. Do not carry the product upside down holding only the stand base. Stand Base Stand Body 4. Your monitor may fall and get damaged or injure your foot. Insert the ...
Owner's Manual (English)
Page 5
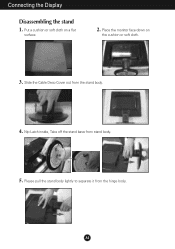
Connecting the Display Disassembling the stand 1. Put a cushion or soft cloth on the cushion or soft cloth. 3. Place the monitor face down on a flat surface. 2. Slide the Cable Deco Cover out from the hinge body. A4 Please pull the stand body lightly to separate it from the stand body. 4. Nip Latch inside, Take off the stand base from stand body. 5.
Connecting the Display Disassembling the stand 1. Put a cushion or soft cloth on the cushion or soft cloth. 3. Place the monitor face down on a flat surface. 2. Slide the Cable Deco Cover out from the hinge body. A4 Please pull the stand body lightly to separate it from the stand body. 4. Nip Latch inside, Take off the stand base from stand body. 5.

Owner's Manual (English)
Page 7
... below sketch map form 1 to manually run this function once again, push the 'AUTO/SET' button on . A6 Insert the Cable Deco Cover in the Stand Body in the picture. However, be aware that this function automatically adjusts the display to a 15 pin 2 row connector. 2. PC-outlet type DVI-D(This feature...
... below sketch map form 1 to manually run this function once again, push the 'AUTO/SET' button on . A6 Insert the Cable Deco Cover in the Stand Body in the picture. However, be aware that this function automatically adjusts the display to a 15 pin 2 row connector. 2. PC-outlet type DVI-D(This feature...

Owner's Manual (English)
Page 20
... 1680 x 1050 @60 Hz VESA 1680 x 1050 @60 Hz DDC 2B On Mode Sleep Mode Off Mode : 40W(Typ.) ≤ 1W ≤ 1W With Stand Without Stand Width 50.80 cm / 20.00 inches 50.80 cm / 20.00 inches Height 38.87 cm / 15.30 inches 34.87 cm / 13.72... or PC-outlet type NOTE Information in this document is subject to change without speaker) Dimensions &Weight Tilt Range Swivel Range Power Input Environmental Conditions Stand Base Power cord 22 inches (55.8 cm) Flat Panel Active matrix-TFT LCD Anti-Glare coating 22 inches viewable 0.282*0.282 mm pixel pitch Horizontal...
... 1680 x 1050 @60 Hz VESA 1680 x 1050 @60 Hz DDC 2B On Mode Sleep Mode Off Mode : 40W(Typ.) ≤ 1W ≤ 1W With Stand Without Stand Width 50.80 cm / 20.00 inches 50.80 cm / 20.00 inches Height 38.87 cm / 15.30 inches 34.87 cm / 13.72... or PC-outlet type NOTE Information in this document is subject to change without speaker) Dimensions &Weight Tilt Range Swivel Range Power Input Environmental Conditions Stand Base Power cord 22 inches (55.8 cm) Flat Panel Active matrix-TFT LCD Anti-Glare coating 22 inches viewable 0.282*0.282 mm pixel pitch Horizontal...
Owner's Manual (English)
Page 22
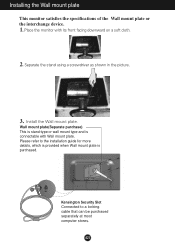
Separate the stand using a screwdriver as shown in the picture. .3 Install the Wall mount plate. Kensington Security Slot Connected to the installation guide for more details, which is ... the Wall mount plate This monitor satisfies the specifications of the Wall mount plate or the interchange device. 1. Wall mount plate(Separate purchase) This is stand-type or wall mount type and is purchased. Place the monitor with Wall mount plate.
Separate the stand using a screwdriver as shown in the picture. .3 Install the Wall mount plate. Kensington Security Slot Connected to the installation guide for more details, which is ... the Wall mount plate This monitor satisfies the specifications of the Wall mount plate or the interchange device. 1. Wall mount plate(Separate purchase) This is stand-type or wall mount type and is purchased. Place the monitor with Wall mount plate.


