

Owner's Manual
Page 5
... system, and other attached devices is turned off. Assemble the Stand Base(Front, Rear) into the product in the correct direction as shown in the picture. Do not carry the product upside down holding only the stand base. Assemble the Stand Body into the Stand Body in the... picture. Connecting the stand 1. The product may differ from the items shown in the correct direction. 4. Connecting the Display Before setting up carefully and face the ...
... system, and other attached devices is turned off. Assemble the Stand Base(Front, Rear) into the product in the correct direction as shown in the picture. Do not carry the product upside down holding only the stand base. Assemble the Stand Body into the Stand Body in the... picture. Connecting the stand 1. The product may differ from the items shown in the correct direction. 4. Connecting the Display Before setting up carefully and face the ...

Owner's Manual
Page 6
A5 Place the monitor face Down on aflat surface. 2. Pushing Latch inside, Take the stand base from stand body. 4. Pack up the product as shown in the picture. A 1. Separate the stand using a screwdriver as shown in the picture. Note: Please keep the 4 screws in an accessible place for future use. 5. Put a cushion or soft cloth on the cushion or soft cloth. 3. Connecting the Display Disassembling the stand Type.
A5 Place the monitor face Down on aflat surface. 2. Pushing Latch inside, Take the stand base from stand body. 4. Pack up the product as shown in the picture. A 1. Separate the stand using a screwdriver as shown in the picture. Note: Please keep the 4 screws in an accessible place for future use. 5. Put a cushion or soft cloth on the cushion or soft cloth. 3. Connecting the Display Disassembling the stand Type.

Owner's Manual
Page 7
Put a cushion or soft cloth on the cushion or soft cloth. 3. Pull out the Stand to remove. 5. Pushing Latch inside, Take the stand base from stand body. 6. Pack up the product as it follows and turn the Stand Base in the picture. A6 B 1. Place the monitor face Down on aflat surface. 2. Connecting the Display Disassembling the stand Type. Change your hold on the product as shown in the arrow direction. 4.
Put a cushion or soft cloth on the cushion or soft cloth. 3. Pull out the Stand to remove. 5. Pushing Latch inside, Take the stand base from stand body. 6. Pack up the product as it follows and turn the Stand Base in the picture. A6 B 1. Place the monitor face Down on aflat surface. 2. Connecting the Display Disassembling the stand Type. Change your hold on the product as shown in the arrow direction. 4.

Owner's Manual
Page 11
The setting method can fine the best resolution you want and it is back to the original display. *Only One touch of characters and pictures for the old not having good eye sight, housewives not dealing with computer well and children. Use 'ez Zooming' Key one step low resolution. MENU ...
The setting method can fine the best resolution you want and it is back to the original display. *Only One touch of characters and pictures for the old not having good eye sight, housewives not dealing with computer well and children. Use 'ez Zooming' Key one step low resolution. MENU ...

Owner's Manual
Page 14
... Display(OSD) Selection and Adjustment The following table indicates all the On Screen Display control, adjustment, and setting menus. A13 Main menu Sub-menu A D Reference PICTURE BRIGHTNESS CONTRAST COLOR GAMMA PRESET RED sRGB 6500K 9300K GREEN POSITION BLUE HORIZONTAL VERTICAL CLOCK TRACKING PHASE SHARPNESS SETUP LANGUAGE OSD HORIZONTAL POSITION VERTICAL To...
... Display(OSD) Selection and Adjustment The following table indicates all the On Screen Display control, adjustment, and setting menus. A13 Main menu Sub-menu A D Reference PICTURE BRIGHTNESS CONTRAST COLOR GAMMA PRESET RED sRGB 6500K 9300K GREEN POSITION BLUE HORIZONTAL VERTICAL CLOCK TRACKING PHASE SHARPNESS SETUP LANGUAGE OSD HORIZONTAL POSITION VERTICAL To...

Owner's Manual
Page 15
Listed below are the icons, icon names, and icon descriptions of the all items shown on the monitor may differ from the manual. A14 Press the MENU Button, then the main menu of selecting and adjusting an item using the OSD system. On Screen Display(OSD) Selection and Adjustment You were introduced to the procedure of the OSD appears. Menu Name PICTURE Icons Sub-menus Button Tip MENU : Exit - + : Adjust (Decrease/Increase) SET : Enter : Select another sub-menu NOTE OSD (On Screen Display) menu languages on the Menu.
Listed below are the icons, icon names, and icon descriptions of the all items shown on the monitor may differ from the manual. A14 Press the MENU Button, then the main menu of selecting and adjusting an item using the OSD system. On Screen Display(OSD) Selection and Adjustment You were introduced to the procedure of the OSD appears. Menu Name PICTURE Icons Sub-menus Button Tip MENU : Exit - + : Adjust (Decrease/Increase) SET : Enter : Select another sub-menu NOTE OSD (On Screen Display) menu languages on the Menu.

Owner's Manual
Page 16
... low gamma values display high contrast images. To move image left and right. On Screen Display(OSD) Selection and Adjustment Main menu Sub menu Description PICTURE PICTURE BRIGHTNESS CONTRAST GAMMA MENU : Exit - : Decrease + : Increase SET : Select another sub-menu • sRGB: Set the screen color to fit the SRGB standard color specification...
... low gamma values display high contrast images. To move image left and right. On Screen Display(OSD) Selection and Adjustment Main menu Sub menu Description PICTURE PICTURE BRIGHTNESS CONTRAST GAMMA MENU : Exit - : Decrease + : Increase SET : Select another sub-menu • sRGB: Set the screen color to fit the SRGB standard color specification...
Owner's Manual
Page 25
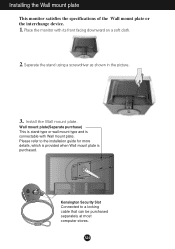
... mount plate(Separate purchase) This is stand-type or wall mount type and is purchased. A24 Separate the stand using a screwdriver as shown in the picture. .3 Install the Wall mount plate. Kensington Security Slot Connected to the installation guide for more details, which is provided when Wall mount plate is connectable...
... mount plate(Separate purchase) This is stand-type or wall mount type and is purchased. A24 Separate the stand using a screwdriver as shown in the picture. .3 Install the Wall mount plate. Kensington Security Slot Connected to the installation guide for more details, which is provided when Wall mount plate is connectable...


