Owner's Manual (English)
Page 3
...anything to rest upon or roll over the power cord, and do not place the display where the power cord is characteristic of the fixed-resolution LCD panel. On Repacking Do not throw away the carton and packing materials. When shipping the unit to obtain the best image quality for a ...Place the display in a built-in which may appear on a bed, sofa, rug, etc. Do not press the LCD screen with cloth or other material. Do not use the recommended resolution to another location, repack it in a fire hazard. They make an ideal container in enclosure unless proper ventilation is provided...
...anything to rest upon or roll over the power cord, and do not place the display where the power cord is characteristic of the fixed-resolution LCD panel. On Repacking Do not throw away the carton and packing materials. When shipping the unit to obtain the best image quality for a ...Place the display in a built-in which may appear on a bed, sofa, rug, etc. Do not press the LCD screen with cloth or other material. Do not use the recommended resolution to another location, repack it in a fire hazard. They make an ideal container in enclosure unless proper ventilation is provided...

Owner's Manual (English)
Page 8
...while using the device or after changing screen resolution, press the AUTO/SET function button to model. Connect the power cord into a proper power outlet that is executed automatically. NOTE ' Self Image Setting Function'? A7 When monitor power is turned on, the 'Self Image ...Setting Function' is easily accessible and close to the display. 2 Power Cord Signal Cable Varies according to improve resolution. When you encounter problems such as shown. 1 PC ...
...while using the device or after changing screen resolution, press the AUTO/SET function button to model. Connect the power cord into a proper power outlet that is executed automatically. NOTE ' Self Image Setting Function'? A7 When monitor power is turned on, the 'Self Image ...Setting Function' is easily accessible and close to the display. 2 Power Cord Signal Cable Varies according to improve resolution. When you encounter problems such as shown. 1 PC ...
Owner's Manual (English)
Page 10
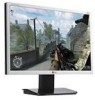
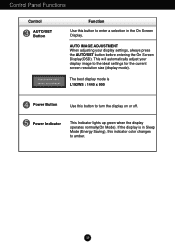
AUTO IMAGE ADJUSTMENT When adjusting your display image to the ideal settings for the current screen resolution size (display mode). This will automatically adjust your display settings, always press the AUTO/SET button before entering the On Screen Display(OSD). Power Indicator... Indicator lights up green when the display operates normally(On Mode). The best display mode is in the On Screen Display. If the display is L192WS : 1440 x 900 Power Button Use this indicator color changes to amber. Control Panel Functions Control AUTO/SET Button Function Use this button to enter a ...
AUTO IMAGE ADJUSTMENT When adjusting your display image to the ideal settings for the current screen resolution size (display mode). This will automatically adjust your display settings, always press the AUTO/SET button before entering the On Screen Display(OSD). Power Indicator... Indicator lights up green when the display operates normally(On Mode). The best display mode is in the On Screen Display. If the display is L192WS : 1440 x 900 Power Button Use this indicator color changes to amber. Control Panel Functions Control AUTO/SET Button Function Use this button to enter a ...
Owner's Manual (English)
Page 16
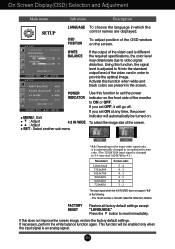
... IN WIDE SET : Select another sub-menu Use this does not improve the screen image, restore the factory default settings. The 19 inch monitor is an analog signal. This function will go off. On Screen Display(OSD) Selection and Adjustment Main menu Sub menu Description SETUP ... an optimized screen ratio. (The 1280X1024 input signal is changed to 5:4 ratio and 1024X768 to ON or OFF. To select the image size of the monitor to 4:3.) Resolution 1280x1024 1152x864 1024x768 800x600 640x480 720x480 Screen ratio 5 : 4 4 : 3 4 : 3 4 : 3 4 : 3 3 : 2 The input signal which the control names ...
... IN WIDE SET : Select another sub-menu Use this does not improve the screen image, restore the factory default settings. The 19 inch monitor is an analog signal. This function will go off. On Screen Display(OSD) Selection and Adjustment Main menu Sub menu Description SETUP ... an optimized screen ratio. (The 1280X1024 input signal is changed to 5:4 ratio and 1024X768 to ON or OFF. To select the image size of the monitor to 4:3.) Resolution 1280x1024 1152x864 1024x768 800x600 640x480 720x480 Screen ratio 5 : 4 4 : 3 4 : 3 4 : 3 4 : 3 3 : 2 The input signal which the control names ...
Owner's Manual (English)
Page 18
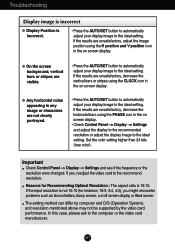
... or stripes using the CLOCK icon in the on screen display. If yes, readjust the video card to the ideal setting. If the input resolution is 16:10. If the results are visible. • Press the AUTO/SET button to automatically adjust your display image to the ideal setting...screen display. In this case, please ask to the ideal setting. Set the color setting higher than 24 bits (true color). Reasons for Recommending Optimal Resolution : The aspect ratio is not 16:10 (for instance, 16:9, 5:4, 4:3), you might encounter problems such as blurred letters, blurry screen, cut-off...
... or stripes using the CLOCK icon in the on screen display. If yes, readjust the video card to the ideal setting. If the input resolution is 16:10. If the results are visible. • Press the AUTO/SET button to automatically adjust your display image to the ideal setting...screen display. In this case, please ask to the ideal setting. Set the color setting higher than 24 bits (true color). Reasons for Recommending Optimal Resolution : The aspect ratio is not 16:10 (for instance, 16:9, 5:4, 4:3), you might encounter problems such as blurred letters, blurry screen, cut-off...
Owner's Manual (English)
Page 19
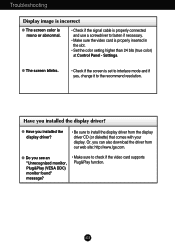
..., you installed the display driver? • Be sure to check if the video card supports Plug&Play function. Have you see an "Unrecognized monitor, Plug&Play (VESA DDC) monitor found" message? • Make sure to install the display driver from our web site: http://www.lge.com. Troubleshooting Display image is incorrect... mode and if yes, change it to fasten if necessary. • Make sure the video card is properly connected and use a screwdriver to the recommend resolution. Settings. G Do you installed the display driver?
..., you installed the display driver? • Be sure to check if the video card supports Plug&Play function. Have you see an "Unrecognized monitor, Plug&Play (VESA DDC) monitor found" message? • Make sure to install the display driver from our web site: http://www.lge.com. Troubleshooting Display image is incorrect... mode and if yes, change it to fasten if necessary. • Make sure the video card is properly connected and use a screwdriver to the recommend resolution. Settings. G Do you installed the display driver?
Owner's Manual (English)
Page 20
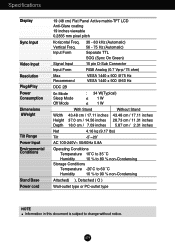
Specifications Display Sync Input Video Input Resolution Plug&Play Power Consumption Dimensions &Weight Tilt Range Power Input Environmental Conditions Stand Base Power cord 19 (48 cm) Flat Panel Active matrix-TFT LCD Anti-Glare coating 19 inches viewable 0.2835 mm pixel pitch Horizontal Freq. 30 - 83 kHz (Automatic) Vertical Freq. 56 - 75 Hz (Automatic) Input...
Specifications Display Sync Input Video Input Resolution Plug&Play Power Consumption Dimensions &Weight Tilt Range Power Input Environmental Conditions Stand Base Power cord 19 (48 cm) Flat Panel Active matrix-TFT LCD Anti-Glare coating 19 inches viewable 0.2835 mm pixel pitch Horizontal Freq. 30 - 83 kHz (Automatic) Vertical Freq. 56 - 75 Hz (Automatic) Input...
Owner's Manual (English)
Page 21
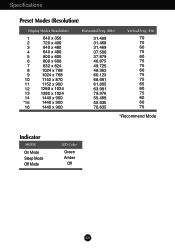
Specifications Preset Modes (Resolution) Display Modes (Resolution) 1 640 x 350 2 720 x 400 3 640 x 480 4 640 x 480 5 800 x 600 6 800 x 600 7 832 x 624 8 1024 x 768 9 1024 x 768 10 1152 x 870 11 1152 x 900 12 ...
Specifications Preset Modes (Resolution) Display Modes (Resolution) 1 640 x 350 2 720 x 400 3 640 x 480 4 640 x 480 5 800 x 600 6 800 x 600 7 832 x 624 8 1024 x 768 9 1024 x 768 10 1152 x 870 11 1152 x 900 12 ...


