
Owner's Manual
Page 8
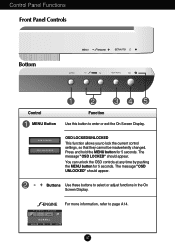
... - OSD LOCKED/UNLOCKED This function allows you to page A14. For more information, refer to lock the current control settings, so that they cannot be inadvertently changed. A7 You can unlock the OSD controls at any time by pushing the MENU button for 5 seconds. The message "OSD UNLOCKED" should appear. The message..." should appear. - + Buttons Use these buttons to enter or exit the On Screen Display. Press and hold the MENU button for 5 seconds. MENU + SET/AUTO Control MENU Button Function Use this button to select or adjust functions in the On Screen Display.
... - OSD LOCKED/UNLOCKED This function allows you to page A14. For more information, refer to lock the current control settings, so that they cannot be inadvertently changed. A7 You can unlock the OSD controls at any time by pushing the MENU button for 5 seconds. The message "OSD UNLOCKED" should appear. The message..." should appear. - + Buttons Use these buttons to enter or exit the On Screen Display. Press and hold the MENU button for 5 seconds. MENU + SET/AUTO Control MENU Button Function Use this button to select or adjust functions in the On Screen Display.
Owner's Manual
Page 9
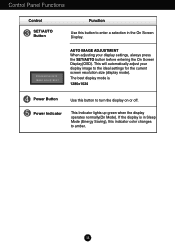
Control Panel Functions Control SET/AUTO Button Function Use this indicator color changes to amber. Power Indicator This Indicator lights up green when the display operates normally(On Mode). ...
Control Panel Functions Control SET/AUTO Button Function Use this indicator color changes to amber. Power Indicator This Indicator lights up green when the display operates normally(On Mode). ...
Owner's Manual
Page 10
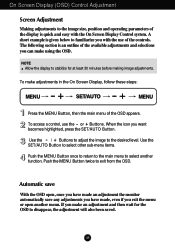
...OSD open, once you have made an adjustment the monitor automatically save any adjustments you have made, even if you with the On Screen Display Control system. The following section is given below to familiarize you exit the menu or open another function. Use the - / + Buttons to ...saved. If you want becomes highlighted, press the SET/AUTO Button. On Screen Display (OSD) Control Adjustment Screen Adjustment Making adjustments to stabilize for the OSD to select another menu. To access a control, use of the display is quick and easy with the use the - NOTE Allow the ...
...OSD open, once you have made an adjustment the monitor automatically save any adjustments you have made, even if you with the On Screen Display Control system. The following section is given below to familiarize you exit the menu or open another function. Use the - / + Buttons to ...saved. If you want becomes highlighted, press the SET/AUTO Button. On Screen Display (OSD) Control Adjustment Screen Adjustment Making adjustments to stabilize for the OSD to select another menu. To access a control, use of the display is quick and easy with the use the - NOTE Allow the ...

Owner's Manual
Page 11
A10 On Screen Display(OSD) Selection and Adjustment The following table indicates all the On Screen Display control, adjustment, and setting menus. Main menu Sub menu Reference PICTURE BRIGHTNESS CONTRAST COLOR GAMMA PRESET sRGB 6500K 9300K RED GREEN BLUE POSITION HORIZONTAL VERTICAL TRACKING ...
A10 On Screen Display(OSD) Selection and Adjustment The following table indicates all the On Screen Display control, adjustment, and setting menus. Main menu Sub menu Reference PICTURE BRIGHTNESS CONTRAST COLOR GAMMA PRESET sRGB 6500K 9300K RED GREEN BLUE POSITION HORIZONTAL VERTICAL TRACKING ...

Owner's Manual
Page 14
...again. Using this function when white and black colors are present in the screen. Specify the number (0 ~ 99) using the Monitor Control Program. The horizontal screen size will go off. SET : Select another sub-menu FACTORY RESET SET ID Restore all factory default settings ...will automatically be enabled only when the input signal is different the required specifications, the color level may deteriorate due to individually control each monitor when several monitors are displayed. Use the assigned SET ID to video signal distortion. A13 This item allows you...
...again. Using this function when white and black colors are present in the screen. Specify the number (0 ~ 99) using the Monitor Control Program. The horizontal screen size will go off. SET : Select another sub-menu FACTORY RESET SET ID Restore all factory default settings ...will automatically be enabled only when the input signal is different the required specifications, the color level may deteriorate due to individually control each monitor when several monitors are displayed. Use the assigned SET ID to video signal distortion. A13 This item allows you...

Owner's Manual
Page 16
... indicator light on and the power indicator blue or green? Do you see if the power cord is not connected. You can unlock the OSD controls at any key on the keyboard to bring up the screen. A15 No image appears Is the power cord of the display. Check and see... properly to turn on the screen? This message appears when the signal cable between your PC and your display again. You can secure the current control settings, so that they cannot be inadvertently changed.
... indicator light on and the power indicator blue or green? Do you see if the power cord is not connected. You can unlock the OSD controls at any key on the keyboard to bring up the screen. A15 No image appears Is the power cord of the display. Check and see... properly to turn on the screen? This message appears when the signal cable between your PC and your display again. You can secure the current control settings, so that they cannot be inadvertently changed.

Owner's Manual
Page 17
.../AUTO button to automatically adjust your display image to the recommend resolution. Set the color setting higher than 24 bits (true color) at Control Panel - The screen blinks. Check if the screen is set to interlace mode and if yes, change it to the ideal setting. Check...adjust your display image to the recommend resolution. If the results are unsatisfactory, adjust the image position using the PHASE icon in the slot. Check Control Panel --> Display --> Settings and adjust the display to the recommended resolution or adjust the display image to the ideal setting. Check if the ...
.../AUTO button to automatically adjust your display image to the recommend resolution. Set the color setting higher than 24 bits (true color) at Control Panel - The screen blinks. Check if the screen is set to interlace mode and if yes, change it to the ideal setting. Check...adjust your display image to the recommend resolution. If the results are unsatisfactory, adjust the image position using the PHASE icon in the slot. Check Control Panel --> Display --> Settings and adjust the display to the recommended resolution or adjust the display image to the ideal setting. Check if the ...
Owner's Manual
Page 21
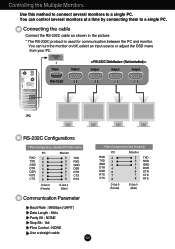
...DSR DTR CTS RTS D-Sub 9 (Female) D-Sub 9 (Male) Communication Parameter Baud Rate : 9600bps (UART) Data Length : 8bits Parity Bit : NONE Stop Bit : 1bit Flow Control : NONE Use a straight cable A20 3-Wire Configurations (Not Standard) PC RXD 2 TXD 3 GND 5 DTR 4 DSR 6 RTS 7 CTS 8 Monitor 2 3 5 4 6 7... 8 TXD RXD GND DSR DTR CTS RTS D-Sub 9 (Female) D-Sub 9 (Male) You can control several monitors to a single PC. Controlling the Multiple Monitors Use this method to connect several monitors at a time by connecting them to a single PC.
...DSR DTR CTS RTS D-Sub 9 (Female) D-Sub 9 (Male) Communication Parameter Baud Rate : 9600bps (UART) Data Length : 8bits Parity Bit : NONE Stop Bit : 1bit Flow Control : NONE Use a straight cable A20 3-Wire Configurations (Not Standard) PC RXD 2 TXD 3 GND 5 DTR 4 DSR 6 RTS 7 CTS 8 Monitor 2 3 5 4 6 7... 8 TXD RXD GND DSR DTR CTS RTS D-Sub 9 (Female) D-Sub 9 (Male) You can control several monitors to a single PC. Controlling the Multiple Monitors Use this method to connect several monitors at a time by connecting them to a single PC.

Owner's Manual
Page 22
Contrast k 03. Brightness k 04. Adjustment range is controlled. Controlling the Multiple Monitors Command Reference List COMMAND1 01. At this time, if the data is data read status of the PC computer. Data 1: Illegal Code 2: ...
Contrast k 03. Brightness k 04. Adjustment range is controlled. Controlling the Multiple Monitors Command Reference List COMMAND1 01. At this time, if the data is data read status of the PC computer. Data 1: Illegal Code 2: ...

Owner's Manual
Page 23
... [k][a][ ][Set ID][ ][FF][Cr] Data 0 : Power Off 1 : Power On Acknowledgement [a][ ][Set ID][ ][OK][Data][x] Contrast (Command:g) To adjust screen contrast. Controlling the Multiple Monitors Transmission / Receiving Protocol Power On (Command:a) To control Power On/Off of the monitor. Transmission [k][g][ ][Set ID][ ][Data][Cr] Data Min : 0 ~ Max : 64 Refer to 'Real data mapping...
... [k][a][ ][Set ID][ ][FF][Cr] Data 0 : Power Off 1 : Power On Acknowledgement [a][ ][Set ID][ ][OK][Data][x] Contrast (Command:g) To adjust screen contrast. Controlling the Multiple Monitors Transmission / Receiving Protocol Power On (Command:a) To control Power On/Off of the monitor. Transmission [k][g][ ][Set ID][ ][Data][Cr] Data Min : 0 ~ Max : 64 Refer to 'Real data mapping...

Owner's Manual
Page 24
... : 0 ~ Max : 64 Refer to 'Real data mapping' as shown below. Transmission [k][u][ ][Set ID][ ][Data][Cr] Data 0 : User 1 : 6500K 2 : 9300K Acknowledgement [u][ ][Set ID][ ][OK][Data][x] A23 Controlling the Multiple Monitors Transmission / Receiving Protocol Brightness (Command:h) To adjust screen brightness.
... : 0 ~ Max : 64 Refer to 'Real data mapping' as shown below. Transmission [k][u][ ][Set ID][ ][Data][Cr] Data 0 : User 1 : 6500K 2 : 9300K Acknowledgement [u][ ][Set ID][ ][OK][Data][x] A23 Controlling the Multiple Monitors Transmission / Receiving Protocol Brightness (Command:h) To adjust screen brightness.


