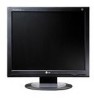
User Guide
Page 2
...Use only the power cord supplied with your dealer. Ensure that the socket-outlet is used as the main disconnection device. There are no user serviceable components inside , even when the power is OFF. To Avoid Personal Injury : Do not place the display on the display. Some internal... in a shock or fire hazard. So are dangerous. Contact your service technician for replacement. In order to allow the proper operation of this manual or listed on a sloping shelf unless properly secured. Overloaded AC outlets and extension cords are frayed power cords and broken plugs. Do not add...
...Use only the power cord supplied with your dealer. Ensure that the socket-outlet is used as the main disconnection device. There are no user serviceable components inside , even when the power is OFF. To Avoid Personal Injury : Do not place the display on the display. Some internal... in a shock or fire hazard. So are dangerous. Contact your service technician for replacement. In order to allow the proper operation of this manual or listed on a sloping shelf unless properly secured. Overloaded AC outlets and extension cords are frayed power cords and broken plugs. Do not add...
User Guide
Page 6
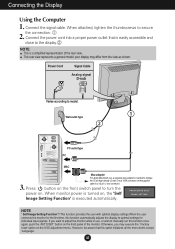
...the signal cable. NOTE This is turned on the front panel of the rear view. This function provides the user with optimal display settings.When the user connects the monitor for the first time, this function automatically adjusts the display to the display. This rear view represents a ...general model; A5 button on the front switch panel to manually run this option initializes all the menu items except 'Language'....
...the signal cable. NOTE This is turned on the front panel of the rear view. This function provides the user with optimal display settings.When the user connects the monitor for the first time, this function automatically adjusts the display to the display. This rear view represents a ...general model; A5 button on the front switch panel to manually run this option initializes all the menu items except 'Language'....
Service Manual
Page 12
f) Click Exit button. - 12 - ADJUSTMENT Windows EDID V1.0 User Manual Operating System: MS Windows 98, 2000, XP Port Setup: Windows 98 => Don't need setup Windows 2000, XP => Need to "c:\WINNT\system32\drivers" folder b) Run Userport.... Port Setup. EDID Read & Write 1) Run WinEDID.exe c) Remove all default number d) Add 300-3FF 2) Edit Week of Manufacture, Year of Manufacture, Serial Number a) Input User Info Data b) Click "Update" button c) Click " Write" button e) Click Start button. This program is available to LCD Monitor only. 1.
f) Click Exit button. - 12 - ADJUSTMENT Windows EDID V1.0 User Manual Operating System: MS Windows 98, 2000, XP Port Setup: Windows 98 => Don't need setup Windows 2000, XP => Need to "c:\WINNT\system32\drivers" folder b) Run Userport.... Port Setup. EDID Read & Write 1) Run WinEDID.exe c) Remove all default number d) Add 300-3FF 2) Edit Week of Manufacture, Year of Manufacture, Serial Number a) Input User Info Data b) Click "Update" button c) Click " Write" button e) Click Start button. This program is available to LCD Monitor only. 1.
Service Manual
Page 13
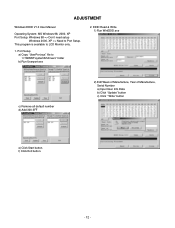
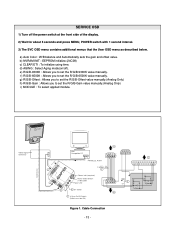
...to set the R/G/B-Gain value manually.(Analog Only) i) MODULE : To select applied module. a) Auto Color : W/B balance and Automatically sets the gain and offset value. Video Signal Generator Control Line IBM Compatible PC 15 10 5 PARALLEL PORT Not used RS232C PARALLEL OFF ON 5V C F VGS A MONITOR B V-SYNC ST POWER Power .... 2) Wait for about 5 seconds and press MENU, POWER switch with 1 second interval. 3) The SVC OSD menu contains additional menus that the User OSD menu as described below. b) NVRAM INIT : EEPROM initialize.(24C08) c) CLEAR ETI : To initialize using time.
...to set the R/G/B-Gain value manually.(Analog Only) i) MODULE : To select applied module. a) Auto Color : W/B balance and Automatically sets the gain and offset value. Video Signal Generator Control Line IBM Compatible PC 15 10 5 PARALLEL PORT Not used RS232C PARALLEL OFF ON 5V C F VGS A MONITOR B V-SYNC ST POWER Power .... 2) Wait for about 5 seconds and press MENU, POWER switch with 1 second interval. 3) The SVC OSD menu contains additional menus that the User OSD menu as described below. b) NVRAM INIT : EEPROM initialize.(24C08) c) CLEAR ETI : To initialize using time.


