User Manual
Page 2
... of power supply you leave the room for its installation, use, and servicing. There are no user serviceable components inside , even when the power is connected to the AC wall outlet, it can be left unattended for a replacement. Call your service technician for this manual or listed on the product screen. Use only a stand recommended by the supplier. To Prevent Fire or Hazards: Always turn the display OFF...
... of power supply you leave the room for its installation, use, and servicing. There are no user serviceable components inside , even when the power is connected to the AC wall outlet, it can be left unattended for a replacement. Call your service technician for this manual or listed on the product screen. Use only a stand recommended by the supplier. To Prevent Fire or Hazards: Always turn the display OFF...
User Manual
Page 3
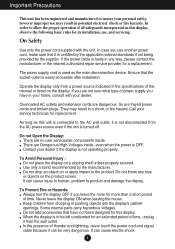
... a fixed image on the screen for a long time as Red, Green or Blue spots on the screen. If you drop the product, the damaged product can cause failures which may appear as this may cause disturbing reflections from surrounding light and bright surfaces. 2 Displays are blocked, built-up heat can cause electric shock or fire. Do not use the recommended resolution to...
... a fixed image on the screen for a long time as Red, Green or Blue spots on the screen. If you drop the product, the damaged product can cause failures which may appear as this may cause disturbing reflections from surrounding light and bright surfaces. 2 Displays are blocked, built-up heat can cause electric shock or fire. Do not use the recommended resolution to...
User Manual
Page 6
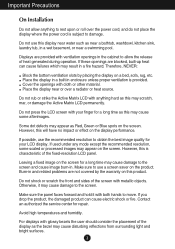
Use a coin on a soft cloth. 2. Once assembled take the monitor up the monitor, ensure that the power to tighten. 5. Make sure you push it until you hear it "click". 3. Important This illustration depicts the general model of the stand base and turn the screw clockwise to the monitor, the computer system, and other attached devices is turned off. Connecting the stand 1. The product may differ from...
Use a coin on a soft cloth. 2. Once assembled take the monitor up the monitor, ensure that the power to tighten. 5. Make sure you push it until you hear it "click". 3. Important This illustration depicts the general model of the stand base and turn the screw clockwise to the monitor, the computer system, and other attached devices is turned off. Connecting the stand 1. The product may differ from...
User Manual
Page 7
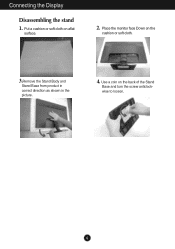
Place the monitor face Down on aflat surface. 2. Connecting the Display Disassembling the stand 1. Put a cushion or soft cloth on the cushion or soft cloth. 3.Remove the Stand Body and Stand Base from product in correct direction as shown in the picture. 4. Use a coin on the back of the Stand Base and turn the screw anticlockwise to loosen. 6
Place the monitor face Down on aflat surface. 2. Connecting the Display Disassembling the stand 1. Put a cushion or soft cloth on the cushion or soft cloth. 3.Remove the Stand Body and Stand Base from product in correct direction as shown in the picture. 4. Use a coin on the back of the Stand Base and turn the screw anticlockwise to loosen. 6
User Manual
Page 8
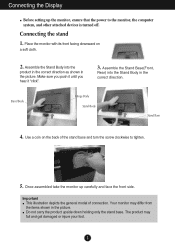
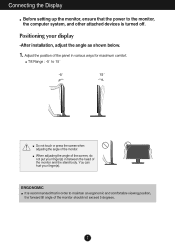
... screen, do not put your display -After installation, adjust the angle as shown below. 1. Adjust the position of the monitor. Tilt Range : -5˚ to 15˚ Do not touch or press the screen when adjusting the angle of the panel in various ways for maximum comfort. ERGONOMIC It is recommended that the power to the monitor, the computer system, and other attached devices is turned off. Positioning...
... screen, do not put your display -After installation, adjust the angle as shown below. 1. Adjust the position of the monitor. Tilt Range : -5˚ to 15˚ Do not touch or press the screen when adjusting the angle of the panel in various ways for maximum comfort. ERGONOMIC It is recommended that the power to the monitor, the computer system, and other attached devices is turned off. Positioning...
User Manual
Page 9
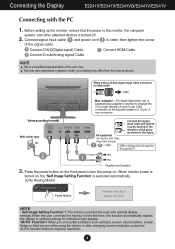
... Mac adapter : For Apple Macintosh use, a separate plug adapter is needed to change the 15 pin high density (3 row) D-sub VGA connector on the supplied cable to turn the power on the front panel to a 15 pin 2 row connector. When using the device or after changing screen resolution, press the AUTO function button to improve resolution. 8 This function provides the user with the PC 1. Connecting the Display E2241V/E2341V/E2341VG/E2441V/E2541V Connecting with optimal display settings.When the user connects the monitor...
... Mac adapter : For Apple Macintosh use, a separate plug adapter is needed to change the 15 pin high density (3 row) D-sub VGA connector on the supplied cable to turn the power on the front panel to a 15 pin 2 row connector. When using the device or after changing screen resolution, press the AUTO function button to improve resolution. 8 This function provides the user with the PC 1. Connecting the Display E2241V/E2341V/E2341VG/E2441V/E2541V Connecting with optimal display settings.When the user connects the monitor...
User Manual
Page 11
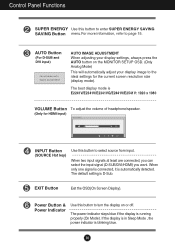
... input signal (D-SUB/DVI/HDMI) you want. Power Button & Power Indicator Use this button to turn the display on the MONITOR SETUP OSD. (Only Analog Mode) This will automatically adjust your display image to page 15. If the display is in Sleep Mode , the power indicator is automatically detected. When only one signal is connected, it is blinking blue. 10 The default setting is running properly (On Mode). EXIT Button Exit the OSD(On Screen Display). The best display mode is E2241V/E2341V/E2341VG/E2441V/E2541V: 1920 x 1080 VOLUME Button...
... input signal (D-SUB/DVI/HDMI) you want. Power Button & Power Indicator Use this button to turn the display on the MONITOR SETUP OSD. (Only Analog Mode) This will automatically adjust your display image to page 15. If the display is in Sleep Mode , the power indicator is automatically detected. When only one signal is connected, it is blinking blue. 10 The default setting is running properly (On Mode). EXIT Button Exit the OSD(On Screen Display). The best display mode is E2241V/E2341V/E2341VG/E2441V/E2541V: 1920 x 1080 VOLUME Button...
User Manual
Page 13
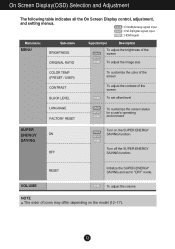
... the On Screen Display control, adjustment, and setting menus. VOLUME HDMI To adjust the volume NOTE The order of the screen HDMI To set to "OFF" mode. DSUB : D-SUB(Analog signal) input DVI-D : DVI-D(Digital signal) input HDMI : HDMI signal Main menu MENU Sub-menu BRIGHTNESS ORIGINAL RATIO Supported input Description DSUB DVI-D HDMI To adjust the brightness of the screen To adjust the image size COLOR TEMP (PRESET / USER) CONTRAST BLACK LEVEL To customize the color of the screen To adjust the contrast of icons may differ depending on the SUPER ENERGY SAVING function. Turn off...
... the On Screen Display control, adjustment, and setting menus. VOLUME HDMI To adjust the volume NOTE The order of the screen HDMI To set to "OFF" mode. DSUB : D-SUB(Analog signal) input DVI-D : DVI-D(Digital signal) input HDMI : HDMI signal Main menu MENU Sub-menu BRIGHTNESS ORIGINAL RATIO Supported input Description DSUB DVI-D HDMI To adjust the brightness of the screen To adjust the image size COLOR TEMP (PRESET / USER) CONTRAST BLACK LEVEL To customize the color of the screen To adjust the contrast of icons may differ depending on the SUPER ENERGY SAVING function. Turn off...
User Manual
Page 14
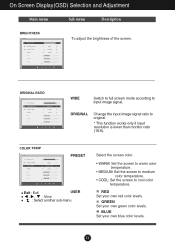
... USER , , : Move : Select another sub-menu Select the screen color. • WARM: Set the screen to warm color temperature . • MEDIUM: Set the screen to medium color temperature. • COOL: Set the screen to input image signal. BLUE Set your own green color levels. ORIGINAL Change the input image signal ratio to original. * This function works only if input resolution is lower than monitor ratio (16:9). RED Set your own red color levels. On Screen Display(OSD) Selection and Adjustment Main menu Sub menu Description To adjust the brightness...
... USER , , : Move : Select another sub-menu Select the screen color. • WARM: Set the screen to warm color temperature . • MEDIUM: Set the screen to medium color temperature. • COOL: Set the screen to input image signal. BLUE Set your own green color levels. ORIGINAL Change the input image signal ratio to original. * This function works only if input resolution is lower than monitor ratio (16:9). RED Set your own red color levels. On Screen Display(OSD) Selection and Adjustment Main menu Sub menu Description To adjust the brightness...
User Manual
Page 15
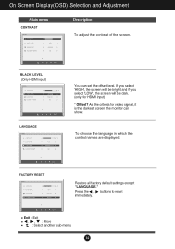
... for HDMI input) * Offset? Restore all factory default settings except "LANGUAGE." To choose the language in which the control names are displayed. Exit : Exit , , : Move : Select another sub-menu 14 If you select 'HIGH', the screen will be bright and if you select 'LOW', the screen will be dark. (only for video signal, it is the darkest screen the monitor can set the offset level. Press the , buttons to reset...
... for HDMI input) * Offset? Restore all factory default settings except "LANGUAGE." To choose the language in which the control names are displayed. Exit : Exit , , : Move : Select another sub-menu 14 If you select 'HIGH', the screen will be bright and if you select 'LOW', the screen will be dark. (only for video signal, it is the darkest screen the monitor can set the offset level. Press the , buttons to reset...

User Manual
Page 17
... SUPER SAVING color is saved during using the monitor. Exit : Exit , : Move : Select another sub-menu OK : Select TOTAL POWER REDUCTION : How much power is green. RESET Clear the TOTAL POWER REDUCTION and TOTAL CO2 REDUCTION values. On Screen Display(OSD) Selection and Adjustment Main menu Sub menu Description ON Turn on the SUPER ENERGY SAVING fuction. When current setting value is OFF,the SUPER SAVING color is LED SAVING function. TOTAL CO2 REDUCTION : Change...
... SUPER SAVING color is saved during using the monitor. Exit : Exit , : Move : Select another sub-menu OK : Select TOTAL POWER REDUCTION : How much power is green. RESET Clear the TOTAL POWER REDUCTION and TOTAL CO2 REDUCTION values. On Screen Display(OSD) Selection and Adjustment Main menu Sub menu Description ON Turn on the SUPER ENERGY SAVING fuction. When current setting value is OFF,the SUPER SAVING color is LED SAVING function. TOTAL CO2 REDUCTION : Change...
User Manual
Page 19
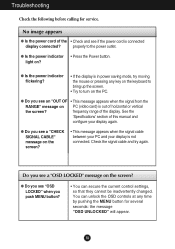
... a "OSD LOCKED" message on the screen? • This message appears when the signal cable between your PC and your display again. Do you see a "CHECK SIGNAL CABLE" message on the screen? You can secure the current control settings, so that they cannot be inadvertently changed. light on PC (video card) is connected display connected? frequency range of horizontal or vertical the screen? G Do you see if the power cord is out of the display. G Is the power indicator...
... a "OSD LOCKED" message on the screen? • This message appears when the signal cable between your PC and your display again. Do you see a "CHECK SIGNAL CABLE" message on the screen? You can secure the current control settings, so that they cannot be inadvertently changed. light on PC (video card) is connected display connected? frequency range of horizontal or vertical the screen? G Do you see if the power cord is out of the display. G Is the power indicator...
User Manual
Page 20
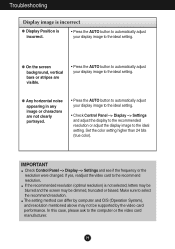
.... • Press the AUTO button to automatically adjust your display image to the ideal setting. • Check Control Panel --> Display --> Settings and adjust the display to the recommended resolution or adjust the display image to the ideal setting. IMPORTANT Check Control Panel --> Display --> Settings and see if the frequency or the resolution were changed. Make sure to the computer or the video card manufacturer. 19 In this case, please ask to select the recommend resolution. Set the color setting higher than 24 bits...
.... • Press the AUTO button to automatically adjust your display image to the ideal setting. • Check Control Panel --> Display --> Settings and adjust the display to the recommended resolution or adjust the display image to the ideal setting. IMPORTANT Check Control Panel --> Display --> Settings and see if the frequency or the resolution were changed. Make sure to the computer or the video card manufacturer. 19 In this case, please ask to select the recommend resolution. Set the color setting higher than 24 bits...
User Manual
Page 21
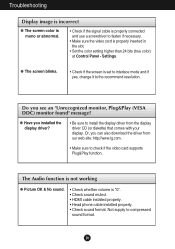
... color) at Control Panel - G Have you installed the display driver? • Be sure to compressed sound format. 20 Not supply to install the display driver from our web site: http://www.lg.com. • Make sure to the recommend resolution. Or, you see an "Unrecognized monitor, Plug&Play (VESA DDC) monitor found" message? G The screen blinks. • Check if the screen is set to interlace mode and if yes, change it to check if the video card supports Plug&Play...
... color) at Control Panel - G Have you installed the display driver? • Be sure to compressed sound format. 20 Not supply to install the display driver from our web site: http://www.lg.com. • Make sure to the recommend resolution. Or, you see an "Unrecognized monitor, Plug&Play (VESA DDC) monitor found" message? G The screen blinks. • Check if the screen is set to interlace mode and if yes, change it to check if the video card supports Plug&Play...

User Manual
Page 22
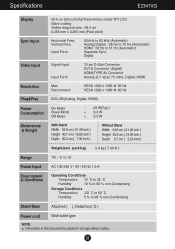
... Sync. Specifications E2241V Display 54.6 cm (21.5 inch) Flat Panel Active matrix-TFT LCD Anti-Glare coating Visible diagonal size : 54.6 cm 0.248 mm x 0.248 mm (Pixel pitch) Sync Input Horizontal Freq. Input Form 30 kHz to 83 kHz (Automatic) Analog,Digital : 56 Hz to 75 Hz (Automatic) HDMI : 56 Hz to change without notice. 21 Vertical Freq. Digital Video Input Signal Input Input Form 15 pin D-Sub Connector DVI-D Connector (Digital) HDMI(TYPE-A) Connector Analog (0.7 Vp-p/ 75 ohm), Digital, HDMI Resolution Plug&Play Max Recommend VESA 1920...
... Sync. Specifications E2241V Display 54.6 cm (21.5 inch) Flat Panel Active matrix-TFT LCD Anti-Glare coating Visible diagonal size : 54.6 cm 0.248 mm x 0.248 mm (Pixel pitch) Sync Input Horizontal Freq. Input Form 30 kHz to 83 kHz (Automatic) Analog,Digital : 56 Hz to 75 Hz (Automatic) HDMI : 56 Hz to change without notice. 21 Vertical Freq. Digital Video Input Signal Input Input Form 15 pin D-Sub Connector DVI-D Connector (Digital) HDMI(TYPE-A) Connector Analog (0.7 Vp-p/ 75 ohm), Digital, HDMI Resolution Plug&Play Max Recommend VESA 1920...

User Manual
Page 23
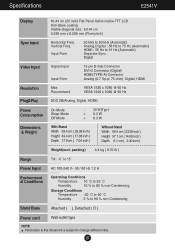
... 5 % to 90 % non-Condensing Stand Base Attached ( ), Detached ( O ) Power cord Wall-outlet type NOTE Information in this document is subject to 61 Hz (Automatic) Separate Sync. Specifications E2341V Display 58.4 cm (23 inch) Flat Panel Active matrix-TFT LCD Anti-Glare coating Visible diagonal size : 58.4 cm 0.265 mm x 0.265 mm (Pixel pitch) Sync Input Horizontal Freq. Input Form 30 kHz to 83 kHz (Automatic) Analog,Digital : 56 Hz to 75...
... 5 % to 90 % non-Condensing Stand Base Attached ( ), Detached ( O ) Power cord Wall-outlet type NOTE Information in this document is subject to 61 Hz (Automatic) Separate Sync. Specifications E2341V Display 58.4 cm (23 inch) Flat Panel Active matrix-TFT LCD Anti-Glare coating Visible diagonal size : 58.4 cm 0.265 mm x 0.265 mm (Pixel pitch) Sync Input Horizontal Freq. Input Form 30 kHz to 83 kHz (Automatic) Analog,Digital : 56 Hz to 75...
User Manual
Page 24
...) Separate Sync. Digital Video Input Signal Input Input Form 15 pin D-Sub Connector DVI-D Connector (Digital) HDMI(TYPE-A) Connector Analog (0.7 Vp-p/ 75 ohm), Digital, HDMI Resolution Plug&Play Max Recommend VESA 1920 x 1080 @ 60 Hz VESA 1920 x 1080 @ 60 Hz DDC 2B(Analog, Digital, HDMI) Power Consumption On Mode Sleep Mode Off Mode : 28 W(Typ.) < 0.3 W < 0.3 W Dimensions & Weight With Stand Width 54.6 cm ( 21.49 inch ) Height 40.7 cm ( 16.02 inch ) Depth 20.2 cm ( 7.95 inch ) Without Stand Width 54.6 cm ( 21.49 inch ) Height 34...
...) Separate Sync. Digital Video Input Signal Input Input Form 15 pin D-Sub Connector DVI-D Connector (Digital) HDMI(TYPE-A) Connector Analog (0.7 Vp-p/ 75 ohm), Digital, HDMI Resolution Plug&Play Max Recommend VESA 1920 x 1080 @ 60 Hz VESA 1920 x 1080 @ 60 Hz DDC 2B(Analog, Digital, HDMI) Power Consumption On Mode Sleep Mode Off Mode : 28 W(Typ.) < 0.3 W < 0.3 W Dimensions & Weight With Stand Width 54.6 cm ( 21.49 inch ) Height 40.7 cm ( 16.02 inch ) Depth 20.2 cm ( 7.95 inch ) Without Stand Width 54.6 cm ( 21.49 inch ) Height 34...

User Manual
Page 25
... ( 22.40 inch ) Height 35.4 cm ( 13.93 inch ) Depth 5.9 cm ( 2.32 inch ) Weight(excl. Specifications E2441V Display 60.97 cm (24 inch) Flat Panel Active matrix-TFT LCD Anti-Glare coating Visible diagonal size : 60.97 cm 0.277 mm x 0.277 mm (Pixel pitch) Sync Input Horizontal Freq. Input Form 30 kHz to 83 kHz (Automatic) Analog,Digital : 56 Hz to 75 Hz (Automatic) HDMI : 56 Hz to change without notice...
... ( 22.40 inch ) Height 35.4 cm ( 13.93 inch ) Depth 5.9 cm ( 2.32 inch ) Weight(excl. Specifications E2441V Display 60.97 cm (24 inch) Flat Panel Active matrix-TFT LCD Anti-Glare coating Visible diagonal size : 60.97 cm 0.277 mm x 0.277 mm (Pixel pitch) Sync Input Horizontal Freq. Input Form 30 kHz to 83 kHz (Automatic) Analog,Digital : 56 Hz to 75 Hz (Automatic) HDMI : 56 Hz to change without notice...
User Manual
Page 26
... kHz (Automatic) Analog,Digital : 56 Hz to 75 Hz (Automatic) HDMI : 56 Hz to change without notice. 25 Digital Video Input Signal Input Input Form 15 pin D-Sub Connector DVI-D Connector (Digital) HDMI(TYPE-A) Connector Analog (0.7 Vp-p/ 75 ohm), Digital, HDMI Resolution Plug&Play Max Recommend VESA 1920 x 1080 @ 60 Hz VESA 1920 x 1080 @ 60 Hz DDC 2B(Analog, Digital, HDMI) Power Consumption On Mode Sleep Mode Off Mode : 33 W(Typ.) < 0.3 W < 0.3 W Dimensions & Weight With Stand Width 59.4 cm ( 23.38 inch ) Height 43.4 cm...
... kHz (Automatic) Analog,Digital : 56 Hz to 75 Hz (Automatic) HDMI : 56 Hz to change without notice. 25 Digital Video Input Signal Input Input Form 15 pin D-Sub Connector DVI-D Connector (Digital) HDMI(TYPE-A) Connector Analog (0.7 Vp-p/ 75 ohm), Digital, HDMI Resolution Plug&Play Max Recommend VESA 1920 x 1080 @ 60 Hz VESA 1920 x 1080 @ 60 Hz DDC 2B(Analog, Digital, HDMI) Power Consumption On Mode Sleep Mode Off Mode : 33 W(Typ.) < 0.3 W < 0.3 W Dimensions & Weight With Stand Width 59.4 cm ( 23.38 inch ) Height 43.4 cm...
User Manual
Page 27
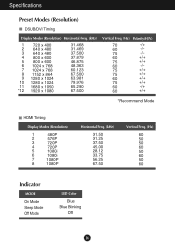
Specifications Preset Modes (Resolution) DSUB/DVI Timing Display Modes (Resolution) Horizontal Freq. (kHz) 1 720 x 400 2 640 x 480 3 640 x 480 4 800 x 600 5 800 x 600 6 1024 x 768 7 1024 x 768 8 1152 x 864 9 1280 x 1024 10 ... +/+ 60 +/+ 75 +/+ 60 -/+ 60 +/+ *Recommend Mode HDMI Timing Display Modes (Resolution) 1 480P 2 576P 3 720P 4 720P 5 1080i 6 1080i 7 1080P 8 1080P Horizontal Freq. (kHz) 31.50 31.25 37.50 45.00 28.12 33.75 56.25 67.50 Vertical Freq. (Hz) 60 50 50 60 50 60 50 60 Indicator MODE On Mode Sleep Mode Off Mode LED Color Blue Blue Blinking Off 26
Specifications Preset Modes (Resolution) DSUB/DVI Timing Display Modes (Resolution) Horizontal Freq. (kHz) 1 720 x 400 2 640 x 480 3 640 x 480 4 800 x 600 5 800 x 600 6 1024 x 768 7 1024 x 768 8 1152 x 864 9 1280 x 1024 10 ... +/+ 60 +/+ 75 +/+ 60 -/+ 60 +/+ *Recommend Mode HDMI Timing Display Modes (Resolution) 1 480P 2 576P 3 720P 4 720P 5 1080i 6 1080i 7 1080P 8 1080P Horizontal Freq. (kHz) 31.50 31.25 37.50 45.00 28.12 33.75 56.25 67.50 Vertical Freq. (Hz) 60 50 50 60 50 60 50 60 Indicator MODE On Mode Sleep Mode Off Mode LED Color Blue Blue Blinking Off 26


