Owners Manual
Page 2
Attaching the Stand Base 5 - Mounting on a wall 9 USING THE MONITOR SET 9 Connecting to a PC 9 - Mounting on a table 6 - Menu Settings 13 -PICTURE 14 -COLOR 15 -DISPLAY 16 -OTHERS 17 SUPER ENERGY SAVING Setting 18 PICTURE MODE Setting 19 TROUBLESHOOTING 21 SPECIFICATIONS 21 E1642C 22 E1942C 23 E2042C 24 E2242C 25 Preset Modes (Resolution) 26 Indicator 27...
Attaching the Stand Base 5 - Mounting on a wall 9 USING THE MONITOR SET 9 Connecting to a PC 9 - Mounting on a table 6 - Menu Settings 13 -PICTURE 14 -COLOR 15 -DISPLAY 16 -OTHERS 17 SUPER ENERGY SAVING Setting 18 PICTURE MODE Setting 19 TROUBLESHOOTING 21 SPECIFICATIONS 21 E1642C 22 E1942C 23 E2042C 24 E2242C 25 Preset Modes (Resolution) 26 Indicator 27...
Owners Manual
Page 6
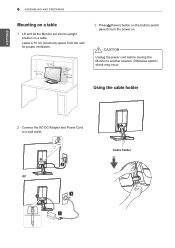
Using the cable holder 2 Connect the AC-DC Adapter and Power Cord to another location. ENEGNLGISH 6 ASSEMBLING AND PREPARING Mounting on a table 1 Lift and tilt the Monitor set into its upright position on . Leave a 10 cm (minimum) space from the wall for proper ventilation. 10 cm 10 cm 10 cm 10 cm 3 Press (Power) button on the bottom switch panel to turn the power on a table. CAUTION Unplug the power cord before moving the Monitor to a wall outlet. Otherwise electric shock may occur. or Cable holder
Using the cable holder 2 Connect the AC-DC Adapter and Power Cord to another location. ENEGNLGISH 6 ASSEMBLING AND PREPARING Mounting on a table 1 Lift and tilt the Monitor set into its upright position on . Leave a 10 cm (minimum) space from the wall for proper ventilation. 10 cm 10 cm 10 cm 10 cm 3 Press (Power) button on the bottom switch panel to turn the power on a table. CAUTION Unplug the power cord before moving the Monitor to a wall outlet. Otherwise electric shock may occur. or Cable holder

Owners Manual
Page 8
... E1942C E2042C E2242C 75 x 75 M4 4 10 cm 10 cm 10 cm 10 cm If you install the Monitor set using an improper accessory are listed on the VESA standard screw specifications. When you intend to mount the Monitor set to a wall, attach Wall mounting ... from your dealer, see the optional Tilt Wall Mounting Bracket Installation and Setup Guide. 8 ASSEMBLING AND PREPARING ENEGNLGISH Mounting on a wall For proper ventilation, allow a clearance of screws may differ depending on the wall mount. y yUse only an authorized LG wall mount and contact the local dealer or qualified personnel...
... E1942C E2042C E2242C 75 x 75 M4 4 10 cm 10 cm 10 cm 10 cm If you install the Monitor set using an improper accessory are listed on the VESA standard screw specifications. When you intend to mount the Monitor set to a wall, attach Wall mounting ... from your dealer, see the optional Tilt Wall Mounting Bracket Installation and Setup Guide. 8 ASSEMBLING AND PREPARING ENEGNLGISH Mounting on a wall For proper ventilation, allow a clearance of screws may differ depending on the wall mount. y yUse only an authorized LG wall mount and contact the local dealer or qualified personnel...


