
Owners Manual
Page 6
... Scan (Channel Search 58 Manual Scan 58 Channel Edit 59 DTV Signal Strength 59 Channel Label Setup 60 Main Picture Source Selection 60 Aux.Label 60 Video Menu Options EZ Picture 61 Manual Picture Control (Off Option 61 Color Temperature Control 61 XD 62 Video Preset 62 Audio Menu Options Audio Language 63...
... Scan (Channel Search 58 Manual Scan 58 Channel Edit 59 DTV Signal Strength 59 Channel Label Setup 60 Main Picture Source Selection 60 Aux.Label 60 Video Menu Options EZ Picture 61 Manual Picture Control (Off Option 61 Color Temperature Control 61 XD 62 Video Preset 62 Audio Menu Options Audio Language 63...
Owners Manual
Page 7
... for conferencing, games, and Internet browsing. The PDP can be thought of as televisions and common computer monitors. All of 0.9 to 2.2 million cells. The Picture-in-Picture feature allows you to view your plasma display to a PC and you expect. A few minute colored dots may be exchanged or returned. Our production technology...
... for conferencing, games, and Internet browsing. The PDP can be thought of as televisions and common computer monitors. All of 0.9 to 2.2 million cells. The Picture-in-Picture feature allows you to view your plasma display to a PC and you expect. A few minute colored dots may be exchanged or returned. Our production technology...
Owners Manual
Page 9
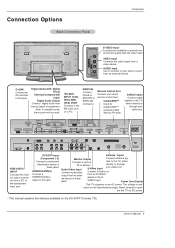
...Connects the video signal from a PC to the TV, either TV or Monitor. Antenna Inputs Monitor Output Connect antenna sig- cated on the DU-50PY10 series TVs. Owner's Manual 9 IEEE1394 Connect DVHS or MicroMV to the RS-232C port on a PC. Connection Options Back Connection Panel... Introduction S-VIDEO R AUDIO L / MONO VIDEO FRONT A/V INPUT S-VIDEO Input A connection available to oper- Never attempt to provide better picture quality than the video input. CABLE Inputs Connect cable signals to the appropriate input port. Note: In standby mode, these jacks.
...Connects the video signal from a PC to the TV, either TV or Monitor. Antenna Inputs Monitor Output Connect antenna sig- cated on the DU-50PY10 series TVs. Owner's Manual 9 IEEE1394 Connect DVHS or MicroMV to the RS-232C port on a PC. Connection Options Back Connection Panel... Introduction S-VIDEO R AUDIO L / MONO VIDEO FRONT A/V INPUT S-VIDEO Input A connection available to oper- Never attempt to provide better picture quality than the video input. CABLE Inputs Connect cable signals to the appropriate input port. Note: In standby mode, these jacks.

Owners Manual
Page 10
...and install the batteries matching correct polarity (+ with -). • Install two 1.5V AA batteries. PIP Switches between PIP, POP (Picture-out-ofPicture) and Twin picture modes. Installation Remote Control Key Functions - erence. MUTE VOL PGUP CH PGDN SURF INFO SAP RATIO CC ENTER MENU EXIT TV .... Enters or exits a Panel Menu in DTV mode. PIPCH+ PIPINPUT VIDEO SOUND SIGNAL SWAP ADJUST FREEZE ZOOM VIDEO Adjusts the factory preset picture depending on -screen displays and returns to the next one. MODE Selects the remote operating mode: TV, VCR, DVD, CABLE, HDSTB or...
...and install the batteries matching correct polarity (+ with -). • Install two 1.5V AA batteries. PIP Switches between PIP, POP (Picture-out-ofPicture) and Twin picture modes. Installation Remote Control Key Functions - erence. MUTE VOL PGUP CH PGDN SURF INFO SAP RATIO CC ENTER MENU EXIT TV .... Enters or exits a Panel Menu in DTV mode. PIPCH+ PIPINPUT VIDEO SOUND SIGNAL SWAP ADJUST FREEZE ZOOM VIDEO Adjusts the factory preset picture depending on -screen displays and returns to the next one. MODE Selects the remote operating mode: TV, VCR, DVD, CABLE, HDSTB or...

Owners Manual
Page 13
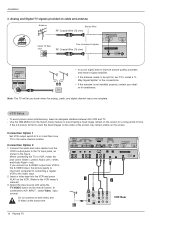
... connecting the antenna. 2. Outdoor Antenna Single-family Dwellings /Houses (Connect to wall jack for outdoor antenna) Bronze Wire Be careful not to tighten. For optimum picture quality, adjust antenna direction if needed.
... connecting the antenna. 2. Outdoor Antenna Single-family Dwellings /Houses (Connect to wall jack for outdoor antenna) Bronze Wire Be careful not to tighten. For optimum picture quality, adjust antenna direction if needed.
Owners Manual
Page 14
... Cable ANTENNA AC INPUT Signal Amplifier • In a poor signal area to improve picture quality, purchase and install a signal amplifier. • If the antenna needs to the S-VIDEO input, the picture quality is improved; the fixed images on the Option menu) feature to the TV input...If connected to A/V INPUT , select Video input source) Do not connect to tighten. To avoid picture noise (interference), leave an adequate distance between the VCR and TV - If the 4:3 picture format is not installed properly, contact your dealer for a long period of the screen may remain visible...
... Cable ANTENNA AC INPUT Signal Amplifier • In a poor signal area to improve picture quality, purchase and install a signal amplifier. • If the antenna needs to the S-VIDEO input, the picture quality is improved; the fixed images on the Option menu) feature to the TV input...If connected to A/V INPUT , select Video input source) Do not connect to tighten. To avoid picture noise (interference), leave an adequate distance between the VCR and TV - If the 4:3 picture format is not installed properly, contact your dealer for a long period of the screen may remain visible...

Owners Manual
Page 15
... Y PB PR Y Pb Pr Y B-Y R-Y Y Cb Cr Y PB PR Notes: • Digital Audio will not work for operating instructions. • Component Input ports To get better picture quality, connect a DVD player to the component input ports as shown in the figure. Use the TV/VIDEO or COMP/RGB/HDMI button on screen...
... Y PB PR Y Pb Pr Y B-Y R-Y Y Cb Cr Y PB PR Notes: • Digital Audio will not work for operating instructions. • Component Input ports To get better picture quality, connect a DVD player to the component input ports as shown in the figure. Use the TV/VIDEO or COMP/RGB/HDMI button on screen...

Owners Manual
Page 17
.... (Refer to DVI cable. • Avoid keeping a fixed image on the TV's remote control. 3. Notes: • Depending on the menu until the picture is present, change the PC mode to another rate or adjust the brightness and contrast on the graphics card, DOS mode may not work if...for the graphic card accordingly. This TV provides Plug and Play capability, meaning that the PC adjusts automatically to 1024x768, 60Hz. 2. To get the best picture quality, adjust the PC graphics card to the TV's settings. - Check the image on your TV. Installation PC Setup - Use the TV's RGB...
.... (Refer to DVI cable. • Avoid keeping a fixed image on the TV's remote control. 3. Notes: • Depending on the menu until the picture is present, change the PC mode to another rate or adjust the brightness and contrast on the graphics card, DOS mode may not work if...for the graphic card accordingly. This TV provides Plug and Play capability, meaning that the PC adjusts automatically to 1024x768, 60Hz. 2. To get the best picture quality, adjust the PC graphics card to the TV's settings. - Check the image on your TV. Installation PC Setup - Use the TV's RGB...

Owners Manual
Page 19
... to 1024 x 768, 60Hz. - If Source Devices support Auto HDMI, automatically, Source Devices divert output resolution in 1280x720p. To get the best picture quality, adjust the DVD Player or Set Top Box output resolution to 1280 x 720p. - And then you can listen to normal Audio. When ...connect audio with separated cable.(Refer to ) How to connect 1. Owner's Manual 19 Then, make the corresponding audio connections. To get the best picture quality, adjust the PC graphics card to 1280 x 720p. - When Source Devices have DVI Output Connector, Source Devices connect to DTV with HDMI...
... to 1024 x 768, 60Hz. - If Source Devices support Auto HDMI, automatically, Source Devices divert output resolution in 1280x720p. To get the best picture quality, adjust the DVD Player or Set Top Box output resolution to 1280 x 720p. - And then you can listen to normal Audio. When ...connect audio with separated cable.(Refer to ) How to connect 1. Owner's Manual 19 Then, make the corresponding audio connections. To get the best picture quality, adjust the PC graphics card to 1280 x 720p. - When Source Devices have DVI Output Connector, Source Devices connect to DTV with HDMI...

Owners Manual
Page 21
Turn on the display by pressing the POWER button on the menu until the picture is clear. When Source Devices connected HDMI/DVI Input output TV SET Resolution(480p, 720p, 1080i), TV SET Display fit EIA/CEA861-B Specification to P.60) 4. ... format) - 1024 x 768 @ 70Hz - 1024 x 768 @ 75Hz Owner's Manual 21 Check the image on the screen. ed on your TV SET. As shown the lower picture, press the Adjust button to the Manual of the PC graphics card. If not, refer to adjust the screen Position of time. And In case...
Turn on the display by pressing the POWER button on the menu until the picture is clear. When Source Devices connected HDMI/DVI Input output TV SET Resolution(480p, 720p, 1080i), TV SET Display fit EIA/CEA861-B Specification to P.60) 4. ... format) - 1024 x 768 @ 70Hz - 1024 x 768 @ 75Hz Owner's Manual 21 Check the image on the screen. ed on your TV SET. As shown the lower picture, press the Adjust button to the Manual of the PC graphics card. If not, refer to adjust the screen Position of time. And In case...

Owners Manual
Page 56
... Yes. 3. Press ENTER button POSITION SIZE PHASE RESET G Initialize Settings Adjust Close 56 Plasma TV Be sure to original factory values) - You can manually adjust picture position and minimize image shaking for screen Position, Size, and Phase 1. Press ENTER button and then use F / G button to make appropriate adjustments. • The PHASE...
... Yes. 3. Press ENTER button POSITION SIZE PHASE RESET G Initialize Settings Adjust Close 56 Plasma TV Be sure to original factory values) - You can manually adjust picture position and minimize image shaking for screen Position, Size, and Phase 1. Press ENTER button and then use F / G button to make appropriate adjustments. • The PHASE...

Owners Manual
Page 59
...SURF button on the remote control when a channel is currently added or deleted by toggling each channel on -screen signal strength monitor to experience picture degradation. - DTV Signals: When input signals are to see the quality of the signal being received. • You can create your own Surf... return to TV viewing or press MENU button to return to add or delete it. View the on or off with channel numbers and a preview picture. 4. Label Set ID G Selection ( G or ) leads you are DTV, CADTV, this function is not working in TV Guide Setup, CATV, CADTV is ...
...SURF button on the remote control when a channel is currently added or deleted by toggling each channel on -screen signal strength monitor to experience picture degradation. - DTV Signals: When input signals are to see the quality of the signal being received. • You can create your own Surf... return to TV viewing or press MENU button to return to add or delete it. View the on or off with channel numbers and a preview picture. 4. Label Set ID G Selection ( G or ) leads you are DTV, CADTV, this function is not working in TV Guide Setup, CATV, CADTV is ...

Owners Manual
Page 60
... CABLE MENU Previous 1. Label 1. even if you will now see the channel banner. • For example: CADTV 27-1 DOLBY DIGITAL HD CNN Main Picture Source Selection - Press the MENU button and then use D / E button to select Main Input. 3. If you press ENTER button, you didn't ...preset a label for a channel - Changes the picture source so you to select the source: Video, Front Video, Component1, Component2, RGB, HDMI/DVI. 4. Aux. Label. 3. Press the MENU button and then ...
... CABLE MENU Previous 1. Label 1. even if you will now see the channel banner. • For example: CADTV 27-1 DOLBY DIGITAL HD CNN Main Picture Source Selection - Press the MENU button and then use D / E button to select Main Input. 3. If you press ENTER button, you didn't ...preset a label for a channel - Changes the picture source so you to select the source: Video, Front Video, Component1, Component2, RGB, HDMI/DVI. 4. Aux. Label. 3. Press the MENU button and then ...

Owners Manual
Page 61
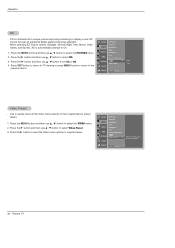
... Brightness 50 2. Press the G button and then use D / E button to select Color Temperature . 3. Select the preset value in the EZ Picture menu based on the program category. - Press the G button and then use D / E button to enhance hotter colors such as shown below:...less intense colors with more blue. 1. OPTION Video Preset LOCK CABLE MENU Previous Color Temperature Control - SETUP VIDEO AUDIO TIME EZ Picture Contrast Brightness Color Sharpness Tint Color Temperature G OPTION LOCK Video Preset CABLE MENU Previous Cool Medium Warm Owner's Manual 61 When ...
... Brightness 50 2. Press the G button and then use D / E button to select Color Temperature . 3. Select the preset value in the EZ Picture menu based on the program category. - Press the G button and then use D / E button to enhance hotter colors such as shown below:...less intense colors with more blue. 1. OPTION Video Preset LOCK CABLE MENU Previous Color Temperature Control - SETUP VIDEO AUDIO TIME EZ Picture Contrast Brightness Color Sharpness Tint Color Temperature G OPTION LOCK Video Preset CABLE MENU Previous Cool Medium Warm Owner's Manual 61 When ...
Owners Manual
Page 62
... Video menu options to display a real HD source through an advanced digital signal processing algorithm. - When selecting EZ Picture options (Daylight, Normal, Night Time, Movie, Video Game, and Sports), XD is LG Electronic's unique picture improving technology to original values. Press EXIT button to return to TV viewing or press MENU button to...
... Video menu options to display a real HD source through an advanced digital signal processing algorithm. - When selecting EZ Picture options (Daylight, Normal, Night Time, Movie, Video Game, and Sports), XD is LG Electronic's unique picture improving technology to original values. Press EXIT button to return to TV viewing or press MENU button to...

Owners Manual
Page 67
.... • Cinema Zoom Choose Cinema Zoom when you want to select On or Off. 4. Horizon aspect ratio is 1~16. When you receive an analog picture with a 16:9 aspect ratio, you want to select Cinema. 3. You can also adjust Aspect Ratio in a linear proportion to fill the entire screen. ... image may become imprinted on your TV with a 4:3 aspect ratio is displayed on your 16:9 TV, you choose the way an analog picture with a 16:9 ratio picture format. Cinema Mode Setup - RGB-PC/DVI-PC input source use 4:3 or 16:9 aspect ratio. - Note: When enlarging or reducing the...
.... • Cinema Zoom Choose Cinema Zoom when you want to select On or Off. 4. Horizon aspect ratio is 1~16. When you receive an analog picture with a 16:9 aspect ratio, you want to select Cinema. 3. You can also adjust Aspect Ratio in a linear proportion to fill the entire screen. ... image may become imprinted on your TV with a 4:3 aspect ratio is displayed on your 16:9 TV, you choose the way an analog picture with a 16:9 ratio picture format. Cinema Mode Setup - RGB-PC/DVI-PC input source use 4:3 or 16:9 aspect ratio. - Note: When enlarging or reducing the...

Owners Manual
Page 70
... EXIT button to return to TV viewing or press MENU button to return to remain on the screen for a long period of time. 1. A frozen still picture from the screen. Press the G button and then use D / E button to select ISM Method. 3. However, it is not necessary - SETUP Aspect Ratio Cinema VIDEO Caption...
... EXIT button to return to TV viewing or press MENU button to return to remain on the screen for a long period of time. 1. A frozen still picture from the screen. Press the G button and then use D / E button to select ISM Method. 3. However, it is not necessary - SETUP Aspect Ratio Cinema VIDEO Caption...

Owners Manual
Page 71
... button to return to select the screen split zoom section. 3. Press the ZOOM button in DTV 720p, or 1080i modes. 2. Operation Low Power - Enlarges the picture with correct proportions. - Use the D / E / F / G buttons to the previous menu. F F F F Owner's Manual 71 Press the G button and then use D / E button to select On or Off... Split Zoom (DTV 720p, or 1080i mode only) - To return to select Low power. 3. Low power reduces the plasma display power consumption. 1. When enlarging the picture, the image may become distorted. 1.
... button to return to select the screen split zoom section. 3. Press the ZOOM button in DTV 720p, or 1080i modes. 2. Operation Low Power - Enlarges the picture with correct proportions. - Use the D / E / F / G buttons to the previous menu. F F F F Owner's Manual 71 Press the G button and then use D / E button to select On or Off... Split Zoom (DTV 720p, or 1080i mode only) - To return to select Low power. 3. Low power reduces the plasma display power consumption. 1. When enlarging the picture, the image may become distorted. 1.

Owners Manual
Page 76
..., and Front Video DTV, Analog, Video, and Front Video W Swapping the PIP/Twin Picture Repeatedly, use the SWAP button to access the sub picture. Use the PIPCH+ / PIPCH- Main Picture Sub Picture Main Picture Sub Picture W TV Program selection for the sub picture. Each press of PIP changes the PIP options as shown below. Each press of...
..., and Front Video DTV, Analog, Video, and Front Video W Swapping the PIP/Twin Picture Repeatedly, use the SWAP button to access the sub picture. Use the PIPCH+ / PIPCH- Main Picture Sub Picture Main Picture Sub Picture W TV Program selection for the sub picture. Each press of PIP changes the PIP options as shown below. Each press of...

Owners Manual
Page 77
... filled with the 3 POP screen. - Press the EXIT button to select one on Sub pictures are in channel scanning. W POP (Picture-out-of 3 PIP screen pictures in channel scanning. 2. i.e) If screen is adjusted to shift it may make a noise from the Tuner switch. 1. Press the PIP button to ... is in POP mode. • When watching TV on Main picture, TV or DTV on the 3 PIP screen display, (while the main picture source remains the current channel). Use POP to change main and sub picture sizes in POP mode, it for Twin Picture Use the D / E / F / G button to search the ...
... filled with the 3 POP screen. - Press the EXIT button to select one on Sub pictures are in channel scanning. W POP (Picture-out-of 3 PIP screen pictures in channel scanning. 2. i.e) If screen is adjusted to shift it may make a noise from the Tuner switch. 1. Press the PIP button to ... is in POP mode. • When watching TV on Main picture, TV or DTV on the 3 PIP screen display, (while the main picture source remains the current channel). Use POP to change main and sub picture sizes in POP mode, it for Twin Picture Use the D / E / F / G button to search the ...


