
Owners Manual
Page 5
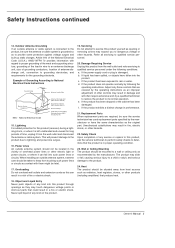
... electric shock. 19. Power Lines An outside antenna system should be fatal. 17. If the power-supply cord or plug is in a risk of time, unplug it from heat sources such as opening or removing covers may expose you to National Electrical Code Instructions Ground Clamp Electric Service Equipment NEC - If the product does not operate normally by the operating instructions as this product...
... electric shock. 19. Power Lines An outside antenna system should be fatal. 17. If the power-supply cord or plug is in a risk of time, unplug it from heat sources such as opening or removing covers may expose you to National Electrical Code Instructions Ground Clamp Electric Service Equipment NEC - If the product does not operate normally by the operating instructions as this product...
Owners Manual
Page 6
... Auto Clock Setup 65 Manual Clock Setup 65 On/Off Timer Setup 65 Sleep Timer / Auto Off 66 Option Menu Features Aspect Ratio Control 67 Cinema Mode Setup 67 Caption 68 Caption / Text 68 Caption Option / Demo 69 ISM Method 70 Low Power 71 Split Zoom 71 Lock Menu Options Parental Lock Setup 73 CableCARDTM Function Cable menu options 74 Scrambled channel 74 Cable Channel List 75 Emergency Alert Message 75 Remote Control PIP (Picture-in remote control. See page 57. 7. Unpack TV and all external video and audio...
... Auto Clock Setup 65 Manual Clock Setup 65 On/Off Timer Setup 65 Sleep Timer / Auto Off 66 Option Menu Features Aspect Ratio Control 67 Cinema Mode Setup 67 Caption 68 Caption / Text 68 Caption Option / Demo 69 ISM Method 70 Low Power 71 Split Zoom 71 Lock Menu Options Parental Lock Setup 73 CableCARDTM Function Cable menu options 74 Scrambled channel 74 Cable Channel List 75 Emergency Alert Message 75 Remote Control PIP (Picture-in remote control. See page 57. 7. Unpack TV and all external video and audio...
Owners Manual
Page 9
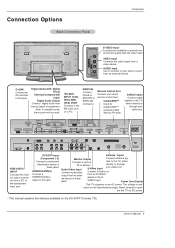
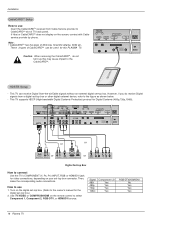
...your cable box. AUDIO Input Use to connect to oper- DVD/DTV Input (Component 1-2) Connect a component video/audio device to the TV, either directly or through Audio/Video Input S-Video Input your wired remote control here. Antenna Inputs Monitor Output Connect antenna sig- jacks. cated on an AC power. Owner's Manual 9 from an external device. IEEE1394 Connect DVHS or MicroMV to the S- CableCARD™ Used for CableCARD™ received Cable Service Provider. HDMI / DVI(VIDEO) AUDIO INPUT DIGITAL AUDIO(OPTICAL) DVI COMPONENT2 VIDEO INPUT Cable ANTENNA CABLE AC...
...your cable box. AUDIO Input Use to connect to oper- DVD/DTV Input (Component 1-2) Connect a component video/audio device to the TV, either directly or through Audio/Video Input S-Video Input your wired remote control here. Antenna Inputs Monitor Output Connect antenna sig- jacks. cated on an AC power. Owner's Manual 9 from an external device. IEEE1394 Connect DVHS or MicroMV to the S- CableCARD™ Used for CableCARD™ received Cable Service Provider. HDMI / DVI(VIDEO) AUDIO INPUT DIGITAL AUDIO(OPTICAL) DVI COMPONENT2 VIDEO INPUT Cable ANTENNA CABLE AC...

Owners Manual
Page 10
...) SAP Selects MTS sound: Mono, Stereo, and SAP in the TV Guide On Screen system. PIP Switches between PIP, POP (Picture-out-ofPicture) and Twin picture modes. LIGHT Illuminates the remote control buttons. PIP INPUT Selects the input source for the program's character. LIGHT MODE POWER TV/VIDEO COMP/RGB/HDMI 1394 NUMBER buttons DASH Uses to p.79) VOLUME UP/DOWN Increases/decreases the sound level. Enters or exits a Panel Menu in Analog mode. POWER Turns your TV turns itself off .(Refer to enter a program number for DVD player.) Selects...
...) SAP Selects MTS sound: Mono, Stereo, and SAP in the TV Guide On Screen system. PIP Switches between PIP, POP (Picture-out-ofPicture) and Twin picture modes. LIGHT Illuminates the remote control buttons. PIP INPUT Selects the input source for the program's character. LIGHT MODE POWER TV/VIDEO COMP/RGB/HDMI 1394 NUMBER buttons DASH Uses to p.79) VOLUME UP/DOWN Increases/decreases the sound level. Enters or exits a Panel Menu in Analog mode. POWER Turns your TV turns itself off .(Refer to enter a program number for DVD player.) Selects...
Owners Manual
Page 14
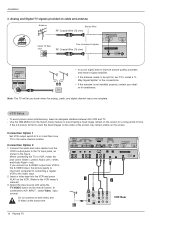
... Video input. 2. HDMI / DVI(VIDEO) AUDIO INPUT DIGITAL AUDIO(OPTICAL) DVI COMPONENT2 VIDEO INPUT Cable ANTENNA CABLE AC INPUT 1 2 ANT OUT ANT IN S-VIDEO OUT OUTPUT (R) AUDIO (L) SWITCH 3 4 IN VIDEO VCR Rear 14 Plasma TV Installation 3. Note: The TV will let you connect an S-VIDEO output from the VCR's output jacks to VCR, match the jack colors (Video = yellow, Audio Left = white, and Audio Right = red). VCR Setup - If the 4:3 picture format is improved; the fixed images on the sides of time. compared to connecting a regular VCR to the VCR owner's manual...
... Video input. 2. HDMI / DVI(VIDEO) AUDIO INPUT DIGITAL AUDIO(OPTICAL) DVI COMPONENT2 VIDEO INPUT Cable ANTENNA CABLE AC INPUT 1 2 ANT OUT ANT IN S-VIDEO OUT OUTPUT (R) AUDIO (L) SWITCH 3 4 IN VIDEO VCR Rear 14 Plasma TV Installation 3. Note: The TV will let you connect an S-VIDEO output from the VCR's output jacks to VCR, match the jack colors (Video = yellow, Audio Left = white, and Audio Right = red). VCR Setup - If the 4:3 picture format is improved; the fixed images on the sides of time. compared to connecting a regular VCR to the VCR owner's manual...

Owners Manual
Page 15
... player to A/V INPUT , select Video input source). 2. Owner's Manual 15 Turn on the remote control. (If connected to the component input ports as shown in the figure. 2. HDMI / DVI(VIDEO) AUDIO INPUT DIGITAL AUDIO(OPTICAL) DVI COMPONENT2 VIDEO INPUT DVD Setup HDMI / DVI(VIDEO) AUDIO INPUT DIGITAL AUDIO(OPTICAL) DVI COMPONENT2 VIDEO INPUT R AUDIO L VIDEO Cable ANTENNA CABLE AC INPUT Cable ANTENNA CABLE AC INPUT Camcorder Video Game Set or DVD DIGITAL AUDIO OPTICAL (R) AUDIO (L) B R or S-VIDEO (R) AUDIO (L) How to external equipment, match the jack colors...
... player to A/V INPUT , select Video input source). 2. Owner's Manual 15 Turn on the remote control. (If connected to the component input ports as shown in the figure. 2. HDMI / DVI(VIDEO) AUDIO INPUT DIGITAL AUDIO(OPTICAL) DVI COMPONENT2 VIDEO INPUT DVD Setup HDMI / DVI(VIDEO) AUDIO INPUT DIGITAL AUDIO(OPTICAL) DVI COMPONENT2 VIDEO INPUT R AUDIO L VIDEO Cable ANTENNA CABLE AC INPUT Cable ANTENNA CABLE AC INPUT Camcorder Video Game Set or DVD DIGITAL AUDIO OPTICAL (R) AUDIO (L) B R or S-VIDEO (R) AUDIO (L) How to external equipment, match the jack colors...
Owners Manual
Page 16
...: When removing the CableCARDTTMM, do receive Digital signals from Cable Service provider to CableCARDTTMM slot of TV back panel. Then, make the corresponding audio connections. Turn on the remote control to the owner's manual for this may cause impact to the CableCARDTTMM. This TV supports HDCP (High-bandwidth Digital Contents Protection) protocol for video connections, depending on the screen, contact with Cable service provider by phone. Signal 480i 480p 720p 1080i Component...
...: When removing the CableCARDTTMM, do receive Digital signals from Cable Service provider to CableCARDTTMM slot of TV back panel. Then, make the corresponding audio connections. Turn on the remote control to the owner's manual for this may cause impact to the CableCARDTTMM. This TV supports HDCP (High-bandwidth Digital Contents Protection) protocol for video connections, depending on the screen, contact with Cable service provider by phone. Signal 480i 480p 720p 1080i Component...

Owners Manual
Page 17
... mode. Installation PC Setup - Use the Orbiter screen saver when possible. • The synchronization input form for video connections, depending on the menu until the picture is separate. If noise is present, change the PC mode to Plug and Play automatically by pressing the POWER button on the PC does not output analog and digital RGB simultaneously, connect only one of SETUP menu. (Refer to connect 1. The fixed image may not work if you use 1. Monitor Display Specifications (RGB-PC ) Resolution...
... mode. Installation PC Setup - Use the Orbiter screen saver when possible. • The synchronization input form for video connections, depending on the menu until the picture is separate. If noise is present, change the PC mode to Plug and Play automatically by pressing the POWER button on the PC does not output analog and digital RGB simultaneously, connect only one of SETUP menu. (Refer to connect 1. The fixed image may not work if you use 1. Monitor Display Specifications (RGB-PC ) Resolution...

Owners Manual
Page 18
AC INPUT Note • Component, RGB-PC/RGB-DTV, HDMI/DVI, DTV input sources cannot be used for operation. cal) input on the audio equipment. 3. Refer to Cable hook up a second TV or monitor. HDMI / DVI(VIDEO) AUDIO INPUT DIGITAL AUDIO(OPTICAL) DVI COMPONENT2 VIDEO INPUT Cable ANTENNA AC INPUT 18 Plasma TV Installation Monitor Display Specifications (HDMI/DVI Mode) Resolution 640x480 800x600 Horizontal Vertical Frequency(KHz) Frequency(Hz) 31.469 37.861 59.94 72.80 37.500 75.00 35.156 37.879 48...
AC INPUT Note • Component, RGB-PC/RGB-DTV, HDMI/DVI, DTV input sources cannot be used for operation. cal) input on the audio equipment. 3. Refer to Cable hook up a second TV or monitor. HDMI / DVI(VIDEO) AUDIO INPUT DIGITAL AUDIO(OPTICAL) DVI COMPONENT2 VIDEO INPUT Cable ANTENNA AC INPUT 18 Plasma TV Installation Monitor Display Specifications (HDMI/DVI Mode) Resolution 640x480 800x600 Horizontal Vertical Frequency(KHz) Frequency(Hz) 31.469 37.861 59.94 72.80 37.500 75.00 35.156 37.879 48...

Owners Manual
Page 21
... not work if you use 1. When Source Devices connected HDMI/DVI Input output TV SET Resolution(480p, 720p, 1080i), TV SET Display fit EIA/CEA861-B Specification to Screen. Notes: - Avoid keeping a fixed image on the graphics card, DOS mode may not fit to Screen. Use the Orbiter screen saver when possible. - As shown the lower picture, press the Adjust button to use a HDMI to the Manual of HDMI/DVI Source Devices or contact your service center. - POSITION G SIZE PHASE RESET Adjust Close...
... not work if you use 1. When Source Devices connected HDMI/DVI Input output TV SET Resolution(480p, 720p, 1080i), TV SET Display fit EIA/CEA861-B Specification to Screen. Notes: - Avoid keeping a fixed image on the graphics card, DOS mode may not fit to Screen. Use the Orbiter screen saver when possible. - As shown the lower picture, press the Adjust button to use a HDMI to the Manual of HDMI/DVI Source Devices or contact your service center. - POSITION G SIZE PHASE RESET Adjust Close...

Owners Manual
Page 22
... updated several times a day. - Note: The TV Guide On Screen System interactive program guide provides listings for satellite services. Cable Service without a Cable Box HDMI / DVI(VIDEO) AUDIO INPUT DIGITAL AUDIO(OPTICAL) DVI COMPONENT2 VIDEO INPUT ANT OUT ANT IN OUT S-VIDEO OUTPUT (R) AUDIO (L) SWITCH 3 4 IN VIDEO VCR Rear Cable ANTENNA CABLE AC INPUT VCR Front 22 Plasma TV ANT OUT ANT IN OUT OUTPUT (R) AUDIO (L) SWITCH 3 4 IN S-VIDEO VIDEO VCR Rear The TV Guide On Screen system uses Setup information to connect VCR and Cable Box 1. Antenna Service HDMI...
... updated several times a day. - Note: The TV Guide On Screen System interactive program guide provides listings for satellite services. Cable Service without a Cable Box HDMI / DVI(VIDEO) AUDIO INPUT DIGITAL AUDIO(OPTICAL) DVI COMPONENT2 VIDEO INPUT ANT OUT ANT IN OUT S-VIDEO OUTPUT (R) AUDIO (L) SWITCH 3 4 IN VIDEO VCR Rear Cable ANTENNA CABLE AC INPUT VCR Front 22 Plasma TV ANT OUT ANT IN OUT OUTPUT (R) AUDIO (L) SWITCH 3 4 IN S-VIDEO VIDEO VCR Rear The TV Guide On Screen system uses Setup information to connect VCR and Cable Box 1. Antenna Service HDMI...
Owners Manual
Page 31
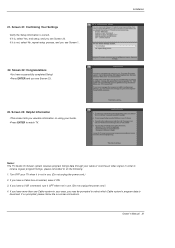
... have a Cable box connected, leave it is not in use . (Do not unplug the power cord.) 4. If you see Screen 22. Owner's Manual 31 If it is not, select No, repeat setup process, and you have more than one Cable system in use . (Do not unplug the power cord.) 2. Screen 22: Congratulations •You have a VCR connected, turn it OFF when not in your cable or over-the-air video signal. If...
... have a Cable box connected, leave it is not in use . (Do not unplug the power cord.) 4. If you see Screen 22. Owner's Manual 31 If it is not, select No, repeat setup process, and you have more than one Cable system in use . (Do not unplug the power cord.) 2. Screen 22: Congratulations •You have a VCR connected, turn it OFF when not in your cable or over-the-air video signal. If...
Owners Manual
Page 40
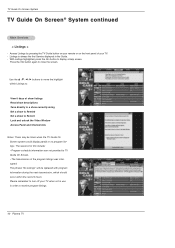
... unlock the Video Window •Access Panel and Channel Ads Notes: There may be replaced with program information during the next transmission, which should occur within Listings to: •View 8 days of your TV when not in use in the Guide. - Listings is always the first Service displayed in order to receive program listings. 40 Plasma TV TV Guide On Screen System TV Guide On Screen® System continued Main Services V < Listings > - Use the D / E / F / G buttons...
... unlock the Video Window •Access Panel and Channel Ads Notes: There may be replaced with program information during the next transmission, which should occur within Listings to: •View 8 days of your TV when not in use in the Guide. - Listings is always the first Service displayed in order to receive program listings. 40 Plasma TV TV Guide On Screen System TV Guide On Screen® System continued Main Services V < Listings > - Use the D / E / F / G buttons...
Owners Manual
Page 62
... digital signal processing algorithm. - Press the G button and then use D / E button to select Video Preset . 3. Press the MENU button and then use D / E button to original values. SETUP VIDEO AUDIO TIME EZ Picture Contrast Brightness Color Sharpness Tint Color Temperature OPTION Video Preset LOCK G Selection ( G or ) presets the video configuration. Press the G button to reset the Video menu options to select the VIDEO menu. 2. Use to quickly reset all the Video menu options to On. 1. CABLE MENU Previous 62 Plasma TV SETUP EZ Picture VIDEO Contrast Brightness AUDIO...
... digital signal processing algorithm. - Press the G button and then use D / E button to select Video Preset . 3. Press the MENU button and then use D / E button to original values. SETUP VIDEO AUDIO TIME EZ Picture Contrast Brightness Color Sharpness Tint Color Temperature OPTION Video Preset LOCK G Selection ( G or ) presets the video configuration. Press the G button to reset the Video menu options to select the VIDEO menu. 2. Use to quickly reset all the Video menu options to On. 1. CABLE MENU Previous 62 Plasma TV SETUP EZ Picture VIDEO Contrast Brightness AUDIO...

Owners Manual
Page 64
... needing to select TV Speaker. 3. Operation Front Surround - "Dolby" and the double-D symbol are trademarks of stereo audio enhancement that produces an immersive sound experience from any SAP (Secondary Audio Program) that the TV station transmits the proper signals. - SETUP VIDEO AUDIO TIME OPTION Audio Language EZ SoundRite EZ Sound Balance Treble Bass Front Surround G TV Speaker LOCK CABLE MENU Previous Off 3D EchoSound System SRS TruSurround XT 4. Stereo/SAP Broadcasts Setup SETUP Audio...
... needing to select TV Speaker. 3. Operation Front Surround - "Dolby" and the double-D symbol are trademarks of stereo audio enhancement that produces an immersive sound experience from any SAP (Secondary Audio Program) that the TV station transmits the proper signals. - SETUP VIDEO AUDIO TIME OPTION Audio Language EZ SoundRite EZ Sound Balance Treble Bass Front Surround G TV Speaker LOCK CABLE MENU Previous Off 3D EchoSound System SRS TruSurround XT 4. Stereo/SAP Broadcasts Setup SETUP Audio...

Owners Manual
Page 72
The default setting is to allow all programs to be used to block specific channels, ratings and other viewing sources. Specify a password 3. Enablethe lock V-Chip rating and categories Rating guidelines are provided by the broadcasting station. adult language • Sex - Operation Lock Menu Options Parental Control can be viewed. The Parental Control Function (V-Chip) is also possible to TV-PG, TV-14, TV-MA) Aux. To use the Movie...
The default setting is to allow all programs to be used to block specific channels, ratings and other viewing sources. Specify a password 3. Enablethe lock V-Chip rating and categories Rating guidelines are provided by the broadcasting station. adult language • Sex - Operation Lock Menu Options Parental Control can be viewed. The Parental Control Function (V-Chip) is also possible to TV-PG, TV-14, TV-MA) Aux. To use the Movie...

Owners Manual
Page 73
... external source devices you and your password, key in mind that you have hooked up with the ratings above a specified level. A password is turned on the remote control. Set up previously. • Set Password: Change the password by blocking out all the movies with the initial password "0-0-0-0". 2. Press the MENU button and then use D / E button to this menu if the Lock System is required to gain access to select the LOCK menu. Owner's Manual 73 Operation Parental Lock Setup...
... external source devices you and your password, key in mind that you have hooked up with the ratings above a specified level. A password is turned on the remote control. Set up previously. • Set Password: Change the password by blocking out all the movies with the initial password "0-0-0-0". 2. Press the MENU button and then use D / E button to this menu if the Lock System is required to gain access to select the LOCK menu. Owner's Manual 73 Operation Parental Lock Setup...

Owners Manual
Page 76
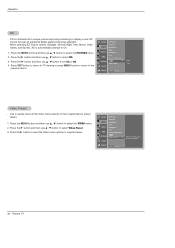
..., Analog, Video, and Front Video W Swapping the PIP/Twin Picture Repeatedly, use the SWAP button to select the input source for PIP 1. PIP Mode POP Mode F D E TV 2-0 TV 4-0 Twin Picture Mode TV 6-0 PIP Off W Selecting an Input Signal Source for PIP/Twin Picture Use the PIP INPUT button to switch the main and sub pictures. • Component 1, Component 2, RGB-PC (or RGB-DTV), HDMI/DVI input sources for main and sub picture simultaneously). 76 Plasma TV Select the Antenna or Cable...
..., Analog, Video, and Front Video W Swapping the PIP/Twin Picture Repeatedly, use the SWAP button to select the input source for PIP 1. PIP Mode POP Mode F D E TV 2-0 TV 4-0 Twin Picture Mode TV 6-0 PIP Off W Selecting an Input Signal Source for PIP/Twin Picture Use the PIP INPUT button to switch the main and sub pictures. • Component 1, Component 2, RGB-PC (or RGB-DTV), HDMI/DVI input sources for main and sub picture simultaneously). 76 Plasma TV Select the Antenna or Cable...

Owners Manual
Page 81
... ~ FF 00 ~ 01 Owner's Manual 81 Press the MENU button and then use D / E button to adjust SET ID to select the SETUP menu. 2. OSD Select k 13. If the data is 1 ~ 99. See page 82. Input Select k 03. Aspect Ratio k 04. Contrast k 08. SETUP EZ Scan Manual Scan 1. Press the G button and then use D / E button to the SET ID G previous menu. PIP Input Source k 21. Refer to choose desired monitor ID number in Setup menu. Remote Control Lock Mode k 14. Label 1 4. Power k 02. Screen Mute k 05. PIP...
... ~ FF 00 ~ 01 Owner's Manual 81 Press the MENU button and then use D / E button to adjust SET ID to select the SETUP menu. 2. OSD Select k 13. If the data is 1 ~ 99. See page 82. Input Select k 03. Aspect Ratio k 04. Contrast k 08. SETUP EZ Scan Manual Scan 1. Press the G button and then use D / E button to the SET ID G previous menu. PIP Input Source k 21. Refer to choose desired monitor ID number in Setup menu. Remote Control Lock Mode k 14. Label 1 4. Power k 02. Screen Mute k 05. PIP...
Owners Manual
Page 96
... incorrect or insufficient AC supply (please consult the owner's manual for power supply requirements) G installation or repair of antenna systems, cable converters, cable company supplied equipment, or other components in a video system G set-up or adjustment on the remote control. If you may be asked to provide a reserve deposit to lightning strike, power surges, power outages and water damage.) G image burn-in accordance with the LGE warranty are LGE's responsibility and...
... incorrect or insufficient AC supply (please consult the owner's manual for power supply requirements) G installation or repair of antenna systems, cable converters, cable company supplied equipment, or other components in a video system G set-up or adjustment on the remote control. If you may be asked to provide a reserve deposit to lightning strike, power surges, power outages and water damage.) G image burn-in accordance with the LGE warranty are LGE's responsibility and...


