Specification (English)
Page 1
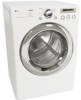
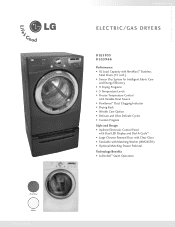
Pearl Gray White LGusa.com L A U N D RY ELECTRIC/GAS DRYERS D L E 5 955 DLG5966 Performance • XL Load Capacity with NeveRust™ Stainless Steel Drum (7.3 cu.ft.) • Sensor Dry System for Intelligent Fabric Care and Energy ...
Pearl Gray White LGusa.com L A U N D RY ELECTRIC/GAS DRYERS D L E 5 955 DLG5966 Performance • XL Load Capacity with NeveRust™ Stainless Steel Drum (7.3 cu.ft.) • Sensor Dry System for Intelligent Fabric Care and Energy ...
Specification (English)
Page 2
...or under a counter. Try stacking the washer and dryer. Place them side by pressing Custom Program. LG ELECTRONICS INC. 1000 Sylvan Ave., Englewood Cliffs, NJ 07632 800.243.0000 LGusa.com ELECTRIC/GAS DRYERS DLE5955 DLG5966 TYPE Front Loader Design Look Front Control ... (parts and labor) UPC CODES DLE5955W 048231 009157 DLG5966W 048231 009164 WDP3W 048231 008556 WSTK1 048231 008327 DLE5955G 048231 009188 DLG5966G 048231 009195 WDP3G 048231 009201 GSTK1 048231 009218 Design and specifications are property of LG Electronics Inc. Less space? Add our tall drawer...
...or under a counter. Try stacking the washer and dryer. Place them side by pressing Custom Program. LG ELECTRONICS INC. 1000 Sylvan Ave., Englewood Cliffs, NJ 07632 800.243.0000 LGusa.com ELECTRIC/GAS DRYERS DLE5955 DLG5966 TYPE Front Loader Design Look Front Control ... (parts and labor) UPC CODES DLE5955W 048231 009157 DLG5966W 048231 009164 WDP3W 048231 008556 WSTK1 048231 008327 DLE5955G 048231 009188 DLG5966G 048231 009195 WDP3G 048231 009201 GSTK1 048231 009218 Design and specifications are property of LG Electronics Inc. Less space? Add our tall drawer...

User Guide
Page 2
Your new LG Dryer combines the most advanced drying sensor technology with many years of reliable service. By following the operating and care instructions in this manual, your purchase and welcome to Do if You Smell Gas 4 Grounding Instructions 5 Safety Instructions for Installation 5, 6 Safety Instructions for... Optional Pedestal Base or Stacking Kit 11 Leveling the Dryer 12 Reversing the Door Swing 12 Changing the Dryer Vent Location 13 Venting the Dryer 14, 15 Connecting Gas Dryers 16 17 Connecting Electric Dryers 18 Special Requirements for Manufactured or Mobile Homes 19 ...
Your new LG Dryer combines the most advanced drying sensor technology with many years of reliable service. By following the operating and care instructions in this manual, your purchase and welcome to Do if You Smell Gas 4 Grounding Instructions 5 Safety Instructions for Installation 5, 6 Safety Instructions for... Optional Pedestal Base or Stacking Kit 11 Leveling the Dryer 12 Reversing the Door Swing 12 Changing the Dryer Vent Location 13 Venting the Dryer 14, 15 Connecting Gas Dryers 16 17 Connecting Electric Dryers 18 Special Requirements for Manufactured or Mobile Homes 19 ...

User Guide
Page 4
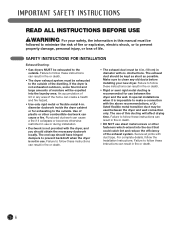
... wWARNING For your safety, the information in this manual must be minimized further by properly venting the dryer to the outdoors. 4 Gas appliances can be performed by the incomplete combustion of this appliance or any gas or electrical appliance. 2. Do not try to light a match or cigarette, or turn on any other appliances...
... wWARNING For your safety, the information in this manual must be minimized further by properly venting the dryer to the outdoors. 4 Gas appliances can be performed by the incomplete combustion of this appliance or any gas or electrical appliance. 2. Do not try to light a match or cigarette, or turn on any other appliances...
User Guide
Page 6
... death. • Rigid or semi rigid metal ducting is not provided with no obstructions. Failure to prevent backdraft when the dryer is impossible to make a connection with duct tape. The exhaust duct should have hinged dampers to follow these instructions can result...Installation Instructions. Use of life. IMPORTANT SAFETY INSTRUCTIONS READ ALL INSTRUCTIONS BEFORE USE wWARNING For your new dryer. SAFETY INSTRUCTIONS FOR INSTALLATION Exhaust/Ducting: • Gas dryers MUST be exhausted to prevent property damage, personal injury, or loss of plastic or other fasteners ...
... death. • Rigid or semi rigid metal ducting is not provided with no obstructions. Failure to prevent backdraft when the dryer is impossible to make a connection with duct tape. The exhaust duct should have hinged dampers to follow these instructions can result...Installation Instructions. Use of life. IMPORTANT SAFETY INSTRUCTIONS READ ALL INSTRUCTIONS BEFORE USE wWARNING For your new dryer. SAFETY INSTRUCTIONS FOR INSTALLATION Exhaust/Ducting: • Gas dryers MUST be exhausted to prevent property damage, personal injury, or loss of plastic or other fasteners ...
User Guide
Page 9
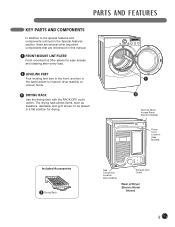
... Four leveling feet (two in the front, and two in a flat position for drying. 1 2 Terminal Block Access Panel (Electric Models) Power Cord Location (Gas Models) Included Accessories 3 Drying Rack Gas Connection Location (Gas Models) Exhaust Duct Outlet Rear of Dryer (Electric Model Shown) 9 PARTS AND FEATURES KEY PARTS AND COMPONENTS In addition to improve...
... Four leveling feet (two in the front, and two in a flat position for drying. 1 2 Terminal Block Access Panel (Electric Models) Power Cord Location (Gas Models) Included Accessories 3 Drying Rack Gas Connection Location (Gas Models) Exhaust Duct Outlet Rear of Dryer (Electric Model Shown) 9 PARTS AND FEATURES KEY PARTS AND COMPONENTS In addition to improve...
User Guide
Page 10
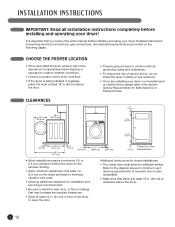
...least 18 in. (46 cm) of the dryer to open the door. Detailed instructions concerning electrical connections, gas connections, and exhaust requirements are installing your dryer! CLEARANCES 20" (50.8 cm) 18" (45.72 cm) • Properly ground dryer to conform with a solid, level floor.... • If the dryer is important that you are ...
...least 18 in. (46 cm) of the dryer to open the door. Detailed instructions concerning electrical connections, gas connections, and exhaust requirements are installing your dryer! CLEARANCES 20" (50.8 cm) 18" (45.72 cm) • Properly ground dryer to conform with a solid, level floor.... • If the dryer is important that you are ...
User Guide
Page 13
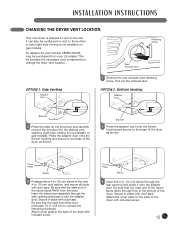
...all joints with duct tape. Be sure that the male end of the elbow faces AWAY from your LG retailer. Secure in place with duct tape. Be sure that the male end of the elbow faces down... 3 Insert the 4-in. (10 cm) elbow through hole in . (3.8 cm) to the back of the dryer with included screw. 13 Retaining Screw Rear Exhaust Duct OPTION 1: Side Venting Adapter duct 1 Remove the rear exhaust duct... (right-side venting is not available on gas models). INSTALLATION INSTRUCTIONS CHANGING THE DRYER VENT LOCATION Your new dryer is shipped to vent to the base of the dryer as shown.
...all joints with duct tape. Be sure that the male end of the elbow faces AWAY from your LG retailer. Secure in place with duct tape. Be sure that the male end of the elbow faces down... 3 Insert the 4-in. (10 cm) elbow through hole in . (3.8 cm) to the back of the dryer with included screw. 13 Retaining Screw Rear Exhaust Duct OPTION 1: Side Venting Adapter duct 1 Remove the rear exhaust duct... (right-side venting is not available on gas models). INSTALLATION INSTRUCTIONS CHANGING THE DRYER VENT LOCATION Your new dryer is shipped to vent to the base of the dryer as shown.
User Guide
Page 14
...observe the duct length limitations noted in fire or death. • Gas dryers MUST exhaust to the outdoors. You should be kept as short as an attic, wall, ceiling, crawl space.... • Do not allow ductwork to rest on or contact sharp objects. Secure all joints with the dryer. Failure to follow these instructions can result in fire or death. • To reduce the risk... of fire, combustion, or accumulation of combustible gases, DO NOT exhaust dryer air into the duct that could catch lint and reduce the efficiency of the exhaust system. ...
...observe the duct length limitations noted in fire or death. • Gas dryers MUST exhaust to the outdoors. You should be kept as short as an attic, wall, ceiling, crawl space.... • Do not allow ductwork to rest on or contact sharp objects. Secure all joints with the dryer. Failure to follow these instructions can result in fire or death. • To reduce the risk... of fire, combustion, or accumulation of combustible gases, DO NOT exhaust dryer air into the duct that could catch lint and reduce the efficiency of the exhaust system. ...

User Guide
Page 16
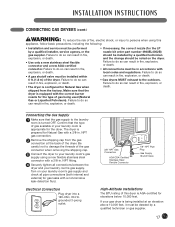
... to do so can result in fire, explosion, or death. • To prevent contamination of the gas valve, purge the gas supply of air and sediment before connecting the gas supply to the dryer. approved tubing may be installed. Failure to do so can result in fire, explosion, or death. ... to follow this warning can result in fire, explosion, or death. • This dryer must not exceed 13 in . INSTALLATION INSTRUCTIONS CONNECTING GAS DRYERS wWARNING: To reduce the risk of fire, electric shock, or injury to persons when using a rigid pipe, the rigid pipe should be ...
... to do so can result in fire, explosion, or death. • To prevent contamination of the gas valve, purge the gas supply of air and sediment before connecting the gas supply to the dryer. approved tubing may be installed. Failure to do so can result in fire, explosion, or death. ... to follow this warning can result in fire, explosion, or death. • This dryer must not exceed 13 in . INSTALLATION INSTRUCTIONS CONNECTING GAS DRYERS wWARNING: To reduce the risk of fire, electric shock, or injury to persons when using a rigid pipe, the rigid pipe should be ...
User Guide
Page 17
... Valve High-Altitude Installations The BTU rating of this appliance, follow basic precautions, including the following: • Installation and service must be noted on your gas dryer is appropriate for the LP nozzle kit order part number 4948EL4002B) should be installed by a qualified technician and the change should be derated...
... Valve High-Altitude Installations The BTU rating of this appliance, follow basic precautions, including the following: • Installation and service must be noted on your gas dryer is appropriate for the LP nozzle kit order part number 4948EL4002B) should be installed by a qualified technician and the change should be derated...
User Guide
Page 19
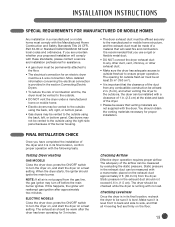
...25 in2 (163 cm2). • It is provided in the exhaust duct can be a 4-wire connection. Gas dryers may turn off before the main burner ignites. ELECTRIC MODELS Close the dryer door, press the ON/OFF switch to side, and that the clearance of the duct from any other ..., chimney, or other exhaust duct. • Make sure the dryer has adequate access to the floor. • The electrical connection for assistance. • A gas dryer must be sure it is in its final location, recheck the dryer to be permanently attached to outside using the right side panel because...
...25 in2 (163 cm2). • It is provided in the exhaust duct can be a 4-wire connection. Gas dryers may turn off before the main burner ignites. ELECTRIC MODELS Close the dryer door, press the ON/OFF switch to side, and that the clearance of the duct from any other ..., chimney, or other exhaust duct. • Make sure the dryer has adequate access to the floor. • The electrical connection for assistance. • A gas dryer must be sure it is in its final location, recheck the dryer to be permanently attached to outside using the right side panel because...
User Guide
Page 30
...With some loads that produce high amounts of lint, it corrected by a qualified electrician. • Confirm that the house gas shutoff and the dryer gas shutoff are both fully open. • Confirm and follow the manufacturer's instructions. • Overdrying a load of laundry can cause ... has tripped, or power outage has occurred. • House fuse is blown, circuit breaker has tripped, or power outage has occurred. • Gas supply or service turned off the dryer and call for drying. • Check pockets thoroughly before you call for a load will not turn on...
...With some loads that produce high amounts of lint, it corrected by a qualified electrician. • Confirm that the house gas shutoff and the dryer gas shutoff are both fully open. • Confirm and follow the manufacturer's instructions. • Overdrying a load of laundry can cause ... has tripped, or power outage has occurred. • House fuse is blown, circuit breaker has tripped, or power outage has occurred. • Gas supply or service turned off the dryer and call for drying. • Check pockets thoroughly before you call for a load will not turn on...
User Guide
Page 33
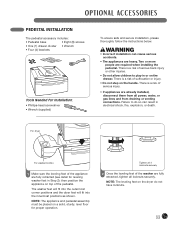
...washer/combo 1 Make sure the leveling feet of serious injury. • If appliances are fully retracted, tighten all power, water, or gas lines and from draining or venting connections. NOTE: The appliance and pedestal assembly must be placed on a solid, sturdy, level floor ...To ensure safe and secure installation, please thoroughly follow the instructions below. The washer feet will fit into the outermost corner positions and the dryer feet will fit into the innermost positions as shown. There is a risk of the pedestal. then position the appliance on the drawer. ...
...washer/combo 1 Make sure the leveling feet of serious injury. • If appliances are fully retracted, tighten all power, water, or gas lines and from draining or venting connections. NOTE: The appliance and pedestal assembly must be placed on a solid, sturdy, level floor ...To ensure safe and secure installation, please thoroughly follow the instructions below. The washer feet will fit into the outermost corner positions and the dryer feet will fit into the innermost positions as shown. There is a risk of the pedestal. then position the appliance on the drawer. ...
User Guide
Page 35
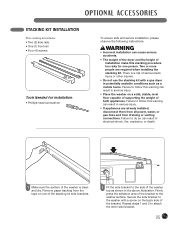
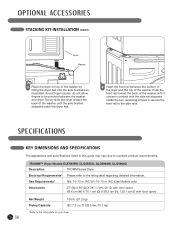
... are required when installing the stacking kit. Failure to follow this warning can cause serious accidents. • The weight of the dryer and the height of installation make this stacking procedure too risky for Installation: • Phillips-head screwdriver To ensure safe and secure... installation, please observe the following instructions. Secure the side bracket to the washer with a gas dryer in the above illustration. Failure to follow this warning can result in electrical shock, fire, explosion, or death. 1 Make sure the...
... are required when installing the stacking kit. Failure to follow this warning can cause serious accidents. • The weight of the dryer and the height of installation make this stacking procedure too risky for Installation: • Phillips-head screwdriver To ensure safe and secure... installation, please observe the following instructions. Secure the side bracket to the washer with a gas dryer in the above illustration. Failure to follow this warning can result in electrical shock, fire, explosion, or death. 1 Make sure the...
User Guide
Page 36
.... 4 Insert the front rail between the washer and dryer. WC (Gas Models only) Dimensions 27"(W) X 30"(D) X 3811/16"(H), 50" (D with door open ) Net Weight Drying Capacity 126 lb. (57.2 kg) IEC 7.3 cu. TROMM™ Dryer Models DLE5955W, DLG5955G, DLG5966W, DLG5966G Description TROMM Series Dryer Electrical Requirements* Please refer to constant product improvements. OPTIONAL ACCESSORIES STACKING...
.... 4 Insert the front rail between the washer and dryer. WC (Gas Models only) Dimensions 27"(W) X 30"(D) X 3811/16"(H), 50" (D with door open ) Net Weight Drying Capacity 126 lb. (57.2 kg) IEC 7.3 cu. TROMM™ Dryer Models DLE5955W, DLG5955G, DLG5966W, DLG5966G Description TROMM Series Dryer Electrical Requirements* Please refer to constant product improvements. OPTIONAL ACCESSORIES STACKING...


