Specification (English)
Page 2
... Dry Beep, Wrinkle Care, Rack Dry, Anti Bacterial, Child Lock, Beep On/Off 5 Temperature Levels High, Medium High, Medium, Low, Ultra Low 5 Drying Levels Very Dry, More Dry, Normal Dry, Less Dry, Damp Dry Dry Times 60 min., 50 min., 40 min., 30 min., 20 min., More Time, Less Time FABRIC CARE FEATURES Sensor Dry Precise Temperature Control with Variable Heater CONVENIENCE FEATURES End of Cycle Beeper Variable Venting Option Electric: 4 Way Venting Gas: 3 Way Venting FlowSense™ Duct Clogging Indicator Drum Light Reversible Door Remaining Time Display...
... Dry Beep, Wrinkle Care, Rack Dry, Anti Bacterial, Child Lock, Beep On/Off 5 Temperature Levels High, Medium High, Medium, Low, Ultra Low 5 Drying Levels Very Dry, More Dry, Normal Dry, Less Dry, Damp Dry Dry Times 60 min., 50 min., 40 min., 30 min., 20 min., More Time, Less Time FABRIC CARE FEATURES Sensor Dry Precise Temperature Control with Variable Heater CONVENIENCE FEATURES End of Cycle Beeper Variable Venting Option Electric: 4 Way Venting Gas: 3 Way Venting FlowSense™ Duct Clogging Indicator Drum Light Reversible Door Remaining Time Display...

User Guide
Page 2
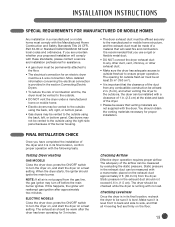
... 9 INSTALLATION INSTRUCTIONS Choose the Proper Location 10 Clearances 10 Installation With Optional Pedestal Base or Stacking Kit 11 Leveling the Dryer 12 Reversing the Door Swing 12 Changing the Dryer Vent Location 13 Venting the Dryer 14, 15 Connecting Gas Dryers 16 17 Connecting Electric Dryers 18 Special Requirements for Manufactured or Mobile Homes 19 Final Installation Check 19 Duct Condition Testing 20 HOW TO USE Sorting Loads 21 Loading the Dryer 21 Check the Lint Filter Before Every Load 21 Control Panel Features 22 Cycle Guide 23 The Time...
... 9 INSTALLATION INSTRUCTIONS Choose the Proper Location 10 Clearances 10 Installation With Optional Pedestal Base or Stacking Kit 11 Leveling the Dryer 12 Reversing the Door Swing 12 Changing the Dryer Vent Location 13 Venting the Dryer 14, 15 Connecting Gas Dryers 16 17 Connecting Electric Dryers 18 Special Requirements for Manufactured or Mobile Homes 19 Final Installation Check 19 Duct Condition Testing 20 HOW TO USE Sorting Loads 21 Loading the Dryer 21 Check the Lint Filter Before Every Load 21 Control Panel Features 22 Cycle Guide 23 The Time...

User Guide
Page 3
... Use and Care Guide or in published user-repair instructions that you understand and have been previously cleaned in, washed in, soaked in, or spotted with controls. • Before the dryer is removed from the accumulation of lint, dust, and dirt. • The interior of the dryer and exhaust vent should be cleaned periodically by qualified service personnel. • Do not install or store the dryer...
... Use and Care Guide or in published user-repair instructions that you understand and have been previously cleaned in, washed in, soaked in, or spotted with controls. • Before the dryer is removed from the accumulation of lint, dust, and dirt. • The interior of the dryer and exhaust vent should be cleaned periodically by qualified service personnel. • Do not install or store the dryer...
User Guide
Page 4
.... 3. Immediately call your gas supplier, call the fire department. Do not touch any phone in the vicinity of this manual must be performed by the incomplete combustion of natural gas or LP fuels. Gas appliances can be minimized further by properly venting the dryer to the outdoors. 4 WHAT TO DO IF YOU SMELL GAS: 1. Follow the gas supplier's instructions carefully. 5.
.... 3. Immediately call your gas supplier, call the fire department. Do not touch any phone in the vicinity of this manual must be performed by the incomplete combustion of natural gas or LP fuels. Gas appliances can be minimized further by properly venting the dryer to the outdoors. 4 WHAT TO DO IF YOU SMELL GAS: 1. Follow the gas supplier's instructions carefully. 5.

User Guide
Page 5
... to persons when using this appliance, follow basic precautions, including the following: • Properly ground dryer to the weather. • All repairs and servicing must be performed by an authorized servicer unless specifically recommended in this warning can cause serious injury, fire, electrical shock or death. • Connect to a properly rated, protected, and sized power circuit to do...
... to persons when using this appliance, follow basic precautions, including the following: • Properly ground dryer to the weather. • All repairs and servicing must be performed by an authorized servicer unless specifically recommended in this warning can cause serious injury, fire, electrical shock or death. • Connect to a properly rated, protected, and sized power circuit to do...
User Guide
Page 6
... loss of fire or explosion, electric shock, or to follow the Installation Instructions. Make sure to clean any area of this manual must be exhausted to follow these instructions can create a health and fire hazard. • Use only rigid metal or flexible metal 4-in this ducting will be used between the dryer and the wall. Secure all joints...
... loss of fire or explosion, electric shock, or to follow the Installation Instructions. Make sure to clean any area of this manual must be exhausted to follow these instructions can create a health and fire hazard. • Use only rigid metal or flexible metal 4-in this ducting will be used between the dryer and the wall. Secure all joints...
User Guide
Page 7
... the installation instructions in a risk of life. Have the wall outlet and circuit checked by pulling on the power cord. The power cord can result in electrical shock or injury. • Refer to do so can be damaged, resulting in this manual for specific electrical requirements for your safety, the information in this dryer must be properly grounded. IMPORTANT SAFETY INSTRUCTIONS READ ALL INSTRUCTIONS BEFORE USE...
... the installation instructions in a risk of life. Have the wall outlet and circuit checked by pulling on the power cord. The power cord can result in electrical shock or injury. • Refer to do so can be damaged, resulting in this manual for specific electrical requirements for your safety, the information in this dryer must be properly grounded. IMPORTANT SAFETY INSTRUCTIONS READ ALL INSTRUCTIONS BEFORE USE...
User Guide
Page 13
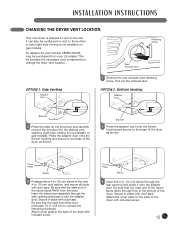
... carefully remove the knockout for the desired vent opening (right-side venting is not available on gas models). Insert the elbow/duct assembly through hole in place with duct tape. This kit contains the necessary duct components to the rear. Pull out the exhaust duct. Bracket 2 Press the adapter duct onto the blower housing and secure to the bottom or side (right-side venting is not available on gas models). INSTALLATION INSTRUCTIONS CHANGING THE DRYER VENT LOCATION...
... carefully remove the knockout for the desired vent opening (right-side venting is not available on gas models). Insert the elbow/duct assembly through hole in place with duct tape. This kit contains the necessary duct components to the rear. Pull out the exhaust duct. Bracket 2 Press the adapter duct onto the blower housing and secure to the bottom or side (right-side venting is not available on gas models). INSTALLATION INSTRUCTIONS CHANGING THE DRYER VENT LOCATION...
User Guide
Page 14
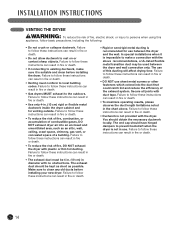
... obstructions. The exhaust duct should obtain the necessary ductwork locally. The use . Failure to follow these instructions can result in fire or death. • If connecting to existing ductwork, make sure it is recommended for venting outside. INSTALLATION INSTRUCTIONS VENTING THE DRYER wWARNING: To reduce the risk of fire, electric shock, or injury to persons when using this ducting will affect drying time. Failure...
... obstructions. The exhaust duct should obtain the necessary ductwork locally. The use . Failure to follow these instructions can result in fire or death. • If connecting to existing ductwork, make sure it is recommended for venting outside. INSTALLATION INSTRUCTIONS VENTING THE DRYER wWARNING: To reduce the risk of fire, electric shock, or injury to persons when using this ducting will affect drying time. Failure...

User Guide
Page 16
... use an open flame to inspect for use with a standard 3-prong (grounding) wall outlet to do so can be plugged into a 120-VAC, 60-Hz. grounded outlet protected by closing its individual manual shutoff valve during any disassembly requires the attention and tools of gas is insoluble in . It can result in fire, explosion, or death. 16 Gas pressure must connect the dryer...
... use an open flame to inspect for use with a standard 3-prong (grounding) wall outlet to do so can be plugged into a 120-VAC, 60-Hz. grounded outlet protected by closing its individual manual shutoff valve during any disassembly requires the attention and tools of gas is insoluble in . It can result in fire, explosion, or death. 16 Gas pressure must connect the dryer...
User Guide
Page 17
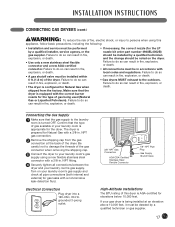
... 10,000 feet. grounded 3-prong outlet. 3/8" NPT Gas Connection AGA/CSA-Certified Stainless Steel Flexible Connector 1/8" NPT Pipe Plug Gas Supply Shutoff Valve High-Altitude Installations The BTU rating of this appliance, follow basic precautions, including the following: • Installation and service must be noted on your laundry room is turned OFF. If your gas dryer is being used (Natural Gas or Liquefied Petroleum). INSTALLATION INSTRUCTIONS CONNECTING GAS DRYERS (cont.) wWARNING: To...
... 10,000 feet. grounded 3-prong outlet. 3/8" NPT Gas Connection AGA/CSA-Certified Stainless Steel Flexible Connector 1/8" NPT Pipe Plug Gas Supply Shutoff Valve High-Altitude Installations The BTU rating of this appliance, follow basic precautions, including the following: • Installation and service must be noted on your laundry room is turned OFF. If your gas dryer is being used (Natural Gas or Liquefied Petroleum). INSTALLATION INSTRUCTIONS CONNECTING GAS DRYERS (cont.) wWARNING: To...
User Guide
Page 19
... when venting the dryer to turn the dryer on, and start the dryer on the floor. 19 Testing Dryer Heating GAS MODELS Close the dryer door, press the ON/OFF switch to the floor. • The electrical connection for an electric dryer must comply with a manometer, placed on a heat setting. Static pressure in the exhaust duct should ignite the main burner. Checking Levelness Once the dryer is in its final location, confirm proper operation with...
... when venting the dryer to turn the dryer on, and start the dryer on the floor. 19 Testing Dryer Heating GAS MODELS Close the dryer door, press the ON/OFF switch to the floor. • The electrical connection for an electric dryer must comply with a manometer, placed on a heat setting. Static pressure in the exhaust duct should ignite the main burner. Checking Levelness Once the dryer is in its final location, confirm proper operation with...

User Guide
Page 22
... that cycle and any load settings will be lost. 2 CYCLE SELECTOR KNOB Turn this knob to select the desired cycle. Press again to turn the dryer OFF. HOW TO USE CONTROL PANEL FEATURES Following are instructions for starting and using the cycle settings buttons anytime before operating this dryer. 7 5 7 6 1 2 3 1 POWER ON/OFF BUTTON Press to turn the dryer ON. Please refer to specific sections of fire, electric shock, or injury to persons, read this entire manual...
... that cycle and any load settings will be lost. 2 CYCLE SELECTOR KNOB Turn this knob to select the desired cycle. Press again to turn the dryer OFF. HOW TO USE CONTROL PANEL FEATURES Following are instructions for starting and using the cycle settings buttons anytime before operating this dryer. 7 5 7 6 1 2 3 1 POWER ON/OFF BUTTON Press to turn the dryer ON. Please refer to specific sections of fire, electric shock, or injury to persons, read this entire manual...
User Guide
Page 24
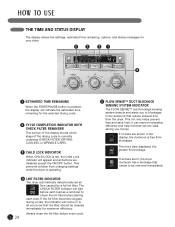
... which stage of the drying cycle is currently underway (CHECK FILTER, DRYING, COOLING, or WRINKLE CARE). 3 CHILD LOCK INDICATOR When CHILD LOCK is set, the Child Lock indicator will light before each load as a reminder to blockages in the display, the ductwork is free from changing settings while the dryer is operating. 4 LINT FILTER INDICATOR The dryer automatically detects reduced air flow caused by a full lint filter. This prevents children from blockages. HOW TO USE THE TIME AND STATUS DISPLAY The...
... which stage of the drying cycle is currently underway (CHECK FILTER, DRYING, COOLING, or WRINKLE CARE). 3 CHILD LOCK INDICATOR When CHILD LOCK is set, the Child Lock indicator will light before each load as a reminder to blockages in the display, the ductwork is free from changing settings while the dryer is operating. 4 LINT FILTER INDICATOR The dryer automatically detects reduced air flow caused by a full lint filter. This prevents children from blockages. HOW TO USE THE TIME AND STATUS DISPLAY The...
User Guide
Page 29
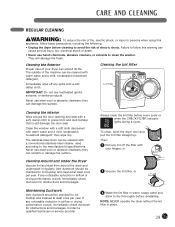
... technician or service provider. 3 Wash the lint filter in place. 29 To clean, open the dryer door and pull the lint filter straight up. NOTE: NEVER operate the dryer without the lint filter in warm, soapy water and allow to dry thoroughly before every cycle or when the CHECK FILTER indicator lights during a cycle. Never use steel wool or abrasive cleansers; They will damage the finish. Clean the window with a soft cloth dampened...
... technician or service provider. 3 Wash the lint filter in place. 29 To clean, open the dryer door and pull the lint filter straight up. NOTE: NEVER operate the dryer without the lint filter in warm, soapy water and allow to dry thoroughly before every cycle or when the CHECK FILTER indicator lights during a cycle. Never use steel wool or abrasive cleansers; They will damage the finish. Clean the window with a soft cloth dampened...
User Guide
Page 30
... clothes • Power cord is not properly plugged in clothes after drying section below. • Divide larger loads into a grounded outlet matching the dryer's rating plate. • Reset circuit breaker or replace fuse. If the problem is a circuit overload, have it may be necessary to clean the filter during the washing process. Display shows error code tE1 or tE2 Lint on the heat setting, the type of heat used (electric, natural, or LP gas), the size of the load, the type...
... clothes • Power cord is not properly plugged in clothes after drying section below. • Divide larger loads into a grounded outlet matching the dryer's rating plate. • Reset circuit breaker or replace fuse. If the problem is a circuit overload, have it may be necessary to clean the filter during the washing process. Display shows error code tE1 or tE2 Lint on the heat setting, the type of heat used (electric, natural, or LP gas), the size of the load, the type...
User Guide
Page 31
...; Divide larger loads into smaller loads of a consistent size. • Use the appropriate control settings for drying. • If you are not blocked, jammed, or damaged. • Reset circuit breaker or replace fuse. Clothes are shrinking CHECK FILTER light is on during the cycle. • Confirm that the exhaust ductwork is cleaned before every load. To help reduce and maintain more moisture. See the Installation Instructions. • Ductwork should be checked/cleaned soon...
...; Divide larger loads into smaller loads of a consistent size. • Use the appropriate control settings for drying. • If you are not blocked, jammed, or damaged. • Reset circuit breaker or replace fuse. Clothes are shrinking CHECK FILTER light is on during the cycle. • Confirm that the exhaust ductwork is cleaned before every load. To help reduce and maintain more moisture. See the Installation Instructions. • Ductwork should be checked/cleaned soon...
User Guide
Page 32
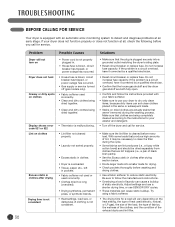
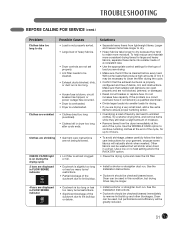
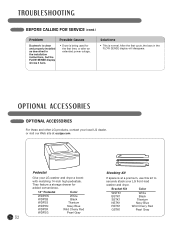
... site at a premium, use this kit to securely stack your LG washer and dryer a boost with matching 14-inch high pedestals. TROUBLESHOOTING BEFORE CALLING FOR SERVICE (cont.) Problem Possible Causes Ductwork is clean and properly installed as described in the FLOW SENSE display will disappear. They feature a storage drawer for the first time, or after an extended power outage. Bracket Kit Color WSTK1 BSTK1 SSTK1...
... site at a premium, use this kit to securely stack your LG washer and dryer a boost with matching 14-inch high pedestals. TROUBLESHOOTING BEFORE CALLING FOR SERVICE (cont.) Problem Possible Causes Ductwork is clean and properly installed as described in the FLOW SENSE display will disappear. They feature a storage drawer for the first time, or after an extended power outage. Bracket Kit Color WSTK1 BSTK1 SSTK1...
User Guide
Page 35
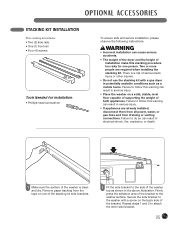
... illustration. Failure to attach the other injuries. • Do not use the stacking kit with a gas dryer in serious injury. • If appliances are required when installing the stacking kit. Firmly press the adhesive area of the bracket. Two or more people are already installed, disconnect them from all power, water, or gas lines and from the tape on one person. There is clean and dry.
... illustration. Failure to attach the other injuries. • Do not use the stacking kit with a gas dryer in serious injury. • If appliances are required when installing the stacking kit. Firmly press the adhesive area of the bracket. Two or more people are already installed, disconnect them from all power, water, or gas lines and from the tape on one person. There is clean and dry.
User Guide
Page 37
... improper installation or maintenance. • Products with altered or removed serial numbers. THE ABOVE WARRANTY DOES NOT APPLY TO: • Service trips to your home to deliver, pick up, and/or install the product, instruct, replace house fuses or correct house wiring or plumbing, or correction of unauthorized repairs. • Damage to the instructions outlined in other than normal, single-family household use during the warranty...
... improper installation or maintenance. • Products with altered or removed serial numbers. THE ABOVE WARRANTY DOES NOT APPLY TO: • Service trips to your home to deliver, pick up, and/or install the product, instruct, replace house fuses or correct house wiring or plumbing, or correction of unauthorized repairs. • Damage to the instructions outlined in other than normal, single-family household use during the warranty...


