
Owner's Manual
Page 2
1-800-243-0000 24 HOURS A DAY, 7 DAYS A WEEK FOR LG CUSTOMER SERVICE Electric and Gas Dryer / / / / / / P/No.: 3828EL4001A
1-800-243-0000 24 HOURS A DAY, 7 DAYS A WEEK FOR LG CUSTOMER SERVICE Electric and Gas Dryer / / / / / / P/No.: 3828EL4001A
Owner's Manual
Page 3
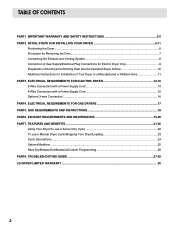
...AND INSTRUCTIONS 18 PART6. TROUBLESHOOTING GUIDE ...27-29 LG DRYER LIMITED WARRANTY ...30 2 PART3. EXHAUST REQUIREMENTS AND MAINTENANCE 19-20 PART7. ELECTRICAL REQUIREMENTS FOR GAS DRYERS 17 PART5. INITIAL STEPS FOR INSTALLING YOUR DRYER 6-11 Positioning the Dryer ...6 Procedure for Reversing the Door...7 Connecting the......16 PART4. TABLE OF CONTENTS PART1. FEATURES AND BENEFITS ...21-26 Using Your Dryer/To use a Sensor Dry Cycle 22 To use a Manual Dryer Cycle/Stopping Your Dryer/Loading 23 Cycle Descriptions...24 Options/Modifiers ...25 Rack Dry/Beeper/Anti-Bacterial/Custom Programming...
...AND INSTRUCTIONS 18 PART6. TROUBLESHOOTING GUIDE ...27-29 LG DRYER LIMITED WARRANTY ...30 2 PART3. EXHAUST REQUIREMENTS AND MAINTENANCE 19-20 PART7. ELECTRICAL REQUIREMENTS FOR GAS DRYERS 17 PART5. INITIAL STEPS FOR INSTALLING YOUR DRYER 6-11 Positioning the Dryer ...6 Procedure for Reversing the Door...7 Connecting the......16 PART4. TABLE OF CONTENTS PART1. FEATURES AND BENEFITS ...21-26 Using Your Dryer/To use a Sensor Dry Cycle 22 To use a Manual Dryer Cycle/Stopping Your Dryer/Loading 23 Cycle Descriptions...24 Options/Modifiers ...25 Rack Dry/Beeper/Anti-Bacterial/Custom Programming...
Owner's Manual
Page 4
... all warranty coverage is effective for your dryer is available by contacting your nearest LG Service Center and, for warranty period from the date of fire or explosion, electric shock, or to obtain warranty service. Model No. Serial No. Date of the dryer behind the door. For your appliance, ...electrical parts if they are located on the Model and Serial Number Plate located on the front of Purchase ❈ Staple your new LG dryer. Use the space below to record the model number and serial number of original purchase date is installed and operated according to the instructions...
... all warranty coverage is effective for your dryer is available by contacting your nearest LG Service Center and, for warranty period from the date of fire or explosion, electric shock, or to obtain warranty service. Model No. Serial No. Date of the dryer behind the door. For your appliance, ...electrical parts if they are located on the Model and Serial Number Plate located on the front of Purchase ❈ Staple your new LG dryer. Use the space below to record the model number and serial number of original purchase date is installed and operated according to the instructions...
Owner's Manual
Page 5
...softners or products to play on or in the appliance. Check with a qualified electrician or service person if you are in your dryer, please exercise care and follow basic safety precautions, including the following: 1) Read all local codes and ordinances. Do not modify... the manufacturer of electric shock. WARNING - Items contaminated with gasoline, dry-cleaning solvents, or other personal or property injury when using your dryer. This appliance is moving. 6) Do not install or store this appliance where it will be cleaned periodically by a qualified electrician. 4...
...softners or products to play on or in the appliance. Check with a qualified electrician or service person if you are in your dryer, please exercise care and follow basic safety precautions, including the following: 1) Read all local codes and ordinances. Do not modify... the manufacturer of electric shock. WARNING - Items contaminated with gasoline, dry-cleaning solvents, or other personal or property injury when using your dryer. This appliance is moving. 6) Do not install or store this appliance where it will be cleaned periodically by a qualified electrician. 4...
Owner's Manual
Page 6
Gas appliances can cause minor exposure to four of these instructions can completely remove oil. Properly adjusted dryers will minimize combustion. WHAT TO DO IF YOU SMELL GAS: • Do not try to cause cancer, birth defects or other flammable...'s phone. Part 1 IMPORTANT WARRANTY AND SAFETY INSTRUCTIONS ! Follow the gas supplier's instructions carefully. • If you cannot reach your gas supplier from dryer. • Place dryer at least 18 inches above the floor for a garage installation. • Failure to publish a list of natural gas or LP fuels. Exposure to ...
Gas appliances can cause minor exposure to four of these instructions can completely remove oil. Properly adjusted dryers will minimize combustion. WHAT TO DO IF YOU SMELL GAS: • Do not try to cause cancer, birth defects or other flammable...'s phone. Part 1 IMPORTANT WARRANTY AND SAFETY INSTRUCTIONS ! Follow the gas supplier's instructions carefully. • If you cannot reach your gas supplier from dryer. • Place dryer at least 18 inches above the floor for a garage installation. • Failure to publish a list of natural gas or LP fuels. Exposure to ...
Owner's Manual
Page 7
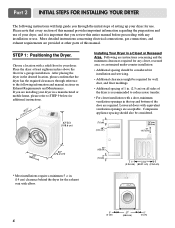
... home, please refer to STEP 9 below for additional instructions. (12580.2.57"cm) 42"3/4 (108.6 cm) Installing Your Dryer in . (14 cm) clearance behind the dryer for the exhaust vent with any closet, recessed area, or customized under-counter installation: • Additional spacing should also be... use of 1 in the top and bottom of this manual. Please note that every section of the door are installing your dryer. More detailed instructions concerning electrical connections, gas connections, and exhaust requirements are provided at least eighteen inches above the floor for ...
... home, please refer to STEP 9 below for additional instructions. (12580.2.57"cm) 42"3/4 (108.6 cm) Installing Your Dryer in . (14 cm) clearance behind the dryer for the exhaust vent with any closet, recessed area, or customized under-counter installation: • Additional spacing should also be... use of 1 in the top and bottom of this manual. Please note that every section of the door are installing your dryer. More detailed instructions concerning electrical connections, gas connections, and exhaust requirements are provided at least eighteen inches above the floor for ...

Owner's Manual
Page 8
...2.5 cm (1 inch), a load may not tumble properly and internal sensors may be installed to open either to reverse the direction in which your dryer. If the dryer is level from left to right and from front to back. Follow these procedures to the left or the right. The leveling legs must... remain firmly on your dryer may malfunction. Please review this manual also provide important information concerning the placement of and clearances for Reversing the Door The door on the ...
...2.5 cm (1 inch), a load may not tumble properly and internal sensors may be installed to open either to reverse the direction in which your dryer. If the dryer is level from left to right and from front to back. Follow these procedures to the left or the right. The leveling legs must... remain firmly on your dryer may malfunction. Please review this manual also provide important information concerning the placement of and clearances for Reversing the Door The door on the ...
Owner's Manual
Page 9
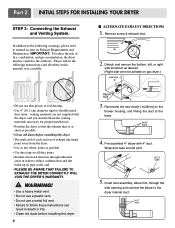
...remove the bottom, left, or right side knockout as possible • Clean old ducts before installing this dryer 8 Attach hole 3. and • PLEASE BE AWARE THAT FAILURE TO EXHAUST THE DRYER CORRECTLY WILL VOID THE DRYER'S WARRANTY. ! WARNING! • Use a heavy metal vent. • Do not use a plastic... (and all duct joints • Insulate ductwork that the exhaust duct is as short as desired. (Right side vent not avilable on gas dryer.) • Do not use a metal foil vent. • Failure to reduce condensation and lint build-up on Exhaust Requirements and Maintenance....
...remove the bottom, left, or right side knockout as possible • Clean old ducts before installing this dryer 8 Attach hole 3. and • PLEASE BE AWARE THAT FAILURE TO EXHAUST THE DRYER CORRECTLY WILL VOID THE DRYER'S WARRANTY. ! WARNING! • Use a heavy metal vent. • Do not use a plastic... (and all duct joints • Insulate ductwork that the exhaust duct is as short as desired. (Right side vent not avilable on gas dryer.) • Do not use a metal foil vent. • Failure to reduce condensation and lint build-up on Exhaust Requirements and Maintenance....
Owner's Manual
Page 10
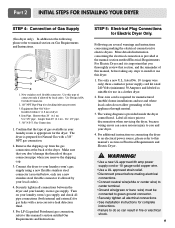
... Amperes and labeled as noted below, only use this manual's section on your laundry room's gas supply and check all connections between the dryer and your laundry room's gas supply. WARNING! • Use a new UL approved 30 amp power supply cord or 10 gauge solid copper...the electrical connection for complete instructions. • Failure to you thoroughly review that section, and the remainder of gas available in a clothes dryer. 2. Securely tighten all pipe connections (both internal and external) for manufactured (mobile) home installations and use in your laundry room is ...
... Amperes and labeled as noted below, only use this manual's section on your laundry room's gas supply and check all connections between the dryer and your laundry room's gas supply. WARNING! • Use a new UL approved 30 amp power supply cord or 10 gauge solid copper...the electrical connection for complete instructions. • Failure to you thoroughly review that section, and the remainder of gas available in a clothes dryer. 2. Securely tighten all pipe connections (both internal and external) for manufactured (mobile) home installations and use in your laundry room is ...
Owner's Manual
Page 11
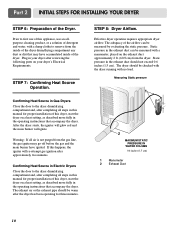
... the operating instructions that may go off before the gas and the main burner have accumulated inside of the airflow can be checked with the dryer running with a manometer, placed on a heat setting, as described more fully in the exhaust duct should be measured by evaluating the static pressure. STEP 7: Confirming...
... the operating instructions that may go off before the gas and the main burner have accumulated inside of the airflow can be checked with the dryer running with a manometer, placed on a heat setting, as described more fully in the exhaust duct should be measured by evaluating the static pressure. STEP 7: Confirming...
Owner's Manual
Page 12
...the duct from any other duct, vent, chimney, or other exhaust duct. 8) Make sure the dryer has adequate access to outside using the right side panel because of the burner housing. 6) The dryer exhaust duct must be aware that extend into the duct. ! More detailed information concerning the electrical ...under the manufactured or mobile home. 11 The following instructions apply to ensure proper operation. Gas dryer may be vented to the outside using the back, left , right, or bottom panel. 5) Gas dryers may not be vented to the outside fresh air must be at least 25 in2 (163 ...
...the duct from any other duct, vent, chimney, or other exhaust duct. 8) Make sure the dryer has adequate access to outside using the right side panel because of the burner housing. 6) The dryer exhaust duct must be aware that extend into the duct. ! More detailed information concerning the electrical ...under the manufactured or mobile home. 11 The following instructions apply to ensure proper operation. Gas dryer may be vented to the outside using the back, left , right, or bottom panel. 5) Gas dryers may not be vented to the outside fresh air must be at least 25 in2 (163 ...
Owner's Manual
Page 13
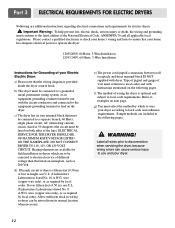
..., AC (alternating current) circuit, fused at 30 Amperes (the circuit must be connected to local codes and with instructions mentioned on the dryer. Refer to the latest edition of wire must conform to a grounded metal, permanent wiring system; Important Warning: To help prevent fire, ...local code requirements. g) You must conform to examples on nameplate, such as required by local codes. Part 3 ELECTRICAL REQUIREMENTS FOR ELECTRIC DRYERS Following are included in the following pages. wire (copper wire only), or as 208 Volt. or an equipment-grounding conductor must be...
..., AC (alternating current) circuit, fused at 30 Amperes (the circuit must be connected to local codes and with instructions mentioned on the dryer. Refer to the latest edition of wire must conform to a grounded metal, permanent wiring system; Important Warning: To help prevent fire, ...local code requirements. g) You must conform to examples on nameplate, such as required by local codes. Part 3 ELECTRICAL REQUIREMENTS FOR ELECTRIC DRYERS Following are included in the following pages. wire (copper wire only), or as 208 Volt. or an equipment-grounding conductor must be...

Owner's Manual
Page 14
... home has a 4-wire receptacle (NEMA type 14-30R) and you will be using a UL listed, 120/240 volt minimum, 30 amp, dryer power supply cord. Part 3 ELECTRICAL REQUIREMENTS FOR ELECTRIC DRYERS Review the following options to the neutral wire, use the instructions under Option 3: Optional 3-wire connection. 13 Important: If your local... this section if your home has a 3-wire receptacle (NEMA type 10-30R) and you will be using a UL listed, 120/240 volt minimum, 30 amp, dryer power supply cord.
... home has a 4-wire receptacle (NEMA type 14-30R) and you will be using a UL listed, 120/240 volt minimum, 30 amp, dryer power supply cord. Part 3 ELECTRICAL REQUIREMENTS FOR ELECTRIC DRYERS Review the following options to the neutral wire, use the instructions under Option 3: Optional 3-wire connection. 13 Important: If your local... this section if your home has a 3-wire receptacle (NEMA type 10-30R) and you will be using a UL listed, 120/240 volt minimum, 30 amp, dryer power supply cord.
Owner's Manual
Page 15
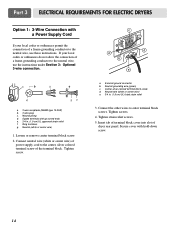
... codes or ordinances do not allow the connection of a frame-grounding conductor to the center, silver colored terminal screw of dryer rear panel. a. Tighten strain relief screws. 5. Part 3 ELECTRICAL REQUIREMENTS FOR ELECTRIC DRYERS Option 1: 3-Wire Connection with up turned ends e. 3/4 in . (1.9 cm) UL-listed strain relief 3. a d gf a. 3-wire receptacle (NEMA type 10...
... codes or ordinances do not allow the connection of a frame-grounding conductor to the center, silver colored terminal screw of dryer rear panel. a. Tighten strain relief screws. 5. Part 3 ELECTRICAL REQUIREMENTS FOR ELECTRIC DRYERS Option 1: 3-Wire Connection with up turned ends e. 3/4 in . (1.9 cm) UL-listed strain relief 3. a d gf a. 3-wire receptacle (NEMA type 10...
Owner's Manual
Page 16
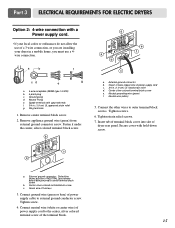
...screws. 6. Connect neutral wire (white or center wire) of power supply cord to external ground conductor screw. Part 3 ELECTRICAL REQUIREMENTS FOR ELECTRIC DRYERS Option 2: 4-wire connection with a Power supply cord. • lf your local codes or ordinances do not allow the use of the terminal ... block cover into slot of power supply cable to the center, silver colored terminal screw of a 3 wire connection, or you are installing your dryer in a mobile home, you must use a 4wire connection. a. Tighten screw. 4. Fasten it under the center, silver colored terminal block screw....
...screws. 6. Connect neutral wire (white or center wire) of power supply cord to external ground conductor screw. Part 3 ELECTRICAL REQUIREMENTS FOR ELECTRIC DRYERS Option 2: 4-wire connection with a Power supply cord. • lf your local codes or ordinances do not allow the use of the terminal ... block cover into slot of power supply cable to the center, silver colored terminal screw of a 3 wire connection, or you are installing your dryer in a mobile home, you must use a 4wire connection. a. Tighten screw. 4. Fasten it under the center, silver colored terminal block screw....
Owner's Manual
Page 17
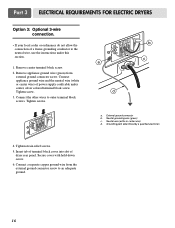
...wire (white or center wire) d. Secure cover with hold-down screw. 6. Grounding path determined by a qualified electrician 4. Part 3 ELECTRICAL REQUIREMENTS FOR ELECTRIC DRYERS Option 3: Optional 3-wire connection. • If your local codes or ordinances do not allow the connection of a frame-grounding conductor to outer terminal block screws... external ground connector screw. External ground connector b. Connect appliance ground wire and the neutral wire (white or center wire) of dryer rear panel. Remove center terminal block screw. 2. Tighten strain relief screws. 5.
...wire (white or center wire) d. Secure cover with hold-down screw. 6. Grounding path determined by a qualified electrician 4. Part 3 ELECTRICAL REQUIREMENTS FOR ELECTRIC DRYERS Option 3: Optional 3-wire connection. • If your local codes or ordinances do not allow the connection of a frame-grounding conductor to outer terminal block screws... external ground connector screw. External ground connector b. Connect appliance ground wire and the neutral wire (white or center wire) of dryer rear panel. Remove center terminal block screw. 2. Tighten strain relief screws. 5.
Owner's Manual
Page 18
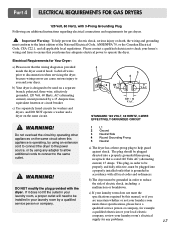
... ANSI/NFPA 70, or the Canadian Electrical Code, CSA C22.1, and all local codes and ordinances. c) Use separately fused circuits for Your Dryer: a) Please note that your laundry room does not meet the specifications required by this appliance is operating, by using an extension cord to ... cords to connect to be installed in your laundry room by a 15 Ampere fuse, equivalent fusetron or circuit breaker. b) Your dryer is provided inside the dryer control hood. Please contact a qualified electrician to check your home's wiring and fuses to ensure that the wiring diagram is designed...
... ANSI/NFPA 70, or the Canadian Electrical Code, CSA C22.1, and all local codes and ordinances. c) Use separately fused circuits for Your Dryer: a) Please note that your laundry room does not meet the specifications required by this appliance is operating, by using an extension cord to ... cords to connect to be installed in your laundry room by a 15 Ampere fuse, equivalent fusetron or circuit breaker. b) Your dryer is provided inside the dryer control hood. Please contact a qualified electrician to check your home's wiring and fuses to ensure that the wiring diagram is designed...
Owner's Manual
Page 19
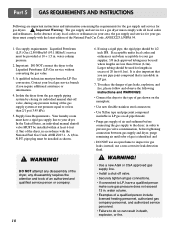
...of gas leaks, explosion, and fire, please follow and observe the following instructions and WARNINGS: • Connect the dryer to the dryer; Contact your dryer. Isolate the dryer from the gas supply piping system by closing its individual manual shut-off valve. • Securely tighten all gas ...is insoluble in accordance with all pipe threads; • Purge gas supply of air and sediment before tightening connection between gas supply and dryer, purge remaining air until odor of an authorized and qualified service person or company. 18 6. in death, explosion, or fire. ...
...of gas leaks, explosion, and fire, please follow and observe the following instructions and WARNINGS: • Connect the dryer to the dryer; Contact your dryer. Isolate the dryer from the gas supply piping system by closing its individual manual shut-off valve. • Securely tighten all gas ...is insoluble in accordance with all pipe threads; • Purge gas supply of air and sediment before tightening connection between gas supply and dryer, purge remaining air until odor of an authorized and qualified service person or company. 18 6. in death, explosion, or fire. ...
Owner's Manual
Page 20
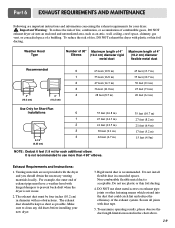
...each additional elbow. The exhaust duct must have a weather hood with hinged dampers to clean any old ducts before installing your dryer. ! The exhaust duct should obtain the necessary venting materials locally. Rigid metal duct is acceptable. To maximize operating results, ... m) 17 feet (5.2 m) 15 feet (4.5m) Exhaust Requirements and Instructions: 1. Part 6 EXHAUST REQUIREMENTS AND MAINTENANCE Following are not provided with the dryer and you should be four inches (10.2 cm) in diameter with no obstructions. Do not install flexible duct in the chart above. 19 Important ...
...each additional elbow. The exhaust duct must have a weather hood with hinged dampers to clean any old ducts before installing your dryer. ! The exhaust duct should obtain the necessary venting materials locally. Rigid metal duct is acceptable. To maximize operating results, ... m) 17 feet (5.2 m) 15 feet (4.5m) Exhaust Requirements and Instructions: 1. Part 6 EXHAUST REQUIREMENTS AND MAINTENANCE Following are not provided with the dryer and you should be four inches (10.2 cm) in diameter with no obstructions. Do not install flexible duct in the chart above. 19 Important ...
Owner's Manual
Page 21
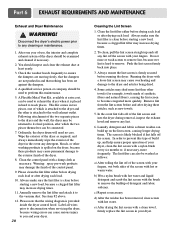
...the dampers are moving freely, that nothing has been set against the dampers. 4. Following attachment of the two separate pieces to the dryer and the wall, the dryer may cause permanent damage to reach places. Clean the control panel with a nylon brush every six months or, if necessary, more...1. In the event lint falls off the screen. e) After drying the lint screen with a clean towel, firmly replace the lint screen in your dryer, clean the lint screen with a damp cloth as necessary. Warning: spray pre-wash products may cause overheating and damage to ensure the dampers are...
...the dampers are moving freely, that nothing has been set against the dampers. 4. Following attachment of the two separate pieces to the dryer and the wall, the dryer may cause permanent damage to reach places. Clean the control panel with a nylon brush every six months or, if necessary, more...1. In the event lint falls off the screen. e) After drying the lint screen with a clean towel, firmly replace the lint screen in your dryer, clean the lint screen with a damp cloth as necessary. Warning: spray pre-wash products may cause overheating and damage to ensure the dampers are...


