

Owners Manual
Page 1
Model number : Serial number : LG DLP PROJECTOR BX220-JD OWNER'S MANUAL Retain it for future reference. See the label attached on the bottom of the set . Please read this information to your set . Record model number and serial number of the set and quote this manual carefully before operating your dealer when you require service.
Model number : Serial number : LG DLP PROJECTOR BX220-JD OWNER'S MANUAL Retain it for future reference. See the label attached on the bottom of the set . Please read this information to your set . Record model number and serial number of the set and quote this manual carefully before operating your dealer when you require service.
Owners Manual
Page 3
... Projector 13 Using Kensington Security System 14 Turning on the Projector 15 Turning off the Projector 15 Focus and Position of the Screen Image........16 Selecting source mode 16 Connection Connecting to a Desktop PC 17 Connecting to a Notebook PC 17 Connecting to a Video Source 18 Connecting to a DVD 18 Connecting to a product it means the product is attached to a D-TV Set-Top Box 18 Function Video Menu Options Adjusting Video 19 APC (Auto Picture Control 19 Auto Color Temperature Control 20 White...
... Projector 13 Using Kensington Security System 14 Turning on the Projector 15 Turning off the Projector 15 Focus and Position of the Screen Image........16 Selecting source mode 16 Connection Connecting to a Desktop PC 17 Connecting to a Notebook PC 17 Connecting to a Video Source 18 Connecting to a DVD 18 Connecting to a product it means the product is attached to a D-TV Set-Top Box 18 Function Video Menu Options Adjusting Video 19 APC (Auto Picture Control 19 Auto Color Temperature Control 20 White...

Owners Manual
Page 4
... would cause the internal temperature to the projector. ➟ After reading this instruction may become unstable and affect operation. Only use the projector on the power cord This may cause a fire hazard ! Do not place the projector directly on the installed projector. If grounding methods are given in a damp place such as radiators, fires and stove etc. Power WARNING Earth wire should be...
... would cause the internal temperature to the projector. ➟ After reading this instruction may become unstable and affect operation. Only use the projector on the power cord This may cause a fire hazard ! Do not place the projector directly on the installed projector. If grounding methods are given in a damp place such as radiators, fires and stove etc. Power WARNING Earth wire should be...

Owners Manual
Page 5
... and lamp cover will not trip or tread on the Mains multi-outlet. Safety Instructions ENGLISH Power WARNING Do not use too many plugs on the power lead. It may cause a fire or an electric shock hazard ! If you pull the cord the cord may be placed upon . This may result in overheating of the appliance, and have the cord replaced with...
... and lamp cover will not trip or tread on the Mains multi-outlet. Safety Instructions ENGLISH Power WARNING Do not use too many plugs on the power lead. It may cause a fire or an electric shock hazard ! If you pull the cord the cord may be placed upon . This may result in overheating of the appliance, and have the cord replaced with...

Owners Manual
Page 7
... open into the front. (If you mount on the Projector screen tiny black points and/or bright points (red, blue, or green). ENGLISH Names of parts Main Body * The projector is installed. This can be a normal result of parts MENU SOURCE VOL VOL AUTO OK POWER Foot adjusting button Front remote control sensor Lens cover * Push the lens cover into the inside after pushing the cover, the lens cover is manufactured using high-precision technology. Rear remote control sensor Control panel Zoom ring Power button Focus...
... open into the front. (If you mount on the Projector screen tiny black points and/or bright points (red, blue, or green). ENGLISH Names of parts Main Body * The projector is installed. This can be a normal result of parts MENU SOURCE VOL VOL AUTO OK POWER Foot adjusting button Front remote control sensor Lens cover * Push the lens cover into the inside after pushing the cover, the lens cover is manufactured using high-precision technology. Rear remote control sensor Control panel Zoom ring Power button Focus...
Owners Manual
Page 10
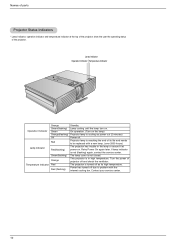
... of the projector show the user the operating status of projector off due to be replaced with the internal cooling fan. Retry Power On again later. Contact your service center. 10 Lamp Indicator Operation Indicator Temperature Indicator MENU SOURCE VOL VOL AUTO OK POWER Operation Indicator Lamp Indicator Temperature Indicator Orange Green(flashing) Green Orange(flashing) Off Red Red(flashing) Green(flashing) Orange Red Red (flashing) Standby. Projector lamp is cooling as its life and needs to problem with a new lamp. (over 2000 hours) The projector has trouble in high...
... of the projector show the user the operating status of projector off due to be replaced with the internal cooling fan. Retry Power On again later. Contact your service center. 10 Lamp Indicator Operation Indicator Temperature Indicator MENU SOURCE VOL VOL AUTO OK POWER Operation Indicator Lamp Indicator Temperature Indicator Orange Green(flashing) Green Orange(flashing) Off Red Red(flashing) Green(flashing) Orange Red Red (flashing) Standby. Projector lamp is cooling as its life and needs to problem with a new lamp. (over 2000 hours) The projector has trouble in high...

Owners Manual
Page 11
... these items. * When applying a ceiling installer, use only the ceiling installer for projector. * Contact your service personnel for projector Portable Bag S-Video Cable DVI-D Cable RS-232C Cable 11 Projection Screen Lamp SCART to RCA jack (option) Ceiling installer for replacing a new lamp. * Projector lamp is reaching the end of parts Accessories POWER MENU KEYSTONE SOURCE AUTO KEYSTONE OK BLANK LASER ARC STILL Remote Control 1.5V 1.5V 2 Batteries (size AAA) Power Cord Video Cable Computer Cable RCA to D-Sub Adaptor Operating guide Optional Extras * Contact your...
... these items. * When applying a ceiling installer, use only the ceiling installer for projector. * Contact your service personnel for projector Portable Bag S-Video Cable DVI-D Cable RS-232C Cable 11 Projection Screen Lamp SCART to RCA jack (option) Ceiling installer for replacing a new lamp. * Projector lamp is reaching the end of parts Accessories POWER MENU KEYSTONE SOURCE AUTO KEYSTONE OK BLANK LASER ARC STILL Remote Control 1.5V 1.5V 2 Batteries (size AAA) Power Cord Video Cable Computer Cable RCA to D-Sub Adaptor Operating guide Optional Extras * Contact your...

Owners Manual
Page 12
... cause overheating of the projector. G Install this projector only in the following conditions. The projector is no input signal, the Menu will not be mounted to a wall or ceiling only. This product should be displayed on the front. GLeave an adequate distance(30cm/12 inches or more) around the projector. G This may , however, see tiny black points and/or bright points (red, blue, or green) that...
... cause overheating of the projector. G Install this projector only in the following conditions. The projector is no input signal, the Menu will not be mounted to a wall or ceiling only. This product should be displayed on the front. GLeave an adequate distance(30cm/12 inches or more) around the projector. G This may , however, see tiny black points and/or bright points (red, blue, or green) that...

Owners Manual
Page 13
... AV source. 2.Place the projector the correct distance from the screen. If the projector is not set at a right angle to a wall power socket and other connected sources. ENGLISH Installing and Composition Basic Operation of the Projector 1.Place the projector on the picture format Screen height (X) Projection off-set at a right angle, the screen image will be crooked. If this (Refer to page 22.) 4.Connect the cables of lens Projection distance (D) screen size 40″ screen height...
... AV source. 2.Place the projector the correct distance from the screen. If the projector is not set at a right angle to a wall power socket and other connected sources. ENGLISH Installing and Composition Basic Operation of the Projector 1.Place the projector on the picture format Screen height (X) Projection off-set at a right angle, the screen image will be crooked. If this (Refer to page 22.) 4.Connect the cables of lens Projection distance (D) screen size 40″ screen height...

Owners Manual
Page 15
... to display the picture after the operation indicator light turns (Green). Press the POWER button on the top cover or remote control. 2. Please Press Key Again. 15 G Select the source mode with the SOURCE button. Turning off the projector, as this will allow the lamp cooling to preserve the lamp life. * Don't unplug the power cord while the ventilation fan (inlet/outlet) is lit up . Remove the lens cover of the lamp.) G It will not operate. Power Off? G An image will help...
... to display the picture after the operation indicator light turns (Green). Press the POWER button on the top cover or remote control. 2. Please Press Key Again. 15 G Select the source mode with the SOURCE button. Turning off the projector, as this will allow the lamp cooling to preserve the lamp life. * Don't unplug the power cord while the ventilation fan (inlet/outlet) is lit up . Remove the lens cover of the lamp.) G It will not operate. Power Off? G An image will help...

Owners Manual
Page 16
... screen. Selecting source mode 1. RGB DVI S-Video Video 16 MENU SOURCE VOL VOL AUTO OK POWER 1. After raising the front foot, do not press down on the screen, check if it . Release the button to place the screen image in its new position. 3. Press the SOURCE button. select OK F RGB G 2. G To adjust the size of the image, rotate the zoom ring which is the inner ring on the lens. While pressing the foot adjuster button...
... screen. Selecting source mode 1. RGB DVI S-Video Video 16 MENU SOURCE VOL VOL AUTO OK POWER 1. After raising the front foot, do not press down on the screen, check if it . Release the button to place the screen image in its new position. 3. Press the SOURCE button. select OK F RGB G 2. G To adjust the size of the image, rotate the zoom ring which is the inner ring on the lens. While pressing the foot adjuster button...
Owners Manual
Page 17
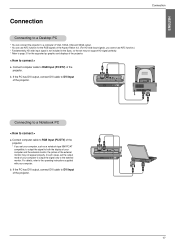
... projector. Connect computer cable to DVI Input of the projector. 17 If the PC has DVI output, connect DVI cable to connect > a. For details, refer to the operating instructions supplied with your computer and the external monitor, the picture of the external monitor may not support HD signal perfectly. * Refer to page 31 for the RGB signals of the Aspect Ration 4:3. (For HD wide input signals, you set...
... projector. Connect computer cable to DVI Input of the projector. 17 If the PC has DVI output, connect DVI cable to connect > a. For details, refer to the operating instructions supplied with your computer and the external monitor, the picture of the external monitor may not support HD signal perfectly. * Refer to page 31 for the RGB signals of the Aspect Ration 4:3. (For HD wide input signals, you set...

Owners Manual
Page 19
... adjust. 3. G In the broadcasting system NTSC, the picture item Tint is no input signal present, the Menu will not affect other input source. G To exit the menu display, repeatedly, press the MENU button. APC (Auto Picture Control) * Use APC to set the projector for the following input source : Video/S-Video/Component (480i(576i)), Component (480p(576p), 720p, 1080i) G To restore the original image condition after selecting [Reset] item. Clear Soft User < RGB mode > Contrast Brightness Color R Color G Color B Reset MENU...
... adjust. 3. G In the broadcasting system NTSC, the picture item Tint is no input signal present, the Menu will not affect other input source. G To exit the menu display, repeatedly, press the MENU button. APC (Auto Picture Control) * Use APC to set the projector for the following input source : Video/S-Video/Component (480i(576i)), Component (480p(576p), 720p, 1080i) G To restore the original image condition after selecting [Reset] item. Clear Soft User < RGB mode > Contrast Brightness Color R Color G Color B Reset MENU...

Owners Manual
Page 22
... KEYSTONE + or KEYSTONE - Keystone Auto Source Blank Image Lamp Mode Lamp Time MENU prev. 0 F Off G F Blue G F Normal mode G 0 Hr move F G select 22 G Keystone are adjusted from -50 to select On or Off. G You can 't get the best angle of projection, because it may cause a blazing fire of the button changes the display as you can also use F, G button to adjust the screen condition as below. Press the F, G button to +50. Keystone 0 Auto Source Function * Automatically detects the projector input signal...
... KEYSTONE + or KEYSTONE - Keystone Auto Source Blank Image Lamp Mode Lamp Time MENU prev. 0 F Off G F Blue G F Normal mode G 0 Hr move F G select 22 G Keystone are adjusted from -50 to select On or Off. G You can 't get the best angle of projection, because it may cause a blazing fire of the button changes the display as you can also use F, G button to adjust the screen condition as below. Press the F, G button to +50. Keystone 0 Auto Source Function * Automatically detects the projector input signal...

Owners Manual
Page 23
... G F Blue G F Normal mode G 0 Hr move F G select Lamp Mode Function 1. G The screen turns off to select Normal mode or Silent mode. Press the OK (A) button and then use D , E button to select Lamp Mode item. 3. G Background color will be effective if you want to use. Keystone Auto Source Blank Image Lamp Mode Lamp Time MENU prev. 0 F Off G F Blue G F Normal G 0 Hr move F G select 23 G To exit the menu display, repeatedly, press the MENU button. Function ENGLISH Using Blank function * This function may be changed...
... G F Blue G F Normal mode G 0 Hr move F G select Lamp Mode Function 1. G The screen turns off to select Normal mode or Silent mode. Press the OK (A) button and then use D , E button to select Lamp Mode item. 3. G Background color will be effective if you want to use. Keystone Auto Source Blank Image Lamp Mode Lamp Time MENU prev. 0 F Off G F Blue G F Normal G 0 Hr move F G select 23 G To exit the menu display, repeatedly, press the MENU button. Function ENGLISH Using Blank function * This function may be changed...

Owners Manual
Page 24
... hours), the lamp indicator will be turned red. To exit Pause, press any button . * The STILL function would release automatically after about 10 minutes. 24 G When projector lamp is displayed. Keystone Auto Source Blank Image Lamp Mode Lamp Time MENU prev. 0 F Off G F Blue G F Normal mode G 0 Hr move F G adjust Using Still function 1. Press the STILL button. * You can freeze the input image. 2. G The used lamp time is reaching the end of excessive lamp time. Function Special Menu Options Checking lamp time 1. Press the MENU button and then use F, G button...
... hours), the lamp indicator will be turned red. To exit Pause, press any button . * The STILL function would release automatically after about 10 minutes. 24 G When projector lamp is displayed. Keystone Auto Source Blank Image Lamp Mode Lamp Time MENU prev. 0 F Off G F Blue G F Normal mode G 0 Hr move F G adjust Using Still function 1. Press the STILL button. * You can freeze the input image. 2. G The used lamp time is reaching the end of excessive lamp time. Function Special Menu Options Checking lamp time 1. Press the MENU button and then use F, G button...

Owners Manual
Page 25
... image. *Auto Tracking function works in RGB input only. 1. move F G adjust Auto Configure Clock 0 Phase 15 Horizontal 0 Vertical 0 MENU prev. ENGLISH Screen Menu Options Auto Tracking Function *This function assures you of getting the best video quality by selecting Horizontal / Vertical position. (RGB mode) 1. You can 't get the best picture quality only with the input source, set the position of Auto Configure if you want . Press the AUTO button. Adjust...
... image. *Auto Tracking function works in RGB input only. 1. move F G adjust Auto Configure Clock 0 Phase 15 Horizontal 0 Vertical 0 MENU prev. ENGLISH Screen Menu Options Auto Tracking Function *This function assures you of getting the best video quality by selecting Horizontal / Vertical position. (RGB mode) 1. You can 't get the best picture quality only with the input source, set the position of Auto Configure if you want . Press the AUTO button. Adjust...

Owners Manual
Page 26
... menu display, repeatedly, press the MENU button. SET ID 1. Press the OK (A) button and then use F, G button to connect external control equipment • Connect the serial port of Set ID is not supplied with the specified ID number will operate from the remote control. F English G F 4 : 3 G F move 1 G F G select How to select the menu. 2. Press the MENU button and then use D , E button to the RS-232C jack on the projector back panel. • RS-232C cable is 1~99. G The adjustment...
... menu display, repeatedly, press the MENU button. SET ID 1. Press the OK (A) button and then use F, G button to connect external control equipment • Connect the serial port of Set ID is not supplied with the specified ID number will operate from the remote control. F English G F 4 : 3 G F move 1 G F G select How to select the menu. 2. Press the MENU button and then use D , E button to the RS-232C jack on the projector back panel. • RS-232C cable is 1~99. G The adjustment...
Owners Manual
Page 27
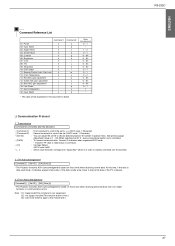
... can adjust the set is data write mode, it indicates present status data. Tint k 09. OSD Select k 11. Remote Control Lock / Key Lock k 12. Green ADC gain adjustment j 15. Data : [1] : illegal code(This command is 1 ~ 99. Power k 02. Color Temperature k 13. Transmission [Command1][Command2][ ][Set ID][ ][Data][Cr] * [Command 1] * [Command 2] * [Set ID] * [DATA] * [Cr] *[ ] : First command to control the set.(k, j, x, ASCII code, 1 Character) : Second command to classify command, set ID and Data. 2. When selecting Set ID '0', every connected projector set...
... can adjust the set is data write mode, it indicates present status data. Tint k 09. OSD Select k 11. Remote Control Lock / Key Lock k 12. Green ADC gain adjustment j 15. Data : [1] : illegal code(This command is 1 ~ 99. Power k 02. Color Temperature k 13. Transmission [Command1][Command2][ ][Set ID][ ][Data][Cr] * [Command 1] * [Command 2] * [Set ID] * [DATA] * [Cr] *[ ] : First command to control the set.(k, j, x, ASCII code, 1 Character) : Second command to classify command, set ID and Data. 2. When selecting Set ID '0', every connected projector set...

Owners Manual
Page 35
... Inc., type NSH200LG 35 It could cause injury and electric shock due to avoid injury cause by high temperature of bottom enclosure. from disconnect mains plug to high temperature and voltage. Only service personnel can replace lamp after minimum 3 min. Do not touch and open the lamp replace cover of lamp. * Applicable Lamp: Manufactured by dry hygrometer Projector Lamp lamp model AJ-LT91 lamp power consumption 200W LAMP Replacement WARNING : Lamp is no user replaceable part.
... Inc., type NSH200LG 35 It could cause injury and electric shock due to avoid injury cause by high temperature of bottom enclosure. from disconnect mains plug to high temperature and voltage. Only service personnel can replace lamp after minimum 3 min. Do not touch and open the lamp replace cover of lamp. * Applicable Lamp: Manufactured by dry hygrometer Projector Lamp lamp model AJ-LT91 lamp power consumption 200W LAMP Replacement WARNING : Lamp is no user replaceable part.


