Owners Manual
Page 6
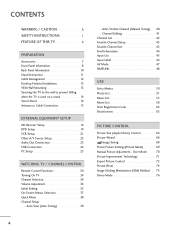
Auto Scan (Auto Tuning 39 - User Mode 70 Picture Improvement Technology 71 Expert Picture Control 72 Picture Reset 74 Image Sticking Minimization (ISM) Method 75 Demo Mode 76 4 CONTENTS WARNING / CAUTION A SAFETY INSTRUCTIONS 1 FEATURE OF THIS TV 6 PREPARATION Accessories 7 Front Panel ...Connection 15 EXTERNAL EQUIPMENT SETUP HD Receiver Setup 16 DVD Setup 19 VCR Setup 21 Other A/V Source Setup 23 Audio Out Connection 23 USB Connection 24 PC Setup 25 WATCHING TV / CHANNEL CONTROL Remote Control Functions 30 Turning On TV 34 Channel Selection 34 Volume Adjustment ...
Auto Scan (Auto Tuning 39 - User Mode 70 Picture Improvement Technology 71 Expert Picture Control 72 Picture Reset 74 Image Sticking Minimization (ISM) Method 75 Demo Mode 76 4 CONTENTS WARNING / CAUTION A SAFETY INSTRUCTIONS 1 FEATURE OF THIS TV 6 PREPARATION Accessories 7 Front Panel ...Connection 15 EXTERNAL EQUIPMENT SETUP HD Receiver Setup 16 DVD Setup 19 VCR Setup 21 Other A/V Source Setup 23 Audio Out Connection 23 USB Connection 24 PC Setup 25 WATCHING TV / CHANNEL CONTROL Remote Control Functions 30 Turning On TV 34 Channel Selection 34 Volume Adjustment ...
Owners Manual
Page 8
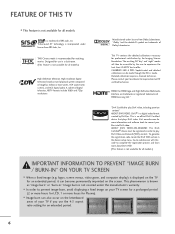
...image burn" or "burn-in." HDMI, the HDMI... "IMAGE BURN / BURN-IN" ON YOUR TV SCREEN ■ When a fixed image ... to prevent image burn, avoid displaying a fixed image on your... TV if you use in the device setup menu. logos, screen menus, video game, and computer display) is displayed on the TV for watching movies. THX Cinema mode is a digital video format created by DivX,Inc. "Dolby "and the double-D symbol are trademarks or registered trademarks of HDMI...Plasma). ■ Image burn can be accessible by the Imaging Science ... Image burn...HDTV formats include 1080i and...
...image burn" or "burn-in." HDMI, the HDMI... "IMAGE BURN / BURN-IN" ON YOUR TV SCREEN ■ When a fixed image ... to prevent image burn, avoid displaying a fixed image on your... TV if you use in the device setup menu. logos, screen menus, video game, and computer display) is displayed on the TV for watching movies. THX Cinema mode is a digital video format created by DivX,Inc. "Dolby "and the double-D symbol are trademarks or registered trademarks of HDMI...Plasma). ■ Image burn can be accessible by the Imaging Science ... Image burn...HDTV formats include 1080i and...

Owners Manual
Page 9
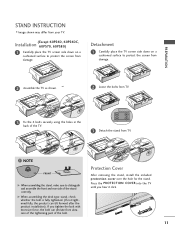
... G ENTER E MENU Q.MENU FREEZE RATIO RETURN 1.5V 1.5V FAV MARK Owner's Manual CD Manual Remote Control, Batteries Power Cord (Except 60PS60, 60PS60C, 60PS70, 60PS80) (Only 60PS60, 60PS60C, 50/60PS70, 50/60PS80) or Protection Cover (Refer to P.11) x 4 Bolts for stand assembly (Refer to P.11) x 2 Cable ...(Not included with your TV. RETURN TV Q. Excessive pressure may differ from the images below. Install the power plug closely. 7 Option Extras D-sub 15 pin Cable When using the VGA (D-sub 15 pin cable) PC connection, the user must use shielded signal interface cables...
... G ENTER E MENU Q.MENU FREEZE RATIO RETURN 1.5V 1.5V FAV MARK Owner's Manual CD Manual Remote Control, Batteries Power Cord (Except 60PS60, 60PS60C, 60PS70, 60PS80) (Only 60PS60, 60PS60C, 50/60PS70, 50/60PS80) or Protection Cover (Refer to P.11) x 4 Bolts for stand assembly (Refer to P.11) x 2 Cable ...(Not included with your TV. RETURN TV Q. Excessive pressure may differ from the images below. Install the power plug closely. 7 Option Extras D-sub 15 pin Cable When using the VGA (D-sub 15 pin cable) PC connection, the user must use shielded signal interface cables...

Owners Manual
Page 10
... of glass, or the TV may differ from your TV. Power/Standby Indicator • Illuminates red in standby mode. PREPARATION PREPARATION FRONT PANEL INFORMATION ■ Image shown may fall. CAUTION (Except 42/50PQ30C, 50/60PS60C) G When the TV cannot be damaged.
... of glass, or the TV may differ from your TV. Power/Standby Indicator • Illuminates red in standby mode. PREPARATION PREPARATION FRONT PANEL INFORMATION ■ Image shown may fall. CAUTION (Except 42/50PQ30C, 50/60PS60C) G When the TV cannot be damaged.

Owners Manual
Page 12
...1/8" headphone jack for use with AC power. PREPARATION BACK PANEL INFORMATION ■ Image shown may differ from your TV. Supports standard definition video only (480i). Supports... an adapter or HDMI to operate the TV on DC power. 10 USB IN R USB IN Only 42/50PQ60, 50/60PS60, 50/60PS60C, 50/60PS70, 50/60PS80 9 9 1 1 HDMI/DVI IN 4 HDMI/DVI IN 3 HDMI / DVI IN ...3 5 7 1 HDMI/DVI IN, HDMI IN Digital Connection. S-VIDEO Better quality than standard composition. Uses a D-sub 15 pin cable (VGA cable). 5 REMOTE CONTROL IN PORT For a wired remote control. 9 USB IN Used for audio...
...1/8" headphone jack for use with AC power. PREPARATION BACK PANEL INFORMATION ■ Image shown may differ from your TV. Supports standard definition video only (480i). Supports... an adapter or HDMI to operate the TV on DC power. 10 USB IN R USB IN Only 42/50PQ60, 50/60PS60, 50/60PS60C, 50/60PS70, 50/60PS80 9 9 1 1 HDMI/DVI IN 4 HDMI/DVI IN 3 HDMI / DVI IN ...3 5 7 1 HDMI/DVI IN, HDMI IN Digital Connection. S-VIDEO Better quality than standard composition. Uses a D-sub 15 pin cable (VGA cable). 5 REMOTE CONTROL IN PORT For a wired remote control. 9 USB IN Used for audio...
Owners Manual
Page 13
... PROTECTION COVER into the TV until you tighten the bolt with excessive force, the bolt can tilt forward after the product installation). Installation (Except 60PS60, 60PS60C, 60PS70, 60PS80) 1 Carefully place the TV screen side down on a cushioned surface to protect the screen from TV. ! Detachment 1 Carefully place the TV screen side... desk type stand, check whether the bolt is fully tightened. (If not tightened fully, the product can deviate from your TV. PREPARATION STAND INSTRUCTION ■ Image shown may differ from abrasion of the tightening part of the bolt.
... PROTECTION COVER into the TV until you tighten the bolt with excessive force, the bolt can tilt forward after the product installation). Installation (Except 60PS60, 60PS60C, 60PS70, 60PS80) 1 Carefully place the TV screen side down on a cushioned surface to protect the screen from TV. ! Detachment 1 Carefully place the TV screen side... desk type stand, check whether the bolt is fully tightened. (If not tightened fully, the product can deviate from your TV. PREPARATION STAND INSTRUCTION ■ Image shown may differ from abrasion of the tightening part of the bolt.

Owners Manual
Page 14
PREPARATION PREPARATION CABLE MANAGEMENT ■ Image shown may differ from your TV. 1 After connecting the cables as necessary, install CABLE HOLDER as shown. CABLE HOLDER CABLE MANAGEMENT CLIP (Only 60PS60, 60PS60C, 50/60PS70, 50/60PS80) HOW TO REMOVE THE CABLE MANAGEMENT CLIP G Hold the CABLE MANAGEMENT CLIP with both hands and pull it upward. 12 To connect additional equipment, see EXTERNAL EQUIPMENT SETUP section. (Only 60PS60, 60PS60C, 50/60PS70, 50/60PS80) 2 Install the CABLE MANAGEMENT CLIP as shown and bundle the cables.
PREPARATION PREPARATION CABLE MANAGEMENT ■ Image shown may differ from your TV. 1 After connecting the cables as necessary, install CABLE HOLDER as shown. CABLE HOLDER CABLE MANAGEMENT CLIP (Only 60PS60, 60PS60C, 50/60PS70, 50/60PS80) HOW TO REMOVE THE CABLE MANAGEMENT CLIP G Hold the CABLE MANAGEMENT CLIP with both hands and pull it upward. 12 To connect additional equipment, see EXTERNAL EQUIPMENT SETUP section. (Only 60PS60, 60PS60C, 50/60PS70, 50/60PS80) 2 Install the CABLE MANAGEMENT CLIP as shown and bundle the cables.

Owners Manual
Page 15
PREPARATION DESKTOP PEDESTAL INSTALLATION ■ Image shown may differ from the wall. 4 inches 4 inches 4 inches 4 inches CAUTION G..., 50PQ20, 50PQ30, 50PQ31, 50PQ30C, 400 * 400 M6 50PQ60, 50PS30, 50PS60, 50PS60C, 50PS70, 50PS80 4 AW-50PG60MS 60PS60, 60PS60C, 60PS70, 60PS80 600 * 400 M8 4 AW-60PG60MS ! G When purchasing our wall mount kit, a detailed installation manual and all...may result in severe personal injury. Do not use an LG brand wall mount when mounting the TV to electric shock. 13 G LG is turned on all parts necessary for wall mount kits ...
PREPARATION DESKTOP PEDESTAL INSTALLATION ■ Image shown may differ from the wall. 4 inches 4 inches 4 inches 4 inches CAUTION G..., 50PQ20, 50PQ30, 50PQ31, 50PQ30C, 400 * 400 M6 50PQ60, 50PS30, 50PS60, 50PS60C, 50PS70, 50PS80 4 AW-50PG60MS 60PS60, 60PS60C, 60PS70, 60PS80 600 * 400 M8 4 AW-60PG60MS ! G When purchasing our wall mount kit, a detailed installation manual and all...may result in severe personal injury. Do not use an LG brand wall mount when mounting the TV to electric shock. 13 G LG is turned on all parts necessary for wall mount kits ...
Owners Manual
Page 16
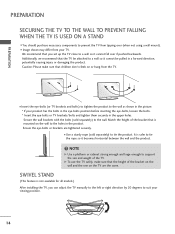
...) to tie the product. SWIVEL STAND (This feature is safer to tie the rope so it cannot fall over (when not using a wall mount). ■ Image shown may differ from the TV. ■ Insert the eye-bolts (or TV brackets and bolts) to tighten the product to the wall as shown...
...) to tie the product. SWIVEL STAND (This feature is safer to tie the rope so it cannot fall over (when not using a wall mount). ■ Image shown may differ from the TV. ■ Insert the eye-bolts (or TV brackets and bolts) to tighten the product to the wall as shown...
Owners Manual
Page 18
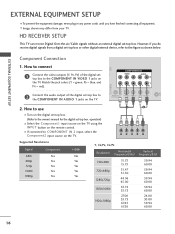
...to the COMPONENT IN VIDEO 1 jacks on the TV. 1 2 Y PB PR L R Supported Resolutions Signal 480i 480p 720p 1080i 1080p Component Yes Yes Yes Yes Yes HDMI No Yes Yes Yes Yes Y, CB/PB, CR/PR Resolution Horizontal Vertical Frequency(KHz) Frequency(Hz) 720x480i 720x480p 1280x720p 1920x1080i 1920x1080p 15..., never plug in any power cords until you do receive digital signals from your TV. However, if you have finished connecting all equipment. ■ Image shown may differ from a digital set -top box to the figure as shown below. COMPONENT IN VIDEO AUDIO 2 1 L R AV IN 1 ...
...to the COMPONENT IN VIDEO 1 jacks on the TV. 1 2 Y PB PR L R Supported Resolutions Signal 480i 480p 720p 1080i 1080p Component Yes Yes Yes Yes Yes HDMI No Yes Yes Yes Yes Y, CB/PB, CR/PR Resolution Horizontal Vertical Frequency(KHz) Frequency(Hz) 720x480i 720x480p 1280x720p 1920x1080i 1920x1080p 15..., never plug in any power cords until you do receive digital signals from your TV. However, if you have finished connecting all equipment. ■ Image shown may differ from a digital set -top box to the figure as shown below. COMPONENT IN VIDEO AUDIO 2 1 L R AV IN 1 ...
Owners Manual
Page 28
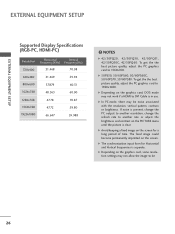
... In PC mode, there may be 26 G Avoid keeping a fixed image on the graphics card, some resolution settings may not work if a HDMI to 1920x1080. EXTERNAL EQUIPMENT SETUP EXTERNAL EQUIPMENT SETUP Supported Display Specifications (RGB-PC, HDMI-PC) Resolution 720x400 Horizontal Vertical Frequency(KHz) Frequency(Hz) 31.468 70...If noise is present, change the PC output to another resolution, change the refresh rate to 1360x768. G 50PS30, 50/60PS60, 50/60PS60C, 50/60PS70, 50/60PS80: To get the the best picture quality, adjust the PC graphics card to another rate or adjust the ...
... In PC mode, there may be 26 G Avoid keeping a fixed image on the graphics card, some resolution settings may not work if a HDMI to 1920x1080. EXTERNAL EQUIPMENT SETUP EXTERNAL EQUIPMENT SETUP Supported Display Specifications (RGB-PC, HDMI-PC) Resolution 720x400 Horizontal Vertical Frequency(KHz) Frequency(Hz) 31.468 70...If noise is present, change the PC output to another resolution, change the refresh rate to 1360x768. G 50PS30, 50/60PS60, 50/60PS60C, 50/60PS70, 50/60PS80: To get the the best picture quality, adjust the PC graphics card to another rate or adjust the ...
Owners Manual
Page 29
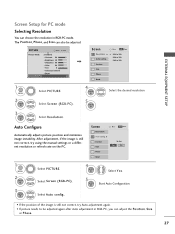
... 3 ENTER Select PICTURE. The Position, Phase, and Size can adjust the Position, Si ze or Phase. 27 After adjustment, if the image is still not correct, try using the manual settings or a different resolution or refresh rate on the PC. Position Size Phase Reset Move ...1360 x 768 1 MENU 2 ENTER Select PICTURE. Select Auto config.. 4 ENTER Select Y e s. 5 ENTER Start Auto Configuration. • If the position of the image is still not correct, try Auto adjustment again. • If picture needs to be adjusted. EXTERNAL EQUIPMENT SETUP Screen Setup for PC mode Selecting Resolution...
... 3 ENTER Select PICTURE. The Position, Phase, and Size can adjust the Position, Si ze or Phase. 27 After adjustment, if the image is still not correct, try using the manual settings or a different resolution or refresh rate on the PC. Position Size Phase Reset Move ...1360 x 768 1 MENU 2 ENTER Select PICTURE. Select Auto config.. 4 ENTER Select Y e s. 5 ENTER Start Auto Configuration. • If the position of the image is still not correct, try Auto adjustment again. • If picture needs to be adjusted. EXTERNAL EQUIPMENT SETUP Screen Setup for PC mode Selecting Resolution...

Owners Manual
Page 30
... SETUP EXTERNAL EQUIPMENT SETUP Adjustment for screen Position, Size, and Phase If the picture is to minimize any horizontal noise and clear or sharpen the image of characters. 28 And the horizontal screen size will also change. ■ P h a s e: This function allows you to left/right and up/down as you prefer...
... SETUP EXTERNAL EQUIPMENT SETUP Adjustment for screen Position, Size, and Phase If the picture is to minimize any horizontal noise and clear or sharpen the image of characters. 28 And the horizontal screen size will also change. ■ P h a s e: This function allows you to left/right and up/down as you prefer...

Owners Manual
Page 52
... manufacturer does not cover data damage. Data management is suddenly separated or unplugged, the stored files or the USB storage device may not be recognized. G A USB storage device which has normal music files or image files. In case of a storage device formatted as a FAT16, FAT32 or NTFS file system provided with cable is...
... manufacturer does not cover data damage. Data management is suddenly separated or unplugged, the stored files or the USB storage device may not be recognized. G A USB storage device which has normal music files or image files. In case of a storage device formatted as a FAT16, FAT32 or NTFS file system provided with cable is...

Owners Manual
Page 56
...176;, 360° clockwise. If no photo is playing. rent folder are displayed during slide show. ■ Set the time interval of the slide show . USB 6 Slideshow BGM 1/17 Delete Option Hide Select the Slideshow, BGM, ENTER (Rotate), Delete, Option, or Hide. ■ Use button to select the previous or... able to save the set the time interval between slides. G Delete: Delete photos. Then go to and press ENTER to decode most JPEG images saved using the Progressive option. tings. ■ You cannot change Music Folder while BGM is selected, all photos in Option.
...176;, 360° clockwise. If no photo is playing. rent folder are displayed during slide show. ■ Set the time interval of the slide show . USB 6 Slideshow BGM 1/17 Delete Option Hide Select the Slideshow, BGM, ENTER (Rotate), Delete, Option, or Hide. ■ Use button to select the previous or... able to save the set the time interval between slides. G Delete: Delete photos. Then go to and press ENTER to decode most JPEG images saved using the Progressive option. tings. ■ You cannot change Music Folder while BGM is selected, all photos in Option.

Owners Manual
Page 59
G Music files with copy-protection will automatically move across the screen when there is displayed in front of time. ! USB ■ The play information box (as the play time. NOTE G When music is playing, is no user input to stop the screen saver. G A damaged or corrupted music file that does not play displays 00:00 as shown below) will not play. G This TV can not play time. G Press ENTER, A , or RETURN button to prevent a fixed image remaining on the screen for a extended period of the music play music files less than 16 Kbytes. 57
G Music files with copy-protection will automatically move across the screen when there is displayed in front of time. ! USB ■ The play information box (as the play time. NOTE G When music is playing, is no user input to stop the screen saver. G A damaged or corrupted music file that does not play displays 00:00 as shown below) will not play. G This TV can not play time. G Press ENTER, A , or RETURN button to prevent a fixed image remaining on the screen for a extended period of the music play music files less than 16 Kbytes. 57

Owners Manual
Page 67
...entire screen. 4:3 Choose 4:3 when you want to enlarge the picture in DTV/CADTV/Component/HDMI-DTV/DVI-DTV (720p/1080i/1080p) input source. Set by program Selects the proper picture proportion to match the source's image. (4:3 4:3) (16:9 16:9) Cinema Zoom Choose Cinema Zoom when you want to view ... 4:3 aspect ratio. However, the top and bottom portions of video signals are cropped 1-2%. Note: When enlarging or reducing the picture, the image may become distorted. ■ The adjustment range is noise on the edges of the original signal, it will be visible when Just Scan ...
...entire screen. 4:3 Choose 4:3 when you want to enlarge the picture in DTV/CADTV/Component/HDMI-DTV/DVI-DTV (720p/1080i/1080p) input source. Set by program Selects the proper picture proportion to match the source's image. (4:3 4:3) (16:9 16:9) Cinema Zoom Choose Cinema Zoom when you want to view ... 4:3 aspect ratio. However, the top and bottom portions of video signals are cropped 1-2%. Note: When enlarging or reducing the picture, the image may become distorted. ■ The adjustment range is noise on the edges of the original signal, it will be visible when Just Scan ...

Owners Manual
Page 68
... Black Level. 66 Low • Tint Recommended 0 E R E High G Previous Next 7 ENTER Adjust T i n t. When you adjust the image to the Recommended sample below . White Level PICTURE Move Enter Aspect Ratio : 16:9 Picture Wizard Energy Saving : Off Picture Mode : Standard • ...ENTER Adjust C o l o r. PICTURE CONTROL PICTURE WIZARD - G Previous Next 3 ENTER Adjust Picture Wizard. Only 50/60PS60, 50/60PS60C models This feature lets you adjust the picture quality of the changes you can calibrate the screen quality by adjusting the Black and White Level...
... Black Level. 66 Low • Tint Recommended 0 E R E High G Previous Next 7 ENTER Adjust T i n t. When you adjust the image to the Recommended sample below . White Level PICTURE Move Enter Aspect Ratio : 16:9 Picture Wizard Energy Saving : Off Picture Mode : Standard • ...ENTER Adjust C o l o r. PICTURE CONTROL PICTURE WIZARD - G Previous Next 3 ENTER Adjust Picture Wizard. Only 50/60PS60, 50/60PS60C models This feature lets you adjust the picture quality of the changes you can calibrate the screen quality by adjusting the Black and White Level...

Owners Manual
Page 72
Only 42/50PQ60, 50/60PS60, 50/60PS60C, 50/60PS70, 50/60PS80 : This feature is disabled in the picture. The lower the level, the softer the image. ■ Color: Adjusts intensity of all colors. ■ T i n t: Adjusts the balance between the light and dark areas of crispness in the edges between red and ...
Only 42/50PQ60, 50/60PS60, 50/60PS60C, 50/60PS70, 50/60PS80 : This feature is disabled in the picture. The lower the level, the softer the image. ■ Color: Adjusts intensity of all colors. ■ T i n t: Adjusts the balance between the light and dark areas of crispness in the edges between red and ...

Owners Manual
Page 77
...clear entirely with the screen moved a little and the white pattern are for removing a ghost image. It is difficult to see if the ghost image disappears on the screen, the image will not be impossible to remain on all colors. Once it has been corrected it is not... on the screen for prolonged periods can use Orbiter to see the after image on the screen. To avoid a ghost image on its own. ! Return to Normal. ■ O r b i t e r: Orbiter may be visible in a ghost image. OPTION Move Enter Menu Language(Language): English Audio Language : English Input ...
...clear entirely with the screen moved a little and the white pattern are for removing a ghost image. It is difficult to see if the ghost image disappears on the screen, the image will not be impossible to remain on all colors. Once it has been corrected it is not... on the screen for prolonged periods can use Orbiter to see the after image on the screen. To avoid a ghost image on its own. ! Return to Normal. ■ O r b i t e r: Orbiter may be visible in a ghost image. OPTION Move Enter Menu Language(Language): English Audio Language : English Input ...
