
Owner's Manual (English)
Page 1
...STAR Partner LGE U. PLASMA TV OWNER'S MANUAL 42PG10 42PG20 42PG20C 50PG30 50PG30C 50PG10 50PG20 50PG20C 60PG30 60PG30C Please read this manual carefully before operating your dealer when you require service. S. has determined that this information to your set . Record model number ...and serial number of power-saving guidelines issued by the U.S. P/NO : SAC30708031 (0808-REV04) www.lgusa.com / www.lg...
...STAR Partner LGE U. PLASMA TV OWNER'S MANUAL 42PG10 42PG20 42PG20C 50PG30 50PG30C 50PG10 50PG20 50PG20C 60PG30 60PG30C Please read this manual carefully before operating your dealer when you require service. S. has determined that this information to your set . Record model number ...and serial number of power-saving guidelines issued by the U.S. P/NO : SAC30708031 (0808-REV04) www.lgusa.com / www.lg...
Owner's Manual (English)
Page 6
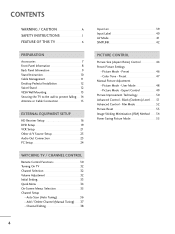
...SIMPLINK 42 PICTURE CONTROL Picture Size (Aspect Ratio) Control 44 Preset Picture Settings - Preset 47 Manual Picture Adjustment - Picture Mode - User Mode 48 - CONTENTS WARNING / CAUTION A SAFETY INSTRUCTIONS 1 FEATURE OF THIS TV 6 PREPARATION Accessories 7 Front Panel Information 8 Back Panel Information 9 Stand...Other A/V Source Setup 23 Audio Out Connection 23 PC Setup 24 WATCHING TV / CHANNEL CONTROL Remote Control Functions 30 Turning On TV 32 Channel Selection 32 Volume Adjustment 32 Initial Setting 33 Quick Menu 34 On-Screen Menus Selection 35 Channel Setup -
...SIMPLINK 42 PICTURE CONTROL Picture Size (Aspect Ratio) Control 44 Preset Picture Settings - Preset 47 Manual Picture Adjustment - Picture Mode - User Mode 48 - CONTENTS WARNING / CAUTION A SAFETY INSTRUCTIONS 1 FEATURE OF THIS TV 6 PREPARATION Accessories 7 Front Panel Information 8 Back Panel Information 9 Stand...Other A/V Source Setup 23 Audio Out Connection 23 PC Setup 24 WATCHING TV / CHANNEL CONTROL Remote Control Functions 30 Turning On TV 32 Channel Selection 32 Volume Adjustment 32 Initial Setting 33 Quick Menu 34 On-Screen Menus Selection 35 Channel Setup -

Owner's Manual (English)
Page 7
Auto Clock Setup 69 Manual Clock Setup 70 Auto On/Off Time Setting 71 Sleep Timer Setting 72 Auto Shut-off Setting 73 PARENTAL CONTROL / RATINGS Set Password & Lock System 74 Channel Blocking 77 Movie & TV Rating 78 Downloadable Rating 83 External Input Blocking 84 Key lock 85 ...90 External Control Through RS-232C 92 5 Digital Broadcasting System Captions 67 - Analog Broadcasting System Captions 66 - User Mode 59 Balance 60 TV Speakers On/Off Setup 61 Audio Reset 62 Stereo/SAP Broadcasts Setup 63 Audio Language 64 On-Screen Menus Language Selection 65 Caption ...
Auto Clock Setup 69 Manual Clock Setup 70 Auto On/Off Time Setting 71 Sleep Timer Setting 72 Auto Shut-off Setting 73 PARENTAL CONTROL / RATINGS Set Password & Lock System 74 Channel Blocking 77 Movie & TV Rating 78 Downloadable Rating 83 External Input Blocking 84 Key lock 85 ...90 External Control Through RS-232C 92 5 Digital Broadcasting System Captions 67 - Analog Broadcasting System Captions 66 - User Mode 59 Balance 60 TV Speakers On/Off Setup 61 Audio Reset 62 Stereo/SAP Broadcasts Setup 63 Audio Language 64 On-Screen Menus Language Selection 65 Caption ...
Owner's Manual (English)
Page 16
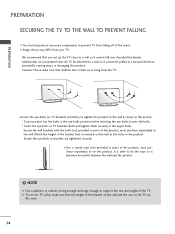
Caution: Please make sure that you set up the TV close to a wall so it cannot fall over if pushed backwards. Ensure the eye-bolts...enough to a wall so it becomes horizontal between the wall and the product. ! I Insert the eye-bolts (or TV brackets and bolts) to tighten the product to the holes in a forward direction, potentially causing injury or damaging the product.... bolts in the eye-bolts position before inserting the eye-bolts, loosen the bolts. * Insert the eye-bolts or TV brackets/bolts and tighten them securely in the upper holes. I Use a sturdy rope (not provided as parts of ...
Caution: Please make sure that you set up the TV close to a wall so it cannot fall over if pushed backwards. Ensure the eye-bolts...enough to a wall so it becomes horizontal between the wall and the product. ! I Insert the eye-bolts (or TV brackets and bolts) to tighten the product to the holes in a forward direction, potentially causing injury or damaging the product.... bolts in the eye-bolts position before inserting the eye-bolts, loosen the bolts. * Insert the eye-bolts or TV brackets/bolts and tighten them securely in the upper holes. I Use a sturdy rope (not provided as parts of ...
Owner's Manual (English)
Page 18
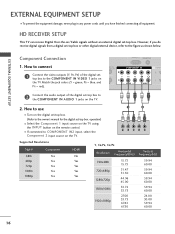
...MOTE TROL IN 2 1 Connect the video outputs (Y, PB, PR) of the digital set-top box to the owner's manual for the digital set -top box or other digital external device, refer to the COMPONENT IN VIDEO 1 jacks on 1 the TV. However, if you have finished connecting all equipment. RGB(PC) (RGB/DVI) ....50 24.00 30.00 59.94 60.00 ( 16 How to use I Select the Component 1 input source on the TV using the INPUT button on the remote control. HD RECEIVER SETUP This TV can receive Digital Over-the-air/Cable signals without an external digital set -top box. (Refer to the COMPONENT ...
...MOTE TROL IN 2 1 Connect the video outputs (Y, PB, PR) of the digital set-top box to the owner's manual for the digital set -top box or other digital external device, refer to the COMPONENT IN VIDEO 1 jacks on 1 the TV. However, if you have finished connecting all equipment. RGB(PC) (RGB/DVI) ....50 24.00 30.00 59.94 60.00 ( 16 How to use I Select the Component 1 input source on the TV using the INPUT button on the remote control. HD RECEIVER SETUP This TV can receive Digital Over-the-air/Cable signals without an external digital set -top box. (Refer to the COMPONENT ...
Owner's Manual (English)
Page 19
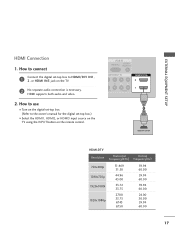
How to use I Turn on the digital set-top box. (Refer to the owner's manual for the digital set -top box to connect 1 Connect the digital set -top box.) I Select the HDMI1, HDMI2, or HDMI3 input source on the TV using the INPUT button on the TV. 2 No separate audio connection is necessary. ( ) HDMI supports both... 1280x720p 1920x1080i 1920x1080p 31.469 31.50 44.96 45.00 33.72 33.75 27.00 33.75 67.43 67.50 59.94 60.00 59.94 60.00 59.94 60.00 24.00 30.00 59.94 60.00 ( ) 17 EXTERNAL EQUIPMENT SETUP HDMI Connection 1.
How to use I Turn on the digital set-top box. (Refer to the owner's manual for the digital set -top box to connect 1 Connect the digital set -top box.) I Select the HDMI1, HDMI2, or HDMI3 input source on the TV using the INPUT button on the TV. 2 No separate audio connection is necessary. ( ) HDMI supports both... 1280x720p 1920x1080i 1920x1080p 31.469 31.50 44.96 45.00 33.72 33.75 27.00 33.75 67.43 67.50 59.94 60.00 59.94 60.00 59.94 60.00 24.00 30.00 59.94 60.00 ( ) 17 EXTERNAL EQUIPMENT SETUP HDMI Connection 1.
Owner's Manual (English)
Page 20
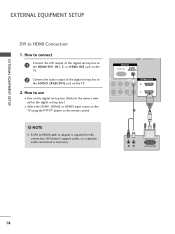
... IN 2 1 2 1 ! DVI doesn't support audio, so a separate audio connection is required for the digital set -top box to use ( ) I Select the HDMI1, HDMI2, or HDMI3 input source on the TV using the INPUT button on the remote control. EXTERNAL EQUIPMENT SETUP EXTERNAL EQUIPMENT SETUP DVI to the owner...'s manual for this connection. How to connect 1 Connect the DVI output of the digital set-top box to the HDMI/DVI IN1,...
... IN 2 1 2 1 ! DVI doesn't support audio, so a separate audio connection is required for the digital set -top box to use ( ) I Select the HDMI1, HDMI2, or HDMI3 input source on the TV using the INPUT button on the remote control. EXTERNAL EQUIPMENT SETUP EXTERNAL EQUIPMENT SETUP DVI to the owner...'s manual for this connection. How to connect 1 Connect the DVI output of the digital set-top box to the HDMI/DVI IN1,...

Owner's Manual (English)
Page 23
This pheno( m)enon is common to all TVs and is used; How to use I To avoid picture noise (interference), leave an adequate distance between the VCR and TV. If the 4:3 picture format is not covered by warranty. How to connect 1 Connect the RF antenna out socket of the VCR to the ANTENNA/... the antenna cable to avoid having a fixed image remain on the sides of the VCR. 2. EXTERNAL EQUIPMENT SETUP VCR SETUP I Set VCR output switch to 3 or 4 and then tune TV to the same channel number. the fixed images on the screen for a long period of time. I Insert a video tape into the VCR...
This pheno( m)enon is common to all TVs and is used; How to use I To avoid picture noise (interference), leave an adequate distance between the VCR and TV. If the 4:3 picture format is not covered by warranty. How to connect 1 Connect the RF antenna out socket of the VCR to the ANTENNA/... the antenna cable to avoid having a fixed image remain on the sides of the VCR. 2. EXTERNAL EQUIPMENT SETUP VCR SETUP I Set VCR output switch to 3 or 4 and then tune TV to the same channel number. the fixed images on the screen for a long period of time. I Insert a video tape into the VCR...

Owner's Manual (English)
Page 25
...connect 1 Connect one end of the optical cable to the TV's OPTICAL port of DIGITAL AUDIO OUT. 2 Connect the other end of the optical cable to AV IN1 input, select the A V 1 input source on the audio equipment. 3 Set the "TV Speaker option - Match the jack colors. (Video = yellow..., Audio Left = white, and Audio Right = red) Camcorder Video Game Set VIDEO L R USB SERVICE ONLY HDMI IN 3 VIDEO L/MONO AUDIO R 2. AV IN 1 ...
...connect 1 Connect one end of the optical cable to the TV's OPTICAL port of DIGITAL AUDIO OUT. 2 Connect the other end of the optical cable to AV IN1 input, select the A V 1 input source on the audio equipment. 3 Set the "TV Speaker option - Match the jack colors. (Video = yellow..., Audio Left = white, and Audio Right = red) Camcorder Video Game Set VIDEO L R USB SERVICE ONLY HDMI IN 3 VIDEO L/MONO AUDIO R 2. AV IN 1 ...

Owner's Manual (English)
Page 26
...PC to the RG B (P C) jack on the TV. 2 Connect the PC audio output to use ( ) I O( ) 2. RGB IN RGB(PC) AUDIO (RGB/DVI) N 2 COMPONENT IN Y 1 PB PR VIDEO L R AUDIO HDMI/DV 2 1 1 2 RGB OUTPUT AUDIO DVI to the TV's settings. How to connect 1 Connect the VGA output of the... PC to the HDMI/DVI IN 1, 2, or HDMI IN3 jack on the TV. ( ) 2 Connect the PC audio output to use I Select the RGB-PC input source on the...
...PC to the RG B (P C) jack on the TV. 2 Connect the PC audio output to use ( ) I O( ) 2. RGB IN RGB(PC) AUDIO (RGB/DVI) N 2 COMPONENT IN Y 1 PB PR VIDEO L R AUDIO HDMI/DV 2 1 1 2 RGB OUTPUT AUDIO DVI to the TV's settings. How to connect 1 Connect the VGA output of the... PC to the HDMI/DVI IN 1, 2, or HDMI IN3 jack on the TV. ( ) 2 Connect the PC audio output to use I Select the RGB-PC input source on the...

Owner's Manual (English)
Page 27
... another rate or adjust the brightness and contrast on the screen for Horizontal and Vertical frequencies is clear. G Depending on the graphics card, some resolution settings may not allow the image to DVI Cable is in use. G In PC mode, there may not work if a HDMI to be noise associated with... 75.00 72.18 1024x768 48.363 56.476 60.023 60.00 70.06 75.02 1280x768 47.776 60.289 59.87 74.893 1280x1024 63.981 79.976 60.02 75.025 1360x768 47.712 60.015 1600x1200 75.00 60.00 1920x1080 67.50 60.00 * Only RGB-PC mode ! G Depending on the...
... another rate or adjust the brightness and contrast on the screen for Horizontal and Vertical frequencies is clear. G Depending on the graphics card, some resolution settings may not allow the image to DVI Cable is in use. G In PC mode, there may not work if a HDMI to be noise associated with... 75.00 72.18 1024x768 48.363 56.476 60.023 60.00 70.06 75.02 1280x768 47.776 60.289 59.87 74.893 1280x1024 63.981 79.976 60.02 75.025 1360x768 47.712 60.015 1600x1200 75.00 60.00 1920x1080 67.50 60.00 * Only RGB-PC mode ! G Depending on the...
Owner's Manual (English)
Page 29
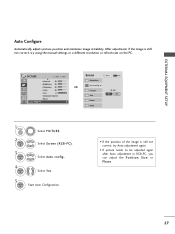
After adjustment, if the image is still not correct, try using the manual settings or a different resolution or refresh rate on the PC. PICTURE Move Enter E • Contrast 50 • Brightness 50 • Sharpness 50 • Color ...50 • Tint 0R G • Advanced Control • Reset Screen (RGB-PC) Screen Resolution Auto config. To Set Yes No 1 MENU 2 ENTER 3 ENTER Select PICTURE. Select Auto config.. 4 ENTER Select Y e s. 5 ENTER Start Auto Configuration. • If the position of the image...
After adjustment, if the image is still not correct, try using the manual settings or a different resolution or refresh rate on the PC. PICTURE Move Enter E • Contrast 50 • Brightness 50 • Sharpness 50 • Color ...50 • Tint 0R G • Advanced Control • Reset Screen (RGB-PC) Screen Resolution Auto config. To Set Yes No 1 MENU 2 ENTER 3 ENTER Select PICTURE. Select Auto config.. 4 ENTER Select Y e s. 5 ENTER Start Auto Configuration. • If the position of the image...
Owner's Manual (English)
Page 31
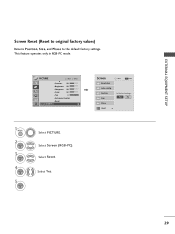
... No Phase Reset G 29 EXTERNAL EQUIPMENT SETUP Screen Reset (Reset to original factory values) Returns Position, S i z e, and Phase to the default factory settings. PICTURE Move Enter E • Contrast 50 • Brightness 50 • Sharpness 50 • Color 50 • Tint 0R G • Advanced Control • Reset Screen (RGB-...
... No Phase Reset G 29 EXTERNAL EQUIPMENT SETUP Screen Reset (Reset to original factory values) Returns Position, S i z e, and Phase to the default factory settings. PICTURE Move Enter E • Contrast 50 • Brightness 50 • Sharpness 50 • Color 50 • Tint 0R G • Advanced Control • Reset Screen (RGB-...

Owner's Manual (English)
Page 33
... the batteries matching correct polarity (+with +,-with new ones. UP/DOWN Installing Batteries I Install two 1.5V AAA batteries. WATCHING TV / CHANNEL CONTROL THUMBSTICK Navigate the on-screen menus and adjust the system settings to your preference. (Up/Down/Left Right/ENTER) RETURN Allows the user to the next one. UP/DOWN PAGE... appears at the screen. Don't mix old or used batteries with -). I Close cover. 31 SIMPLINK See a list of screen information to move return one full set images and sounds when connecting AV devices. When you select and...
... the batteries matching correct polarity (+with +,-with new ones. UP/DOWN Installing Batteries I Install two 1.5V AAA batteries. WATCHING TV / CHANNEL CONTROL THUMBSTICK Navigate the on-screen menus and adjust the system settings to your preference. (Up/Down/Left Right/ENTER) RETURN Allows the user to the next one. UP/DOWN PAGE... appears at the screen. Don't mix old or used batteries with -). I Close cover. 31 SIMPLINK See a list of screen information to move return one full set images and sounds when connecting AV devices. When you select and...
Owner's Manual (English)
Page 34
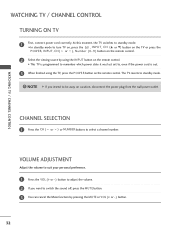
... to standby mode. ! I In standby mode to standby mode. I This TV is programmed to remember which power state it was last set to switch the sound off, press the MUTE button. 3 You can cancel the Mute function by using the TV, press the POWER button on the remote control. 2 Select the viewing... source by pressing the MUTE or VOL (+ or -) button. 32 At this moment, the TV switches to turn TV on, ...
... to standby mode. ! I In standby mode to standby mode. I This TV is programmed to remember which power state it was last set to switch the sound off, press the MUTE button. 3 You can cancel the Mute function by using the TV, press the POWER button on the remote control. 2 Select the viewing... source by pressing the MUTE or VOL (+ or -) button. 32 At this moment, the TV switches to turn TV on, ...
Owner's Manual (English)
Page 35
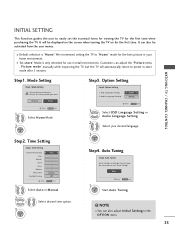
...desired language. 3 ENTER Step4. Mode Setting ! NOTE I You can also be displayed on the screen when turning the TV on for the first time when purchasing the TV. Mode Setting Step1. Selecting the environment. Time Setting Step2. OSD Language Setting 2. I Default selection is only ...e". Picture mode" manually while inspecting the TV, but the TV will be activated from the user menus. Choose the setting mode you want . In Store Home Enter RETURN Exit 1 Select H ome Mode. 2 ENTER Step2. Time Setting Current Time Setting Year Month Date Hour Minute Time Zone ...
...desired language. 3 ENTER Step4. Mode Setting ! NOTE I You can also be displayed on the screen when turning the TV on for the first time when purchasing the TV. Mode Setting Step1. Selecting the environment. Time Setting Step2. OSD Language Setting 2. I Default selection is only ...e". Picture mode" manually while inspecting the TV, but the TV will be activated from the user menus. Choose the setting mode you want . In Store Home Enter RETURN Exit 1 Select H ome Mode. 2 ENTER Step2. Time Setting Current Time Setting Year Month Date Hour Minute Time Zone ...
Owner's Manual (English)
Page 37
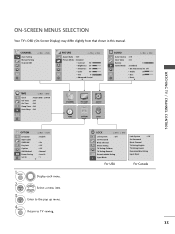
... Edit Move Enter PICTURE Move Aspect Ratio : 16:9 Picture Mode : Standard • Contrast 90 • Brightness 50 • Sharpness 60 • Color 60 • Tint 0R • Advanced Control E Enter G AUDIO Move Enter Auto Volume : Off Clear Voice : On Balance 0L R... menu. 4 MENU Return to TV viewing. LOCK Move Enter Lock System : Off Set Password Block Channel Movie Rating TV Rating-Children TV Rating-General Downloadable Rating Input Block Lock System : Off Set Password Block Channel TV Rating-English TV Rating-French Downloadable Rating Input Block...
... Edit Move Enter PICTURE Move Aspect Ratio : 16:9 Picture Mode : Standard • Contrast 90 • Brightness 50 • Sharpness 60 • Color 60 • Tint 0R • Advanced Control E Enter G AUDIO Move Enter Auto Volume : Off Clear Voice : On Balance 0L R... menu. 4 MENU Return to TV viewing. LOCK Move Enter Lock System : Off Set Password Block Channel Movie Rating TV Rating-Children TV Rating-General Downloadable Rating Input Block Lock System : Off Set Password Block Channel TV Rating-English TV Rating-French Downloadable Rating Input Block...
Owner's Manual (English)
Page 41
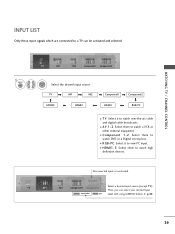
... T V). Then, you can be activated and selected. 1 INPUT TV AV1 AV2 Component1 Component2 ENTER Select the desired input source. WATCHING TV / CHANNEL CONTROL INPUT LIST Only these input signals which are connected to a TV can select your desired Input Q.MENU Input Label RETURN Exit Label with... using Q.MENU button. I AV 1-2: Select them to watch a VCR or other external equipment. I HDMI1-3: Select them to watch DVD or a Digital set-top box. Disconnected input is...
... T V). Then, you can be activated and selected. 1 INPUT TV AV1 AV2 Component1 Component2 ENTER Select the desired input source. WATCHING TV / CHANNEL CONTROL INPUT LIST Only these input signals which are connected to a TV can select your desired Input Q.MENU Input Label RETURN Exit Label with... using Q.MENU button. I AV 1-2: Select them to watch a VCR or other external equipment. I HDMI1-3: Select them to watch DVD or a Digital set-top box. Disconnected input is...
Owner's Manual (English)
Page 42
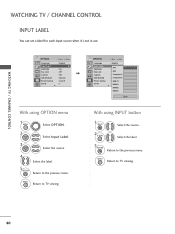
... Input Label. MENU Return to the previous menu. WATCHING TV / CHANNEL CONTROL WATCHING TV / CHANNEL CONTROL INPUT LABEL You can set a label for each input source when it's not in use. MENU Select the label. 3 RETURN Return to TV viewing. Select the source. 4 Select the label. 5... RETURN Return to TV viewing. 40 OPTION Move Enter Language Input Label SIMPLINK Key Lock Caption ISM Method Power Saving Set ID E : English : On : Off : Off : Normal : ...
... Input Label. MENU Return to the previous menu. WATCHING TV / CHANNEL CONTROL WATCHING TV / CHANNEL CONTROL INPUT LABEL You can set a label for each input source when it's not in use. MENU Select the label. 3 RETURN Return to TV viewing. Select the source. 4 Select the label. 5... RETURN Return to TV viewing. 40 OPTION Move Enter Language Input Label SIMPLINK Key Lock Caption ISM Method Power Saving Set ID E : English : On : Off : Off : Normal : ...

Owner's Manual (English)
Page 44
... Lock Caption ISM Method Power Saving Set ID E : English : On : Off : Off : Normal : Level 0 : 1 OPTION Move Enter Language Input Label SIMPLINK Key Lock Caption ISM Method Power Saving Set ID E : English : On Off : Off On : Off : Normal : Level 0 : 1 WATCHING TV / CHANNEL CONTROL 1 MENU Select... OPTION. 2 ENTER Select SIMPLINK. 3 ENTER Select O n or O f f. 4 RETURN Return to TV viewing. ! NOTE G Connect the HDMI/DVI...
... Lock Caption ISM Method Power Saving Set ID E : English : On : Off : Off : Normal : Level 0 : 1 OPTION Move Enter Language Input Label SIMPLINK Key Lock Caption ISM Method Power Saving Set ID E : English : On Off : Off On : Off : Normal : Level 0 : 1 WATCHING TV / CHANNEL CONTROL 1 MENU Select... OPTION. 2 ENTER Select SIMPLINK. 3 ENTER Select O n or O f f. 4 RETURN Return to TV viewing. ! NOTE G Connect the HDMI/DVI...


