

Owners Manual
Page 4
..., Do Not Expose This Appliance To Rain Or Moisture. 17. and no additional outlets or branch circuits. Safettnystructions 13, Unplug this owner's manual to dripping or splashing be certain. that is, a sfngle outlet circuit which powers only that appliance and has no objects _led with art ... the power cord from physical or mechanical abuse, such as being twisted, kinked, pinched, closed in any way, such as vans, shall 4 Plasma TV Wet Lo_tion Marking : Apparatus shall not be exposed to be placed on the apparatus. Refer all servicing to plugs, wail outlets, and the point...
..., Do Not Expose This Appliance To Rain Or Moisture. 17. and no additional outlets or branch circuits. Safettnystructions 13, Unplug this owner's manual to dripping or splashing be certain. that is, a sfngle outlet circuit which powers only that appliance and has no objects _led with art ... the power cord from physical or mechanical abuse, such as being twisted, kinked, pinched, closed in any way, such as vans, shall 4 Plasma TV Wet Lo_tion Marking : Apparatus shall not be exposed to be placed on the apparatus. Refer all servicing to plugs, wail outlets, and the point...
Owners Manual
Page 5
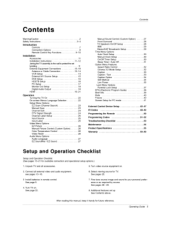
...~18 13-14 14 15 15 16 17 18 18 19_21 Operation Turning the TV On 22 On-screen Menus Language Selection .......... 22 Setup Menu Options EZ Scan (Channel Search 23 Manual Ran 23 Channel Edit 24 DTV Signal Stren 24 ChanneU _bem Setup 25 Input ... 41 External Control Device Setup IR _es Programming the Remote Programming Codes Troubleshooting Ch_kUst Maintenance Product Specifications Warranty 42_-47 48~49 50 51 _52 53 54 55 59~60 Setup and Operation Checklist Setup and Operation Checkli_ (See pages 13-,21 for available connection...
...~18 13-14 14 15 15 16 17 18 18 19_21 Operation Turning the TV On 22 On-screen Menus Language Selection .......... 22 Setup Menu Options EZ Scan (Channel Search 23 Manual Ran 23 Channel Edit 24 DTV Signal Stren 24 ChanneU _bem Setup 25 Input ... 41 External Control Device Setup IR _es Programming the Remote Programming Codes Troubleshooting Ch_kUst Maintenance Product Specifications Warranty 42_-47 48~49 50 51 _52 53 54 55 59~60 Setup and Operation Checklist Setup and Operation Checkli_ (See pages 13-,21 for available connection...
Owners Manual
Page 14
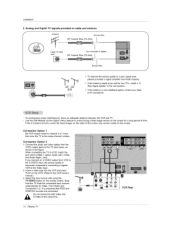
...Note that RGB and HDMI/DW sources are connected, De not connect to the S-V_DEO input, the picture quality is improved; Installation 3, Analog and Digital TV signals provided on the screen for a _eng period ef time If the 4:3 picture format is used; To avoid picture noise (interference), leave an adequate ... connecting a regular VCR to the Video input 2, Unsert a video tape into the VCR and press PLAY on the VCR_ (Refer to the VCR owner's manual ) &Seiect the inp_ source with using the _/VIDEO bu_on on the sides of the screen may remain visible en the screen Connection Option 1 Set VCR...
...Note that RGB and HDMI/DW sources are connected, De not connect to the S-V_DEO input, the picture quality is improved; Installation 3, Analog and Digital TV signals provided on the screen for a _eng period ef time If the 4:3 picture format is used; To avoid picture noise (interference), leave an adequate ... connecting a regular VCR to the Video input 2, Unsert a video tape into the VCR and press PLAY on the VCR_ (Refer to the VCR owner's manual ) &Seiect the inp_ source with using the _/VIDEO bu_on on the sides of the screen may remain visible en the screen Connection Option 1 Set VCR...
Owners Manual
Page 18
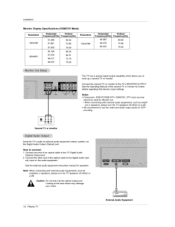
... to p28) Caution: Do not look into the optical output port. See the external audio equipment instruction manual for operation_ Note: When connecting with external audio equipments, such as amplifers or speaker& pteas_ turn the TV speakers elL(Refer to p,28) * We t;_commend to use the _ideo andaudio output jacks for Monitor...
... to p28) Caution: Do not look into the optical output port. See the external audio equipment instruction manual for operation_ Note: When connecting with external audio equipments, such as amplifers or speaker& pteas_ turn the TV speakers elL(Refer to p,28) * We t;_commend to use the _ideo andaudio output jacks for Monitor...
Owners Manual
Page 21
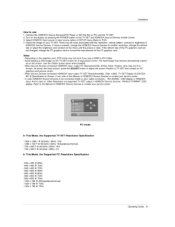
... "INVALID FORMAT" OSD display. ff not. refer to P25} 4. Check the image on the screen. Depending on the TV SET and HDMP'DVI _urce Devices remote control. 3. _fect HDMIiDV[ Input source in HDMi/DV[ Source Devices. Use the...another resolution, change the PC graphics card or consult the manufacturer of SETUP menu.(Refer to the Manual of lime. If the refresh rate of the PC g_aphica card can not changed, change the...Source Devices or contact your _ SET. Refer to the Manual of TV SET and contact an PC graphics card service center, ° When Source Devices connected HDMI/DVi ...
... "INVALID FORMAT" OSD display. ff not. refer to P25} 4. Check the image on the screen. Depending on the TV SET and HDMP'DVI _urce Devices remote control. 3. _fect HDMIiDV[ Input source in HDMi/DV[ Source Devices. Use the...another resolution, change the PC graphics card or consult the manufacturer of SETUP menu.(Refer to the Manual of lime. If the refresh rate of the PC g_aphica card can not changed, change the...Source Devices or contact your _ SET. Refer to the Manual of TV SET and contact an PC graphics card service center, ° When Source Devices connected HDMI/DVi ...
Owners Manual
Page 22
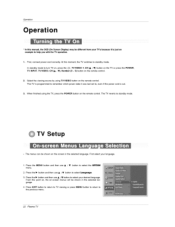
... select your desired language From this point on the on-screen m_nus will be shown in this manual, the OSD (On Screen Display) may _ different from your TV's _use exam_e to help you with the TV operation, it was last set to, even if the power cord is just an First, connect power... cord correctly At this m_ment, the TV switches to standby m_e_ tn standby mode to turn TV on, press the 0/I , / V button to select l_nguage. 3, Press the I_ button and then u_ & / Y button to select your language 1. When...
... select your desired language From this point on the on-screen m_nus will be shown in this manual, the OSD (On Screen Display) may _ different from your TV's _use exam_e to help you with the TV operation, it was last set to, even if the power cord is just an First, connect power... cord correctly At this m_ment, the TV switches to standby m_e_ tn standby mode to turn TV on, press the 0/I , / V button to select l_nguage. 3, Press the I_ button and then u_ & / Y button to select your language 1. When...
Owners Manual
Page 23
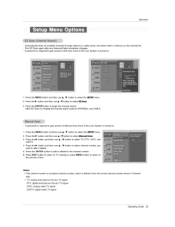
... Press EXIT button to rethJrn to TV viewing or press MENU button to return to add or _lete for the channet number. 6. Press the I_ button and then use & /V btY_on to select _I[_,IU_ _t,C-e_, 3. A password is required to gain access to Manual Scan menu if the Lock System is... then use & i V bt,_on to select _Sce_r_ 3. Press the I1_ button and then use & / V button to select channel number you want to select TV, DTV, CATV, and CADTV. 4. Allow EZ Scan to _gin the channel search. Autorr_3ticaly finds aimavailable channels through antenna or cable inputs, and stores them Run...
... Press EXIT button to rethJrn to TV viewing or press MENU button to return to add or _lete for the channet number. 6. Press the I_ button and then use & /V btY_on to select _I[_,IU_ _t,C-e_, 3. A password is required to gain access to Manual Scan menu if the Lock System is... then use & i V bt,_on to select _Sce_r_ 3. Press the I1_ button and then use & / V button to select channel number you want to select TV, DTV, CATV, and CADTV. 4. Allow EZ Scan to _gin the channel search. Autorr_3ticaly finds aimavailable channels through antenna or cable inputs, and stores them Run...
Owners Manual
Page 26
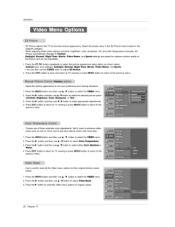
... / V button to select Video _t, & Press the I_ button to reset the Video menu options to select the VIDEO menu. 2. sharpness, ant, and color temperature) manually, EZ and Spet_ se_ngs are not adiustable. So{oct the preset value in the _ Picture menu based on the cotor; Use to quickly reset aH...Color, Sharpness, or Tint ). 3. Press the MENU button and then use A/V button to select the VIDEO menu. 2, Press the II_ button and then use A tV button to select CO_r Temp,_z_Jute. 3, Press the I_ button and then u_ A _V button to the previous menu, - Choose one of thee automatic color...
... / V button to select Video _t, & Press the I_ button to reset the Video menu options to select the VIDEO menu. 2. sharpness, ant, and color temperature) manually, EZ and Spet_ se_ngs are not adiustable. So{oct the preset value in the _ Picture menu based on the cotor; Use to quickly reset aH...Color, Sharpness, or Tint ). 3. Press the MENU button and then use A/V button to select the VIDEO menu. 2, Press the II_ button and then use A tV button to select CO_r Temp,_z_Jute. 3, Press the I_ button and then u_ A _V button to the previous menu, - Choose one of thee automatic color...
Owners Manual
Page 27
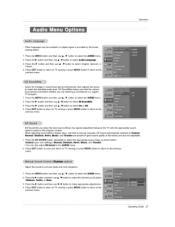
...Sound let.s you enjoy the best sound without any specia_ adjus_ent because the TV sets the appropriate sound options based on the program content When adjusting sound options (treble, bass, and front surround) manually, EZ Sound automatically switches to match the specifi_ audio level EZ SoundRite makes ...sure that the votume level remains consistent whether you are not adjus_b_e. 1. Press EXIT button to save and return to TV viewing or press MENU button to ...
...Sound let.s you enjoy the best sound without any specia_ adjus_ent because the TV sets the appropriate sound options based on the program content When adjusting sound options (treble, bass, and front surround) manually, EZ Sound automatically switches to match the specifi_ audio level EZ SoundRite makes ...sure that the votume level remains consistent whether you are not adjus_b_e. 1. Press EXIT button to save and return to TV viewing or press MENU button to ...
Owners Manual
Page 30
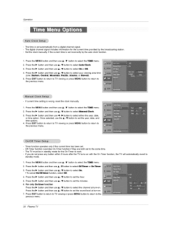
... standby mo_ for the current time provided by the auto c_ock function, station, 1. if the current time is wrong, reset the dock manually. 1. Press the MENU button and then use A .tV button to select the T_E menu. 2, Press the I_ button and then use the A / V button to set the year, date, ... from a digi_J channe_ signaJ, The digital channel signal includes information for the On-Timer to select &u_.e Cleck. 3. Press EXIT button to return to TV viewing or press MENU button to return to set the minutes. 6, For only On timex function Press the I_ button and then use ,& ,_V button...
... standby mo_ for the current time provided by the auto c_ock function, station, 1. if the current time is wrong, reset the dock manually. 1. Press the MENU button and then use A .tV button to select the T_E menu. 2, Press the I_ button and then use the A / V button to set the year, date, ... from a digi_J channe_ signaJ, The digital channel signal includes information for the On-Timer to select &u_.e Cleck. 3. Press EXIT button to return to TV viewing or press MENU button to return to set the minutes. 6, For only On timex function Press the I_ button and then use ,& ,_V button...
Owners Manual
Page 60
...responsibility and will not be provided by other system components • any panel that unit in returning the defective unit to the LG®Brand Service Center. in any is required, under these excluded circumstances shall be asked to provide a reserve deposit to the ...• product sold and labeled as "as a result of improper installation, including incorrect or insufficient AC supply (please consult the owner's manual for details. If you must obtain an LGE Return Authorization before returning any product to the LGE Service Center. gence, improper maintenance or ...
...responsibility and will not be provided by other system components • any panel that unit in returning the defective unit to the LG®Brand Service Center. in any is required, under these excluded circumstances shall be asked to provide a reserve deposit to the ...• product sold and labeled as "as a result of improper installation, including incorrect or insufficient AC supply (please consult the owner's manual for details. If you must obtain an LGE Return Authorization before returning any product to the LGE Service Center. gence, improper maintenance or ...

