
Specification (English)
Page 2
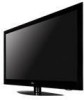
... x 11.3" TV without notice. RGB 60p A/V Input Navigation • Input Labeling • Quick View (Previous Channel) • Quick Setup Guide • e-Manual • Parental Control w/V-Chip • Key Lock • Closed Caption • LG SimpLink (HDMI... LG Corp. HDMI 60p/30p/24p - All other trademarks are approximate. © 2009 LG Electronics U.S.A., Inc., Englewood Cliffs, NJ. PLASMA TV 50PS80 50" Broadband Full HD 1080p Plasma TV (50.0" diagonal) LGusa.com PLASMA SPECIFICATION Screen Size 50" Class (50...
... x 11.3" TV without notice. RGB 60p A/V Input Navigation • Input Labeling • Quick View (Previous Channel) • Quick Setup Guide • e-Manual • Parental Control w/V-Chip • Key Lock • Closed Caption • LG SimpLink (HDMI... LG Corp. HDMI 60p/30p/24p - All other trademarks are approximate. © 2009 LG Electronics U.S.A., Inc., Englewood Cliffs, NJ. PLASMA TV 50PS80 50" Broadband Full HD 1080p Plasma TV (50.0" diagonal) LGusa.com PLASMA SPECIFICATION Screen Size 50" Class (50...
Owner's Manual (English)
Page 1
...LG Customer Information Center Yahoo Support http://connectedtv.yahoo.com/help Netflix Support http://www.netflix.com/tvhelp YouTube Support http://www.youtube.com/t/contact_us Vudu Support http://www.vudu.com/support P/NO : SAC33601909 (0909-REV01) www.lgusa.com Record it for future reference. LCD TV PLASMA TV OWNER'S MANUAL LCD TV MODELS 42LH50 47LH50 55LH50 PLASMA TV... MODELS 50PS80 60PS80 Please read this manual carefully before operating your set and retain it ...
...LG Customer Information Center Yahoo Support http://connectedtv.yahoo.com/help Netflix Support http://www.netflix.com/tvhelp YouTube Support http://www.youtube.com/t/contact_us Vudu Support http://www.vudu.com/support P/NO : SAC33601909 (0909-REV01) www.lgusa.com Record it for future reference. LCD TV PLASMA TV OWNER'S MANUAL LCD TV MODELS 42LH50 47LH50 55LH50 PLASMA TV... MODELS 50PS80 60PS80 Please read this manual carefully before operating your set and retain it ...
Owner's Manual (English)
Page 4
...replaced with something. 14 CAUTION concerning the Power Cord: It is not disconnected from physical or mechanical abuse, such as this owner's manual to be connected to rain, moisture or other liquids. Do not install this apparatus or antenna during a thunder or lighting storm. ...Pay particular attention to telephone wires, lightening rods, or gas pipes. If grounding methods are dangerous. Do not touch the TV with a three-prong grounded AC plug must remain readily operable. 19 As long as being twisted, kinked, pinched, closed in electric shock...
...replaced with something. 14 CAUTION concerning the Power Cord: It is not disconnected from physical or mechanical abuse, such as this owner's manual to be connected to rain, moisture or other liquids. Do not install this apparatus or antenna during a thunder or lighting storm. ...Pay particular attention to telephone wires, lightening rods, or gas pipes. If grounding methods are dangerous. Do not touch the TV with a three-prong grounded AC plug must remain readily operable. 19 As long as being twisted, kinked, pinched, closed in electric shock...
Owner's Manual (English)
Page 6
...Setup 45 WATCHING TV / CHANNEL CONTROL Remote Control Functions 48 Turning On the TV 50 Channel Selection 50 Volume Adjustment 50 Initial Setting 51 On-Screen Menus Selection 53 Quick Menu 54 Channel Setup 6 - TV Widgets 70 ...Netflix 78 My Media 90 YouTube 108 NETCAST Time-Out Setting 111 Vudu 112 PICTURE CONTROL Picture Size (Aspect Ratio) Control 128 Picture Wizard 130 Preset Picture Settings (Picture Mode 132 Manual...
...Setup 45 WATCHING TV / CHANNEL CONTROL Remote Control Functions 48 Turning On the TV 50 Channel Selection 50 Volume Adjustment 50 Initial Setting 51 On-Screen Menus Selection 53 Quick Menu 54 Channel Setup 6 - TV Widgets 70 ...Netflix 78 My Media 90 YouTube 108 NETCAST Time-Out Setting 111 Vudu 112 PICTURE CONTROL Picture Size (Aspect Ratio) Control 128 Picture Wizard 130 Preset Picture Settings (Picture Mode 132 Manual...
Owner's Manual (English)
Page 7
... Analog Broadcasting System Captions 154 - Auto Clock Setup 157 Manual Clock Setup 158 Auto On/Off Time Setting 159 Sleep Timer Setting 160 PARENTAL CONTROL / RATINGS Set Password & Lock System 161 Channel Blocking 164 Movie & TV Rating 165 Downloadable Rating 168 External Input Blocking 169 APPENDIX ...Product Specifications 175 IR Codes 176 Open Source License 178 Legal Notice 192 7 User Mode 146 SRS Trusurround XT 147 Balance 148 TV Speakers On/Off Setup 149 Audio Reset 150 Stereo/SAP Broadcasts Setup 151 Audio Language 152 On-Screen Menus Language Selection 153 ...
... Analog Broadcasting System Captions 154 - Auto Clock Setup 157 Manual Clock Setup 158 Auto On/Off Time Setting 159 Sleep Timer Setting 160 PARENTAL CONTROL / RATINGS Set Password & Lock System 161 Channel Blocking 164 Movie & TV Rating 165 Downloadable Rating 168 External Input Blocking 169 APPENDIX ...Product Specifications 175 IR Codes 176 Open Source License 178 Legal Notice 192 7 User Mode 146 SRS Trusurround XT 147 Balance 148 TV Speakers On/Off Setup 149 Audio Reset 150 Stereo/SAP Broadcasts Setup 151 Audio Language 152 On-Screen Menus Language Selection 153 ...
Owner's Manual (English)
Page 9
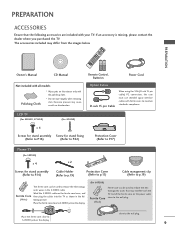
...NFUAMMV ACRKH P A G E WIDGETS ABC 7PQRS 5 JKL 3 DEF 8 6 LIST TUV 0 MNO 9 WXYZ RATIO FREEZE FLASHBK 1.5V 1.5V PREPARATION Owner's Manual CD Manual Not included with all models Polishing Cloth * Wipe spots on the ferrite core twice, and Ferrite Core then plug the cables into the...(For 42LH50) x 4 Screws for stand assembly Screw for stand fixing (Refer to P.16) (Refer to P.22) Protection Cover (Refer to P.17) Plasma TV (For 50PS80) x 4 x 2 Screws for stand assembly (Refer to P.14) Cable Holder (Refer to p.19) Protection Cover (Refer to p.15) Cable management clip...
...NFUAMMV ACRKH P A G E WIDGETS ABC 7PQRS 5 JKL 3 DEF 8 6 LIST TUV 0 MNO 9 WXYZ RATIO FREEZE FLASHBK 1.5V 1.5V PREPARATION Owner's Manual CD Manual Not included with all models Polishing Cloth * Wipe spots on the ferrite core twice, and Ferrite Core then plug the cables into the...(For 42LH50) x 4 Screws for stand assembly Screw for stand fixing (Refer to P.16) (Refer to P.22) Protection Cover (Refer to P.17) Plasma TV (For 50PS80) x 4 x 2 Screws for stand assembly (Refer to P.14) Cable Holder (Refer to p.19) Protection Cover (Refer to p.15) Cable management clip...
Owner's Manual (English)
Page 18
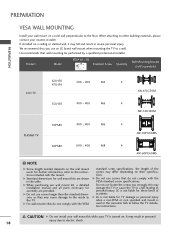
...to the TV. G When purchasing our wall mount kit, a detailed installation manual and all parts necessary for assembly are shown in the table. For further information, refer to personal injury. Do not use an LG brand wall mount when mounting the TV to electric shock. 18 LG is turned...400 * 400 M6 4 AW-47LG30M 4 AW-55LH40M PLASMA TV 50PS80 400 * 400 M6 4 AW-50PG60MS 60PS80 600 * 400 M8 4 AW-60PG60MS ! G Do not use screws that wall mounting be performed by a qualified professional installer. G LG is not liable for TV damage or personal injury when a non-VESA or non...
...to the TV. G When purchasing our wall mount kit, a detailed installation manual and all parts necessary for assembly are shown in the table. For further information, refer to personal injury. Do not use an LG brand wall mount when mounting the TV to electric shock. 18 LG is turned...400 * 400 M6 4 AW-47LG30M 4 AW-55LH40M PLASMA TV 50PS80 400 * 400 M6 4 AW-50PG60MS 60PS80 600 * 400 M8 4 AW-60PG60MS ! G Do not use screws that wall mounting be performed by a qualified professional installer. G LG is not liable for TV damage or personal injury when a non-VESA or non...

Owner's Manual (English)
Page 21
SWIVEL STAND After installing the TV, you can adjust the TV set manually to suit your TV. PREPARATION DESKTOP PEDESTAL INSTALLATION I Image shown may differ from the wall. 4 inches 4 inches 4 inches 4 inches CAUTION G Ensure adequate ventilation by 20 degrees to the left or right direction by following the clearance recommendations. For proper ventilation, allow a clearance of heat source. G Do not mount near or above any type of 4 inches on all four sides from your viewing position. 21
SWIVEL STAND After installing the TV, you can adjust the TV set manually to suit your TV. PREPARATION DESKTOP PEDESTAL INSTALLATION I Image shown may differ from the wall. 4 inches 4 inches 4 inches 4 inches CAUTION G Ensure adequate ventilation by 20 degrees to the left or right direction by following the clearance recommendations. For proper ventilation, allow a clearance of heat source. G Do not mount near or above any type of 4 inches on all four sides from your viewing position. 21
Owner's Manual (English)
Page 25
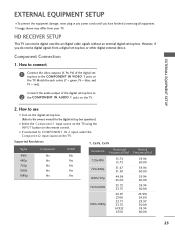
How to use I Turn on the digital set-top box. (Refer to the owner's manual for the digital set-top box operation.) I If connected to COMPONENT IN 2 input, select the Component2 input ...Yes Yes Yes Resolution Horizontal Frequency(KHz) 720x480i 720x480p 1280x720p 15.73 15.73 31.47 31.50 44.96 45.00 1920x1080i 33.72 33.75 1920x1080p 26.97 27.00 33.71 33.75 67.432 67...60.00 59.94 60.00 23.976 24.00 29.97 30.00 59.94 60.00 25 HD RECEIVER SETUP This TV can receive digital over-the-air/digital cable signals without an external digital set-top box. Match the jack colors (Y = green...
How to use I Turn on the digital set-top box. (Refer to the owner's manual for the digital set-top box operation.) I If connected to COMPONENT IN 2 input, select the Component2 input ...Yes Yes Yes Resolution Horizontal Frequency(KHz) 720x480i 720x480p 1280x720p 15.73 15.73 31.47 31.50 44.96 45.00 1920x1080i 33.72 33.75 1920x1080p 26.97 27.00 33.71 33.75 67.432 67...60.00 59.94 60.00 23.976 24.00 29.97 30.00 59.94 60.00 25 HD RECEIVER SETUP This TV can receive digital over-the-air/digital cable signals without an external digital set-top box. Match the jack colors (Y = green...

Owner's Manual (English)
Page 27
... case use I Turn on the digital set-top box. (Refer to the owner's manual for the digital set -top box to use the latest cables that support HDMI version ... Horizontal Vertical Frequency(KHz) Frequency(Hz) 720x480p 1280x720p 1920x1080i 1920x1080p 31.47 31.50 44.96 45.00 33.72 33.75 26.97 27.00 33.71 33.75 67.432 67...3 2 L R 1 EO AUDIO OMPONENT IN /DVI IN RGB IN (PC) AUDIO IN OPT A (RGB/DVI) AN SERVICE ONLY CA () 1 HDMI OUTPUT Plasma TV ( ) 3 2 1 AU (R OPTICAL DIGITAL /DVI IN AUDIO OUT RGB IN (PC) R AUDIO L(MONO) VIDEO S-VIDEO LAN SERVICE AV ONLY 1 HDMI OUTPUT...
... case use I Turn on the digital set-top box. (Refer to the owner's manual for the digital set -top box to use the latest cables that support HDMI version ... Horizontal Vertical Frequency(KHz) Frequency(Hz) 720x480p 1280x720p 1920x1080i 1920x1080p 31.47 31.50 44.96 45.00 33.72 33.75 26.97 27.00 33.71 33.75 67.432 67...3 2 L R 1 EO AUDIO OMPONENT IN /DVI IN RGB IN (PC) AUDIO IN OPT A (RGB/DVI) AN SERVICE ONLY CA () 1 HDMI OUTPUT Plasma TV ( ) 3 2 1 AU (R OPTICAL DIGITAL /DVI IN AUDIO OUT RGB IN (PC) R AUDIO L(MONO) VIDEO S-VIDEO LAN SERVICE AV ONLY 1 HDMI OUTPUT...
Owner's Manual (English)
Page 28
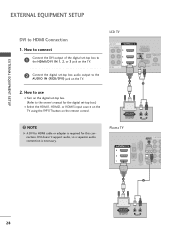
...3 2 L R 1 AUDIO NT IN () /DVI IN RGB IN (PC) AUDIO IN (RGB/DVI) OPTICAL DIGITA AUDIO OUT ANTENNA/ SERVICE ONLY CABLE IN 1 2 DVI OUTPUT L R AUDIO Plasma TV PR RGB IN (PC) R AUDIO L(MONO) VIDEO S-VIDEO OPTICAL DIGITAL /DVI IN AUDIO OUT 3 AUDIO IN COMPONENT (RGB/DVI) PB Y L 2 R 1 LAN SERVICE AV IN 1 1...Connect the DVI output of the digital set-top box to the HDMI/DVI IN 1, 2, or 3 jack on the TV. 2 Connect the digital set-top box audio output to the owner's manual for this connection. NOTE G A DVI to HDMI Connection 1. How to use I Select the HDMI1, HDMI2, or ...
...3 2 L R 1 AUDIO NT IN () /DVI IN RGB IN (PC) AUDIO IN (RGB/DVI) OPTICAL DIGITA AUDIO OUT ANTENNA/ SERVICE ONLY CABLE IN 1 2 DVI OUTPUT L R AUDIO Plasma TV PR RGB IN (PC) R AUDIO L(MONO) VIDEO S-VIDEO OPTICAL DIGITAL /DVI IN AUDIO OUT 3 AUDIO IN COMPONENT (RGB/DVI) PB Y L 2 R 1 LAN SERVICE AV IN 1 1...Connect the DVI output of the digital set-top box to the HDMI/DVI IN 1, 2, or 3 jack on the TV. 2 Connect the digital set-top box audio output to the owner's manual for this connection. NOTE G A DVI to HDMI Connection 1. How to use I Select the HDMI1, HDMI2, or ...
Owner's Manual (English)
Page 29
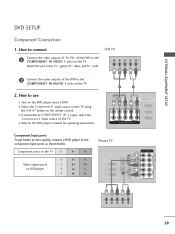
... video outputs (Y, PB, PR) of the DVD to COMPONENT IN 2 input, select the Component2 input source on the TV. Match the jack colors (Y = green, PB = blue, and PR = red). I Refer to the DVD player's manual for operating instructions. 1 2 AV IN 1 LAN VIDEO L(MONO) AUDIO R 3 2 2 L R 1 1 VIDEO ...get better picture quality, connect a DVD player to the COMPONENT IN VIDEO 1 jacks on the TV. I If connected to the COMPONENT IN AUDIO 1 jacks on DVD player Y PB PR Y B-Y R-Y Y Cb Cr Y Pb Pr Plasma TV ( ) AUDIO IN COMPONENT IN (RGB/DVI) Y VIDEO RGB IN (PC) R AUDIO ...
... video outputs (Y, PB, PR) of the DVD to COMPONENT IN 2 input, select the Component2 input source on the TV. Match the jack colors (Y = green, PB = blue, and PR = red). I Refer to the DVD player's manual for operating instructions. 1 2 AV IN 1 LAN VIDEO L(MONO) AUDIO R 3 2 2 L R 1 1 VIDEO ...get better picture quality, connect a DVD player to the COMPONENT IN VIDEO 1 jacks on the TV. I If connected to the COMPONENT IN AUDIO 1 jacks on DVD player Y PB PR Y B-Y R-Y Y Cb Cr Y Pb Pr Plasma TV ( ) AUDIO IN COMPONENT IN (RGB/DVI) Y VIDEO RGB IN (PC) R AUDIO ...
Owner's Manual (English)
Page 30
...VIDEO L R AUDIO Plasma TV AUDIO OUT ( ) AUDIO IN COMPONENT IN (RGB/DVI) L UT R Y VIDEO PB L PR RGB IN (PC) R AUDIO L(MONO) VIDEO S-VIDEO SERVICE AV IN 1 1 ONLY R L AUDIO REMOTE CONTROL IN ANTENNA/ CABLE IN 2 1 VIDEO L R AUDIO 30 () How to the DVD player's manual for operating instructions.... I Turn on the remote control. I Refer to use I Select the A V 1 or A V 2 input source on the TV using the INPUT button on the DVD player, insert a DVD. How to connect 1...
...VIDEO L R AUDIO Plasma TV AUDIO OUT ( ) AUDIO IN COMPONENT IN (RGB/DVI) L UT R Y VIDEO PB L PR RGB IN (PC) R AUDIO L(MONO) VIDEO S-VIDEO SERVICE AV IN 1 1 ONLY R L AUDIO REMOTE CONTROL IN ANTENNA/ CABLE IN 2 1 VIDEO L R AUDIO 30 () How to the DVD player's manual for operating instructions.... I Turn on the remote control. I Refer to use I Select the A V 1 or A V 2 input source on the TV using the INPUT button on the DVD player, insert a DVD. How to connect 1...

Owner's Manual (English)
Page 31
... to use I Turn on the DVD player, insert a DVD. How to the AUDIO input jacks on the remote control. () EXTERNAL EQUIPMENT SETUP S-Video Connection (For Plasma TV) 1. I Select the A V 1 input source on the TV using the INPUT button on the TV. () 2. I Refer to the DVD player's manual for operating instructions.
... to use I Turn on the DVD player, insert a DVD. How to the AUDIO input jacks on the remote control. () EXTERNAL EQUIPMENT SETUP S-Video Connection (For Plasma TV) 1. I Select the A V 1 input source on the TV using the INPUT button on the TV. () 2. I Refer to the DVD player's manual for operating instructions.
Owner's Manual (English)
Page 32
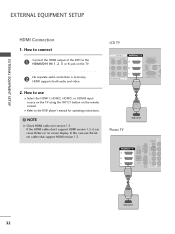
...AUDIO R 3 2 L R 1 O AUDIO MPONENT IN /DVI IN RGB IN (PC) AUDIO IN (RGB/DVI) OPTIC AU ANT SERVICE ONLY CAB () 1 HDMI OUTPUT Plasma TV RGB IN (PC) R AUDIO L(MONO) VIDEO S-VIDEO OPTICAL DIGITAL /DVI IN AUDIO OUT 3 AUDIO IN COM (RGB/DVI) 2 1 LAN SERVICE AV IN 1 1 ONLY...version 1.3, it can cause flickers or no screen display. () EXTERNAL EQUIPMENT SETUP EXTERNAL EQUIPMENT SETUP HDMI Connection 1. How to the DVD player's manual for operating instructions. ! I Refer to use the latest cables that support HDMI version 1.3. HDMI supports both audio and video. 2. NOTE ...
...AUDIO R 3 2 L R 1 O AUDIO MPONENT IN /DVI IN RGB IN (PC) AUDIO IN (RGB/DVI) OPTIC AU ANT SERVICE ONLY CAB () 1 HDMI OUTPUT Plasma TV RGB IN (PC) R AUDIO L(MONO) VIDEO S-VIDEO OPTICAL DIGITAL /DVI IN AUDIO OUT 3 AUDIO IN COM (RGB/DVI) 2 1 LAN SERVICE AV IN 1 1 ONLY...version 1.3, it can cause flickers or no screen display. () EXTERNAL EQUIPMENT SETUP EXTERNAL EQUIPMENT SETUP HDMI Connection 1. How to the DVD player's manual for operating instructions. ! I Refer to use the latest cables that support HDMI version 1.3. HDMI supports both audio and video. 2. NOTE ...
Owner's Manual (English)
Page 33
.../DVI) 1 2 Connect the antenna cable to the same channel number. I Set VCR output switch to 3 or 4 and then tune TV to the RF antenna in socket of the ( ) VCR to the VCR owner's manual.) Plasma TV ANT OUT S-VIDEO VIDEO L R AUDIO ANT IN OUTPUT SWITCH Wall Jack 2 Antenna VIDEO L AUDIO O () REMOTE CONTROL IN 1 AUDIO...
.../DVI) 1 2 Connect the antenna cable to the same channel number. I Set VCR output switch to 3 or 4 and then tune TV to the RF antenna in socket of the ( ) VCR to the VCR owner's manual.) Plasma TV ANT OUT S-VIDEO VIDEO L R AUDIO ANT IN OUTPUT SWITCH Wall Jack 2 Antenna VIDEO L AUDIO O () REMOTE CONTROL IN 1 AUDIO...
Owner's Manual (English)
Page 34
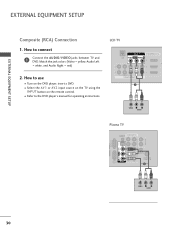
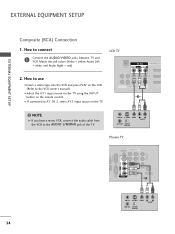
... AUDIO COMPONENT IN 1 ! ANT IN S-VIDEO VIDEO L R AUDIO ANT OUT OUTPUT SWITCH Plasma TV AUDIO OUT CAL TAL O OUT ( ) AUDIO IN COMPONENT IN (RGB/DVI) PB Y R...I Insert a video tape into the VCR and press PLAY on the VCR. (Refer to the VCR owner's manual.) I If connected to AV IN 2, select AV2 input source on the remote control. NOTE G If you have... a mono VCR, connect the audio cable from the VCR to connect LCD TV 1 Connect the AUDIO/VIDEO jacks between TV and VCR. EXTERNAL EQUIPMENT SETUP EXTERNAL EQUIPMENT SETUP Composite (RCA) Connection 1. Match the jack...
... AUDIO COMPONENT IN 1 ! ANT IN S-VIDEO VIDEO L R AUDIO ANT OUT OUTPUT SWITCH Plasma TV AUDIO OUT CAL TAL O OUT ( ) AUDIO IN COMPONENT IN (RGB/DVI) PB Y R...I Insert a video tape into the VCR and press PLAY on the VCR. (Refer to the VCR owner's manual.) I If connected to AV IN 2, select AV2 input source on the remote control. NOTE G If you have... a mono VCR, connect the audio cable from the VCR to connect LCD TV 1 Connect the AUDIO/VIDEO jacks between TV and VCR. EXTERNAL EQUIPMENT SETUP EXTERNAL EQUIPMENT SETUP Composite (RCA) Connection 1. Match the jack...

Owner's Manual (English)
Page 35
How to use I Insert a video tape into the VCR and press PLAY on the VCR. (Refer to the VCR owner's manual.) I Select the A V 1 input source on the TV using the INPUT button on the TV. () 2. AUDIO OUT R PTICAL IGITAL DIO OUT AUDIO IN COMPONENT IN (RGB/DVI) PB Y VIDEO L PR RGB IN (PC...not connect to the AUDIO input jacks on the remote control. EXTERNAL EQUIPMENT SETUP S-Video Connection (For Plasma TV) 1. How to connect 1 Connect the S-VIDEO output of the VCR to the S -VIDEO input on the TV. 2 Connect the audio outputs of the VCR to both Video and the S-Video cables, only the...
How to use I Insert a video tape into the VCR and press PLAY on the VCR. (Refer to the VCR owner's manual.) I Select the A V 1 input source on the TV using the INPUT button on the TV. () 2. AUDIO OUT R PTICAL IGITAL DIO OUT AUDIO IN COMPONENT IN (RGB/DVI) PB Y VIDEO L PR RGB IN (PC...not connect to the AUDIO input jacks on the remote control. EXTERNAL EQUIPMENT SETUP S-Video Connection (For Plasma TV) 1. How to connect 1 Connect the S-VIDEO output of the VCR to the S -VIDEO input on the TV. 2 Connect the audio outputs of the VCR to both Video and the S-Video cables, only the...

Owner's Manual (English)
Page 41
...RGB-PC, you can adjust the Position, S i z e or P h a s e. 41 PICTURE Move Enter E • Contrast 50 • Brightness 50 • Sharpness 50 • Color 50 • Tint 0R G • Advanced Control • Picture Reset Screen (RGB-PC) 1 MENU 2 ENTER 3 ENTER Select PICTURE.... After adjustment, if the image is still not correct, try using the manual settings or a different resolution...
...RGB-PC, you can adjust the Position, S i z e or P h a s e. 41 PICTURE Move Enter E • Contrast 50 • Brightness 50 • Sharpness 50 • Color 50 • Tint 0R G • Advanced Control • Picture Reset Screen (RGB-PC) 1 MENU 2 ENTER 3 ENTER Select PICTURE.... After adjustment, if the image is still not correct, try using the manual settings or a different resolution...

Owner's Manual (English)
Page 42
...prefer. Make appropriate adjustments. PICTURE Move Enter E • Contrast 50 • Brightness 50 • Sharpness 50 • Color 50 • Tint 0R G • Advanced Control • ...Picture Reset Screen (RGB-PC) 1 MENU 2 ENTER 3 ENTER 4 ENTER 5 ENTER Select PICTURE. Position Size Phase Reset Move Prev. Select Position, S i z e, or Phase. I S i z e: This function is not clear after auto adjustment and especially if characters are still trembling, adjust the picture phase manually...
...prefer. Make appropriate adjustments. PICTURE Move Enter E • Contrast 50 • Brightness 50 • Sharpness 50 • Color 50 • Tint 0R G • Advanced Control • ...Picture Reset Screen (RGB-PC) 1 MENU 2 ENTER 3 ENTER 4 ENTER 5 ENTER Select PICTURE. Position Size Phase Reset Move Prev. Select Position, S i z e, or Phase. I S i z e: This function is not clear after auto adjustment and especially if characters are still trembling, adjust the picture phase manually...


