
Specification (English)
Page 1
50PQ30 50" High Definition Plasma TV (50.0" diagonal) The PQ30 Series uses advanced panel technology such as 600Hz Sub Field Driving for superior performance in an HD resolution display. TV • 720p HD Resolution • 600Hz Sub Field Driving • 2,000,000:1 Dynamic Contrast Ratio • 1,500 cd.../m2 Brightness • Image Sticking Minimization • Dual XD® Engine • ISFccc® Ready • AV Mode II (Cinema, Sports, Game) • LG ...
50PQ30 50" High Definition Plasma TV (50.0" diagonal) The PQ30 Series uses advanced panel technology such as 600Hz Sub Field Driving for superior performance in an HD resolution display. TV • 720p HD Resolution • 600Hz Sub Field Driving • 2,000,000:1 Dynamic Contrast Ratio • 1,500 cd.../m2 Brightness • Image Sticking Minimization • Dual XD® Engine • ISFccc® Ready • AV Mode II (Cinema, Sports, Game) • LG ...

Owner's Manual (English)
Page 1
...: SAC33575901(0905-REV06) www.lgusa.com / www.lg.cwaw/ww.lgwuws.alg.comm/ ewrwciwa.l.lgco.cma Changing the factory default picture setting or enabling other features will be achieved. PLASMA TV OWNER'S MANUAL 42PQ20 50PQ20 42PQ30 50PQ30 42PQ31 50PQ31 42PQ60 50PQ60 50PS30 50PS60 60PS60 42PQ30C 50PQ30C ...50PS60C 60PS60C 50PS70 60PS70 50PS80 60PS80 Please read this is located on the back and one side of the TV is the setting in the "factory default (Home Use mode...
...: SAC33575901(0905-REV06) www.lgusa.com / www.lg.cwaw/ww.lgwuws.alg.comm/ ewrwciwa.l.lgco.cma Changing the factory default picture setting or enabling other features will be achieved. PLASMA TV OWNER'S MANUAL 42PQ20 50PQ20 42PQ30 50PQ30 42PQ31 50PQ31 42PQ60 50PQ60 50PS30 50PS60 60PS60 42PQ30C 50PQ30C ...50PS60C 60PS60C 50PS70 60PS70 50PS80 60PS80 Please read this is located on the back and one side of the TV is the setting in the "factory default (Home Use mode...

Owner's Manual (English)
Page 2
...may not cause (harmful) interference, and (2) this device must accept any way without written authorization from LG Electronics. Consult the dealer or an experienced radio/TV technician for a Class B digital device, pursuant to modify this equipment does cause harmful interference to an...Operation is subject to which can radiate radio frequency energy and, if not installed and used in a residential installation. NO USER SERVICEABLE PARTS INSIDE. NOTE TO CABLE/TV INSTALLER This reminder is connected. - These limits are designed to provide reasonable protection against...
...may not cause (harmful) interference, and (2) this device must accept any way without written authorization from LG Electronics. Consult the dealer or an experienced radio/TV technician for a Class B digital device, pursuant to modify this equipment does cause harmful interference to an...Operation is subject to which can radiate radio frequency energy and, if not installed and used in a residential installation. NO USER SERVICEABLE PARTS INSIDE. NOTE TO CABLE/TV INSTALLER This reminder is connected. - These limits are designed to provide reasonable protection against...

Owner's Manual (English)
Page 3
...any heat sources such as power- Servicing is required when the apparatus has been damaged in accordance with the manufacturer's instructions. 8 Use only with the apparatus. SAFETY INSTRUCTIONS IMPORTANT SAFETY INSTRUCTIONS Read these instructions. Install in any ventilation openings. When a cart is ...of time. 5 Do not defeat the safety purpose of the obsolete outlet. 10 Refer all warnings. supply cord or plug is used, use attachments/accessories specified by the manufacturer, or sold with the cart, stand, tripod, bracket, or table specified by the manufacturer....
...any heat sources such as power- Servicing is required when the apparatus has been damaged in accordance with the manufacturer's instructions. 8 Use only with the apparatus. SAFETY INSTRUCTIONS IMPORTANT SAFETY INSTRUCTIONS Read these instructions. Install in any ventilation openings. When a cart is ...of time. 5 Do not defeat the safety purpose of the obsolete outlet. 10 Refer all warnings. supply cord or plug is used, use attachments/accessories specified by the manufacturer, or sold with the cart, stand, tripod, bracket, or table specified by the manufacturer....

Owner's Manual (English)
Page 4
...circuit breaker. Pay particular attention to prevent possible electric shock (i.e. Do not make sure 12 not to install the TV by SWITCH" (Except 42/50PQ30C, 50/60PS60C) Do not use of your appliance, and if its appearance indicates damage or deterioration, unplug it is not disconnected from physical or mechanical...or splashing and do not expose this product near flammable objects such as this apparatus or antenna during a thunder or lighting storm. a TV with something. 14 CAUTION concerning the Power Cord: It is recommend that you turn off this unit by the hanging power and signal ...
...circuit breaker. Pay particular attention to prevent possible electric shock (i.e. Do not make sure 12 not to install the TV by SWITCH" (Except 42/50PQ30C, 50/60PS60C) Do not use of your appliance, and if its appearance indicates damage or deterioration, unplug it is not disconnected from physical or mechanical...or splashing and do not expose this product near flammable objects such as this apparatus or antenna during a thunder or lighting storm. a TV with something. 14 CAUTION concerning the Power Cord: It is recommend that you turn off this unit by the hanging power and signal ...
Owner's Manual (English)
Page 6
... Back Panel Information 10 Stand Instruction 11 Cable Management 12 Desktop Pedestal Installation 13 VESA Wall Mounting 13 Securing the TV to the wall to prevent falling when the TV is used on a stand 14 Swivel Stand 14 Antenna or Cable Connection 15 EXTERNAL EQUIPMENT SETUP HD Receiver Setup 16 DVD ... Channel Setup 43 Favorite Channel List 43 Brief Information 44 Input List 45 Input Label 46 AV Mode 47 SIMPLINK 48 USB Entry Modes 50 Photo List 51 Music List 55 Movie List 58 DivX Registration Code 62 Deactivation 63 PICTURE CONTROL Picture Size (Aspect Ratio) Control 64 ...
... Back Panel Information 10 Stand Instruction 11 Cable Management 12 Desktop Pedestal Installation 13 VESA Wall Mounting 13 Securing the TV to the wall to prevent falling when the TV is used on a stand 14 Swivel Stand 14 Antenna or Cable Connection 15 EXTERNAL EQUIPMENT SETUP HD Receiver Setup 16 DVD ... Channel Setup 43 Favorite Channel List 43 Brief Information 44 Input List 45 Input Label 46 AV Mode 47 SIMPLINK 48 USB Entry Modes 50 Photo List 51 Music List 55 Movie List 58 DivX Registration Code 62 Deactivation 63 PICTURE CONTROL Picture Size (Aspect Ratio) Control 64 ...
Owner's Manual (English)
Page 8
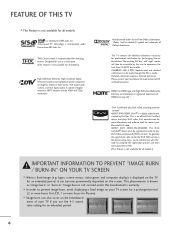
...day" and "night" modes will then be accessible by the user to experience the best their LG HDTV has to inquire about DivX VOD. (This feature is not available for all models.) IMPORTANT ... the DivX VOD section in order to complete the registration process and learn more hours for Plasma). ■ Image burn can be registered in the device setup menu. High-resolution digital ...incorporated under the manufacturer's warranty. ■ In order to play DivX Video-on your TV if you use in ." HDMI, the HDMI logo and High-Definition Multimedia Interface are trademarks of digital ...
...day" and "night" modes will then be accessible by the user to experience the best their LG HDTV has to inquire about DivX VOD. (This feature is not available for all models.) IMPORTANT ... the DivX VOD section in order to complete the registration process and learn more hours for Plasma). ■ Image burn can be registered in the device setup menu. High-resolution digital ...incorporated under the manufacturer's warranty. ■ In order to play DivX Video-on your TV if you use in ." HDMI, the HDMI logo and High-Definition Multimedia Interface are trademarks of digital ...
Owner's Manual (English)
Page 9
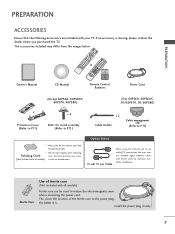
...) * Wipe spots on the exterior only with all models) Ferrite core can be used to the power plug, the better it is missing, please contact the dealer where you purchased the TV. If an accessory is . Install the power plug closely. 7 MESNTUB POWER MENU ENERGY..., 50/60PS80) or Protection Cover (Refer to P.11) x 4 Bolts for stand assembly (Refer to P.11) x 2 Cable Holder Cable management clip (Refer to maintain standards compliance. Ferrite Core Use of the ferrite core to reduce the electromagnetic wave when connecting the power cord. RETURN TV Q. Polishing Cloth *...
...) * Wipe spots on the exterior only with all models) Ferrite core can be used to the power plug, the better it is missing, please contact the dealer where you purchased the TV. If an accessory is . Install the power plug closely. 7 MESNTUB POWER MENU ENERGY..., 50/60PS80) or Protection Cover (Refer to P.11) x 4 Bolts for stand assembly (Refer to P.11) x 2 Cable Holder Cable management clip (Refer to maintain standards compliance. Ferrite Core Use of the ferrite core to reduce the electromagnetic wave when connecting the power cord. RETURN TV Q. Polishing Cloth *...
Owner's Manual (English)
Page 12
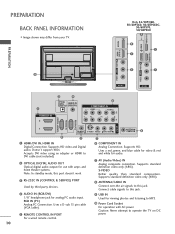
... and listening to this jack. 4 AUDIO IN (RGB/DVI) 1/8" headphone jack for audio. 7 AV (Audio/Video) IN Analog composite connection. Uses a red, green, and blue cable for video & red and white for analog PC audio input. RGB IN (PC) Analog PC Connection. Caution...'t work. 3 RS-232C IN (CONTROL & SERVICE) PORT Used by third party devices. 6 COMPONENT IN Analog Connection. Supports HD. PREPARATION BACK PANEL INFORMATION ■ Image shown may differ from your TV. USB IN R USB IN Only 42/50PQ60, 50/60PS60, 50/60PS60C, 50/60PS70, 50/60PS80 9 9 1 1 HDMI/DVI IN 4 HDMI/DVI ...
... and listening to this jack. 4 AUDIO IN (RGB/DVI) 1/8" headphone jack for audio. 7 AV (Audio/Video) IN Analog composite connection. Uses a red, green, and blue cable for video & red and white for analog PC audio input. RGB IN (PC) Analog PC Connection. Caution...'t work. 3 RS-232C IN (CONTROL & SERVICE) PORT Used by third party devices. 6 COMPONENT IN Analog Connection. Supports HD. PREPARATION BACK PANEL INFORMATION ■ Image shown may differ from your TV. USB IN R USB IN Only 42/50PQ60, 50/60PS60, 50/60PS60C, 50/60PS70, 50/60PS80 9 9 1 1 HDMI/DVI IN 4 HDMI/DVI ...
Owner's Manual (English)
Page 13
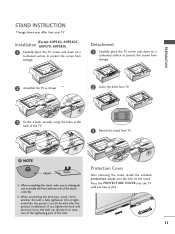
...FRONT G When assembling the stand, make sure to protect the screen from damage. 2 Assemble the TV as shown. 2 Loose the bolts from TV. 3 Fix the 4 bolts securely using the holes in the back of the TV. 3 Detach the stand from abrasion of the tightening part of the stand correctly. Press the ...PROTECTION COVER into the TV until you tighten the bolt with excessive force, the bolt can tilt...
...FRONT G When assembling the stand, make sure to protect the screen from damage. 2 Assemble the TV as shown. 2 Loose the bolts from TV. 3 Fix the 4 bolts securely using the holes in the back of the TV. 3 Detach the stand from abrasion of the tightening part of the stand correctly. Press the ...PROTECTION COVER into the TV until you tighten the bolt with excessive force, the bolt can tilt...
Owner's Manual (English)
Page 15
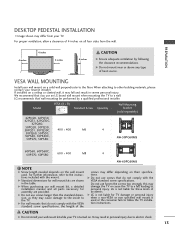
... installer. NOTE G Screw length needed depends on their specifications. G Do not use an LG brand wall mount when mounting the TV to a wall. It may cause damage to the inside to the TV. We recommend that do not comply with the VESA standard screw specifications. Model VESA...42PQ20, 42PQ30, 42PQ31, 42PQ30C, 42PQ60, 50PQ20, 50PQ30, 50PQ31, 50PQ30C, 400 * 400 M6 50PQ60, 50PS30, 50PS60, 50PS60C, 50PS70, 50PS80 4 AW-50PG60MS 60PS60, 60PS60C, 60PS70, 60PS80 600 * 400 M8 4 AW-60PG60MS ! G For wall mounts that you use screws longer then the standard dimension, as they...
... installer. NOTE G Screw length needed depends on their specifications. G Do not use an LG brand wall mount when mounting the TV to a wall. It may cause damage to the inside to the TV. We recommend that do not comply with the VESA standard screw specifications. Model VESA...42PQ20, 42PQ30, 42PQ31, 42PQ30C, 42PQ60, 50PQ20, 50PQ30, 50PQ31, 50PQ30C, 400 * 400 M6 50PQ60, 50PS30, 50PS60, 50PS60C, 50PS70, 50PS80 4 AW-50PG60MS 60PS60, 60PS60C, 60PS70, 60PS80 600 * 400 M8 4 AW-60PG60MS ! G For wall mounts that you use screws longer then the standard dimension, as they...
Owner's Manual (English)
Page 16
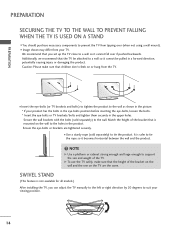
... cabinet strong enough and large enough to support the size and weight of the bracket on the wall and the one on the TV are tightened securely. ■ Use a sturdy rope (sold separately) to the wall. Secure the wall brackets with the bolts (sold separately) to tie the product. It... is mounted on or hang from your TV. PREPARATION PREPARATION SECURING THE TV TO THE WALL TO PREVENT FALLING WHEN THE TV IS USED ON A STAND ■ You should purchase necessary components to prevent the TV from tipping over if pushed backwards. Match the height of the bracket ...
... cabinet strong enough and large enough to support the size and weight of the bracket on the wall and the one on the TV are tightened securely. ■ Use a sturdy rope (sold separately) to the wall. Secure the wall brackets with the bolts (sold separately) to tie the product. It... is mounted on or hang from your TV. PREPARATION PREPARATION SECURING THE TV TO THE WALL TO PREVENT FALLING WHEN THE TV IS USED ON A STAND ■ You should purchase necessary components to prevent the TV from tipping over if pushed backwards. Match the height of the bracket ...
Owner's Manual (English)
Page 18
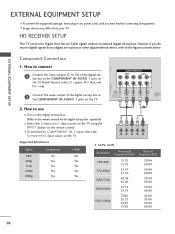
... Vertical Frequency(KHz) Frequency(Hz) 720x480i 720x480p 1280x720p 1920x1080i 1920x1080p 15.73 15.73 31.47 31.50 44.96 45.00 33.72 33.75 27.00 33.75 67.43 67.50 59.94 60.00 59.94 60.00 59.94 60.00 59.94 60.00 24.00... colors (Y = green, PB = blue, and PR = red). operation) ■ Select the Component1 input source on the TV using the INPUT button on the remote control. ■ If connected to the COMPONENT IN VIDEO 1 jacks on the TV. RGB IN (PC) EXTERNAL EQUIPMENT SETUP EXTERNAL EQUIPMENT SETUP ■ To prevent the equipment damage, never...
... Vertical Frequency(KHz) Frequency(Hz) 720x480i 720x480p 1280x720p 1920x1080i 1920x1080p 15.73 15.73 31.47 31.50 44.96 45.00 33.72 33.75 27.00 33.75 67.43 67.50 59.94 60.00 59.94 60.00 59.94 60.00 59.94 60.00 24.00... colors (Y = green, PB = blue, and PR = red). operation) ■ Select the Component1 input source on the TV using the INPUT button on the remote control. ■ If connected to the COMPONENT IN VIDEO 1 jacks on the TV. RGB IN (PC) EXTERNAL EQUIPMENT SETUP EXTERNAL EQUIPMENT SETUP ■ To prevent the equipment damage, never...
Owner's Manual (English)
Page 19
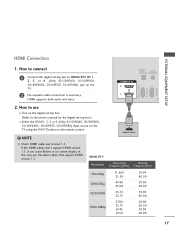
... for the digital set -top box to connect 1 Connect the digital set -top box.) ■ Select the HDMI1, 2, 3 or 4 (Only 42/50PQ60, 50/60PS60, 50/60PS60C, 50/60PS70, 50/60PS80) input source on the TV using the INPUT button on the TV. 2 No separate audio connection is necessary. How to HDMI/DVI IN 1, 2, 3 or 4 (Only 42/50PQ60...
... for the digital set -top box to connect 1 Connect the digital set -top box.) ■ Select the HDMI1, 2, 3 or 4 (Only 42/50PQ60, 50/60PS60, 50/60PS60C, 50/60PS70, 50/60PS80) input source on the TV using the INPUT button on the TV. 2 No separate audio connection is necessary. How to HDMI/DVI IN 1, 2, 3 or 4 (Only 42/50PQ60...
Owner's Manual (English)
Page 20
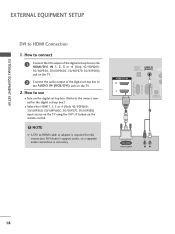
...output of the digital set -top box.) ■ Select the HDMI1, 2, 3 or 4 (Only 42/50PQ60, 50/60PS60, 50/60PS60C, 50/60PS70, 50/60PS80) input source on the TV using the INPUT button on the TV. 2. DVI doesn't support audio, so a separate audio connection is required for the digital set -top box to ...the AUDIO IN (RGB/DVI) jack on the remote control. ! How to use ■ Turn on the digital...
...output of the digital set -top box.) ■ Select the HDMI1, 2, 3 or 4 (Only 42/50PQ60, 50/60PS60, 50/60PS60C, 50/60PS70, 50/60PS80) input source on the TV using the INPUT button on the TV. 2. DVI doesn't support audio, so a separate audio connection is required for the digital set -top box to ...the AUDIO IN (RGB/DVI) jack on the remote control. ! How to use ■ Turn on the digital...
Owner's Manual (English)
Page 21
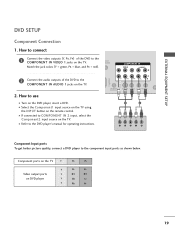
...picture quality, connect a DVD player to the DVD player's manual for operating instructions. How to use ■ Turn on the DVD player, insert a DVD. ■ Select the Component1 input source on the TV using the INPUT button on the remote control. ■ If connected to COMPONENT IN 2 input, select... the Component2 input source on the TV. Match the jack colors (Y = green, PB = blue, and PR = red). 2 ...
...picture quality, connect a DVD player to the DVD player's manual for operating instructions. How to use ■ Turn on the DVD player, insert a DVD. ■ Select the Component1 input source on the TV using the INPUT button on the remote control. ■ If connected to COMPONENT IN 2 input, select... the Component2 input source on the TV. Match the jack colors (Y = green, PB = blue, and PR = red). 2 ...
Owner's Manual (English)
Page 22
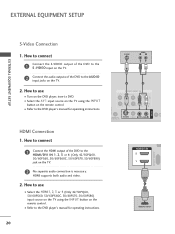
...; Select the HDMI1, 2, 3 or 4 (Only 42/50PQ60, 50/60PS60, 50/60PS60C, 50/60PS70, 50/60PS80) input source on the TV using the INPUT button on the remote control. ■ Refer to the DVD player's manual for operating instructions. RGB(PC) S-VIDEO AUDIO L R 1 2 COMPONENT IN ...1 1 HDMI-DVD OUTPUT 20 HDMI Connection 1. HDMI supports both audio and video. 2. How to use ■ Turn on the DVD player, insert a DVD. ■ Select the A V 1 input source on the TV using the INPUT button on the remote control. ■ Refer to the DVD player's manual for operating instructions...
...; Select the HDMI1, 2, 3 or 4 (Only 42/50PQ60, 50/60PS60, 50/60PS60C, 50/60PS70, 50/60PS80) input source on the TV using the INPUT button on the remote control. ■ Refer to the DVD player's manual for operating instructions. RGB(PC) S-VIDEO AUDIO L R 1 2 COMPONENT IN ...1 1 HDMI-DVD OUTPUT 20 HDMI Connection 1. HDMI supports both audio and video. 2. How to use ■ Turn on the DVD player, insert a DVD. ■ Select the A V 1 input source on the TV using the INPUT button on the remote control. ■ Refer to the DVD player's manual for operating instructions...
Owner's Manual (English)
Page 23
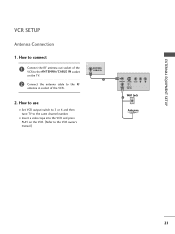
How to use ■ Set VCR output switch to 3 or 4 and then tune TV to the same channel number. ■ Insert a video tape into the VCR and press PLAY on the TV. 2 Connect the antenna cable to the RF antenna in socket of the VCR to the ANTENNA/CABLE IN socket on the VCR. (Refer to connect 1 Connect the RF antenna out socket of the VCR. 2. How to the VCR owner's manual.) ANTENNA/ CABLE IN 1 ANT OUT S-VIDEO VIDEO L R ANT IN OUTPUT SWITCH Wall Jack 2 Antenna 21 EXTERNAL EQUIPMENT SETUP AV IN 1 VCR SETUP Antenna Connection 1.
How to use ■ Set VCR output switch to 3 or 4 and then tune TV to the same channel number. ■ Insert a video tape into the VCR and press PLAY on the TV. 2 Connect the antenna cable to the RF antenna in socket of the VCR to the ANTENNA/CABLE IN socket on the VCR. (Refer to connect 1 Connect the RF antenna out socket of the VCR. 2. How to the VCR owner's manual.) ANTENNA/ CABLE IN 1 ANT OUT S-VIDEO VIDEO L R ANT IN OUTPUT SWITCH Wall Jack 2 Antenna 21 EXTERNAL EQUIPMENT SETUP AV IN 1 VCR SETUP Antenna Connection 1.
Owner's Manual (English)
Page 24
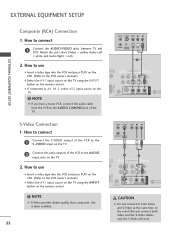
... PLAY on the VCR. (Refer to the VCR owner's manual.) UDIO IN GB/DVI) COMPONENT IN VIDEO AUDIO 2 ■ Select the A V 1 input source on the TV using the INPUT button on the remote control. 1 L R AV IN 1 RGB IN (PC) ■ If connected to the VCR owner's manual.) ■ Select the A V 1 ...input source on the TV using the INPUT button on the TV. ! How to use ■ Insert a video tape into the VCR and press PLAY on the VCR. (Refer to AV IN 2, select AV2 input source on...
... PLAY on the VCR. (Refer to the VCR owner's manual.) UDIO IN GB/DVI) COMPONENT IN VIDEO AUDIO 2 ■ Select the A V 1 input source on the TV using the INPUT button on the remote control. 1 L R AV IN 1 RGB IN (PC) ■ If connected to the VCR owner's manual.) ■ Select the A V 1 ...input source on the TV using the INPUT button on the TV. ! How to use ■ Insert a video tape into the VCR and press PLAY on the VCR. (Refer to AV IN 2, select AV2 input source on...
Owner's Manual (English)
Page 25
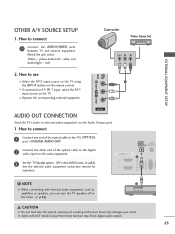
...the A V 1 input source on the audio equipment. 3 Set the "TV Speaker option - Looking at the laser beam may block digital audio output. 23 How to use ■ Select the A V 2 input source on the TV using 1 the INPUT button on the remote control. ■ If connected to the... digital audio input on the TV. ■ Operate the corresponding external equipment. Off" in the menu...
...the A V 1 input source on the audio equipment. 3 Set the "TV Speaker option - Looking at the laser beam may block digital audio output. 23 How to use ■ Select the A V 2 input source on the TV using 1 the INPUT button on the remote control. ■ If connected to the... digital audio input on the TV. ■ Operate the corresponding external equipment. Off" in the menu...


