
Owner's Manual (English)
Page 3
... fit into the apparatus, the apparatus has been exposed to avoid injury from tip-over. 4 Do not install near water. 2 Clean only with the cart, stand, tripod, bracket, or table specified by the manufacturer. 3 Do not block any heat sources such as power- supply cord or plug is required when the...
... fit into the apparatus, the apparatus has been exposed to avoid injury from tip-over. 4 Do not install near water. 2 Clean only with the cart, stand, tripod, bracket, or table specified by the manufacturer. 3 Do not block any heat sources such as power- supply cord or plug is required when the...
Owner's Manual (English)
Page 6
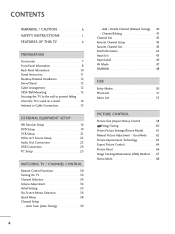
...Setup 43 Favorite Channel List 43 Brief Information 44 Input List 45 Input Label 46 AV Mode 47 SIMPLINK 48 USB Entry Modes 50 Photo List 51 Music List 55 PICTURE CONTROL Picture Size (Aspect Ratio) Control 58 Energy Saving 60 Preset Picture Settings(Picture ... - FEATURES OF THIS TV 6 PREPARATION Accessories 7 Front Panel Information 8 Back Panel Information 10 Stand Instruction 11 Desktop Pedestal Installation 12 Swivel Stand 12 Cable Arrangement 12 VESA Wall Mounting 13 Securing the TV to the wall to prevent falling when the TV is used on a stand 14 Antenna or Cable ...
...Setup 43 Favorite Channel List 43 Brief Information 44 Input List 45 Input Label 46 AV Mode 47 SIMPLINK 48 USB Entry Modes 50 Photo List 51 Music List 55 PICTURE CONTROL Picture Size (Aspect Ratio) Control 58 Energy Saving 60 Preset Picture Settings(Picture ... - FEATURES OF THIS TV 6 PREPARATION Accessories 7 Front Panel Information 8 Back Panel Information 10 Stand Instruction 11 Desktop Pedestal Installation 12 Swivel Stand 12 Cable Arrangement 12 VESA Wall Mounting 13 Securing the TV to the wall to prevent falling when the TV is used on a stand 14 Antenna or Cable ...

Owner's Manual (English)
Page 9
... ferrite core to the power plug, the better it is missing, please contact the dealer where you purchased the TV. MESNTUB POWER MENU INPUENTERGY SDAVVINDG ENTER FAVMARK AV MODE CH P A G E INFO 42/50PQ10 AV MODE 1CH P A G E 42 POWER POWERINSAPVINUGT 753 86 LIST 0 9 VOL MUTE FLASHBK 7 5 3 8 6 LIST 0 ...closely. 7 Excessive pressure may differ from the images below. The closer the location of ferrite core (This feature is not available for stand assembly (Except 60PS11) (Refer to P.11) x 2 Cable Holder (Refer to P.12) Ferrite core Cable management clip (Refer to...
... ferrite core to the power plug, the better it is missing, please contact the dealer where you purchased the TV. MESNTUB POWER MENU INPUENTERGY SDAVVINDG ENTER FAVMARK AV MODE CH P A G E INFO 42/50PQ10 AV MODE 1CH P A G E 42 POWER POWERINSAPVINUGT 753 86 LIST 0 9 VOL MUTE FLASHBK 7 5 3 8 6 LIST 0 ...closely. 7 Excessive pressure may differ from the images below. The closer the location of ferrite core (This feature is not available for stand assembly (Except 60PS11) (Refer to P.11) x 2 Cable Holder (Refer to P.12) Ferrite core Cable management clip (Refer to...
Owner's Manual (English)
Page 13
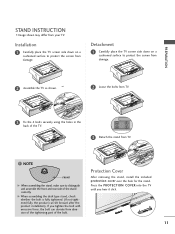
... surface to distinguish and assemble the front and rear side of the stand correctly. Protection Cover After removing the stand, install the included protection cover over the hole for the stand. Press the PROTECTION COVER into the TV until you tighten the bolt with excessive force, the bolt can tilt... cushioned surface to protect the screen from damage. 2 Assemble the TV as shown. 2 Loose the bolts from TV. 3 Fix the 4 bolts securely using the holes in the back of the bolt. NOTE FRONT G When assembling the stand, make sure to protect the screen from abrasion of the tightening ...
... surface to distinguish and assemble the front and rear side of the stand correctly. Protection Cover After removing the stand, install the included protection cover over the hole for the stand. Press the PROTECTION COVER into the TV until you tighten the bolt with excessive force, the bolt can tilt... cushioned surface to protect the screen from damage. 2 Assemble the TV as shown. 2 Loose the bolts from TV. 3 Fix the 4 bolts securely using the holes in the back of the bolt. NOTE FRONT G When assembling the stand, make sure to protect the screen from abrasion of the tightening ...
Owner's Manual (English)
Page 14
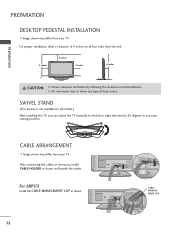
For 60PS11 Install the CABLE MANAGEMENT CLIP as shown and bundle the cables. SWIVEL STAND (This feature is not available for all four sides from the wall. 4 inches 4 inches 4 inches 4 inches CAUTION G Ensure adequate ventilation by 20 degrees ... the left or right direction by following the clearance recommendations. CABLE MANAGEMENT CLIP 12 PREPARATION PREPARATION DESKTOP PEDESTAL INSTALLATION I Image shown may differ from your TV. After connecting the cables as necessary, install CABLE HOLDER as shown. G Do not mount near or above any type of 4 inches on all ...
For 60PS11 Install the CABLE MANAGEMENT CLIP as shown and bundle the cables. SWIVEL STAND (This feature is not available for all four sides from the wall. 4 inches 4 inches 4 inches 4 inches CAUTION G Ensure adequate ventilation by 20 degrees ... the left or right direction by following the clearance recommendations. CABLE MANAGEMENT CLIP 12 PREPARATION PREPARATION DESKTOP PEDESTAL INSTALLATION I Image shown may differ from your TV. After connecting the cables as necessary, install CABLE HOLDER as shown. G Do not mount near or above any type of 4 inches on all ...
Owner's Manual (English)
Page 16
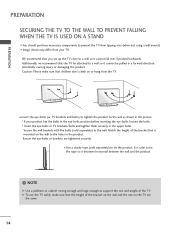
...it becomes horizontal between the wall and the product. ! PREPARATION PREPARATION SECURING THE TV TO THE WALL TO PREVENT FALLING WHEN THE TV IS USED ON A STAND I You should purchase necessary components to prevent the TV from your product has the bolts in the eye-bolts position before inserting the ...eye-bolts, loosen the bolts. * Insert the eye-bolts or TV brackets/bolts and tighten them securely...
...it becomes horizontal between the wall and the product. ! PREPARATION PREPARATION SECURING THE TV TO THE WALL TO PREVENT FALLING WHEN THE TV IS USED ON A STAND I You should purchase necessary components to prevent the TV from your product has the bolts in the eye-bolts position before inserting the ...eye-bolts, loosen the bolts. * Insert the eye-bolts or TV brackets/bolts and tighten them securely...
Owner's Manual (English)
Page 103
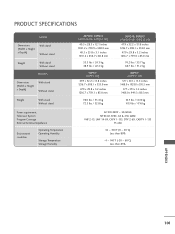
... x Depth) With stand Without stand Weight With stand Without stand MODELS Dimensions (Width x Height x Depth) With stand Without stand Weight With stand Without stand Power requirement Television System....0 mm 47.9 x 29.8 x 3.2 inches 1216.7 x 759.1 x 83.0 mm 78.0 lbs / 35.4 kg 72.3 lbs / 32.8 kg 50PQ10, 50PQ12 (50PQ10-UB, 50PQ12-UD) 47.9 x 32.2 x 13.8 inches 1216.7 x 818.1 x 353.0 mm 47.9 x 29.8 x 3.2 inches 1216.7 x...1468.0 x 949.5 x 88.5 mm 116.9 lbs / 53.06 kg 103.9 lbs / 47.16 kg AC100-240V ~ 50/60Hz NTSC-M, ATSC, 64 & 256 QAM VHF 2-13, UHF 14-69, CATV 1-135, DTV 2-69, CADTV 1-135 ...
... x Depth) With stand Without stand Weight With stand Without stand MODELS Dimensions (Width x Height x Depth) With stand Without stand Weight With stand Without stand Power requirement Television System....0 mm 47.9 x 29.8 x 3.2 inches 1216.7 x 759.1 x 83.0 mm 78.0 lbs / 35.4 kg 72.3 lbs / 32.8 kg 50PQ10, 50PQ12 (50PQ10-UB, 50PQ12-UD) 47.9 x 32.2 x 13.8 inches 1216.7 x 818.1 x 353.0 mm 47.9 x 29.8 x 3.2 inches 1216.7 x...1468.0 x 949.5 x 88.5 mm 116.9 lbs / 53.06 kg 103.9 lbs / 47.16 kg AC100-240V ~ 50/60Hz NTSC-M, ATSC, 64 & 256 QAM VHF 2-13, UHF 14-69, CATV 1-135, DTV 2-69, CADTV 1-135 ...


