Owner's Manual (English)
Page 6
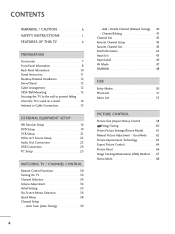
...Setup 19 VCR Setup 21 Other A/V Source Setup 23 Audio Out Connection 23 USB Connection 24 PC Setup 25 WATCHING TV / CHANNEL CONTROL Remote Control Functions 30 Turning On TV 34 Channel Selection 34 Volume Adjustment 34 Initial Setting 35 On-Screen Menus Selection 36 Quick Menu 38 Channel Setup ... Channel Setup 43 Favorite Channel List 43 Brief Information 44 Input List 45 Input Label 46 AV Mode 47 SIMPLINK 48 USB Entry Modes 50 Photo List 51 Music List 55 PICTURE CONTROL Picture Size (Aspect Ratio) Control 58 Energy Saving 60 Preset Picture Settings(Picture Mode 61 ...
...Setup 19 VCR Setup 21 Other A/V Source Setup 23 Audio Out Connection 23 USB Connection 24 PC Setup 25 WATCHING TV / CHANNEL CONTROL Remote Control Functions 30 Turning On TV 34 Channel Selection 34 Volume Adjustment 34 Initial Setting 35 On-Screen Menus Selection 36 Quick Menu 38 Channel Setup ... Channel Setup 43 Favorite Channel List 43 Brief Information 44 Input List 45 Input Label 46 AV Mode 47 SIMPLINK 48 USB Entry Modes 50 Photo List 51 Music List 55 PICTURE CONTROL Picture Size (Aspect Ratio) Control 58 Energy Saving 60 Preset Picture Settings(Picture Mode 61 ...
Owner's Manual (English)
Page 18
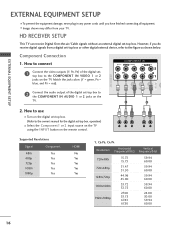
...EXTERNAL EQUIPMENT SETUP I To prevent the equipment damage, never plug in any power cords until you do receive digital signals from your TV. HD RECEIVER SETUP This TV can receive Digital Over-the-air/Cable signals without an external digital set -top box. I Image shown may differ from a ... TV. Y PB PR L R Supported Resolutions Signal 480i 480p 720p 1080i 1080p Component Yes Yes Yes Yes Yes HDMI No Yes Yes Yes Yes Y, CB/PB, CR/PR Resolution Horizontal Vertical Frequency(KHz) Frequency(Hz) 720x480i 720x480p 1280x720p 1920x1080i 1920x1080p 15.73 15.73 31.47 31.50 ...
...EXTERNAL EQUIPMENT SETUP I To prevent the equipment damage, never plug in any power cords until you do receive digital signals from your TV. HD RECEIVER SETUP This TV can receive Digital Over-the-air/Cable signals without an external digital set -top box. I Image shown may differ from a ... TV. Y PB PR L R Supported Resolutions Signal 480i 480p 720p 1080i 1080p Component Yes Yes Yes Yes Yes HDMI No Yes Yes Yes Yes Y, CB/PB, CR/PR Resolution Horizontal Vertical Frequency(KHz) Frequency(Hz) 720x480i 720x480p 1280x720p 1920x1080i 1920x1080p 15.73 15.73 31.47 31.50 ...
Owner's Manual (English)
Page 19
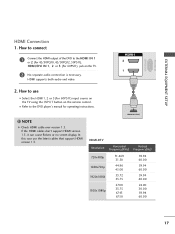
...KHz) Frequency(Hz) 720x480p 1280x720p 1920x1080i 1920x1080p 31.469 31.50 44.96 45.00 33.72 33.75 27.00 33.75 67.43 67.50 59.94 60.00 59.94 60.00 59.94 ...60.00 24.00 30.00 59.94 60.00 17 In this case use 1 I Refer to the HDMI IN 1 or 2 (For 42/50PQ10, 42/50PQ12, 50PS11...), HDMI/DVI IN 1, 2 or 3 (For 60PS11) jack on the remote control. EXTERNAL EQUIPMENT SETUP RS-232C IN (SERVICE ONLY) HDMI Connection 1. IN 2 1 2. I Select the HDMI1, 2 or 3(For 60PS11) input source on the TV using the INPUT button on the TV...
...KHz) Frequency(Hz) 720x480p 1280x720p 1920x1080i 1920x1080p 31.469 31.50 44.96 45.00 33.72 33.75 27.00 33.75 67.43 67.50 59.94 60.00 59.94 60.00 59.94 ...60.00 24.00 30.00 59.94 60.00 17 In this case use 1 I Refer to the HDMI IN 1 or 2 (For 42/50PQ10, 42/50PQ12, 50PS11...), HDMI/DVI IN 1, 2 or 3 (For 60PS11) jack on the remote control. EXTERNAL EQUIPMENT SETUP RS-232C IN (SERVICE ONLY) HDMI Connection 1. IN 2 1 2. I Select the HDMI1, 2 or 3(For 60PS11) input source on the TV using the INPUT button on the TV...
Owner's Manual (English)
Page 26
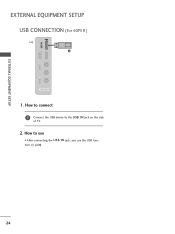
How to connect 1 Connect the USB device to use the USB function. (G p.50) 24 How to the USB I N jack, you use I After connecting the USB I N jack on the side of TV. 2. HDMI / DVI IN 3 USB IN VIDEO L/MONO AUDIO R EXTERNAL EQUIPMENT SETUP EXTERNAL EQUIPMENT SETUP USB CONNECTION (For 60PS11) i.e) 1 AV IN 2 1.
How to connect 1 Connect the USB device to use the USB function. (G p.50) 24 How to the USB I N jack, you use I After connecting the USB I N jack on the side of TV. 2. HDMI / DVI IN 3 USB IN VIDEO L/MONO AUDIO R EXTERNAL EQUIPMENT SETUP EXTERNAL EQUIPMENT SETUP USB CONNECTION (For 60PS11) i.e) 1 AV IN 2 1.
Owner's Manual (English)
Page 29
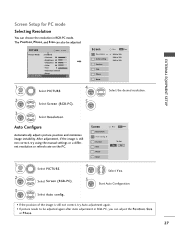
... Reset Move MENU Prev. 1024 x 768 1280 x 768 1360 x 768 1 MENU 2 ENTER Select PICTURE. PICTURE Move Enter E Picture Mode : Standard • Contrast 90 • Brightness 50 • Sharpness 60 • Color 60 • Tint 0R G • Advanced Control • Reset Screen (RGB-PC) Screen Resolution G Auto config. Select Screen (RGB-PC...
... Reset Move MENU Prev. 1024 x 768 1280 x 768 1360 x 768 1 MENU 2 ENTER Select PICTURE. PICTURE Move Enter E Picture Mode : Standard • Contrast 90 • Brightness 50 • Sharpness 60 • Color 60 • Tint 0R G • Advanced Control • Reset Screen (RGB-PC) Screen Resolution G Auto config. Select Screen (RGB-PC...
Owner's Manual (English)
Page 30
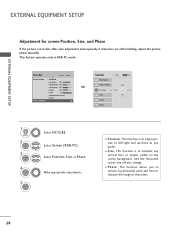
... to minimize any horizontal noise and clear or sharpen the image of characters. 28 PICTURE Move Enter E Picture Mode : Standard • Contrast 90 • Brightness 50 • Sharpness 60 • Color 60 • Tint 0R G • Advanced Control • Reset Screen (RGB-PC) Screen Resolution Auto config. Position G Size Phase Reset...
... to minimize any horizontal noise and clear or sharpen the image of characters. 28 PICTURE Move Enter E Picture Mode : Standard • Contrast 90 • Brightness 50 • Sharpness 60 • Color 60 • Tint 0R G • Advanced Control • Reset Screen (RGB-PC) Screen Resolution Auto config. Position G Size Phase Reset...
Owner's Manual (English)
Page 31
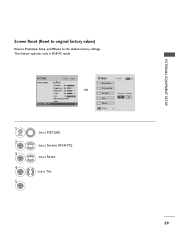
... (Reset to original factory values) Returns Position, S i z e, and Phase to the default factory settings. PICTURE Move Enter E Picture Mode : Standard • Contrast 90 • Brightness 50 • Sharpness 60 • Color 60 • Tint 0R G • Advanced Control • Reset Screen (RGB-PC) 1 MENU 2 ENTER 3 ENTER 4 ENTER 5 ENTER Select PICTURE. Select...
... (Reset to original factory values) Returns Position, S i z e, and Phase to the default factory settings. PICTURE Move Enter E Picture Mode : Standard • Contrast 90 • Brightness 50 • Sharpness 60 • Color 60 • Tint 0R G • Advanced Control • Reset Screen (RGB-PC) 1 MENU 2 ENTER 3 ENTER 4 ENTER 5 ENTER Select PICTURE. Select...
Owner's Manual (English)
Page 38
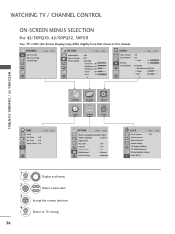
... Enter Lock System : Off Set Password Block Channel Movie Rating TV Rating-Children TV Rating-General Downloadable Rating Input Block WATCHING TV / CHANNEL CONTROL ON-SCREEN MENUS SELECTION For 42/50PQ10, 42/50PQ12, 50PS11 Your TV's OSD (On Screen Display) may differ slightly from that shown...Voice II : On • Level 0- + Balance 0L R Sound Mode : Standard • SRS TruSurround XT:Off • Treble 50 • Bass 50 E WATCHING TV / CHANNEL CONTROL TIME Clock Off Time : Off On Time : Off Sleep Timer : Off Move Enter CHANNEL PICTURE AUDIO TIME OPTION ...
... Enter Lock System : Off Set Password Block Channel Movie Rating TV Rating-Children TV Rating-General Downloadable Rating Input Block WATCHING TV / CHANNEL CONTROL ON-SCREEN MENUS SELECTION For 42/50PQ10, 42/50PQ12, 50PS11 Your TV's OSD (On Screen Display) may differ slightly from that shown...Voice II : On • Level 0- + Balance 0L R Sound Mode : Standard • SRS TruSurround XT:Off • Treble 50 • Bass 50 E WATCHING TV / CHANNEL CONTROL TIME Clock Off Time : Off On Time : Off Sleep Timer : Off Move Enter CHANNEL PICTURE AUDIO TIME OPTION ...
Owner's Manual (English)
Page 39
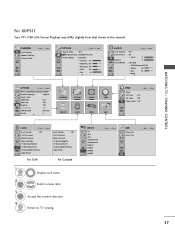
... Move Enter PICTURE Move Aspect Ratio : 16:9 Energy Saving : Intelligent Sensor Picture Mode : Standard • Contrast 90 • Brightness 50 • Sharpness 60 • Color 60 • Tint 0R E Enter G AUDIO Auto Volume Clear Voice II Balance Sound Mode Move Enter... : Off : On • Level 0- + 0L R : Standard • SRS TruSurround XT:Off • Treble 50 • Bass 50 • Reset E WATCHING TV / CHANNEL CONTROL OPTION Move Enter Menu Language(Language): English Audio Language : English Input Label SIMPLINK : On Key Lock : Off...
... Move Enter PICTURE Move Aspect Ratio : 16:9 Energy Saving : Intelligent Sensor Picture Mode : Standard • Contrast 90 • Brightness 50 • Sharpness 60 • Color 60 • Tint 0R E Enter G AUDIO Auto Volume Clear Voice II Balance Sound Mode Move Enter... : Off : On • Level 0- + 0L R : Standard • SRS TruSurround XT:Off • Treble 50 • Bass 50 • Reset E WATCHING TV / CHANNEL CONTROL OPTION Move Enter Menu Language(Language): English Audio Language : English Input Label SIMPLINK : On Key Lock : Off...
Owner's Manual (English)
Page 52
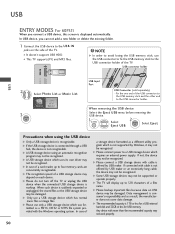
...when the connected USB storage device is suddenly separated or unplugged, the stored files or the USB storage device may not be damaged. G The TV will display up to four memory cards are concurrently recognizable. Any device with cable is consumer's responsibility and as a result, the manufacturer does... use the USB connector to fix the USB memory stick to the USB connector holder of a USB storage device may not work properly. 50 G The recommended capacity is displayed automatically. I It doesn't support USB HDD. G If the USB storage device is connected through a USB hub, the...
...when the connected USB storage device is suddenly separated or unplugged, the stored files or the USB storage device may not be damaged. G The TV will display up to four memory cards are concurrently recognizable. Any device with cable is consumer's responsibility and as a result, the manufacturer does... use the USB connector to fix the USB memory stick to the USB connector holder of a USB storage device may not work properly. 50 G The recommended capacity is displayed automatically. I It doesn't support USB HDD. G If the USB storage device is connected through a USB hub, the...

Owner's Manual (English)
Page 62
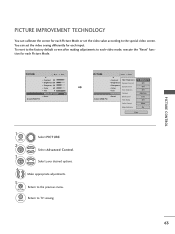
... Sensor? Return to TV viewing. Select Energy Saving. PICTURE CONTROL Return to the previous menu. PICTURE Move Enter Aspect Ratio : 16:9 Energy Saving : Intelligent Sensor Picture Mode : Standard • Contrast 90 • Brightness 50 • Sharpness 60... default factory setting complies with the Energy Star requirements and is disabled in "Picture Mode-Cinema". PICTURE CONTROL ENERGY SAVING For 60PS11 It reduces the TV's power consumption. Select Off, Minimum, Medium or M a x i m u m. This feature is adjusted to the comfortable level to the surrounding...
... Sensor? Return to TV viewing. Select Energy Saving. PICTURE CONTROL Return to the previous menu. PICTURE Move Enter Aspect Ratio : 16:9 Energy Saving : Intelligent Sensor Picture Mode : Standard • Contrast 90 • Brightness 50 • Sharpness 60... default factory setting complies with the Energy Star requirements and is disabled in "Picture Mode-Cinema". PICTURE CONTROL ENERGY SAVING For 60PS11 It reduces the TV's power consumption. Select Off, Minimum, Medium or M a x i m u m. This feature is adjusted to the comfortable level to the surrounding...
Owner's Manual (English)
Page 64
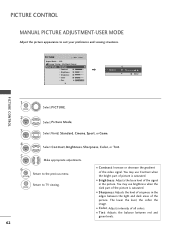
... level, the softer the image. I Sharpness: Adjusts the level of crispness in the picture. Select Picture Mode. RETURN Return to TV viewing. You may use brightness when the dark part of the video signal. I Color: Adjusts intensity of the signal in the ...edges between red and green levels. PICTURE Move Enter Aspect Ratio : 16:9 Energy Saving : Intelligent Sensor Picture Mode : Standard • Contrast 90 • Brightness 50 • Sharpness 60 • Color 60 • Tint 0R G E E • Contrast 80 E Enter E E PICTURE CONTROL 1 MENU 2 ENTER 3 ENTER...
... level, the softer the image. I Sharpness: Adjusts the level of crispness in the picture. Select Picture Mode. RETURN Return to TV viewing. You may use brightness when the dark part of the video signal. I Color: Adjusts intensity of the signal in the ...edges between red and green levels. PICTURE Move Enter Aspect Ratio : 16:9 Energy Saving : Intelligent Sensor Picture Mode : Standard • Contrast 90 • Brightness 50 • Sharpness 60 • Color 60 • Tint 0R G E E • Contrast 80 E Enter E E PICTURE CONTROL 1 MENU 2 ENTER 3 ENTER...
Owner's Manual (English)
Page 65
You can calibrate the screen for each Picture Mode. Select your desired options. 4 Make appropriate adjustments. 5 Return to TV viewing. MENU 63 PICTURE Move Enter E • Contrast 90 • Brightness 50 • Sharpness 60 • Color 60 • Tint 0R G • Advanced Control • Reset Screen (RGB-PC) PICTURE Move Enter E Screen (RGB...
You can calibrate the screen for each Picture Mode. Select your desired options. 4 Make appropriate adjustments. 5 Return to TV viewing. MENU 63 PICTURE Move Enter E • Contrast 90 • Brightness 50 • Sharpness 60 • Color 60 • Tint 0R G • Advanced Control • Reset Screen (RGB-PC) PICTURE Move Enter E Screen (RGB...
Owner's Manual (English)
Page 66
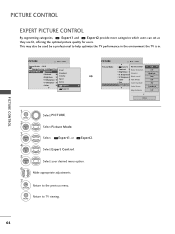
... Contrast • Brightness Standard 80 Cinema 50 • H Sharpness 50 Sport • V Sharpness 50 Game • Color 50 R G Expert1 E Expert2 PICTURE Move Enter E Picture Mode : Expert2 Dynamic Contrast • Contrast 50 Noise Reduction • Brightness 50 Gamma • H Sharpness50 • V Sharpness50Black Level • Color 50 Film Mode • Tint 0 R ... Expert2. 4 ENTER Select Expert Control. 5 ENTER Select your desired menu option. 6 Make appropriate adjustments. 7 Return to TV viewing. This may also be used be a professional to help optimize the...
... Contrast • Brightness Standard 80 Cinema 50 • H Sharpness 50 Sport • V Sharpness 50 Game • Color 50 R G Expert1 E Expert2 PICTURE Move Enter E Picture Mode : Expert2 Dynamic Contrast • Contrast 50 Noise Reduction • Brightness 50 Gamma • H Sharpness50 • V Sharpness50Black Level • Color 50 Film Mode • Tint 0 R ... Expert2. 4 ENTER Select Expert Control. 5 ENTER Select your desired menu option. 6 Make appropriate adjustments. 7 Return to TV viewing. This may also be used be a professional to help optimize the...
Owner's Manual (English)
Page 67
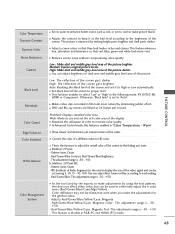
.../Cyan, Magenta. - High: Make dark and middle gray level area of the screen to High or Low automatically. Otherwise, 'Black level' is -50 - +50. Red/Green/Blue Contrast, Red/Green/Blue Brightness: The adjustment range is improved by making bright parts brighter and dark parts darker. b. I As ...the tool used to the brightness of the picture brighter. The picture is -50 - +50. I DVD and Blu-ray movies are filmed at the best level according to selectively adjust the 6 color areas (Red/Green/Blue/Cyan/Mgt/...
.../Cyan, Magenta. - High: Make dark and middle gray level area of the screen to High or Low automatically. Otherwise, 'Black level' is -50 - +50. Red/Green/Blue Contrast, Red/Green/Blue Brightness: The adjustment range is improved by making bright parts brighter and dark parts darker. b. I As ...the tool used to the brightness of the picture brighter. The picture is -50 - +50. I DVD and Blu-ray movies are filmed at the best level according to selectively adjust the 6 color areas (Red/Green/Blue/Cyan/Mgt/...
Owner's Manual (English)
Page 68
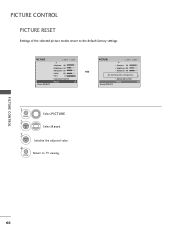
...8226; Color 60 • Tint 0R G • Advanced Control • Reset Screen (RGB-PC) PICTURE Move Enter E • Contrast 90 • Brightness 50 • Sharpness 60 • Color 60 i Resett•inTginvitdeo config0uraRtion... Select Reset. 3 ENTER Initialize the adjusted value. 4 MENU Return to the default factory ...settings. PICTURE CONTROL 66 PICTURE CONTROL PICTURE RESET Settings of the selected picture modes return to TV viewing. G • Advanced Control • Reset Screen (RGB-PC) 1 MENU 2 ENTER Select PICTURE.
...8226; Color 60 • Tint 0R G • Advanced Control • Reset Screen (RGB-PC) PICTURE Move Enter E • Contrast 90 • Brightness 50 • Sharpness 60 • Color 60 i Resett•inTginvitdeo config0uraRtion... Select Reset. 3 ENTER Initialize the adjusted value. 4 MENU Return to the default factory ...settings. PICTURE CONTROL 66 PICTURE CONTROL PICTURE RESET Settings of the selected picture modes return to TV viewing. G • Advanced Control • Reset Screen (RGB-PC) 1 MENU 2 ENTER Select PICTURE.

Owner's Manual (English)
Page 71
... conditions, volume adjustment may be needed every time the channel is changed. Select Auto Volume. 3 ENTER Select O n or O f f. 4 Return to TV viewing. AUDIO Move Enter Auto Volume : Off Clear Voice II : On • Level 0- + Balance 0L R Sound Mode : Standard • SRS ...Clear Voice II : On On • Level 0- + Balance 0L R Sound Mode : Standard • SRS TruSurround XT:Off • Treble 50 • Bass 50 E 1 MENU 2 ENTER Select AUDIO. MENU SOUND & LANGUAGE CONTROL 69 RETURN Return to the previous menu. Because each program. SOUND & LANGUAGE ...
... conditions, volume adjustment may be needed every time the channel is changed. Select Auto Volume. 3 ENTER Select O n or O f f. 4 Return to TV viewing. AUDIO Move Enter Auto Volume : Off Clear Voice II : On • Level 0- + Balance 0L R Sound Mode : Standard • SRS ...Clear Voice II : On On • Level 0- + Balance 0L R Sound Mode : Standard • SRS TruSurround XT:Off • Treble 50 • Bass 50 E 1 MENU 2 ENTER Select AUDIO. MENU SOUND & LANGUAGE CONTROL 69 RETURN Return to the previous menu. Because each program. SOUND & LANGUAGE ...

Owner's Manual (English)
Page 72
...Off Clear Voice II : On • Level 0- + Balance 0L R Sound Mode : Standard • SRS TruSurround XT:Off • Treble 50 • Bass 50 E AUDIO Move Enter Auto Volume : Off Off Clear Voice II : On • Level 0On L R Balance 0L R Sound Mode : Standard ...; Bass 50 E 1 MENU 2 ENTER 3 ENTER Select AUDIO. E Adjustment for Clear Voice II Level With selecting On 4 ENTER Select Level. 5 ENTER Make appropriate adjustments. 6 Return to TV viewing. Select Clear Voice II. MENU Level 0 - + Close E SOUND & LANGUAGE CONTROL 70 Select O n or O f f. I ...
...Off Clear Voice II : On • Level 0- + Balance 0L R Sound Mode : Standard • SRS TruSurround XT:Off • Treble 50 • Bass 50 E AUDIO Move Enter Auto Volume : Off Off Clear Voice II : On • Level 0On L R Balance 0L R Sound Mode : Standard ...; Bass 50 E 1 MENU 2 ENTER 3 ENTER Select AUDIO. E Adjustment for Clear Voice II Level With selecting On 4 ENTER Select Level. 5 ENTER Make appropriate adjustments. 6 Return to TV viewing. Select Clear Voice II. MENU Level 0 - + Close E SOUND & LANGUAGE CONTROL 70 Select O n or O f f. I ...

Owner's Manual (English)
Page 74
... Voice II : On • Level 0- + Balance 0L R Sound Mode : Standard SRS TruSurround XT Off • SRS TruSurround TXrTe:bOlfef 50 • Treble 50 Bass 50 • Bass 50 E Close E 5 ENTER Make appropriate adjustments. 6 Return to TV viewing. Select SRS TruSurround XT. 3 ENTER Select O n or O f f. 4 Return to sound realistic. 1 MENU 2 ENTER Select AUDIO. Select Sound Mode...
... Voice II : On • Level 0- + Balance 0L R Sound Mode : Standard SRS TruSurround XT Off • SRS TruSurround TXrTe:bOlfef 50 • Treble 50 Bass 50 • Bass 50 E Close E 5 ENTER Make appropriate adjustments. 6 Return to TV viewing. Select SRS TruSurround XT. 3 ENTER Select O n or O f f. 4 Return to sound realistic. 1 MENU 2 ENTER Select AUDIO. Select Sound Mode...

Owner's Manual (English)
Page 75
... Off Clear Voice II : On • Level 0- + Balance 0L R Sound Mode : Standard • SRS TruSurround XT:Off • Treble 50 • Bass 50 E AUDIO Move Enter Auto Volume : Off Clear Voice II : On Balance • Level 0Balance 0 L R L R 0 Sound Mode : ...Standard Close • SRS TruSurround XT:Off • Treble 50 • Bass 50 E 1 MENU 2 ENTER 3 ENTER Select AUDIO. Make appropriate adjustments. 4 Return to TV viewing. E SOUND & LANGUAGE CONTROL E BALANCE Adjust the left/right sound of speaker to suit your taste ...
... Off Clear Voice II : On • Level 0- + Balance 0L R Sound Mode : Standard • SRS TruSurround XT:Off • Treble 50 • Bass 50 E AUDIO Move Enter Auto Volume : Off Clear Voice II : On Balance • Level 0Balance 0 L R L R 0 Sound Mode : ...Standard Close • SRS TruSurround XT:Off • Treble 50 • Bass 50 E 1 MENU 2 ENTER 3 ENTER Select AUDIO. Make appropriate adjustments. 4 Return to TV viewing. E SOUND & LANGUAGE CONTROL E BALANCE Adjust the left/right sound of speaker to suit your taste ...


