Owners Manual
Page 2
...can be determined by turning the equipment off and on a circuit different from that interference will not occur in a particular installation, if this product in any way without written authorization from LG Electronics. REFER TO... THE RISK OF FIRE AND ELECTRIC SHOCK, DO NOT EXPOSE THIS PRODUCT TO RAIN OR MOISTURE. 2 Plasma Monitor These limits are designed to persons. ,_ Timhepoerxtcalnatmoaptioenratinpgoinat nwdithminainatennaenqcueilate(sraelrvitcriinagn)gleinsistriunctteinodnesdintothealelrittertahteureusearcctoomthpeanpyriensgenctehe oafppli- Connect the equipment into ...
...can be determined by turning the equipment off and on a circuit different from that interference will not occur in a particular installation, if this product in any way without written authorization from LG Electronics. REFER TO... THE RISK OF FIRE AND ELECTRIC SHOCK, DO NOT EXPOSE THIS PRODUCT TO RAIN OR MOISTURE. 2 Plasma Monitor These limits are designed to persons. ,_ Timhepoerxtcalnatmoaptioenratinpgoinat nwdithminainatennaenqcueilate(sraelrvitcriinagn)gleinsistriunctteinodnesdintothealelrittertahteureusearcctoomthpeanpyriensgenctehe oafppli- Connect the equipment into ...
Owners Manual
Page 5
... / Cable TV Setup External AN Source Setup DVD Setup DTV Setup Monitor Output Setup PC Setup Basic Operation 11 12 12 13 13 14-15 Turning the monitor On 16 Volume Adjustment 16 On-screen Menus Language Selection ....... 16 On Screen Menus Selection and Adjustment ...17 Picture Adjustment APC (Auto Picture...
... / Cable TV Setup External AN Source Setup DVD Setup DTV Setup Monitor Output Setup PC Setup Basic Operation 11 12 12 13 13 14-15 Turning the monitor On 16 Volume Adjustment 16 On-screen Menus Language Selection ....... 16 On Screen Menus Selection and Adjustment ...17 Picture Adjustment APC (Auto Picture...
Owners Manual
Page 7
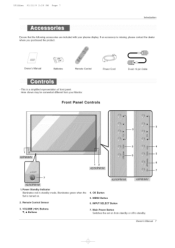
... Ensure that the following accessories are included with your Monitor. Front Panel Controls 12 7 1. Owner's Manual 7 Here shown may be somewhat different from standby or off to standby. Remote Control Sensor 4. VOLUME (_,_) Buttons T, A Buttons 7. If an accessory is turned on from your plasma display. iNPUT SELECT Button 3. OK Button 5. Main Power Button Switches... dealer where you purchased the product. ,/ Owner's Manual Batteries Remote Control Power Cord D-sub 15 pin Cable - MENU Button 6. This is a simplified representation of front panel.
... Ensure that the following accessories are included with your Monitor. Front Panel Controls 12 7 1. Owner's Manual 7 Here shown may be somewhat different from standby or off to standby. Remote Control Sensor 4. VOLUME (_,_) Buttons T, A Buttons 7. If an accessory is turned on from your plasma display. iNPUT SELECT Button 3. OK Button 5. Main Power Button Switches... dealer where you purchased the product. ,/ Owner's Manual Batteries Remote Control Power Cord D-sub 15 pin Cable - MENU Button 6. This is a simplified representation of front panel.

Owners Manual
Page 9
MULTIMEDIA Selects: RGB,HDMI and Component input sources. Brings up the main menu to the room. Not functional POWER Turns your selection or displays the current mode. Install two 1.5V AAA batteries. Owner's Manual 9 Under certain conditions such as necessary. MUTE Switches the sound on ...
MULTIMEDIA Selects: RGB,HDMI and Component input sources. Brings up the main menu to the room. Not functional POWER Turns your selection or displays the current mode. Install two 1.5V AAA batteries. Owner's Manual 9 Under certain conditions such as necessary. MUTE Switches the sound on ...
Owners Manual
Page 12
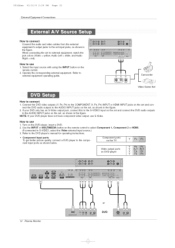
... the S-VIDEO input on the set and connect the DVD audio outputs to the AUDIO INPUT jacks on the set , as shown in the figure. Turn on the remote control. 2. Refer to use 1. Component input ports To get better picture quality, connect a DVD player to the component input ports as ... equipment, match the jack colors (Video = yellow, Audio Left = white, and Audio Right = red). Use the iNPUT or MULTIMEDIA button on DVD player 12 Plasma Monitor or DVD Component ports on the TV Video output ports on the remote control to select Component (If connected to the DVD player's manual...
... the S-VIDEO input on the set and connect the DVD audio outputs to the AUDIO INPUT jacks on the set , as shown in the figure. Turn on the remote control. 2. Refer to use 1. Component input ports To get better picture quality, connect a DVD player to the component input ports as ... equipment, match the jack colors (Video = yellow, Audio Left = white, and Audio Right = red). Use the iNPUT or MULTIMEDIA button on DVD player 12 Plasma Monitor or DVD Component ports on the TV Video output ports on the remote control to select Component (If connected to the DVD player's manual...

Owners Manual
Page 13
Turn on the remote control to the owner's manual for video connections, depending on your set . HOW to hook up a second set -top box connector. Signal ...
Turn on the remote control to the owner's manual for video connections, depending on your set . HOW to hook up a second set -top box connector. Signal ...

Owners Manual
Page 14
... Source Devices is clear. If the graphic card on the PC and the set 's RGB INPUT or HDMI/DVl (VIDEO) INPUT port for a long peri- Turn on the PC does not output analog and digital RGB simultaneously, connect only one of the PC graphic card. Notes: - Avoid keeping a fixed image on... that Video Resolution is in HDMI/DVI Source Devices, "Invalid Format" OSD display. Use the set . 2. Use iNPUT or MULTiMEDiA on your service center. 14 Plasma Monitor The fixed image may be changed, change the refresh rate to another rate or adjust the brightness and contrast on the ISM Method menu...
... Source Devices is clear. If the graphic card on the PC and the set 's RGB INPUT or HDMI/DVl (VIDEO) INPUT port for a long peri- Turn on the PC does not output analog and digital RGB simultaneously, connect only one of the PC graphic card. Notes: - Avoid keeping a fixed image on... that Video Resolution is in HDMI/DVI Source Devices, "Invalid Format" OSD display. Use the set . 2. Use iNPUT or MULTiMEDiA on your service center. 14 Plasma Monitor The fixed image may be changed, change the refresh rate to another rate or adjust the brightness and contrast on the ISM Method menu...

Owners Manual
Page 16
... the set or press the POWER, MULTIMEDIA, INPUT on the remote control and then the set . . First select your desired language. if the set was turned off , press the MUTE button. 3. Press the MENU button and then use _, / _" button to standby mode. 2. Press the VOL _/_ button to save. 16... Plasma Monitor Press the @ON/OFF (or @ / I ), INPUT SELECT button on the set or press the POWER, MULTIMEDIA, INPUT on the remote control and then the ...
... the set or press the POWER, MULTIMEDIA, INPUT on the remote control and then the set . . First select your desired language. if the set was turned off , press the MUTE button. 3. Press the MENU button and then use _, / _" button to standby mode. 2. Press the VOL _/_ button to save. 16... Plasma Monitor Press the @ON/OFF (or @ / I ), INPUT SELECT button on the set or press the POWER, MULTIMEDIA, INPUT on the remote control and then the ...

Owners Manual
Page 21
... to use _, / V button to save . Owner's Manual 21 even if you change channels. 1. Press the _ button and then use your external hi-fi stereo system, turn off the internal speakers of the set. 1. Press the ENTER button to select On or Off. 4. Press the MENU button and then use _, / V button to...
... to use _, / V button to save . Owner's Manual 21 even if you change channels. 1. Press the _ button and then use your external hi-fi stereo system, turn off the internal speakers of the set. 1. Press the ENTER button to select On or Off. 4. Press the MENU button and then use _, / V button to...

Owners Manual
Page 23
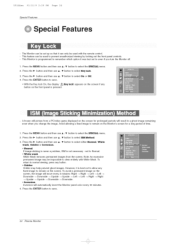
... selected. 3. Press the MENU button and then use _, / _" button to select Auto of_. 3. The Sleep -Iqmer turns the Monitor off , press the SLEEP button once. 4. When the number of minutes. First the O_f option appears on the... The timer begins to select O_f. To check the remaining minutes before the Monitor turns off at the preset time. U514Aen 81/11/9 2:28 PH Page 23 Time Setting If set to on... and there is turned off. 1. Press the _ button and then use _, / _" button to select the number of ...
... selected. 3. Press the MENU button and then use _, / _" button to select Auto of_. 3. The Sleep -Iqmer turns the Monitor off , press the SLEEP button once. 4. When the number of minutes. First the O_f option appears on the... The timer begins to select O_f. To check the remaining minutes before the Monitor turns off at the preset time. U514Aen 81/11/9 2:28 PH Page 23 Time Setting If set to on... and there is turned off. 1. Press the _ button and then use _, / _" button to select the number of ...
Owners Manual
Page 24
Press the ENTER button to save . 24 Plasma Monitor To return to normal viewing, press any button on the ... Left -_ Right -_ Right -_ Upside -_ Upside -_ Downside -_ Downside. * ][_version Inversion will result in a ghost image remaining even when you turn the Monitor off. 1. U514Aen 81/11/9 2:28 PH Page 24 Special Features pecial Features The Monitor can be set up so that it can be...button to save . * With the Key lock On, the display 'Z_ Key 1o¢k' appears on the front panel is best not to allow any fixed image to remain on the screen for a long period of time. 1, Press...
Press the ENTER button to save . 24 Plasma Monitor To return to normal viewing, press any button on the ... Left -_ Right -_ Right -_ Upside -_ Upside -_ Downside -_ Downside. * ][_version Inversion will result in a ghost image remaining even when you turn the Monitor off. 1. U514Aen 81/11/9 2:28 PH Page 24 Special Features pecial Features The Monitor can be set up so that it can be...button to save . * With the Key lock On, the display 'Z_ Key 1o¢k' appears on the front panel is best not to allow any fixed image to remain on the screen for a long period of time. 1, Press...
Owners Manual
Page 37
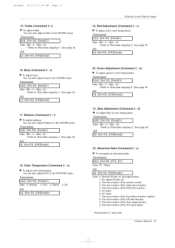
...monitor off by RS-232C function 5: 5V down 6: AC down 7: Turn the monitor off by Fan Alarm function (option) 8: Turn the monitor off by Off time function 9: Turn the monitor off by Auto sleep function a: Turn the monitor off by AV board detect * This function is "read ... 'Real data mapping 2'. You can also adjust bass in color temperature. See page 36. Transmission I[k][t][ ][Set IU][ ][Uata][Cr] I Data Min:O-Max:50 * Refer to 'Real data mapping 1'. Green Adjustment (Command 2 : w) To adjust green in color temperature. See page 36. Transmission [[k][r][ ][Set ID][...
...monitor off by RS-232C function 5: 5V down 6: AC down 7: Turn the monitor off by Fan Alarm function (option) 8: Turn the monitor off by Off time function 9: Turn the monitor off by Auto sleep function a: Turn the monitor off by AV board detect * This function is "read ... 'Real data mapping 2'. You can also adjust bass in color temperature. See page 36. Transmission I[k][t][ ][Set IU][ ][Uata][Cr] I Data Min:O-Max:50 * Refer to 'Real data mapping 1'. Green Adjustment (Command 2 : w) To adjust green in color temperature. See page 36. Transmission [[k][r][ ][Set ID][...

Owners Manual
Page 41
U514Aen 81/11/9 2:28 PH Page 41 Troubleshooti ng Checklist • Check whether the Monitor is turned on . Keep a sufficient distance between the Monitor and the VCR. • Activate any function to restore the brightness of . Adjust ...speakers ..' _i Z_ | oo IL-IlI,W.__U£_:!_,k .__U,_U|.IU... ,,o ,/llUHI • Achange n ambenthumdtyortemperature mayresut nan unusua nose ,ho oo,,o | when the plasma di..s...play is turned on or off and does not indicate a fault with correct polarity (+ to +,-to p.9) _!i _i_i i _I:I ii i _ _ , ! __l'|ccttu.urere aappppe.eaarrsos ...
U514Aen 81/11/9 2:28 PH Page 41 Troubleshooti ng Checklist • Check whether the Monitor is turned on . Keep a sufficient distance between the Monitor and the VCR. • Activate any function to restore the brightness of . Adjust ...speakers ..' _i Z_ | oo IL-IlI,W.__U£_:!_,k .__U,_U|.IU... ,,o ,/llUHI • Achange n ambenthumdtyortemperature mayresut nan unusua nose ,ho oo,,o | when the plasma di..s...play is turned on or off and does not indicate a fault with correct polarity (+ to +,-to p.9) _!i _i_i i _I:I ii i _ _ , ! __l'|ccttu.urere aappppe.eaarrsos ...

