
Owners Manual
Page 1
Retain it for future reference. Record model number and serial number of the Monitor and relate this owner's manual thoroughly before operating the Monitor. PLASMA MONITOR OWNER'S MANUAL MODELS : MU-42PM11/12X/20 MU-50PM10/11/20 Please read this information to your dealer if you ever require service. Model Number : Serial Number : LG Electronics U.S.A., Inc. See the label attached on the back of the Monitor.
Retain it for future reference. Record model number and serial number of the Monitor and relate this owner's manual thoroughly before operating the Monitor. PLASMA MONITOR OWNER'S MANUAL MODELS : MU-42PM11/12X/20 MU-50PM10/11/20 Please read this information to your dealer if you ever require service. Model Number : Serial Number : LG Electronics U.S.A., Inc. See the label attached on the back of the Monitor.
Owners Manual
Page 3
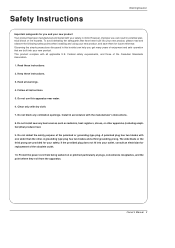
... not block any heat sources such as radiators, heat registers, stoves, or other . If the provided plug does not fit into your new product. Owner's Manual 3 Keep these instructions. 2. Do not defeat the safety purpose of the obsolete outlet. 10. Clean only with dry cloth. 7.
... not block any heat sources such as radiators, heat registers, stoves, or other . If the provided plug does not fit into your new product. Owner's Manual 3 Keep these instructions. 2. Do not defeat the safety purpose of the obsolete outlet. 10. Clean only with dry cloth. 7.
Owners Manual
Page 5
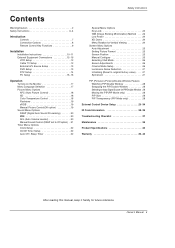
Owner's Manual 5 Contents Warning/Caution 2 Safety Instructions 3~4 Introduction Controls 7 Connection Options 8 Remote Control Key Functions 9 Installation Installation Instructions 10~11 External Equipment Connections 12~16 VCR Setup 12 Cable TV Setup 12 External A/V Source Setup 13 DVD Setup 13 DTV Setup 14 PC ...Setup 15~16 Operation Turning on the Monitor 17 Menu Language Selection 17 Picture Menu Options APC (Auto Picture Control 18 XD 18 Color Temperature Control 18 Fleshtone 19 sRGB 19 Manual...
Owner's Manual 5 Contents Warning/Caution 2 Safety Instructions 3~4 Introduction Controls 7 Connection Options 8 Remote Control Key Functions 9 Installation Installation Instructions 10~11 External Equipment Connections 12~16 VCR Setup 12 Cable TV Setup 12 External A/V Source Setup 13 DVD Setup 13 DTV Setup 14 PC ...Setup 15~16 Operation Turning on the Monitor 17 Menu Language Selection 17 Picture Menu Options APC (Auto Picture Control 18 XD 18 Color Temperature Control 18 Fleshtone 19 sRGB 19 Manual...
Owners Manual
Page 7
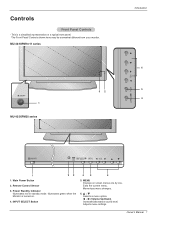
... Up/Down) Increases/decreases sound level. Controls Front Panel Controls - Main Power Button 2. Memorizes menu changes. 6. MU-42/50PM10/11 series ON/OFF 1 MU-42/50PM20 series 32 Introduction 6 5 4 ON/OFF 1 23 1. MENU Displays on . 4. Owner's Manual 7 The Front Panel Controls shown here may be somewhat different from your monitor. Adjusts menu settings. Illuminates...
... Up/Down) Increases/decreases sound level. Controls Front Panel Controls - Main Power Button 2. Memorizes menu changes. 6. MU-42/50PM10/11 series ON/OFF 1 MU-42/50PM20 series 32 Introduction 6 5 4 ON/OFF 1 23 1. MENU Displays on . 4. Owner's Manual 7 The Front Panel Controls shown here may be somewhat different from your monitor. Adjusts menu settings. Illuminates...

Owners Manual
Page 8
...power. S-VIDEO INPUT SOCKETS Connect S-Video out from your wired remote control to the remote control port on DC power. 8 Plasma Monitor Never attempt to the SVIDEO input. Back Connection Panel REMOTE RS-232C INPUT CONTROL (CONTROL/SERVICE) DVI INPUT AUDIO INPUT... DVI (Digital Visual Interface) INPUT/ AUDIO INPUT/ RGB INPUT JACKS Connect the monitor output connector from an external device to 'Speaker & Speaker Stand' manual. 9. COMPONENT INPUT/AUDIO INPUT JACKS Connect a component video/audio device to the appropriate input port. 4. VIDEO / AUDIO (L/MONO) INPUT SOCKETS Connect...
...power. S-VIDEO INPUT SOCKETS Connect S-Video out from your wired remote control to the remote control port on DC power. 8 Plasma Monitor Never attempt to the SVIDEO input. Back Connection Panel REMOTE RS-232C INPUT CONTROL (CONTROL/SERVICE) DVI INPUT AUDIO INPUT... DVI (Digital Visual Interface) INPUT/ AUDIO INPUT/ RGB INPUT JACKS Connect the monitor output connector from an external device to 'Speaker & Speaker Stand' manual. 9. COMPONENT INPUT/AUDIO INPUT JACKS Connect a component video/audio device to the appropriate input port. 4. VIDEO / AUDIO (L/MONO) INPUT SOCKETS Connect...
Owners Manual
Page 9
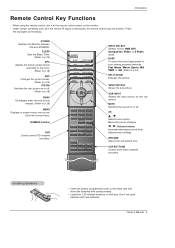
... AAA type. Introduction Remote Control Key Functions - Exits the current menu. SUB INPUT Selects the input source for the sub picture. Adjusts menu settings. Owner's Manual 9 POWER Switches the Monitor between ON and STANDBY. NUMBER buttons DVD Control some video cassette recorders. Press the key again as if the remote IR...
... AAA type. Introduction Remote Control Key Functions - Exits the current menu. SUB INPUT Selects the input source for the sub picture. Adjusts menu settings. Owner's Manual 9 POWER Switches the Monitor between ON and STANDBY. NUMBER buttons DVD Control some video cassette recorders. Press the key again as if the remote IR...

Owners Manual
Page 10
...Installation Instructions • The Monitor can be installed in various ways such as on a wall, or on a desktop etc. • The plasma display is missing, please contact the dealer where you connect the grounding / earth wire to prevent possible electric shock. Power Supply Short-circuit Breaker... 10 Plasma Monitor Owner's Manual 1.5V 1.5V Alkaline Batteries POWER SLEEP APC ARC PIP SWAP MENU INPUT SELECT DASP PIP ARC TWIN PICTURE SUB INPUT MUTE VOL...
...Installation Instructions • The Monitor can be installed in various ways such as on a wall, or on a desktop etc. • The plasma display is missing, please contact the dealer where you connect the grounding / earth wire to prevent possible electric shock. Power Supply Short-circuit Breaker... 10 Plasma Monitor Owner's Manual 1.5V 1.5V Alkaline Batteries POWER SLEEP APC ARC PIP SWAP MENU INPUT SELECT DASP PIP ARC TWIN PICTURE SUB INPUT MUTE VOL...

Owners Manual
Page 11
..., allow a clearance of 4" on the bottom, and 2" from the wall. Detailed installation instructions are available from your dealer. 4 inches 2 inches 4 inches 4 inches 2.36 inches Owner's Manual 11
..., allow a clearance of 4" on the bottom, and 2" from the wall. Detailed installation instructions are available from your dealer. 4 inches 2 inches 4 inches 4 inches 2.36 inches Owner's Manual 11

Owners Manual
Page 12
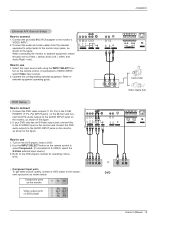
... PR COMPONENT INPUT R L AUDIO INPUT S-VIDEO R L (MONO) AUDIO INPUT VIDEO INPUT ( )R( ) ( )L( ) EXTERNAL SPEAKER AC INPUT 12 Plasma Monitor (R) AUDIO (L) VIDEO TV VCR RF Cable Cable Box Use the ISM Method (on the remote control. (If connected to VCR, match INPUT the jack colors (Video = yellow...an S-VIDEO output from a VCR. After subscribing to the VCR owner's manual.) 4. Insert a video tape into the VCR and press PLAY on the screen for cable box. Select your local cable TV service provider(s). To avoid picture noise (interference), leave an adequate distance between...
... PR COMPONENT INPUT R L AUDIO INPUT S-VIDEO R L (MONO) AUDIO INPUT VIDEO INPUT ( )R( ) ( )L( ) EXTERNAL SPEAKER AC INPUT 12 Plasma Monitor (R) AUDIO (L) VIDEO TV VCR RF Cable Cable Box Use the ISM Method (on the remote control. (If connected to VCR, match INPUT the jack colors (Video = yellow...an S-VIDEO output from a VCR. After subscribing to the VCR owner's manual.) 4. Insert a video tape into the VCR and press PLAY on the screen for cable box. Select your local cable TV service provider(s). To avoid picture noise (interference), leave an adequate distance between...
Owners Manual
Page 13
...How to use 1. Turn on DVD player Y Pb Pr Y B-Y R-Y Y Cb Cr Y PB PR B R (R) AUDIO (L) or S-VIDEO (R) AUDIO (L) DVD Owner's Manual 13 Installation External A/V Source Setup How to the AUDIO INPUT jacks on the monitor, as shown in the figure. 2. PONENT (Y, PB, PR) INPUT jacks on...) ( )L( ) EXTERNAL SPEAKER AC INPUT Camcorder Video Game Set DVD Setup How to external equipment operating guide. Refer to the DVD player's manual for operating instructions. • Component Input ports To get better picture quality, connect a DVD player to external equipment, match the jack colors (...
...How to use 1. Turn on DVD player Y Pb Pr Y B-Y R-Y Y Cb Cr Y PB PR B R (R) AUDIO (L) or S-VIDEO (R) AUDIO (L) DVD Owner's Manual 13 Installation External A/V Source Setup How to the AUDIO INPUT jacks on the monitor, as shown in the figure. 2. PONENT (Y, PB, PR) INPUT jacks on...) ( )L( ) EXTERNAL SPEAKER AC INPUT Camcorder Video Game Set DVD Setup How to external equipment operating guide. Refer to the DVD player's manual for operating instructions. • Component Input ports To get better picture quality, connect a DVD player to external equipment, match the jack colors (...

Owners Manual
Page 14
... box connector. Then, make the corresponding audio connections. Signal 480i 480p 720p 1080i Component Yes Yes Yes Yes RGB,DVI No Yes Yes Yes 14 Plasma Monitor REMOTE RS-232C INPUT CONTROL (CONTROL/SERVICE) DVI INPUT AUDIO INPUT RGB INPUT RGB OUTPUT Y PB PR COMPONENT INPUT R L AUDIO INPUT S-VIDEO R L (MONO) AUDIO... for the digital set-top box.) 2. How to select Component , RGB, or DVI source. Turn on the digital set-top box. (Refer to the owner's manual for video connections, depending on the remote control to use 1. Use INPUT SELECT on your set -top box.
... box connector. Then, make the corresponding audio connections. Signal 480i 480p 720p 1080i Component Yes Yes Yes Yes RGB,DVI No Yes Yes Yes 14 Plasma Monitor REMOTE RS-232C INPUT CONTROL (CONTROL/SERVICE) DVI INPUT AUDIO INPUT RGB INPUT RGB OUTPUT Y PB PR COMPONENT INPUT R L AUDIO INPUT S-VIDEO R L (MONO) AUDIO... for the digital set-top box.) 2. How to select Component , RGB, or DVI source. Turn on the digital set-top box. (Refer to the owner's manual for video connections, depending on the remote control to use 1. Use INPUT SELECT on your set -top box.

Owners Manual
Page 15
... fixed image may be changed, change the PC graphic card or consult the manufacturer of either RGB or DVI; (the other mode is clear. Owner's Manual 15 Check the image on the screen. If the refresh rate of time. Then, make the corresponding audio connection. Turn on the display by the...
... fixed image may be changed, change the PC graphic card or consult the manufacturer of either RGB or DVI; (the other mode is clear. Owner's Manual 15 Check the image on the screen. If the refresh rate of time. Then, make the corresponding audio connection. Turn on the display by the...
Owners Manual
Page 17
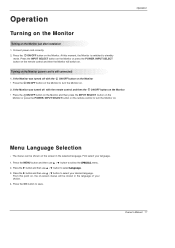
... the MENU button and then use D / E button to select the SPECIAL menu. 2. Press the G button and then use D / E button to select your desired language. Owner's Manual 17 Operation Turning on the Monitor Turning on the Monitor. Connect power cord correctly. 2. Press the G button and then use D / E button to save. Press the...
... the MENU button and then use D / E button to select the SPECIAL menu. 2. Press the G button and then use D / E button to select your desired language. Owner's Manual 17 Operation Turning on the Monitor Turning on the Monitor. Connect power cord correctly. 2. Press the G button and then use D / E button to save. Press the...
Owners Manual
Page 18
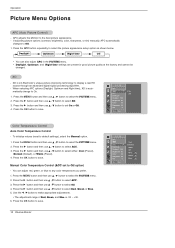
... options (contrast, brightness, color, sharpness, or tint) manually, APC automatically changes to Off option) - XD - When selecting APC options (Daylight, Optimum and Night time), XD is LG Electronic's unique picture improving technology to select Off. 4....Manual Color Temperature Control (ACC set On or Off. 4. Press the G button and then use D / E button to save . Press the OK button to select either: Cool (Preset), Normal (Default), or Warm (Preset). 4. Press the APC button repeatedly to default settings), select the Normal option. 1. XD is automatically change to save . 18 Plasma...
... options (contrast, brightness, color, sharpness, or tint) manually, APC automatically changes to Off option) - XD - When selecting APC options (Daylight, Optimum and Night time), XD is LG Electronic's unique picture improving technology to select Off. 4....Manual Color Temperature Control (ACC set On or Off. 4. Press the G button and then use D / E button to save . Press the OK button to select either: Cool (Preset), Normal (Default), or Warm (Preset). 4. Press the APC button repeatedly to default settings), select the Normal option. 1. XD is automatically change to save . 18 Plasma...

Owners Manual
Page 19
... the MENU button and then use D / E button to save. Use Fleshtone to select the PICTURE menu. 2. Press the OK button to select the PICTURE menu. 2. Manual Picture Control (APC set sRGB to On to Off option) - PICTURE APC ACC Fleshtone G 0 Contrast 100 Brightness 55 Color 55 Sharpness 60 Tint 0 Menu Prev... 0 Menu Prev. You can adjust picture contrast, brightness, color, sharpness, and tint options to save . Press the OK button to the levels you prefer. 1. Owner's Manual 19 If the Monitor is 0 ~ 3. 4. Operation Fleshtone ( RGB-DTV, and DVI-DTV Mode only) -
... the MENU button and then use D / E button to save. Use Fleshtone to select the PICTURE menu. 2. Press the OK button to select the PICTURE menu. 2. Manual Picture Control (APC set sRGB to On to Off option) - PICTURE APC ACC Fleshtone G 0 Contrast 100 Brightness 55 Color 55 Sharpness 60 Tint 0 Menu Prev... 0 Menu Prev. You can adjust picture contrast, brightness, color, sharpness, and tint options to save . Press the OK button to the levels you prefer. 1. Owner's Manual 19 If the Monitor is 0 ~ 3. 4. Operation Fleshtone ( RGB-DTV, and DVI-DTV Mode only) -

Owners Manual
Page 20
... TruSurround XT technology is incorporated under license from SRS Labs, Inc. SOUND DASP BBE G On AVL Off Balance 0 Treble 50 Bass 50 Menu Prev. Press the G button and then use D / E button to select On or Off. 4. Press the... On or Off. 4. If you change channels. 1. even if you adjust sound options (Treble and Bass) manually, DASP automatically changes to select AVL. 3. This function lets you enjoy the best sound without any special adjustment ... equal sound level; SOUND DASP BBE AVL G On Balance 0 Off Treble 50 Bass 50 Menu Prev. 20 Plasma Monitor
... TruSurround XT technology is incorporated under license from SRS Labs, Inc. SOUND DASP BBE G On AVL Off Balance 0 Treble 50 Bass 50 Menu Prev. Press the G button and then use D / E button to select On or Off. 4. Press the... On or Off. 4. If you change channels. 1. even if you adjust sound options (Treble and Bass) manually, DASP automatically changes to select AVL. 3. This function lets you enjoy the best sound without any special adjustment ... equal sound level; SOUND DASP BBE AVL G On Balance 0 Off Treble 50 Bass 50 Menu Prev. 20 Plasma Monitor

Owners Manual
Page 21
SOUND DASP BBE AVL Balance 0G L R Treble 50 Bass 50 Menu Prev. Operation Manual Sound Control (DASP set to save. Press the G button and then use F / G button to select the desired sound option (Balance, Treble, Bass). 3. Press the G button and then use D / E button to make appropriate adjustments. 4. Press the OK button to Off option) - Owner's Manual 21 You can adjust sound options Balance, Treble, and Bass to select the SOUND menu. 2. Press the MENU button and then use D / E button to the levels you prefer. 1.
SOUND DASP BBE AVL Balance 0G L R Treble 50 Bass 50 Menu Prev. Operation Manual Sound Control (DASP set to save. Press the G button and then use F / G button to select the desired sound option (Balance, Treble, Bass). 3. Press the G button and then use D / E button to make appropriate adjustments. 4. Press the OK button to Off option) - Owner's Manual 21 You can adjust sound options Balance, Treble, and Bass to select the SOUND menu. 2. Press the MENU button and then use D / E button to the levels you prefer. 1.
Owners Manual
Page 22
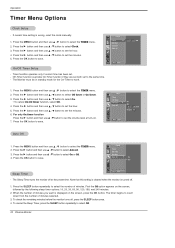
... 17 Menu Prev. Press the SLEEP button repeatedly to select the TIMER menu. 2. When the number of minutes you want is wrong, reset the clock manually. 1. Press the MENU button and then use D / E button to select the number of minutes selected. 3. Press the OK button to select the TIMER menu. 2. ... button once. 4. Press the G button and then use D / E button to the same time. - Press the G button and then use D / E button to select Off. 22 Plasma Monitor Auto Off 1. The Monitor must be in standby mode for the On-Timer to save. To cancel the Sleep Timer, press the SLEEP button...
... 17 Menu Prev. Press the SLEEP button repeatedly to select the TIMER menu. 2. When the number of minutes you want is wrong, reset the clock manually. 1. Press the MENU button and then use D / E button to select the number of minutes selected. 3. Press the OK button to select the TIMER menu. 2. ... button once. 4. Press the G button and then use D / E button to the same time. - Press the G button and then use D / E button to select Off. 22 Plasma Monitor Auto Off 1. The Monitor must be in standby mode for the On-Timer to save. To cancel the Sleep Timer, press the SLEEP button...
Owners Manual
Page 23
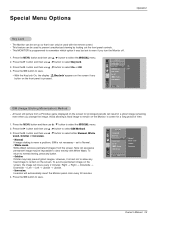
... on the front panel is best not to allow any button. • Orbiter Orbiter may be used to clear entirely with the remote control. - Owner's Manual 23
... on the front panel is best not to allow any button. • Orbiter Orbiter may be used to clear entirely with the remote control. - Owner's Manual 23

Owners Manual
Page 25
... save. This function works in DVI mode. 1. Press the G button and then use D / E button to adjust the position. 4. ARC Position G Manual config Reset D F G E Menu Prev. After adjustment, if the image is still not correct, your Monitor is not available for Component (480p,720p,1080i... use D / E / F / G button to select the SCREEN menu. 2. Press the G button to select the desired picture format. G ARC Position Manual config Reset To set Menu Prev. Caution: If a 4:3 fixed image is still not correct, try Auto adjustment again. 4. Press the ARC button repeatedly to run...
... save. This function works in DVI mode. 1. Press the G button and then use D / E button to adjust the position. 4. ARC Position G Manual config Reset D F G E Menu Prev. After adjustment, if the image is still not correct, your Monitor is not available for Component (480p,720p,1080i... use D / E / F / G button to select the SCREEN menu. 2. Press the G button to select the desired picture format. G ARC Position Manual config Reset To set Menu Prev. Caution: If a 4:3 fixed image is still not correct, try Auto adjustment again. 4. Press the ARC button repeatedly to run...

