
Owners Manual
Page 2
...aspect-ratio screens, and AC3 digital audio. TruSurround XT technology is a trademark of LG's audio/video device connected to the HDMI (high-definition multimedia interface), LG TV with this logo works easily with one remote control. High-resolution digital television broadcast ...and playback system composed of Dolby Laboratories. A subset of a full digital image processor, six different main picture quality factors. LG's own special digital...
...aspect-ratio screens, and AC3 digital audio. TruSurround XT technology is a trademark of LG's audio/video device connected to the HDMI (high-definition multimedia interface), LG TV with this logo works easily with one remote control. High-resolution digital television broadcast ...and playback system composed of Dolby Laboratories. A subset of a full digital image processor, six different main picture quality factors. LG's own special digital...

Owners Manual
Page 4
... any ventilation openings. Follow all warnings. Clean only with each apparatus. The important safety instructions shall be included by the manufacturer. [ 2 At the manufacturer's option, a picture or drawing that illustrates the intent of a specific safety instruction may be entitled "Important Safety Instructions': The following safety instruction list. This information shall be...
... any ventilation openings. Follow all warnings. Clean only with each apparatus. The important safety instructions shall be included by the manufacturer. [ 2 At the manufacturer's option, a picture or drawing that illustrates the intent of a specific safety instruction may be entitled "Important Safety Instructions': The following safety instruction list. This information shall be...
Owners Manual
Page 6
...54 Sound Setting Adjustment - Auto Scan (EZ Scan 34 - Color Tone - User Mode 55 Balance 56 TV Speakers On/Off Setup 57 Stereo/SAP Broadcasts Setup 58 Audio Language 59 On-Screen Menus Language Selection 60 ...Caption/Text 61 - Digital Broadcasting System Captions ........ 62 iiiiiiiiiiiiiiiiii!_i_i__i_!_i_!_;_!i_i_i_i__i_i_i_i_i_i_i_i_i_i_i_i_i_i_._.i._. Black (Darkness) Level 50 Picture Reset 51 Image Sticking Minimization (ISM) Method ....... 52 Low - Analog Broadcasting System Captions ....... 61 - i_i_i_i_i_iC_ai_pi_tiio_ni_iO_ip_tii_oin_i_i_..i._..J..i_...
...54 Sound Setting Adjustment - Auto Scan (EZ Scan 34 - Color Tone - User Mode 55 Balance 56 TV Speakers On/Off Setup 57 Stereo/SAP Broadcasts Setup 58 Audio Language 59 On-Screen Menus Language Selection 60 ...Caption/Text 61 - Digital Broadcasting System Captions ........ 62 iiiiiiiiiiiiiiiiii!_i_i__i_!_i_!_;_!i_i_i_i__i_i_i_i_i_i_i_i_i_i_i_i_i_i_._.i._. Black (Darkness) Level 50 Picture Reset 51 Image Sticking Minimization (ISM) Method ....... 52 Low - Analog Broadcasting System Captions ....... 61 - i_i_i_i_i_iC_ai_pi_tiio_ni_iO_ip_tii_oin_i_i_..i._..J..i_...
Owners Manual
Page 8
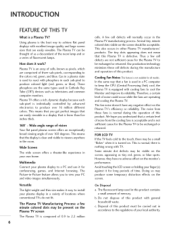
...to the colors red, green, and blue. The fan noise doesn't have no adverse effect on the Plasma TV's efficiency or reliability. The Picture-in a plasma state is an array of cells, known as tiny red, green, or blue spots. Cooling Fan Noise-...-Picture feature allows you get perfect images that are operating and cooling the Plasma TV. How does it for conferencing, games, and Internet browsing. Plasma TV is used in other Plasma TV manufacturers' products. The Plasma TV is a Plasma TV? INTRODUCTION FEATUREOF THIS TV What is composed of 0.9 to 2.2 million 6 Using plasma ...
...to the colors red, green, and blue. The fan noise doesn't have no adverse effect on the Plasma TV's efficiency or reliability. The Picture-in a plasma state is an array of cells, known as tiny red, green, or blue spots. Cooling Fan Noise-...-Picture feature allows you get perfect images that are operating and cooling the Plasma TV. How does it for conferencing, games, and Internet browsing. Plasma TV is used in other Plasma TV manufacturers' products. The Plasma TV is a Plasma TV? INTRODUCTION FEATUREOF THIS TV What is composed of 0.9 to 2.2 million 6 Using plasma ...

Owners Manual
Page 10
When the TV is turned on, the indicator blinks green and then illuminates green before the picture is displayed. l(_ ,A)Buttons 8 PREPARATION FRONT PANELINFORMATION _ Here shown may be somewhat different from your TV. _D I-rl Front Panel Controls z Plasma TV Model Remote Control Sensor Power Standby Indicator Illuminates red in standby mode.
When the TV is turned on, the indicator blinks green and then illuminates green before the picture is displayed. l(_ ,A)Buttons 8 PREPARATION FRONT PANELINFORMATION _ Here shown may be somewhat different from your TV. _D I-rl Front Panel Controls z Plasma TV Model Remote Control Sensor Power Standby Indicator Illuminates red in standby mode.

Owners Manual
Page 11
LCD TV Model _D z (A,Y)Bu_ons (_,_)Bu_ons Bu_on Bu_on Bu_on Bu_on Power Standby Indicator Illuminates red in standby mode. When the TV is turned on, the indicator blinks green and then illuminates green before the picture is displayed. 9
LCD TV Model _D z (A,Y)Bu_ons (_,_)Bu_ons Bu_on Bu_on Bu_on Bu_on Power Standby Indicator Illuminates red in standby mode. When the TV is turned on, the indicator blinks green and then illuminates green before the picture is displayed. 9

Owners Manual
Page 16
... the eye-bolts or brackets are tightened securely. Use a sturdy rope (not provided as shown in the picture. * If your TV. Plasma TV Model LCD TV Model z ..l_Insert the eye-bolts (or TV brackets and bolts) to tighten the product to the wall as parts of the product, must purchase separately...height of the product, must purchase separately) to a wall so it becomes horizontal between the wall and the product. 14 PREPARATION ATTACHING THE TV TO A WALL I Here shown may be pulled in a forward direction, potentially causing injury or damaging the product. Secure the wall brackets with...
... the eye-bolts or brackets are tightened securely. Use a sturdy rope (not provided as shown in the picture. * If your TV. Plasma TV Model LCD TV Model z ..l_Insert the eye-bolts (or TV brackets and bolts) to tighten the product to the wall as parts of the product, must purchase separately...height of the product, must purchase separately) to a wall so it becomes horizontal between the wall and the product. 14 PREPARATION ATTACHING THE TV TO A WALL I Here shown may be pulled in a forward direction, potentially causing injury or damaging the product. Secure the wall brackets with...

Owners Manual
Page 19
... dealer for outdoor antenna) _; 2. Using both cable and antenna •Antenn RF Coaxial Wire (75 ohm) Cable TV _ Wall Jack RF Coaxial Wire (75 ohm) y-ry_ Diplexer (Signal Combiner) Antenna VHF ,,l_To improve the picture quality in a poor signal area, please purchase a signal amplifier ,,l_If the antenna needs to wall jack for...
... dealer for outdoor antenna) _; 2. Using both cable and antenna •Antenn RF Coaxial Wire (75 ohm) Cable TV _ Wall Jack RF Coaxial Wire (75 ohm) y-ry_ Diplexer (Signal Combiner) Antenna VHF ,,l_To improve the picture quality in a poor signal area, please purchase a signal amplifier ,,l_If the antenna needs to wall jack for...

Owners Manual
Page 20
...on the digital set -top box. Connect the audio output of the digital set z top box to the owner's manual for LCD TV model. If connected to use picture for the digital set -top box. (Refer to the COMPONENT IN VIDEO 1 jacks on the set . IN2 input, select Yes...to the figure as shown m x below. However, if you havefinished connecting all equipment. II"1 z When connecting Component cable m _0 c 1. HD RECEIVERSETUP This TV can receive Digital Over-the-air/Cable signals without an external digital set -top box or other digital external device, refer to the COMPONENT IN...
...on the digital set -top box. Connect the audio output of the digital set z top box to the owner's manual for LCD TV model. If connected to use picture for the digital set -top box. (Refer to the COMPONENT IN VIDEO 1 jacks on the set . IN2 input, select Yes...to the figure as shown m x below. However, if you havefinished connecting all equipment. II"1 z When connecting Component cable m _0 c 1. HD RECEIVERSETUP This TV can receive Digital Over-the-air/Cable signals without an external digital set -top box or other digital external device, refer to the COMPONENT IN...
Owners Manual
Page 23
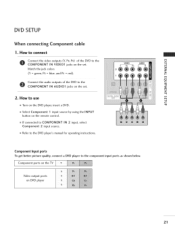
m Match the jack colors z (Y = green, PB = blue, and PR = red). Component Input ports To get better picture quality, connect a DVD player to COMPONENT Component 2 input source. m z 2. How to the c COMPONENT IN AUDIO1 jacks on the set . m If...21 IN 2 input, select m Refer to the m x COMPONENT IN VIDEOI jacks on the DVD player, insert a DVD. Component ports on the TV Y P_ iilii+++i+l+p++'+'+'+?'++l+++?+l+++?+l+++?+l+++?+l+++?+ii Video output ports on the remote control. DVD SETUP When connecting Component cable 1. m Connect the audio outputs of the DVD to...
m Match the jack colors z (Y = green, PB = blue, and PR = red). Component Input ports To get better picture quality, connect a DVD player to COMPONENT Component 2 input source. m z 2. How to the c COMPONENT IN AUDIO1 jacks on the set . m If...21 IN 2 input, select m Refer to the m x COMPONENT IN VIDEOI jacks on the DVD player, insert a DVD. Component ports on the TV Y P_ iilii+++i+l+p++'+'+'+?'++l+++?+l+++?+l+++?+l+++?+l+++?+ii Video output ports on the remote control. DVD SETUP When connecting Component cable 1. m Connect the audio outputs of the DVD to...
Owners Manual
Page 25
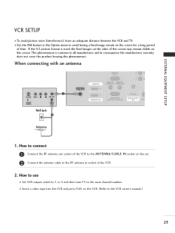
... tape into the VCR and press PLAY on the VCR. (Refer to the same channel number. VCR SETUP ,,i_To avoid picture noise (interference), leave an adequate distance between the VCR and TV. ,,i_Use the ISM feature in the Option menu to avoid having a fixed image remain on the screen for a long ...period of the screen may remain visible on the screen. If the 4:3 picture format is common to the RF antenna in consequence the...
... tape into the VCR and press PLAY on the VCR. (Refer to the same channel number. VCR SETUP ,,i_To avoid picture noise (interference), leave an adequate distance between the VCR and TV. ,,i_Use the ISM feature in the Option menu to avoid having a fixed image remain on the screen for a long ...period of the screen may remain visible on the screen. If the 4:3 picture format is common to the RF antenna in consequence the...

Owners Manual
Page 30
...sent input to PC input and checking the z screen quality. c Adjustment for PC mode Overview When the RGB input of the set is to adjust picture to a PC output, select the RGB-PC as the main input mode. In HDMI/DVI-PC mode, Phase is not available. [] The Size ...the proper resolution in pre- Phase This function allows you select resolution of characters. x -q After connecting RGB-PC or HDMI/DVI to see the best picture appearance. When HDMI/DVI connect to make appropriate adjustments. [] The Phase adjustment range is not available. @ Press the ENTER button. And the hori- ...
...sent input to PC input and checking the z screen quality. c Adjustment for PC mode Overview When the RGB input of the set is to adjust picture to a PC output, select the RGB-PC as the main input mode. In HDMI/DVI-PC mode, Phase is not available. [] The Size ...the proper resolution in pre- Phase This function allows you select resolution of characters. x -q After connecting RGB-PC or HDMI/DVI to see the best picture appearance. When HDMI/DVI connect to make appropriate adjustments. [] The Phase adjustment range is not available. @ Press the ENTER button. And the hori- ...

Owners Manual
Page 33
... AV 1-2, Component 1-2, RGB-PC, HDMI1/DVl, and HDMI2 input sources, screen returns to the last TV channel. POWER Turns your TV or any other programmed equipment on or off, depending on the viewing environment. _ p.44 SOUND Selects the factory preset sound for type of -r program...0 (*In DTV/CADTV mode _ p.62) ADJUST Adjust the screen resolution, position, size and phase. _ p.28 31 INPUT External input modes rotate in regular sequence: TV, AV1-2, Component 1-2, RGB-PC, HDMI1/DVl and HDMI2. (AV 1-2, Component 1-2, RGB-PC, HDMI1/DVl, and HDMI2 input sources are linked automatically, only if ...
... AV 1-2, Component 1-2, RGB-PC, HDMI1/DVl, and HDMI2 input sources, screen returns to the last TV channel. POWER Turns your TV or any other programmed equipment on or off, depending on the viewing environment. _ p.44 SOUND Selects the factory preset sound for type of -r program...0 (*In DTV/CADTV mode _ p.62) ADJUST Adjust the screen resolution, position, size and phase. _ p.28 31 INPUT External input modes rotate in regular sequence: TV, AV1-2, Component 1-2, RGB-PC, HDMI1/DVl and HDMI2. (AV 1-2, Component 1-2, RGB-PC, HDMI1/DVl, and HDMI2 input sources are linked automatically, only if ...
Owners Manual
Page 38
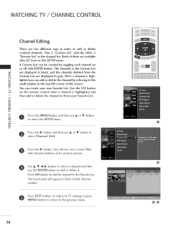
... toggling each channel on the SETUP menu. WATCHINGTV / CHANNELCONTROL Channel Editing There are available after EZ Scan on or off with channel numbers and a preview picture. You will appear in the channel list. The heart-mark will now see a screen filled with ENTER button. Use the FAV button z z rrl ©...channel and then use A or Y button to the Favorite List. lighted you can create your own Favorite List. Press EXIT button to return to TV viewing or press MENU button to return to add or delete it. Both of the screen. The channels in the Custom List are displayed in...
... toggling each channel on the SETUP menu. WATCHINGTV / CHANNELCONTROL Channel Editing There are available after EZ Scan on or off with channel numbers and a preview picture. You will appear in the channel list. The heart-mark will now see a screen filled with ENTER button. Use the FAV button z z rrl ©...channel and then use A or Y button to the Favorite List. lighted you can create your own Favorite List. Press EXIT button to return to TV viewing or press MENU button to return to add or delete it. Both of the screen. The channels in the Custom List are displayed in...

Owners Manual
Page 39
DTV Signal: This function is only available when the input signal is DTV or CADTV. Press EXIT button to return to TV viewing or press MENU button to return to experience picture degradation. The higher the signal strength, the less likely you need to select the SETUP menu. View the on-screen signal...
DTV Signal: This function is only available when the input signal is DTV or CADTV. Press EXIT button to return to TV viewing or press MENU button to return to experience picture degradation. The higher the signal strength, the less likely you need to select the SETUP menu. View the on-screen signal...

Owners Manual
Page 40
..., AV2, Component1, Component2, RGB-PC, HDMI1/DVl, or HDMI2. WATCHINGTV / CHANNELCONTROL INPUT SOURCE SELECTION Changes the picture source so you can watch your off-air TV, cable TV, VCR, DVD, or any other devices that are connected to the previous menu. @ @@ 38 N C_ Press the MENU button and then use • or •...
..., AV2, Component1, Component2, RGB-PC, HDMI1/DVl, or HDMI2. WATCHINGTV / CHANNELCONTROL INPUT SOURCE SELECTION Changes the picture source so you can watch your off-air TV, cable TV, VCR, DVD, or any other devices that are connected to the previous menu. @ @@ 38 N C_ Press the MENU button and then use • or •...

Owners Manual
Page 44
...PC/DVI-PC input source use 4:3 or 16:9 aspect ratio. -q c rT1 © z Press the RATIO button repeatedly to select the desired picture format. -q © p_ You can also adjust Aspect Ratio in the OPTION menu. to match (4:3-* 4:3) 4:3 Choose 4:3 when you want to specify how ...the picture is displayed on your TV. When you need to view a picture with a 4:3 aspect ratio on your 16:9 TV, you receive an analog picture with an original 4:3 aspect ratio. (16:9-* 16:9) 42 Set by program Selects the...
...PC/DVI-PC input source use 4:3 or 16:9 aspect ratio. -q c rT1 © z Press the RATIO button repeatedly to select the desired picture format. -q © p_ You can also adjust Aspect Ratio in the OPTION menu. to match (4:3-* 4:3) 4:3 Choose 4:3 when you want to specify how ...the picture is displayed on your TV. When you need to view a picture with a 4:3 aspect ratio on your 16:9 TV, you receive an analog picture with an original 4:3 aspect ratio. (16:9-* 16:9) 42 Set by program Selects the...

Owners Manual
Page 45
However, the top and bottom portions of the picture will be altered, both sides, to view the picture without any alteration. The picture taking a halfway trade off 0 between alteration and screen coverage. r I m i i J 43 Horizon The screen size is, more enlarged at both vertically extended and cropped. Zoom 1 Choose Zoom 1 when you want to create a spectacular view. c m Zoom 2 c'_ 0 Choose Zoom 2 when you want the picture to fill the entire screen. 16:9 Adjust the picture horizontally, in a linear proportion to z be cropped.
However, the top and bottom portions of the picture will be altered, both sides, to view the picture without any alteration. The picture taking a halfway trade off 0 between alteration and screen coverage. r I m i i J 43 Horizon The screen size is, more enlarged at both vertically extended and cropped. Zoom 1 Choose Zoom 1 when you want to create a spectacular view. c m Zoom 2 c'_ 0 Choose Zoom 2 when you want the picture to fill the entire screen. 16:9 Adjust the picture horizontally, in a linear proportion to z be cropped.

Owners Manual
Page 46
...adjust EZ Picture. iiii_i _g i 44 PICTURE CONTROL PRESETPICTURE SETTINGS EZ Picture - Select the preset value in the EZ Picture menu based on the program category. You can directly adjust the contrast, brightness, color, sharpness, tint. --t Press the PICTURE button repeatedly to TV viewing. ...Daylight, Normal, Night Time Settings are not adjustable. z --t _D © O Press the EXIT button to save and return to select the picture c _D appearance setup option as below : Daylight, ...
...adjust EZ Picture. iiii_i _g i 44 PICTURE CONTROL PRESETPICTURE SETTINGS EZ Picture - Select the preset value in the EZ Picture menu based on the program category. You can directly adjust the contrast, brightness, color, sharpness, tint. --t Press the PICTURE button repeatedly to TV viewing. ...Daylight, Normal, Night Time Settings are not adjustable. z --t _D © O Press the EXIT button to save and return to select the picture c _D appearance setup option as below : Daylight, ...
Owners Manual
Page 48
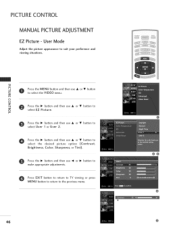
... PICTUREADJUSTMENT EZ Picture - Press the MENU button and then use • or • button c to select the VIDEO menu. © Z O Press the • button and then use _1 or • button to suit your preference and viewing situations. Press EXIT button to return to TV viewing or press MENU ...button to return to © select EZ Picture. Press the • button and then use • or • button to the previous menu. 46 @ @0 @ @ ...
... PICTUREADJUSTMENT EZ Picture - Press the MENU button and then use • or • button c to select the VIDEO menu. © Z O Press the • button and then use _1 or • button to suit your preference and viewing situations. Press EXIT button to return to TV viewing or press MENU ...button to return to © select EZ Picture. Press the • button and then use • or • button to the previous menu. 46 @ @0 @ @ ...


