User Guide
Page 6
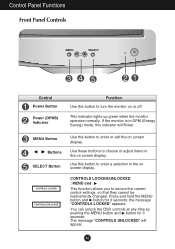
...is in DPM (Energy Saving) mode, this indicator will appear. Use these buttons to choose or adjust items in the on screen display. MENU Button Buttons SELECT Button CONTROLS LOCKED CONTROLS UNLOCKED Use this button to enter or exit the on or off. Press and hold the... Indicator lights up green when the monitor operates normally. Use this button to enter a selection in the on screen display. CONTROLS LOCKED/UNLOCKED : MENU and This function allows you to secure the current control settings, so that they cannot be inadvertently changed. Control Panel Functions Front Panel Controls...
...is in DPM (Energy Saving) mode, this indicator will appear. Use these buttons to choose or adjust items in the on screen display. MENU Button Buttons SELECT Button CONTROLS LOCKED CONTROLS UNLOCKED Use this button to enter or exit the on or off. Press and hold the... Indicator lights up green when the monitor operates normally. Use this button to enter a selection in the on screen display. CONTROLS LOCKED/UNLOCKED : MENU and This function allows you to secure the current control settings, so that they cannot be inadvertently changed. Control Panel Functions Front Panel Controls...
User Guide
Page 7
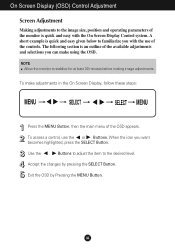
Accept the changes by Pressing the MENU Button. To make using the OSD. Use the Buttons to adjust the item to stabilize for at least 30 minutes before making image adjustments. A6 ... becomes highlighted, press the SELECT Button. When the icon you can make adjustments in the On Screen Display, follow these steps: Press the MENU Button, then the main menu of the monitor is quick and easy with the use the or Buttons. Exit the OSD by pressing the SELECT Button. NOTE Allow...
Accept the changes by Pressing the MENU Button. To make using the OSD. Use the Buttons to adjust the item to stabilize for at least 30 minutes before making image adjustments. A6 ... becomes highlighted, press the SELECT Button. When the icon you can make adjustments in the On Screen Display, follow these steps: Press the MENU Button, then the main menu of the monitor is quick and easy with the use the or Buttons. Exit the OSD by pressing the SELECT Button. NOTE Allow...
User Guide
Page 8
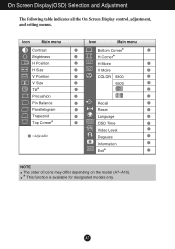
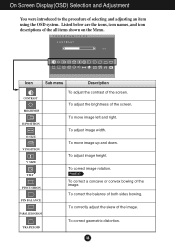
On Screen Display(OSD) Selection and Adjustment The following table indicates all the On Screen Display control, adjustment, and setting menus. Icon Main menu Contrast Brightness H Position H Size V Position V Size Tilt* Pincushion Pin Balance Parallelogram Trapezoid Top Corner* : Adjustable Icon Main menu Bottom Corner* H Corner* H Moire V Moire COLOR 9300 6500 Recall Reset Language OSD Time Video Level Degauss Information Exit* NOTE The order of icons may differ depending on the model (A7~A10). * This function is available for designated models only. A7
On Screen Display(OSD) Selection and Adjustment The following table indicates all the On Screen Display control, adjustment, and setting menus. Icon Main menu Contrast Brightness H Position H Size V Position V Size Tilt* Pincushion Pin Balance Parallelogram Trapezoid Top Corner* : Adjustable Icon Main menu Bottom Corner* H Corner* H Moire V Moire COLOR 9300 6500 Recall Reset Language OSD Time Video Level Degauss Information Exit* NOTE The order of icons may differ depending on the model (A7~A10). * This function is available for designated models only. A7
User Guide
Page 9
... correct image rotation. To correct a concave or convex bowing of the all items shown on the Menu. To correct the balance of the image. To correctly adjust the skew of both sides bowing. Icon Sub menu Description CONTRAST BRIGHTNESS H POSITION H SIZE V POSITION V SIZE TILT* PINCUSHION PIN BALANCE PARALLELOGRAM TRAPEZOID To adjust the...
... correct image rotation. To correct a concave or convex bowing of the all items shown on the Menu. To correct the balance of the image. To correctly adjust the skew of both sides bowing. Icon Sub menu Description CONTRAST BRIGHTNESS H POSITION H SIZE V POSITION V SIZE TILT* PINCUSHION PIN BALANCE PARALLELOGRAM TRAPEZOID To adjust the...
User Guide
Page 10
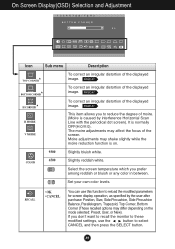
... • CANCEL You can use the button to select CANCEL and then press the SELECT button. On Screen Display(OSD) Selection and Adjustment Icon Sub menu Description * TOP CORNER * BOTTOM CORNER * H CORNER H MOIRE V MOIRE To correct an irregular distortion of the screen. This item allows you to reload the modified parameters...
... • CANCEL You can use the button to select CANCEL and then press the SELECT button. On Screen Display(OSD) Selection and Adjustment Icon Sub menu Description * TOP CORNER * BOTTOM CORNER * H CORNER H MOIRE V MOIRE To correct an irregular distortion of the screen. This item allows you to reload the modified parameters...
User Guide
Page 11
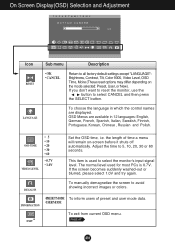
... is 0.7V. the length of preset and user mode data. • USER MODE INFORMATION EXIT * To exit from current OSD menu. On Screen Display(OSD) Selection and Adjustment Icon Sub menu Description RESET • OK • CANCEL Return to avoid showing incorrect images or colors. •PRESETMODE To inform users of time...
... is 0.7V. the length of preset and user mode data. • USER MODE INFORMATION EXIT * To exit from current OSD menu. On Screen Display(OSD) Selection and Adjustment Icon Sub menu Description RESET • OK • CANCEL Return to avoid showing incorrect images or colors. •PRESETMODE To inform users of time...
User Guide
Page 13
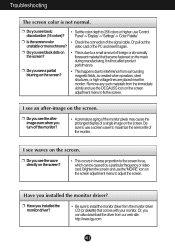
...-voltage lines are placed near the monitor. Remove any such materials from the monitor driver CD (or diskette) that became fastened on the screen adjustment menu to fix the screen. I see an after-image on the screen. ❐ Doyouseetheafterimage even when you turn off the monitor? • A premature aging of the... abnormally florescent material that comes with your monitor. A12 Troubleshooting The screen color is due to a small amount of a single image on the screen adjustment menu to adjust the screen.
...-voltage lines are placed near the monitor. Remove any such materials from the monitor driver CD (or diskette) that became fastened on the screen adjustment menu to fix the screen. I see an after-image on the screen. ❐ Doyouseetheafterimage even when you turn off the monitor? • A premature aging of the... abnormally florescent material that comes with your monitor. A12 Troubleshooting The screen color is due to a small amount of a single image on the screen adjustment menu to adjust the screen.


