User Guide
Page 1
User's Guide 505E 505G Make sure to your dealer when you require service. See the label attached on the back cover and quote this information to read the Important Precautions before using the product. Keep the User's Guide(CD) in an accessible place for furture reference.
User's Guide 505E 505G Make sure to your dealer when you require service. See the label attached on the back cover and quote this information to read the Important Precautions before using the product. Keep the User's Guide(CD) in an accessible place for furture reference.

User Guide
Page 2
... a stand recommended by disassembling, bending, pulling or heating up. In case you use another power cord, make sure that the socket-outlet is faulty in the specifications of this monitor, observe the following basic rules for replacement. If the power cable is easily accessible after installation. Operate the monitor only from a power source indicated in any way, please contact the manufacturer or the nearest authorized repair service...
... a stand recommended by disassembling, bending, pulling or heating up. In case you use another power cord, make sure that the socket-outlet is faulty in the specifications of this monitor, observe the following basic rules for replacement. If the power cable is easily accessible after installation. Operate the monitor only from a power source indicated in any way, please contact the manufacturer or the nearest authorized repair service...
User Guide
Page 3
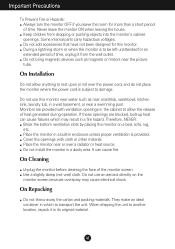
... power cord is subject to damage. Keep children from the wall outlet. They make an ideal container in which may cause electrical shock. Place the monitor in a built-in a fire hazard. Do not use this monitor. Important Precautions To Prevent Fire or Hazards: Always turn the monitor OFF if you leave the room for more than a short period of the monitor screen...
... power cord is subject to damage. Keep children from the wall outlet. They make an ideal container in which may cause electrical shock. Place the monitor in a built-in a fire hazard. Do not use this monitor. Important Precautions To Prevent Fire or Hazards: Always turn the monitor OFF if you leave the room for more than a short period of the monitor screen...
User Guide
Page 4
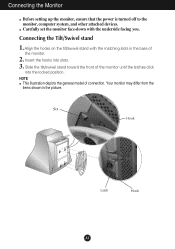
... the base of the monitor. 2. Slide the tilt/swivel stand toward the front of connection. Slot Hook Latch Hook A3 Connecting the Monitor Before setting up the monitor, ensure that the power is turned off to the monitor, computer system, and other attached devices. Carefully set the monitor face-down with the matching slots in the picture. Connecting the Tilt/Swivel stand 1. NOTE This illustration depicts the general model of the monitor...
... the base of the monitor. 2. Slide the tilt/swivel stand toward the front of connection. Slot Hook Latch Hook A3 Connecting the Monitor Before setting up the monitor, ensure that the power is turned off to the monitor, computer system, and other attached devices. Carefully set the monitor face-down with the matching slots in the picture. Connecting the Tilt/Swivel stand 1. NOTE This illustration depicts the general model of the monitor...
User Guide
Page 5
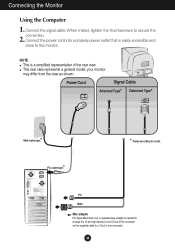
... from the view as shown. Connecting the Monitor Using the Computer 1. Connect the signal cable. A4 NOTE This is easily accessible and close to model. PC MAC Mac adapter For Apple Macintosh use, a separate plug adapter is needed to change the 15 pin high density (3 row) D-sub VGA connector on the supplied cable to secure the connection. 2. When mated, tighten the thumbscrews to a 15 pin 2 row connector. Power Cord Signal Cable Attached Type* Detached Type* * Wall-outlet...
... from the view as shown. Connecting the Monitor Using the Computer 1. Connect the signal cable. A4 NOTE This is easily accessible and close to model. PC MAC Mac adapter For Apple Macintosh use, a separate plug adapter is needed to change the 15 pin high density (3 row) D-sub VGA connector on the supplied cable to secure the connection. 2. When mated, tighten the thumbscrews to a 15 pin 2 row connector. Power Cord Signal Cable Attached Type* Detached Type* * Wall-outlet...
User Guide
Page 6
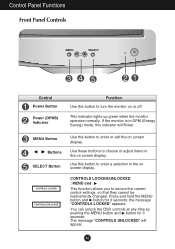
... "CONTROLS LOCKED" appears. Use these buttons to secure the current control settings, so that they cannot be inadvertently changed. A5 This Indicator lights up green when the monitor operates normally. CONTROLS LOCKED/UNLOCKED : MENU and This function allows you to choose or adjust items in DPM (Energy Saving) mode, this button to turn the monitor on screen display. Press and hold the MENU button and button for 3 seconds: The message "CONTROLS UNLOCKED" will flicker. Control Panel Functions Front Panel Controls MENU SELECT Control Power Button Power (DPMS...
... "CONTROLS LOCKED" appears. Use these buttons to secure the current control settings, so that they cannot be inadvertently changed. A5 This Indicator lights up green when the monitor operates normally. CONTROLS LOCKED/UNLOCKED : MENU and This function allows you to choose or adjust items in DPM (Energy Saving) mode, this button to turn the monitor on screen display. Press and hold the MENU button and button for 3 seconds: The message "CONTROLS UNLOCKED" will flicker. Control Panel Functions Front Panel Controls MENU SELECT Control Power Button Power (DPMS...
User Guide
Page 7
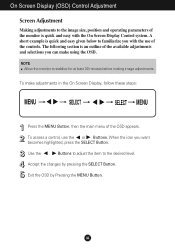
... OSD by pressing the SELECT Button. To make using the OSD. Use the Buttons to adjust the item to stabilize for at least 30 minutes before making image adjustments. Accept the changes by Pressing the MENU Button. To access a control, use of the available adjustments and selections you want becomes highlighted, press the SELECT Button. A6 A short example is quick and easy with the use the or Buttons. On Screen Display (OSD) Control Adjustment Screen Adjustment Making adjustments to the image size, position...
... OSD by pressing the SELECT Button. To make using the OSD. Use the Buttons to adjust the item to stabilize for at least 30 minutes before making image adjustments. Accept the changes by Pressing the MENU Button. To access a control, use of the available adjustments and selections you want becomes highlighted, press the SELECT Button. A6 A short example is quick and easy with the use the or Buttons. On Screen Display (OSD) Control Adjustment Screen Adjustment Making adjustments to the image size, position...
User Guide
Page 8
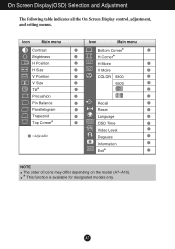
A7 On Screen Display(OSD) Selection and Adjustment The following table indicates all the On Screen Display control, adjustment, and setting menus. Icon Main menu Contrast Brightness H Position H Size V Position V Size Tilt* Pincushion Pin Balance Parallelogram Trapezoid Top Corner* : Adjustable Icon Main menu Bottom Corner* H Corner* H Moire V Moire COLOR 9300 6500 Recall Reset Language OSD Time Video Level Degauss Information Exit* NOTE The order of icons may differ depending on the model (A7~A10). * This function is available for designated models only.
A7 On Screen Display(OSD) Selection and Adjustment The following table indicates all the On Screen Display control, adjustment, and setting menus. Icon Main menu Contrast Brightness H Position H Size V Position V Size Tilt* Pincushion Pin Balance Parallelogram Trapezoid Top Corner* : Adjustable Icon Main menu Bottom Corner* H Corner* H Moire V Moire COLOR 9300 6500 Recall Reset Language OSD Time Video Level Degauss Information Exit* NOTE The order of icons may differ depending on the model (A7~A10). * This function is available for designated models only.
User Guide
Page 9
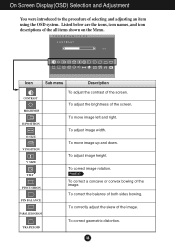
... brightness of the image. To correctly adjust the skew of selecting and adjusting an item using the OSD system. On Screen Display(OSD) Selection and Adjustment You were introduced to the procedure of the image. To move image up and down. To correct geometric distortion. Listed below are the icons, icon names, and icon descriptions of the screen. To adjust image width. Icon Sub menu Description CONTRAST BRIGHTNESS H POSITION H SIZE V POSITION V SIZE TILT...
... brightness of the image. To correctly adjust the skew of selecting and adjusting an item using the OSD system. On Screen Display(OSD) Selection and Adjustment You were introduced to the procedure of the image. To move image up and down. To correct geometric distortion. Listed below are the icons, icon names, and icon descriptions of the screen. To adjust image width. Icon Sub menu Description CONTRAST BRIGHTNESS H POSITION H SIZE V POSITION V SIZE TILT...
User Guide
Page 10
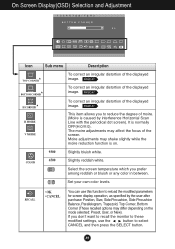
... the SELECT button. This item allows you prefer among reddish or bluish or any color in between. It is on the mode selected: Preset, User, or New). The moire adjustments may affect the focus of the displayed image. Select the screen temperature which you to reduce the degree of moire. (Moire is caused by the user after purchase: Position, Size, Side...
... the SELECT button. This item allows you prefer among reddish or bluish or any color in between. It is on the mode selected: Preset, User, or New). The moire adjustments may affect the focus of the displayed image. Select the screen temperature which you to reduce the degree of moire. (Moire is caused by the user after purchase: Position, Size, Side...
User Guide
Page 11
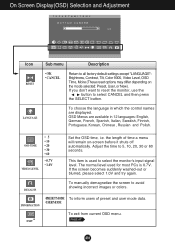
... the monitor's input signal level. On Screen Display(OSD) Selection and Adjustment Icon Sub menu Description RESET • OK • CANCEL Return to all factory default settings except "LANGUAGE": Brightness, Contrast, Tilt, Color 9300, Video Level, OSD Time, Moire (These reset options may differ depending on -screen before it shuts off automatically. Adjust the time to avoid showing incorrect images or colors. •PRESETMODE To inform users of time a menu will remain on the mode selected: Preset, User...
... the monitor's input signal level. On Screen Display(OSD) Selection and Adjustment Icon Sub menu Description RESET • OK • CANCEL Return to all factory default settings except "LANGUAGE": Brightness, Contrast, Tilt, Color 9300, Video Level, OSD Time, Moire (These reset options may differ depending on -screen before it shuts off automatically. Adjust the time to avoid showing incorrect images or colors. •PRESETMODE To inform users of time a menu will remain on the mode selected: Preset, User...
User Guide
Page 12
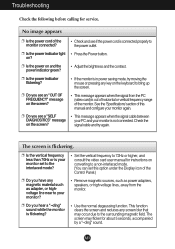
... set this option under the Display icon of this manual and configure your monitor? • Remove magnetic sources, such as adapter, or highvoltage line near to 72Hz or higher, and consult the video card user manual for instructions on and the power indicator green? • Adjust the brightness and the contrast. ❐ Isthepowerindicator flickering? • If the monitor is flickering? • Use the normal degaussing function. The screen is flickering. ❐ Is the vertical frequency...
... set this option under the Display icon of this manual and configure your monitor? • Remove magnetic sources, such as adapter, or highvoltage line near to 72Hz or higher, and consult the video card user manual for instructions on and the power indicator green? • Adjust the brightness and the contrast. ❐ Isthepowerindicator flickering? • If the monitor is flickering? • Use the normal degaussing function. The screen is flickering. ❐ Is the vertical frequency...
User Guide
Page 13
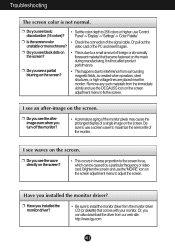
... structures, or high-voltage lines are placed near the monitor. A12 Troubleshooting The screen color is due to a small amount of foreign or abnormally florescent material that comes with your monitor. Be sure to use 'Control Panel' -> 'Display' -> 'Settings' -> 'Color Palette' • Check the connection of the signal cable. Or, you can be caused by a particular frequency or video card. It will not affect product performance. • This...
... structures, or high-voltage lines are placed near the monitor. A12 Troubleshooting The screen color is due to a small amount of foreign or abnormally florescent material that comes with your monitor. Be sure to use 'Control Panel' -> 'Display' -> 'Settings' -> 'Color Palette' • Check the connection of the signal cable. Or, you can be caused by a particular frequency or video card. It will not affect product performance. • This...
User Guide
Page 14
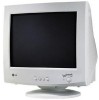
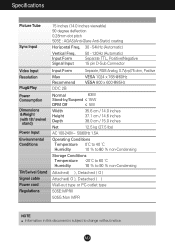
... type or PC-outlet type 505E:MPRII 505G:Non MPR NOTE Information in this document is subject to change without notice. A13 Specifications Picture Tube Sync Input Video Input Resolution Plug&Play Power Consumption Dimensions &Weight (with tilt/ swivel stand) Power Input Environmental Conditions Tilt/Swivel Stand Signal cable Power cord Regulations 15 inches (14.0 inches viewable) 90 degree deflection 0.28mm dot pitch 505E : AGAS(Anti-Glare Anti-Static) coating Horizontal Freq. 30 - 54kHz (Automatic...
... type or PC-outlet type 505E:MPRII 505G:Non MPR NOTE Information in this document is subject to change without notice. A13 Specifications Picture Tube Sync Input Video Input Resolution Plug&Play Power Consumption Dimensions &Weight (with tilt/ swivel stand) Power Input Environmental Conditions Tilt/Swivel Stand Signal cable Power cord Regulations 15 inches (14.0 inches viewable) 90 degree deflection 0.28mm dot pitch 505E : AGAS(Anti-Glare Anti-Static) coating Horizontal Freq. 30 - 54kHz (Automatic...

User Guide
Page 16
Digitally yours
Digitally yours


