
Owners Manual
Page 1
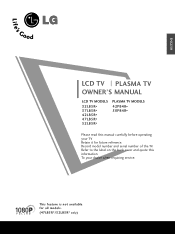
ENGLISH LCD TV PLASMA TV OWNER'S MANUAL LCD TV MODELS 32LB5R* 37LB5R* 42LB5R* 47LB5R* 52LB5R* PLASMA TV MODELS 42PB4R* 50PB4R* Please read this information To your TV Retain it for all models. (47LB5R*/52LB5R* only) Refer to the label on the back cover and quote this manual carefully before operating your dealer when requiring service. This feature is not available for future reference. Record model number and serial number of the TV.
ENGLISH LCD TV PLASMA TV OWNER'S MANUAL LCD TV MODELS 32LB5R* 37LB5R* 42LB5R* 47LB5R* 52LB5R* PLASMA TV MODELS 42PB4R* 50PB4R* Please read this information To your TV Retain it for all models. (47LB5R*/52LB5R* only) Refer to the label on the back cover and quote this manual carefully before operating your dealer when requiring service. This feature is not available for future reference. Record model number and serial number of the TV.
Owners Manual
Page 3
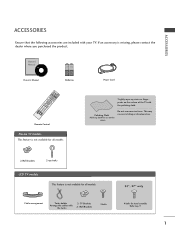
... 4-bolts for use on the surface of the TV with the twists 2- ACCESSORIES ACCESSORIES Ensure that the following accessories are included with your TV. Owner's Manual RATIO PIP PSRIM-PLINK PIP PIP PR+ INPUTTINVPUT POWER BRIGHT DVD SWTAEP XT PIP I/II INPUT VCR TMVODE SHTIFIMTE MENU LIST MACTHIMINEE OK LIVE TV...
... 4-bolts for use on the surface of the TV with the twists 2- ACCESSORIES ACCESSORIES Ensure that the following accessories are included with your TV. Owner's Manual RATIO PIP PSRIM-PLINK PIP PIP PR+ INPUTTINVPUT POWER BRIGHT DVD SWTAEP XT PIP I/II INPUT VCR TMVODE SHTIFIMTE MENU LIST MACTHIMINEE OK LIVE TV...
Owners Manual
Page 4
...Functions 34 Turning on the TV 36 Programme Selection 36 Volume Adjustment 36 On Screen Menus Selection and Adjustment ......37 Auto Programme Tuning 38 Manual Programme Tuning 39 Fine Tuning 40 Assigning a Station Name 41 Booster 42 Programme Edit 43 Favourite Programme 44 Calling the Programme List 45 Input...Selection 46 Key lock 47 48 TIME MACHINE TimeShift Mode(Pause & Replay of Live TV)...... 50 Format hard disk 53 Instant Recording 54 Manual Record 56 Schedule List 57 Record Quality 57 To use the USB device 58 Recorded TV Programme List 60 USB Backup 63 Photo List ...
...Functions 34 Turning on the TV 36 Programme Selection 36 Volume Adjustment 36 On Screen Menus Selection and Adjustment ......37 Auto Programme Tuning 38 Manual Programme Tuning 39 Fine Tuning 40 Assigning a Station Name 41 Booster 42 Programme Edit 43 Favourite Programme 44 Calling the Programme List 45 Input...Selection 46 Key lock 47 48 TIME MACHINE TimeShift Mode(Pause & Replay of Live TV)...... 50 Format hard disk 53 Instant Recording 54 Manual Record 56 Schedule List 57 Record Quality 57 To use the USB device 58 Recorded TV Programme List 60 USB Backup 63 Photo List ...
Owners Manual
Page 5
... 109 Product Specifications 110 Programming the Remote Control 112 IR Codes 114 External Control Device Setup 116 3 Auto Colour Temperature Control(Warm/Medium/Cool) ..82 Manual Picture Adjustment - Picture Improvement Technology 85 Demo 86 Advanced - Black(Darkness) Level 88 Picture Reset 89 Image Sticking Minimization(ISM) Method ..........90 Low-Power Picture...
... 109 Product Specifications 110 Programming the Remote Control 112 IR Codes 114 External Control Device Setup 116 3 Auto Colour Temperature Control(Warm/Medium/Cool) ..82 Manual Picture Adjustment - Picture Improvement Technology 85 Demo 86 Advanced - Black(Darkness) Level 88 Picture Reset 89 Image Sticking Minimization(ISM) Method ..........90 Low-Power Picture...
Owners Manual
Page 6
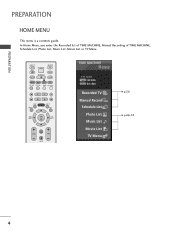
PIP PR+ SWAP PIP INPUT LIST MENU TIME MACHINE LIVE TV EXIT TIME OK TIME SHIFT SHIFT FAV/ MARK VOL PR MUTE TIME MACHINE Free Space HIGH NORMAL Recorded TV Manual Record Schedule List Photo List Music List Movie List TV Menu G p.50 G p.66~74 4 In Home Menu, you enter the Recorded list of TIME MACHINE, Manual Recording of TIME MACHINE, Schedule List ,Photo List, Music List, Movie List or TV Menu. INPUT TV INPUT POWER RATIO BRIGHT MODE TV DVD VCR SIMPLINK PIP TEXT I/II PIP PR- PREPARATION PREPARATION HOME MENU This menu is a contents guide.
PIP PR+ SWAP PIP INPUT LIST MENU TIME MACHINE LIVE TV EXIT TIME OK TIME SHIFT SHIFT FAV/ MARK VOL PR MUTE TIME MACHINE Free Space HIGH NORMAL Recorded TV Manual Record Schedule List Photo List Music List Movie List TV Menu G p.50 G p.66~74 4 In Home Menu, you enter the Recorded list of TIME MACHINE, Manual Recording of TIME MACHINE, Schedule List ,Photo List, Music List, Movie List or TV Menu. INPUT TV INPUT POWER RATIO BRIGHT MODE TV DVD VCR SIMPLINK PIP TEXT I/II PIP PR- PREPARATION PREPARATION HOME MENU This menu is a contents guide.
Owners Manual
Page 17
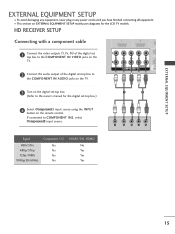
... EXTERNAL EQUIPMENT SETUP mainly uses diagrams for the digital set -top box. (Refer to COMPONENT IN2, select Component2 input source. If connected to the owner's manual for the LCD TV models. I To avoid damaging any equipment, never plug in any power cords until you have finished connecting all equipment.
... EXTERNAL EQUIPMENT SETUP mainly uses diagrams for the digital set -top box. (Refer to COMPONENT IN2, select Component2 input source. If connected to the owner's manual for the LCD TV models. I To avoid damaging any equipment, never plug in any power cords until you have finished connecting all equipment.
Owners Manual
Page 18
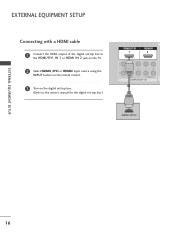
EXTERNAL EQUIPMENT SETUP Connecting with a HDMI cable 1 Connect the HDMI output of the digital set-top box to the HDMI/DVI IN 1 or HDMI IN 2 jack on the TV. 2 Select HDMI1/DVI or HDMI2 input source using the INPUT button on the remote control. 3 Turn on the digital set-top box. (Refer to the owner's manual for the digital set-top box.) HDMI/DVI IN 1 HDMI IN 2 1 2 VIDEO AUDIO COMPONENT IN 1 HDMI-DTV OUTPUT EXTERNAL EQUIPMENT SETUP 16
EXTERNAL EQUIPMENT SETUP Connecting with a HDMI cable 1 Connect the HDMI output of the digital set-top box to the HDMI/DVI IN 1 or HDMI IN 2 jack on the TV. 2 Select HDMI1/DVI or HDMI2 input source using the INPUT button on the remote control. 3 Turn on the digital set-top box. (Refer to the owner's manual for the digital set-top box.) HDMI/DVI IN 1 HDMI IN 2 1 2 VIDEO AUDIO COMPONENT IN 1 HDMI-DTV OUTPUT EXTERNAL EQUIPMENT SETUP 16
Owners Manual
Page 19
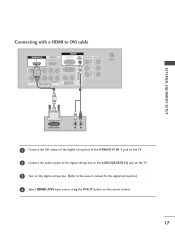
... the digital set-top box to the AUDIO(RGB/DVI) jack on the TV. 3 Turn on the digital set-top box. (Refer to the owner's manual for the digital set-top box.) 4 Select HDMI1/DVI input source using the INPUT button on the remote control. 17
... the digital set-top box to the AUDIO(RGB/DVI) jack on the TV. 3 Turn on the digital set-top box. (Refer to the owner's manual for the digital set-top box.) 4 Select HDMI1/DVI input source using the INPUT button on the remote control. 17
Owners Manual
Page 20
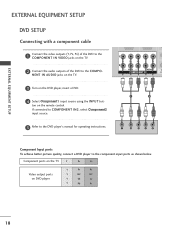
... player, insert a DVD. 4 Select Component1 input source using the INPUT but- If connected to COMPONENT IN2, select Component2 input source. 5 Refer to the DVD player's manual for operating instructions. 1 2 VIDEO AUDIO V COMPONENT IN A 1 2 Component Input ports To achieve better picture quality, connect a DVD player to the component inHpDuMt Ip/DoVrI tINs...
... player, insert a DVD. 4 Select Component1 input source using the INPUT but- If connected to COMPONENT IN2, select Component2 input source. 5 Refer to the DVD player's manual for operating instructions. 1 2 VIDEO AUDIO V COMPONENT IN A 1 2 Component Input ports To achieve better picture quality, connect a DVD player to the component inHpDuMt Ip/DoVrI tINs...

Owners Manual
Page 21
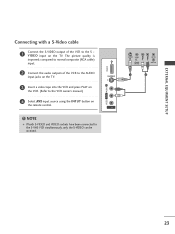
EXTERNAL EQUIPMENT SETUP Connecting with an S-Video cable ONENT IN 1 Connect the S-VIDEO output of the DVD to the S VIDEO input on the TV. 2 Connect the audio outputs of the DVD to the AUDIO input jacks on the TV. 3 Turn on the DVD player, insert a DVD. 4 Select AV2 input source using the INPUT button on the remote control. 5 Refer to the DVD player's manual for operating instructions. VIDEO L/MONO AUDIO R USB IN S-VIDEO S-VIDEO VIDEO L R ANT IN OUTPUT SWITCH ANT OUT 1 2 AV IN 2 HDMI IN 2 19
EXTERNAL EQUIPMENT SETUP Connecting with an S-Video cable ONENT IN 1 Connect the S-VIDEO output of the DVD to the S VIDEO input on the TV. 2 Connect the audio outputs of the DVD to the AUDIO input jacks on the TV. 3 Turn on the DVD player, insert a DVD. 4 Select AV2 input source using the INPUT button on the remote control. 5 Refer to the DVD player's manual for operating instructions. VIDEO L/MONO AUDIO R USB IN S-VIDEO S-VIDEO VIDEO L R ANT IN OUTPUT SWITCH ANT OUT 1 2 AV IN 2 HDMI IN 2 19

Owners Manual
Page 22
... the output resolution appropriately. EXTERNAL EQUIPMENT SETUP EXTERNAL EQUIPMENT SETUP Connecting the HDMI cable 1 Connect the HDMI output of the DVD to the DVD player's manual for operating instructions.
... the output resolution appropriately. EXTERNAL EQUIPMENT SETUP EXTERNAL EQUIPMENT SETUP Connecting the HDMI cable 1 Connect the HDMI output of the DVD to the DVD player's manual for operating instructions.
Owners Manual
Page 24
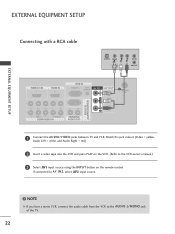
If connected to the VCR owner's manual.) 3 Select AV1 input source using the INPUT button on the remote control. EXTERNAL EQUIPMENT SETUP EXTERNAL EQUIPMENT SETUP Connecting with a RCA cable S-VIDEO VIDEO L R ANT ...
If connected to the VCR owner's manual.) 3 Select AV1 input source using the INPUT button on the remote control. EXTERNAL EQUIPMENT SETUP EXTERNAL EQUIPMENT SETUP Connecting with a RCA cable S-VIDEO VIDEO L R ANT ...
Owners Manual
Page 25
... to the AUDIO input jacks on the TV. 3 Insert a video tape into the VCR and press PLAY on the VCR. (Refer to the VCR owner's manual.) 4 Select AV2 input source using the INPUT button on the TV. VIDEO L/MONO AUDIO R USB IN S-VIDEO AV IN 2 S-VIDEO VIDEO L R ANT IN OUTPUT SWITCH...
... to the AUDIO input jacks on the TV. 3 Insert a video tape into the VCR and press PLAY on the VCR. (Refer to the VCR owner's manual.) 4 Select AV2 input source using the INPUT button on the TV. VIDEO L/MONO AUDIO R USB IN S-VIDEO AV IN 2 S-VIDEO VIDEO L R ANT IN OUTPUT SWITCH...
Owners Manual
Page 27
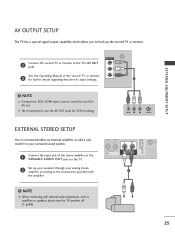
... as amplifiers or speakers, please turn the TV speakers off. (G p.96) RS-232C IN (CONTROL&SER R AUDI 25 AAVV OOUUTT ANTENNA IN See the Operating Manual of the stereo amAVUApDRIlIOiAfBiOeLUrETto the VARIABLE AUDIO OUT jacks on the TV. 2 Set up the second TV or monitor. AUDIO T IN VARIABLE AUDIO OUT 1 !
... as amplifiers or speakers, please turn the TV speakers off. (G p.96) RS-232C IN (CONTROL&SER R AUDI 25 AAVV OOUUTT ANTENNA IN See the Operating Manual of the stereo amAVUApDRIlIOiAfBiOeLUrETto the VARIABLE AUDIO OUT jacks on the TV. 2 Set up the second TV or monitor. AUDIO T IN VARIABLE AUDIO OUT 1 !

Owners Manual
Page 32
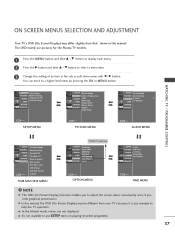
...E button to select Screen. 3 Press the G button and then use D / E button to select Auto Config.. 4 Press the G button to TV viewing. Manual Config. EXTERNAL EQUIPMENT SETUP EXTERNAL EQUIPMENT SETUP Screen Setup for automatic adjustment of the image is still not correct, try Auto adjustment again. • If... picture needs to be unstable for a few seconds while the auto configuration is in RGB (PC), you can adjust the Manual Config.. 5 Press the EXIT button to return to start Auto Config.. • When Auto config. Auto configure This function is functioning...
...E button to select Screen. 3 Press the G button and then use D / E button to select Auto Config.. 4 Press the G button to TV viewing. Manual Config. EXTERNAL EQUIPMENT SETUP EXTERNAL EQUIPMENT SETUP Screen Setup for automatic adjustment of the image is still not correct, try Auto adjustment again. • If... picture needs to be unstable for a few seconds while the auto configuration is in RGB (PC), you can adjust the Manual Config.. 5 Press the EXIT button to return to start Auto Config.. • When Auto config. Auto configure This function is functioning...
Owners Manual
Page 33
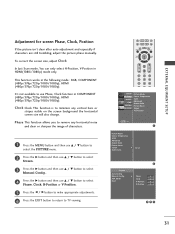
...Phase, Clock, H-Position or V-Position. 5 Press the F / G button to make appropriate adjustments. 6 Press the EXIT button to return to TV viewing. Manual Config. In Just Scan mode, You can only select H-Position, V-Position in the following mode : RGB, COMPONENT (480p/576p/720p/1080i/1080p), HDMI (480p... If the picture isn't clear after auto adjustment and especially if characters are still trembling, adjust the picture phase manually. Phase This function allows you to select Manual Config.. 4 Press the G button and then use Phase, Clock function in COMPONENT (480p/576p/720p/1080i/1080p...
...Phase, Clock, H-Position or V-Position. 5 Press the F / G button to make appropriate adjustments. 6 Press the EXIT button to return to TV viewing. Manual Config. In Just Scan mode, You can only select H-Position, V-Position in the following mode : RGB, COMPONENT (480p/576p/720p/1080i/1080p), HDMI (480p... If the picture isn't clear after auto adjustment and especially if characters are still trembling, adjust the picture phase manually. Phase This function allows you to select Manual Config.. 4 Press the G button and then use Phase, Clock function in COMPONENT (480p/576p/720p/1080i/1080p...

Owners Manual
Page 34
EXTERNAL EQUIPMENT SETUP EXTERNAL EQUIPMENT SETUP Selecting Wide XGA mode To view a normal picture, match the resolution of RGB mode and selection of XGA mode. Manual Config. This function works in the following mode: RGB mode. 1 Press the MENU button and then use D / E button to select the PICTURE menu. 2 Press the G ...
EXTERNAL EQUIPMENT SETUP EXTERNAL EQUIPMENT SETUP Selecting Wide XGA mode To view a normal picture, match the resolution of RGB mode and selection of XGA mode. Manual Config. This function works in the following mode: RGB mode. 1 Press the MENU button and then use D / E button to select the PICTURE menu. 2 Press the G ...
Owners Manual
Page 35
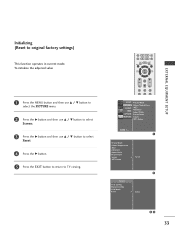
... G button. 5 Press the EXIT button to return to original factory settings) This function operates in current mode. EXTERNAL EQUIPMENT SETUP Initializing (Reset to TV viewing. Manual Config. XGA Mode Reset G To Set 34 33
... G button. 5 Press the EXIT button to return to original factory settings) This function operates in current mode. EXTERNAL EQUIPMENT SETUP Initializing (Reset to TV viewing. Manual Config. XGA Mode Reset G To Set 34 33
Owners Manual
Page 39
...AUDIOO SIMPLINK Key Lock TIMEO ISM Method OPTION G Low Power TIME MACHINEO Set ID Menu Prev. NOTE G. SETUP G Auto Tuning PICTUREO Manual Tuning AUDIOO Programme Edit Favourite Prog. Code USB Backup USB HDD Format Menu Prev. PICTURE MENU SETUPO Sound Mode PICTUREO Auto Volume AUDIO G.... AUDIO MENU WATCHING TV / PROGRAMME CONTROL SETUPO PICTURE O AUDIOO TIMEO OPTIONO TIME MACHINE G TimeShift Mode Record Quality Recorded TV Schedule List Manual Record HDD Format DivX Reg. TIME MENU ! G. You can move to adjust the screen status conveniently since it is just example to ...
...AUDIOO SIMPLINK Key Lock TIMEO ISM Method OPTION G Low Power TIME MACHINEO Set ID Menu Prev. NOTE G. SETUP G Auto Tuning PICTUREO Manual Tuning AUDIOO Programme Edit Favourite Prog. Code USB Backup USB HDD Format Menu Prev. PICTURE MENU SETUPO Sound Mode PICTUREO Auto Volume AUDIO G.... AUDIO MENU WATCHING TV / PROGRAMME CONTROL SETUPO PICTURE O AUDIOO TIMEO OPTIONO TIME MACHINE G TimeShift Mode Record Quality Recorded TV Schedule List Manual Record HDD Format DivX Reg. TIME MENU ! G. You can move to adjust the screen status conveniently since it is just example to ...
Owners Manual
Page 40
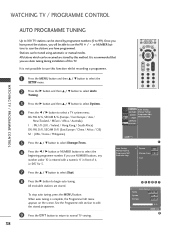
... to edit the stored programme. 9 Press the EXIT button to return to select a TV system menu; Stations can be tuned using automatic or manual modes. If you will be able to use this TV. WATCHING TV / PROGRAMME CONTROL AUTO PROGRAMME TUNING Up to 100 TV stations can be ...Start 7 Press the D / E button to select Start. 8 Press the G button to select the beginning programme number. Once you have programmed. SETUP G Auto Tuning PICTUREO Manual Tuning AUDIOO Programme Edit Favourite Prog. or NUMBER buttons to select Auto Tuning. TIMEO OPTIONO TIME MACHINEO Menu Prev. 1 Auto Tuning...
... to edit the stored programme. 9 Press the EXIT button to return to select a TV system menu; Stations can be tuned using automatic or manual modes. If you will be able to use this TV. WATCHING TV / PROGRAMME CONTROL AUTO PROGRAMME TUNING Up to 100 TV stations can be ...Start 7 Press the D / E button to select Start. 8 Press the G button to select the beginning programme number. Once you have programmed. SETUP G Auto Tuning PICTUREO Manual Tuning AUDIOO Programme Edit Favourite Prog. or NUMBER buttons to select Auto Tuning. TIMEO OPTIONO TIME MACHINEO Menu Prev. 1 Auto Tuning...


