
Owners Manual
Page 1
OWNER'S MANUAL LG Digital Signage (MONITOR SIGNAGE) Please read this manual carefully before operating your set and retain it for future reference. 43UL3J-E 50UL3J-E 55UL3J-E 65UL3J-E 75UL3J-E www.lg.com Copyright © 2021 LG Electronics Inc. All Rights Reserved.
OWNER'S MANUAL LG Digital Signage (MONITOR SIGNAGE) Please read this manual carefully before operating your set and retain it for future reference. 43UL3J-E 50UL3J-E 55UL3J-E 65UL3J-E 75UL3J-E www.lg.com Copyright © 2021 LG Electronics Inc. All Rights Reserved.

Owners Manual
Page 2
ENGLISH 2 TABLE OF CONTENTS WARNING! SAFETY INSTRUCTIONS 3 ASSEMBLY AND PREPARATION...6 --Parts and Buttons 7 --Portrait Layout 8 --Using Kensington Lock 8 --Installing on a Wall 9 REMOTE CONTROL 11 MAKING CONNECTIONS 13 --Connecting to a PC 13 --External Device Connection 13 --Using the Input List 14 --Connecting Multiple Monitors 15 TROUBLESHOOTING 16 PRODUCT SPECIFICATIONS....... 20 LICENSES 26
ENGLISH 2 TABLE OF CONTENTS WARNING! SAFETY INSTRUCTIONS 3 ASSEMBLY AND PREPARATION...6 --Parts and Buttons 7 --Portrait Layout 8 --Using Kensington Lock 8 --Installing on a Wall 9 REMOTE CONTROL 11 MAKING CONNECTIONS 13 --Connecting to a PC 13 --External Device Connection 13 --Using the Input List 14 --Connecting Multiple Monitors 15 TROUBLESHOOTING 16 PRODUCT SPECIFICATIONS....... 20 LICENSES 26

Owners Manual
Page 3
... (servicing) instructions in the literature accompanying the appliance. •• TO PREVENT THE SPREAD OF FIRE, KEEP CANDLES OR OTHER ITEMS WITH OPEN FLAMES AWAY FROM THIS PRODUCT AT ALL TIMES. •• Do not place the monitor and/or remote control in excessively dusty places. Do not expose to persons. 3 ENGLISH WARNING - Install your monitor where...
... (servicing) instructions in the literature accompanying the appliance. •• TO PREVENT THE SPREAD OF FIRE, KEEP CANDLES OR OTHER ITEMS WITH OPEN FLAMES AWAY FROM THIS PRODUCT AT ALL TIMES. •• Do not place the monitor and/or remote control in excessively dusty places. Do not expose to persons. 3 ENGLISH WARNING - Install your monitor where...
Owners Manual
Page 4
... shock, do not touch the monitor with dust, dry the power plug completely or wipe dust off by LG Electronics. When lightning storms or when unused for service or repair. 4 ENGLISH •• Protect the power cord from the monitor. -- Even the monitor is plugged in. •• Do not use a damaged or loosely fitting power cord. •• Be...
... shock, do not touch the monitor with dust, dry the power plug completely or wipe dust off by LG Electronics. When lightning storms or when unused for service or repair. 4 ENGLISH •• Protect the power cord from the monitor. -- Even the monitor is plugged in. •• Do not use a damaged or loosely fitting power cord. •• Be...
Owners Manual
Page 6
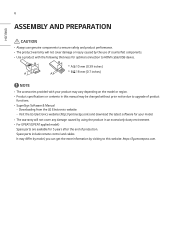
... connection to upgrade of production. 6 ASSEMBLY AND PREPARATION ENGLISH CAUTION •• Always use of counterfeit components. •• Use a product with the following thickness for 5 years after the end of product functions. •• SuperSign Software & Manual -- Spare parts include remote control and cables. It may be changed without prior notice due to HDMI cable/USB device. Downloading from the LG...
... connection to upgrade of production. 6 ASSEMBLY AND PREPARATION ENGLISH CAUTION •• Always use of counterfeit components. •• Use a product with the following thickness for 5 years after the end of product functions. •• SuperSign Software & Manual -- Spare parts include remote control and cables. It may be changed without prior notice due to HDMI cable/USB device. Downloading from the LG...

Owners Manual
Page 7
Power On (Press the button When the monitor is turned off.) Power Off (Press the button When the monitor is turned on.) ENGLISH 7 Parts and Buttons The image may be different according to the model.
Power On (Press the button When the monitor is turned off.) Power Off (Press the button When the monitor is turned on.) ENGLISH 7 Parts and Buttons The image may be different according to the model.
Owners Manual
Page 8
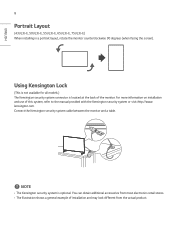
.... Connect the Kensington security system cable between the monitor and a table. ENGLISH 8 Portrait Layout (43UL3J-E, 50UL3J-E, 55UL3J-E, 65UL3J-E, 75UL3J-E) When installing in a portrait layout, rotate the monitor counterclockwise 90 degrees (when facing the screen). NOTE •• The Kensington security system is located at the back of the monitor. Using Kensington Lock (This is not available for all models...
.... Connect the Kensington security system cable between the monitor and a table. ENGLISH 8 Portrait Layout (43UL3J-E, 50UL3J-E, 55UL3J-E, 65UL3J-E, 75UL3J-E) When installing in a portrait layout, rotate the monitor counterclockwise 90 degrees (when facing the screen). NOTE •• The Kensington security system is located at the back of the monitor. Using Kensington Lock (This is not available for all models...
Owners Manual
Page 9
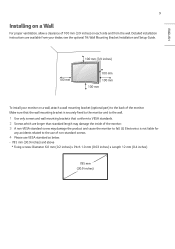
...) Detailed installation instructions are longer than standard length may damage the inside of the monitor. 3 A non-VESA standard screw may damage the product and cause the monitor to the back of the monitor. ENGLISH 100 mm 100 mm (3.9 inches) 100 mm 100 mm 100 mm To install your dealer, see the optional Tilt Wall Mounting Bracket Installation and Setup Guide. 9 Installing on a Wall For...
...) Detailed installation instructions are longer than standard length may damage the inside of the monitor. 3 A non-VESA standard screw may damage the product and cause the monitor to the back of the monitor. ENGLISH 100 mm 100 mm (3.9 inches) 100 mm 100 mm 100 mm To install your dealer, see the optional Tilt Wall Mounting Bracket Installation and Setup Guide. 9 Installing on a Wall For...
Owners Manual
Page 10
... wall mounting brackets that meet the VESA standard. NOTE •• The wall mount kit includes the installation guide and all necessary parts. •• The wall mounting bracket is supported. (in injury. ENGLISH 10 CAUTION •• Disconnect the power cord before moving or installing the monitor to assist with the wall mount. •• Tilt installation of up to 30 degrees facedown is optional. Use an authorized LG wall mount...
... wall mounting brackets that meet the VESA standard. NOTE •• The wall mount kit includes the installation guide and all necessary parts. •• The wall mounting bracket is supported. (in injury. ENGLISH 10 CAUTION •• Disconnect the power cord before moving or installing the monitor to assist with the wall mount. •• Tilt installation of up to 30 degrees facedown is optional. Use an authorized LG wall mount...
Owners Manual
Page 11
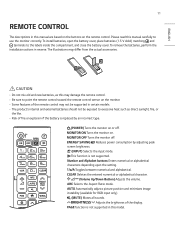
... of the remote control may differ from the actual accessories. function is replaced by adjusting peak screen brightness. (INPUT) Selects the input mode. To install batteries, open the battery cover, place batteries (1.5 V AAA) matching and terminals to use the monitor correctly. Reduces power consumption by an incorrect type. (POWER) Turns the monitor on the monitor. •• Some features of the display. Deletes the...
... of the remote control may differ from the actual accessories. function is replaced by adjusting peak screen brightness. (INPUT) Selects the input mode. To install batteries, open the battery cover, place batteries (1.5 V AAA) matching and terminals to use the monitor correctly. Reduces power consumption by an incorrect type. (POWER) Turns the monitor on the monitor. •• Some features of the display. Deletes the...

Owners Manual
Page 12
... multimedia devices to move back one step in multi-display format. (Control Buttons) Controls media playback. ENGLISH 12 Selects the Picture Mode. (HOME) Activates the Launcher. When the Picture ID number matches the Set ID number, you can control whichever monitor you to enjoy multimedia simply by using the remote control through menus or options. Enters the White Balance menu...
... multimedia devices to move back one step in multi-display format. (Control Buttons) Controls media playback. ENGLISH 12 Selects the Picture Mode. (HOME) Activates the Launcher. When the Picture ID number matches the Set ID number, you can control whichever monitor you to enjoy multimedia simply by using the remote control through menus or options. Enters the White Balance menu...
Owners Manual
Page 13
... external devices to your monitor using HDMI cables is recommended. For more information about external device connections, see the user manual provided with each device. Connecting to a PC Some of the cables are not provided. Connect a HD receiver, DVD, or VCR player to recognize devices attached by the user without device configuration or user intervention when powering up. For the best...
... external devices to your monitor using HDMI cables is recommended. For more information about external device connections, see the user manual provided with each device. Connecting to a PC Some of the cables are not provided. Connect a HD receiver, DVD, or VCR player to recognize devices attached by the user without device configuration or user intervention when powering up. For the best...
Owners Manual
Page 14
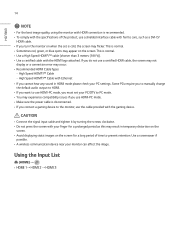
... not use a certified HDMI cable, the screen may not display or a connection error may occur. •• Recommended HDMI Cable Types -- ENGLISH 14 NOTE •• For the best image quality, using the monitor with HDMI connection is recommended. •• To comply with the specifications of the product, use a shielded interface cable with ferrite core, such as this may result in HDMI mode please...
... not use a certified HDMI cable, the screen may not display or a connection error may occur. •• Recommended HDMI Cable Types -- ENGLISH 14 NOTE •• For the best image quality, using the monitor with HDMI connection is recommended. •• To comply with the specifications of the product, use a shielded interface cable with ferrite core, such as this may result in HDMI mode please...

Owners Manual
Page 15
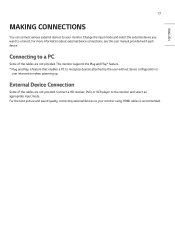
DVI IN DP OUT DP IN DP OUT Connecting Multiple Monitors DP IN DP OUT To use multiple monitors connected to each other, connect the end of the signal input cable to the one monitor and connect the other end to the connection of the other monitor. 15 connection in ENGLISH
DVI IN DP OUT DP IN DP OUT Connecting Multiple Monitors DP IN DP OUT To use multiple monitors connected to each other, connect the end of the signal input cable to the one monitor and connect the other end to the connection of the other monitor. 15 connection in ENGLISH
Owners Manual
Page 16
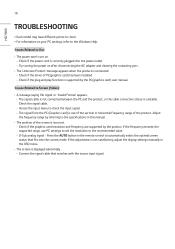
...) user manual. Check if the power cord is unstable. If the frequency exceeds the supported range, use PC settings to set the resolution to check the input signal. -- Check if the driver of the product. If the adjustment is incorrect. -- Issues Related to the specifications in this manual. •• The position of the screen is not satisfactory, adjust the display settings manually in the remote control...
...) user manual. Check if the power cord is unstable. If the frequency exceeds the supported range, use PC settings to set the resolution to check the input signal. -- Check if the driver of the product. If the adjustment is incorrect. -- Issues Related to the specifications in this manual. •• The position of the screen is not satisfactory, adjust the display settings manually in the remote control...

Owners Manual
Page 17
... - This is cold, the screen may need repair. If you turn the monitor on the screen due to 24 bits (True Color) or above. •• Screen color is not satisfactory, adjust the display settings manually in the remote control to automatically select the optimal screen status that fits into the current mode. Press the button in the background. -- Issues Related to automatically select...
... - This is cold, the screen may need repair. If you turn the monitor on the screen due to 24 bits (True Color) or above. •• Screen color is not satisfactory, adjust the display settings manually in the remote control to automatically select the optimal screen status that fits into the current mode. Press the button in the background. -- Issues Related to automatically select...
Owners Manual
Page 18
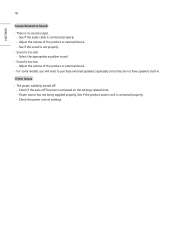
... Check the power control settings. Adjust the volume of the product or external device. •• For some models, you will need to Sound •• There is connected properly. -- See if the sound is set properly. •• Sound is activated on the settings related time.... of the product or external device. -- Other Issues •• The power suddenly turned off function is too dull. -- Select the appropriate equalizer sound. •• Sound is connected properly. -- ENGLISH 18 Issues Related to purchase external speakers separately since they do...
... Check the power control settings. Adjust the volume of the product or external device. •• For some models, you will need to Sound •• There is connected properly. -- See if the sound is set properly. •• Sound is activated on the settings related time.... of the product or external device. -- Other Issues •• The power suddenly turned off function is too dull. -- Select the appropriate equalizer sound. •• Sound is connected properly. -- ENGLISH 18 Issues Related to purchase external speakers separately since they do...

Owners Manual
Page 23
...Specifications Wireless LAN (IEEE 802.11a/b/g/n/ac) Frequency range (MHz) Output power (Max.) (dBm) 2400 to 2483.5 18.5 5150 to 5725 18 5725 to 5850 18 Bluetooth Frequency range (MHz) Output power (Max.) (dBm) 2400 to 2483.5 9 •• As band channels can vary per country, the user... cannot change or adjust the operating frequency. This product is configured for the regional frequency table. •• For consideration of the user, this device should be installed ...
...Specifications Wireless LAN (IEEE 802.11a/b/g/n/ac) Frequency range (MHz) Output power (Max.) (dBm) 2400 to 2483.5 18.5 5150 to 5725 18 5725 to 5850 18 Bluetooth Frequency range (MHz) Output power (Max.) (dBm) 2400 to 2483.5 9 •• As band channels can vary per country, the user... cannot change or adjust the operating frequency. This product is configured for the regional frequency table. •• For consideration of the user, this device should be installed ...

Owners Manual
Page 26
... license. is under license from Dolby Laboratories. and any use of such marks by Bluetooth SIG, Inc. The terms HDMI, HDMI High-Definition Multimedia Interface, and the HDMI Logo are trademarks of their respective owners. The Bluetooth® word mark and logos are those of...and the double-D symbol are trademarks or registered trademarks of the licenses, visit www.lg.com. Other trademarks and trade names are registered trademarks owned by LG Electronics Inc. For more information of HDMI Licensing Administrator, Inc. ENGLISH 26 LICENSES Supported licenses may differ by model.
... license. is under license from Dolby Laboratories. and any use of such marks by Bluetooth SIG, Inc. The terms HDMI, HDMI High-Definition Multimedia Interface, and the HDMI Logo are trademarks of their respective owners. The Bluetooth® word mark and logos are those of...and the double-D symbol are trademarks or registered trademarks of the licenses, visit www.lg.com. Other trademarks and trade names are registered trademarks owned by LG Electronics Inc. For more information of HDMI Licensing Administrator, Inc. ENGLISH 26 LICENSES Supported licenses may differ by model.
Owners Manual
Page 27
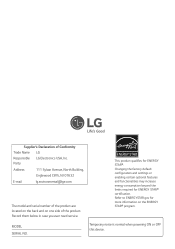
..., NJ 07632 E-mail lg[email protected] The model and serial number of the product are located on the back and on the ENERGY STAR® program. Record them below in case you ever need service. Changing the factory default configuration and settings or enabling certain optional... noise is normal when powering ON or OFF this device. Supplier's Declaration of the product. This product qualifies for ENERGY STAR® certification. MODEL SERIAL NO. Refer to ENERGYSTAR.gov for more information on one side of Conformity Trade Name LG Responsible LG Electronics USA, Inc.
..., NJ 07632 E-mail lg[email protected] The model and serial number of the product are located on the back and on the ENERGY STAR® program. Record them below in case you ever need service. Changing the factory default configuration and settings or enabling certain optional... noise is normal when powering ON or OFF this device. Supplier's Declaration of the product. This product qualifies for ENERGY STAR® certification. MODEL SERIAL NO. Refer to ENERGYSTAR.gov for more information on one side of Conformity Trade Name LG Responsible LG Electronics USA, Inc.


